271: Setting Up Platform Infrastructure
This course is for Platform Administrators who need to understand how Kelvin is physically deployed and how to bring a new installation online from scratch.
By the end, you will understand the Cloud/Edge architecture, know how to choose and provision a cluster, handle firewall requirements, and set up users with the right access controls.
Where this course fits
This is the first course in your Platform Administrator setup path.
- This course — physical architecture, cluster provisioning, and user management
- 272: Setting Up Assets and Data Streams Quickly — model setup with asset types, assets, semantics, and data streams
- Connect data and enforce quality — connectors, data quality, and guardrails (coming soon)
Note
This course assumes you have Platform Administrator credentials and can access both the Kelvin UI and the Administration area.
Part 1: How Kelvin is Physically Set Up
1.1 The two-layer architecture
Kelvin is built on two distinct layers: the Cloud and the Edge. Understanding what lives where is the foundation of everything else in this course.
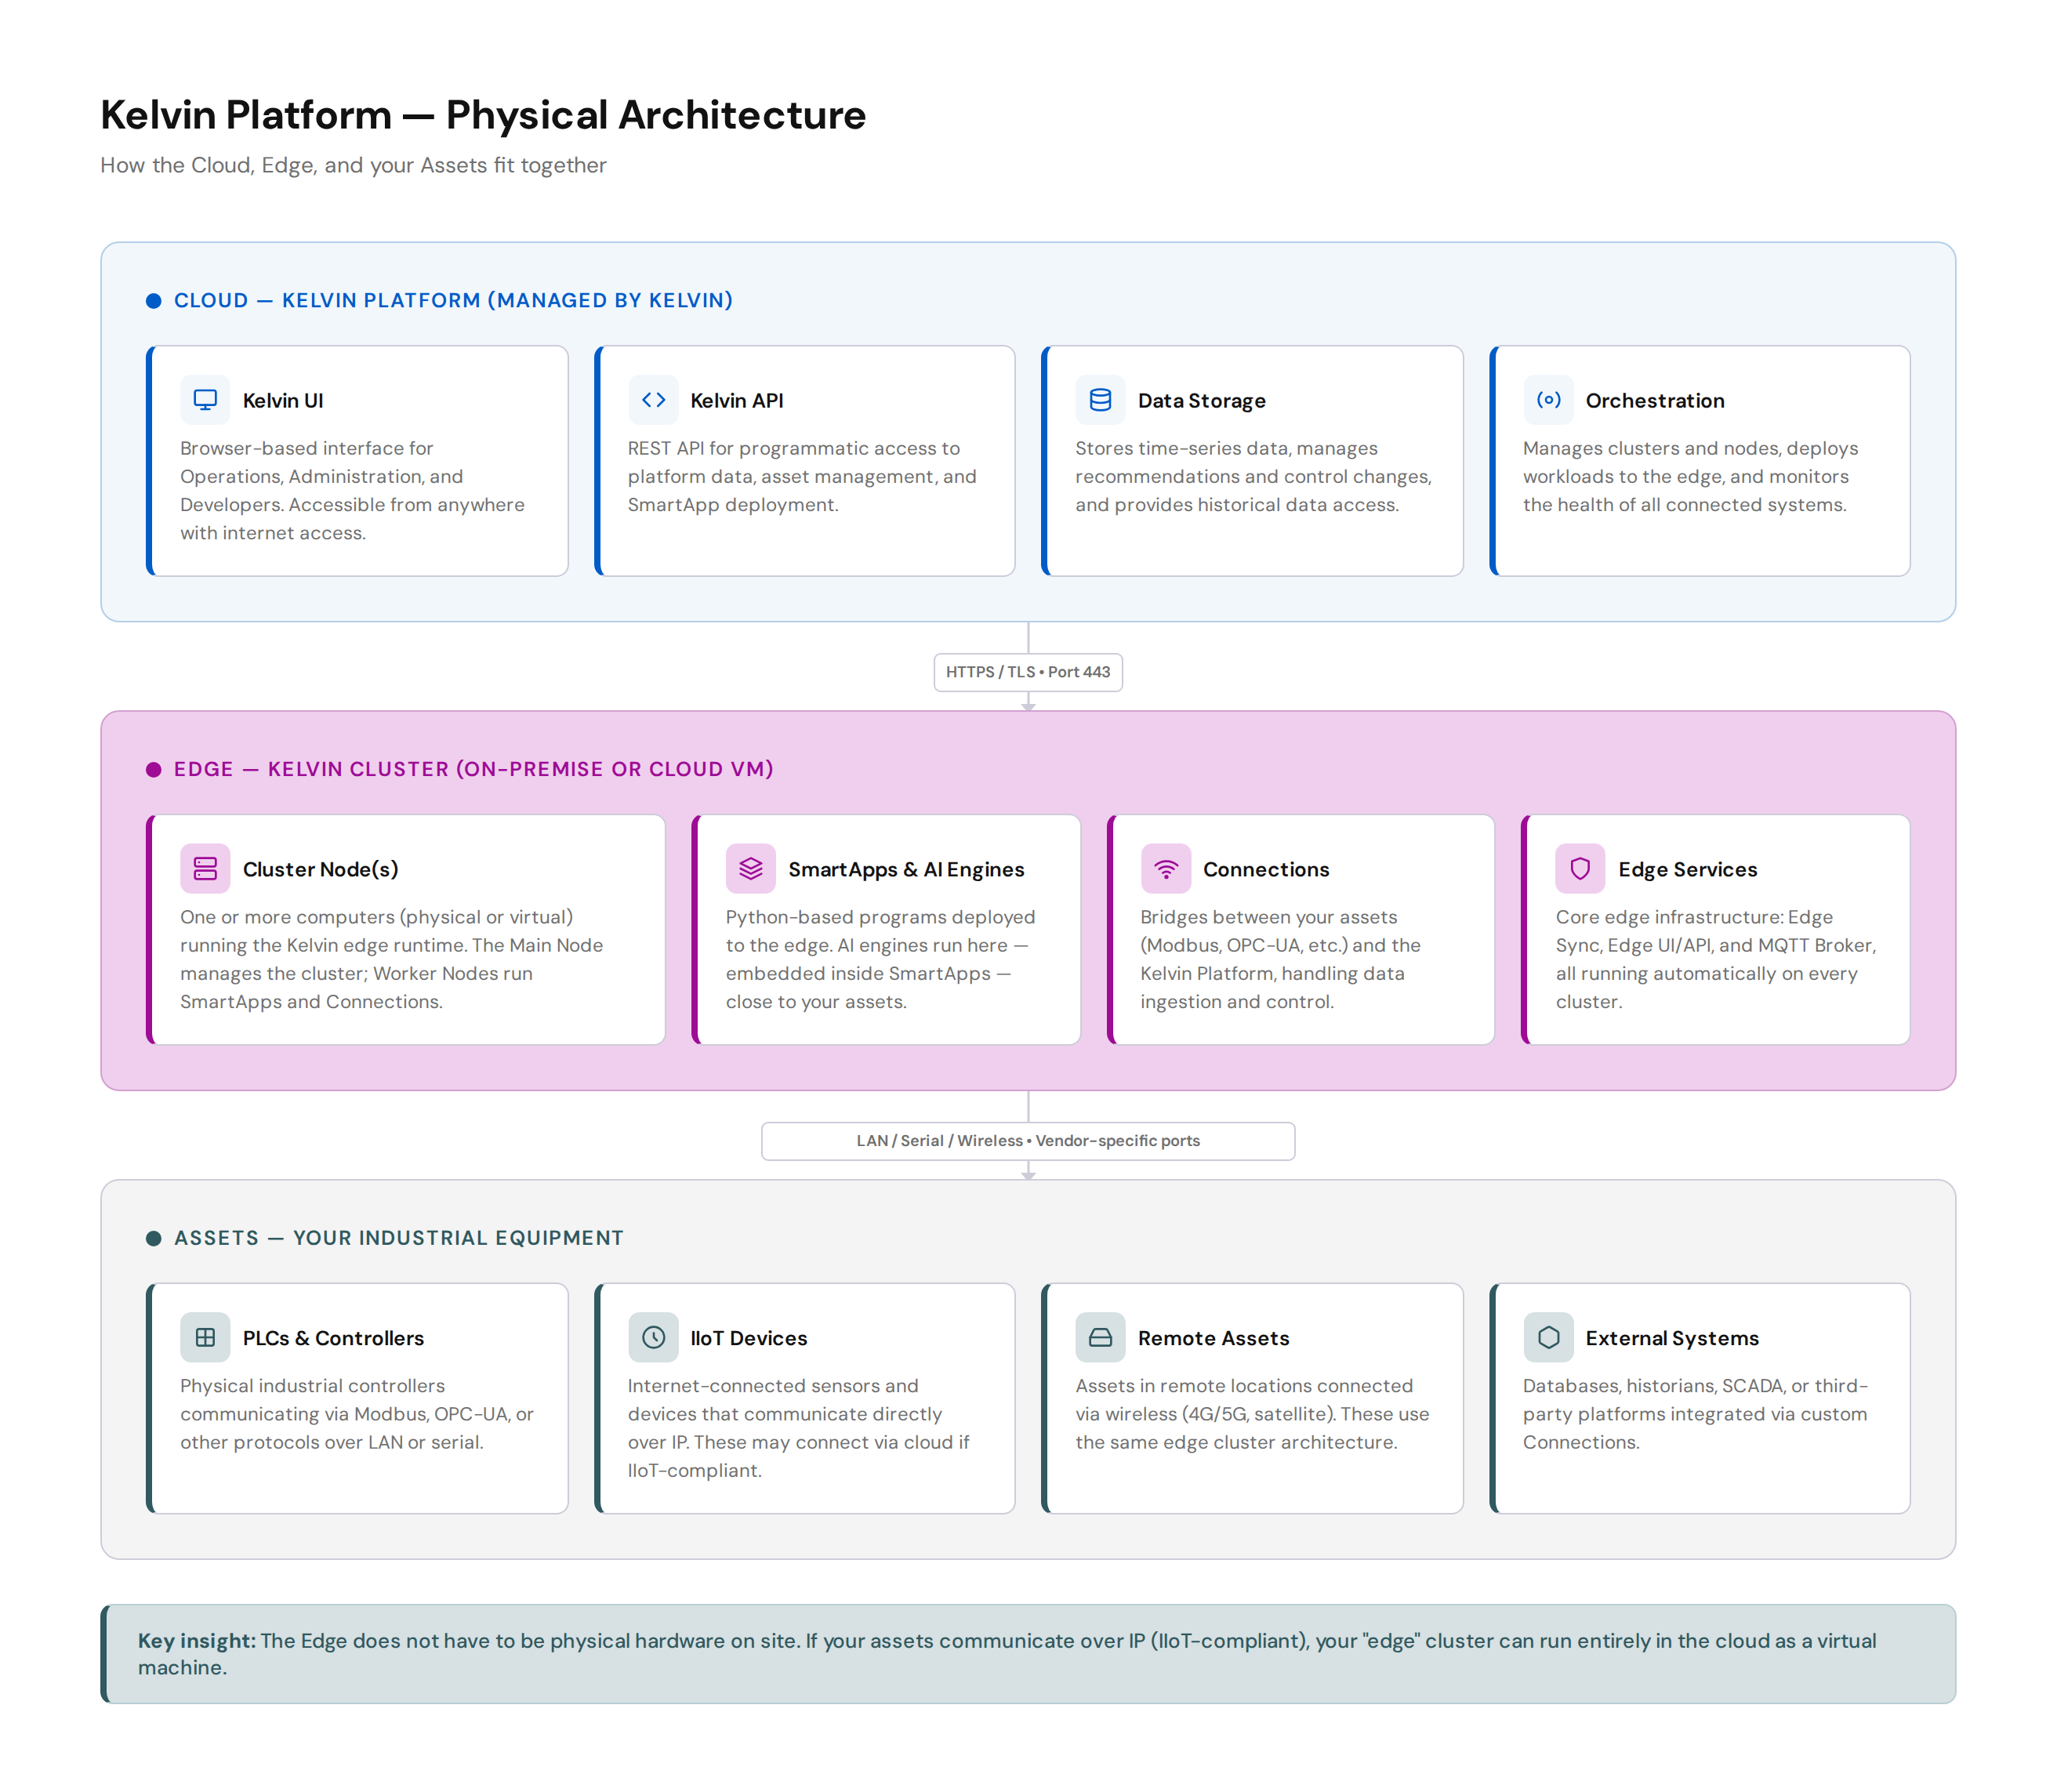
The Cloud is the Kelvin Platform itself. Kelvin hosts and manages it. It provides the UI, the API, data storage, and the orchestration layer that manages your clusters.
The Edge is the compute layer that runs close to your assets. It is a Cluster — one or more computers running the Kelvin edge runtime. The edge runs SmartApps, AI engines, and Connections. It handles asset communication and keeps data flowing even when the internet connection is interrupted.
Note
AI engines are not cloud-hosted. They run at the edge, embedded inside SmartApps, wherever those SmartApps are deployed. This keeps AI processing close to the data source.
Your Assets sit below the edge. These are your industrial machines, PLCs, sensors, or external systems. They communicate with the edge cluster using industrial protocols (Modbus TCP, OPC-UA, serial Modbus, and so on) or over IP.
1.2 Does the edge have to be on-premise?
No. "Edge" refers to where your cluster runs, not whether it is physical hardware.
If your assets communicate over IP (they are IIoT-compliant), your cluster can run as a virtual machine in the cloud. The edge and the Kelvin Cloud simply become two cloud-based services talking to each other.
| Your asset setup | Where to run your cluster |
|---|---|
| Physical machines, PLCs, serial or LAN protocols | On-premise server or VM near the assets |
| IIoT devices communicating over IP | Cloud VM or managed Kubernetes (EKS, AKS, GKE) |
| Mix of both | On-premise cluster, with cloud VM for IIoT assets |
Pro Tip
Even if your assets are on-premise today, talk to Kelvin about your long-term plan. Choosing the right cluster type from the start avoids migration work later.
1.3 What runs on the edge?
The main things you will deploy to a cluster are Connections (which collect data from your assets) and SmartApps (which process and act on that data, including any AI engines). Both are managed from the Kelvin UI once your cluster is running.
Every cluster also starts a small set of background edge services automatically — including Edge Sync for data synchronisation, a local Edge UI/API for on-site management, and an MQTT Broker for internal communication. These run transparently and do not require setup on your part.
For full documentation on managing edge services, visit:
Part 2: Setting Up the Physical Infrastructure
2.1 Choosing your provisioning type
Kelvin gives you four ways to provision a cluster. The right choice depends on your environment, your team's skills, and whether you need to scale to multiple nodes.
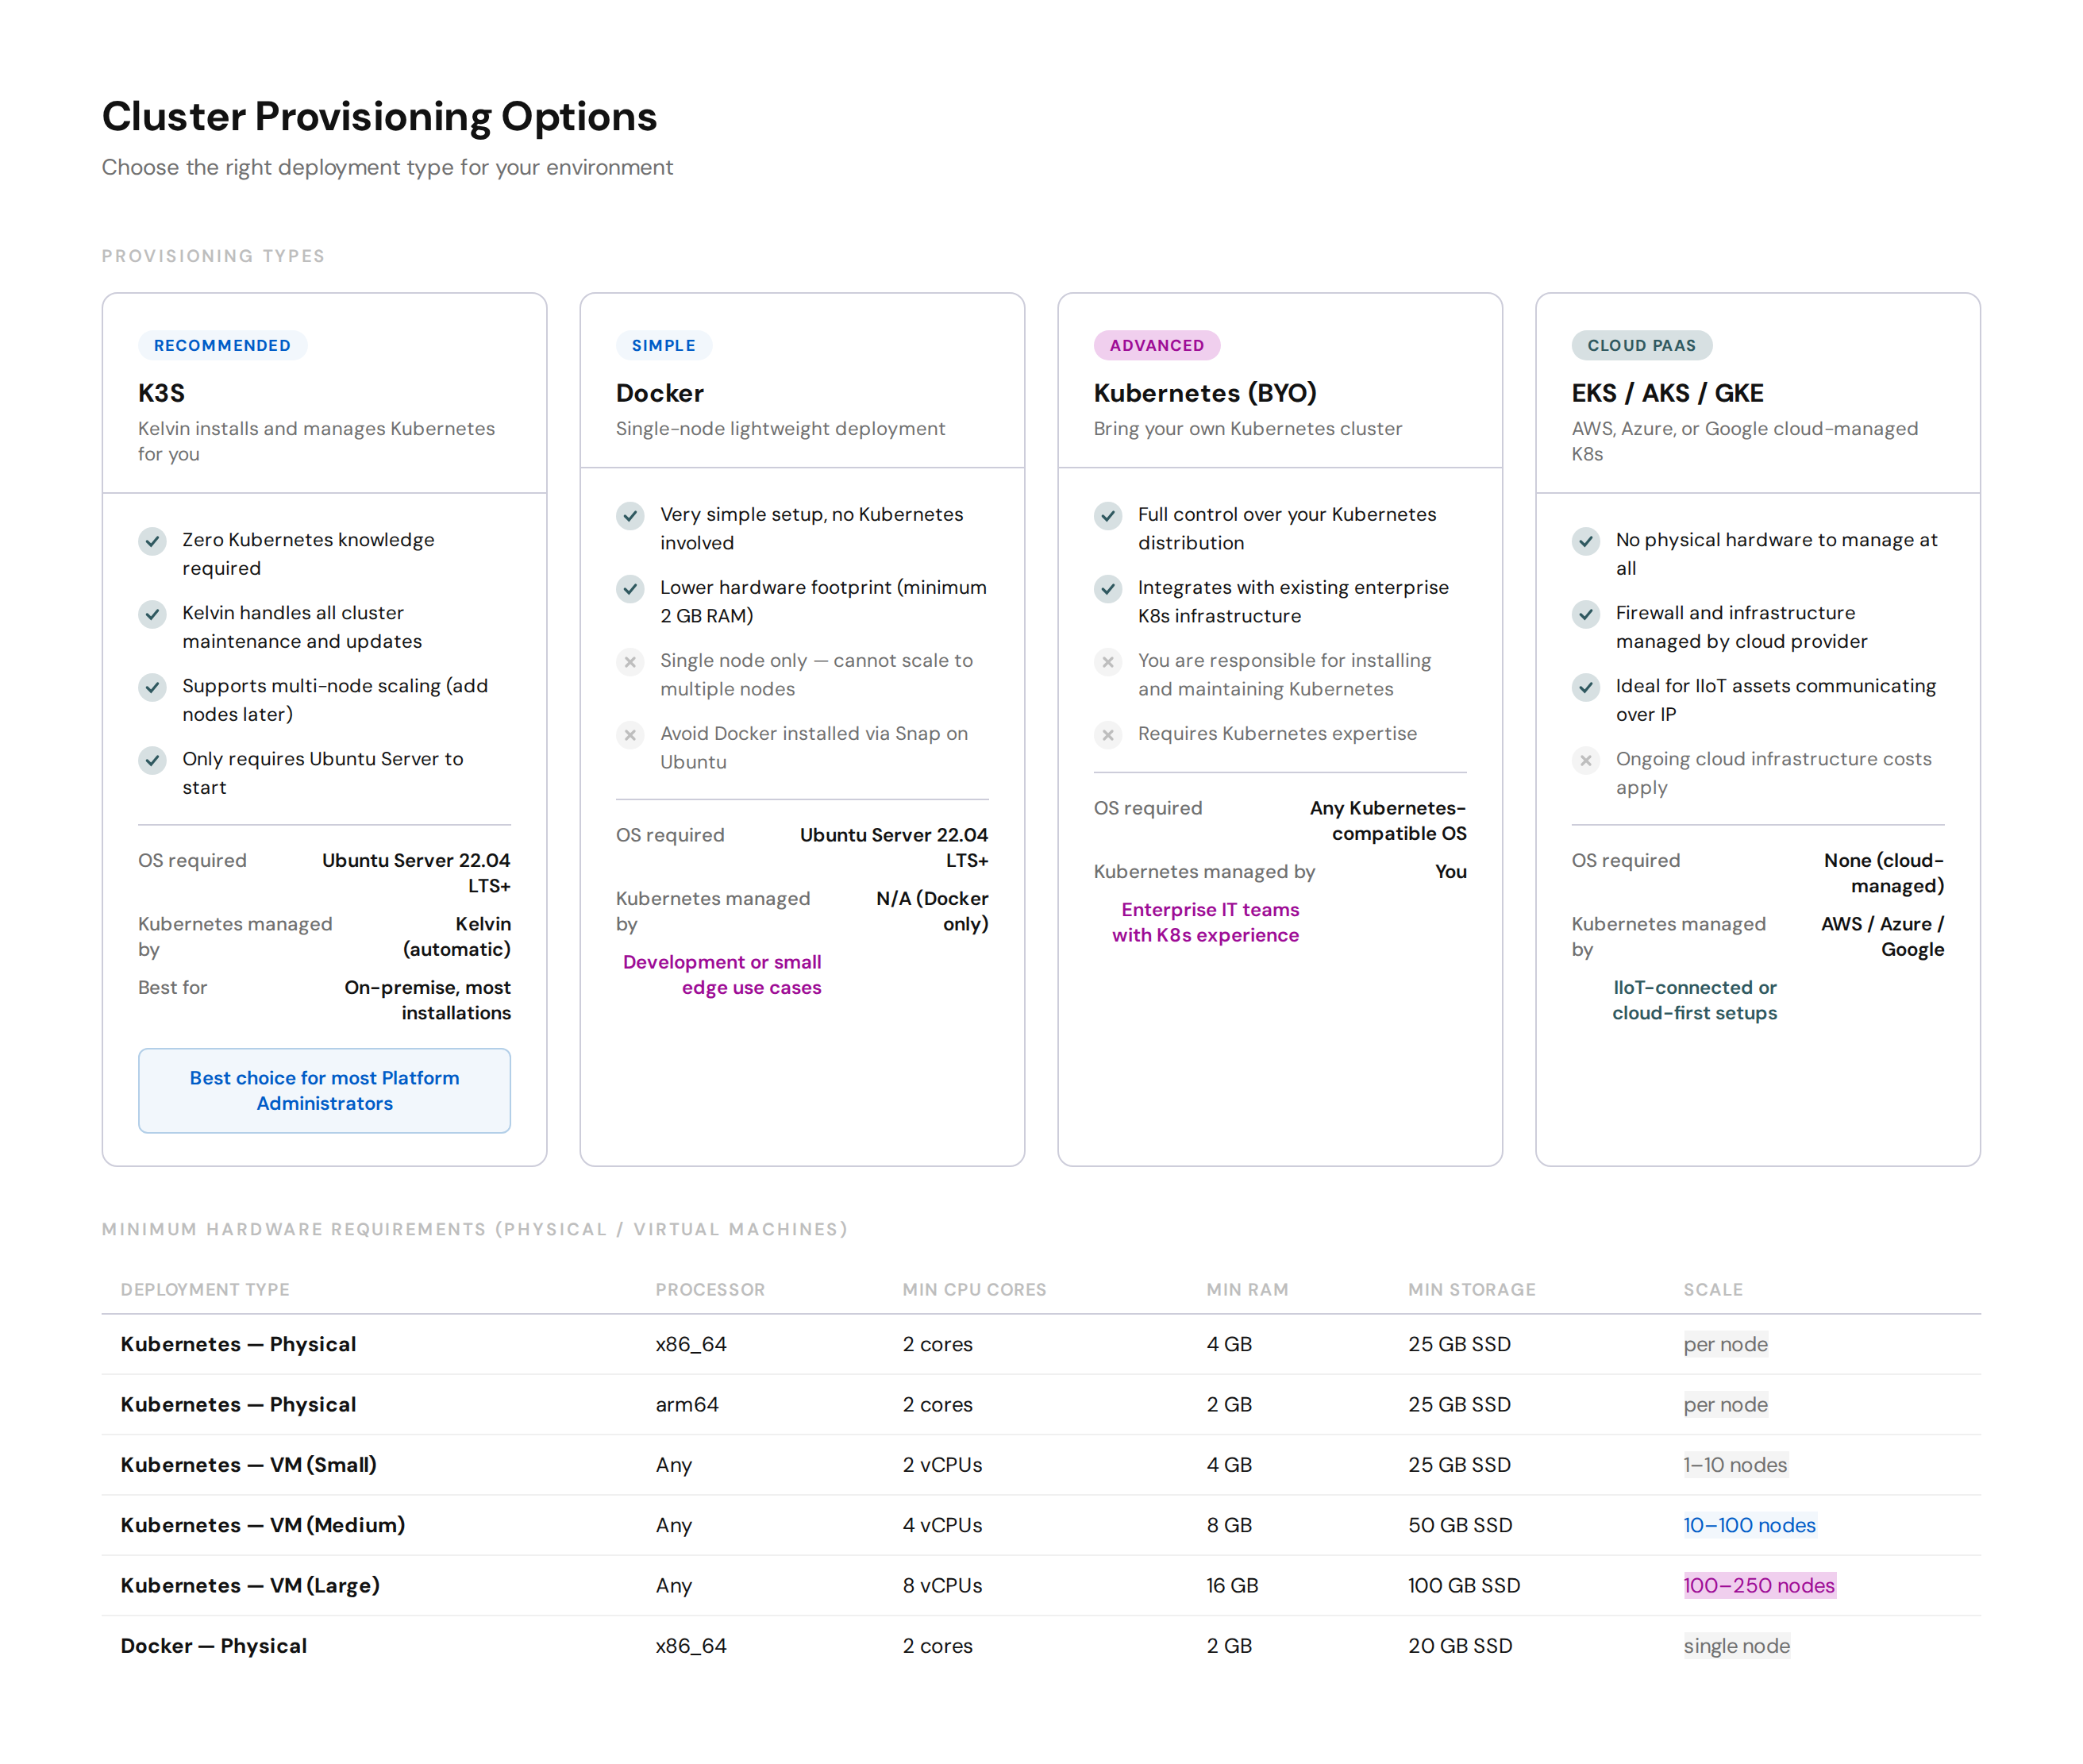
For most Platform Administrators, K3S is the correct choice. Kelvin installs and manages Kubernetes for you. You only need Ubuntu Server to get started.
Use Docker for lightweight single-node setups or development environments. It cannot be scaled to multiple nodes later.
Use Kubernetes (BYO) or a managed cloud option (EKS / AKS / GKE) only if your organisation already runs Kubernetes infrastructure and you need to integrate Kelvin into it.
For Operations
arm64 processors are supported, but not all Connections are compiled for arm64. Check with Kelvin before purchasing arm64 hardware if you plan to collect data from assets using Connections.
2.2 Operating system
For on-premise and VM deployments, use Ubuntu Server 22.04 LTS or newer. Kelvin's software is tested on LTS releases only.
At a minimum, install the command-line server only. You do not need a graphical user interface.
You can download Ubuntu Server at https://ubuntu.com/download/server.
Warning
If you install Docker on Ubuntu, do not use Snap to install it. Snap's sandboxing restrictions conflict with the Kelvin provisioning script. Install Docker using apt instead: sudo apt install curl docker.io.
2.3 Firewall configuration
If your cluster is in a restricted network environment, you need to open specific ports. There are two phases: installation and ongoing operations.
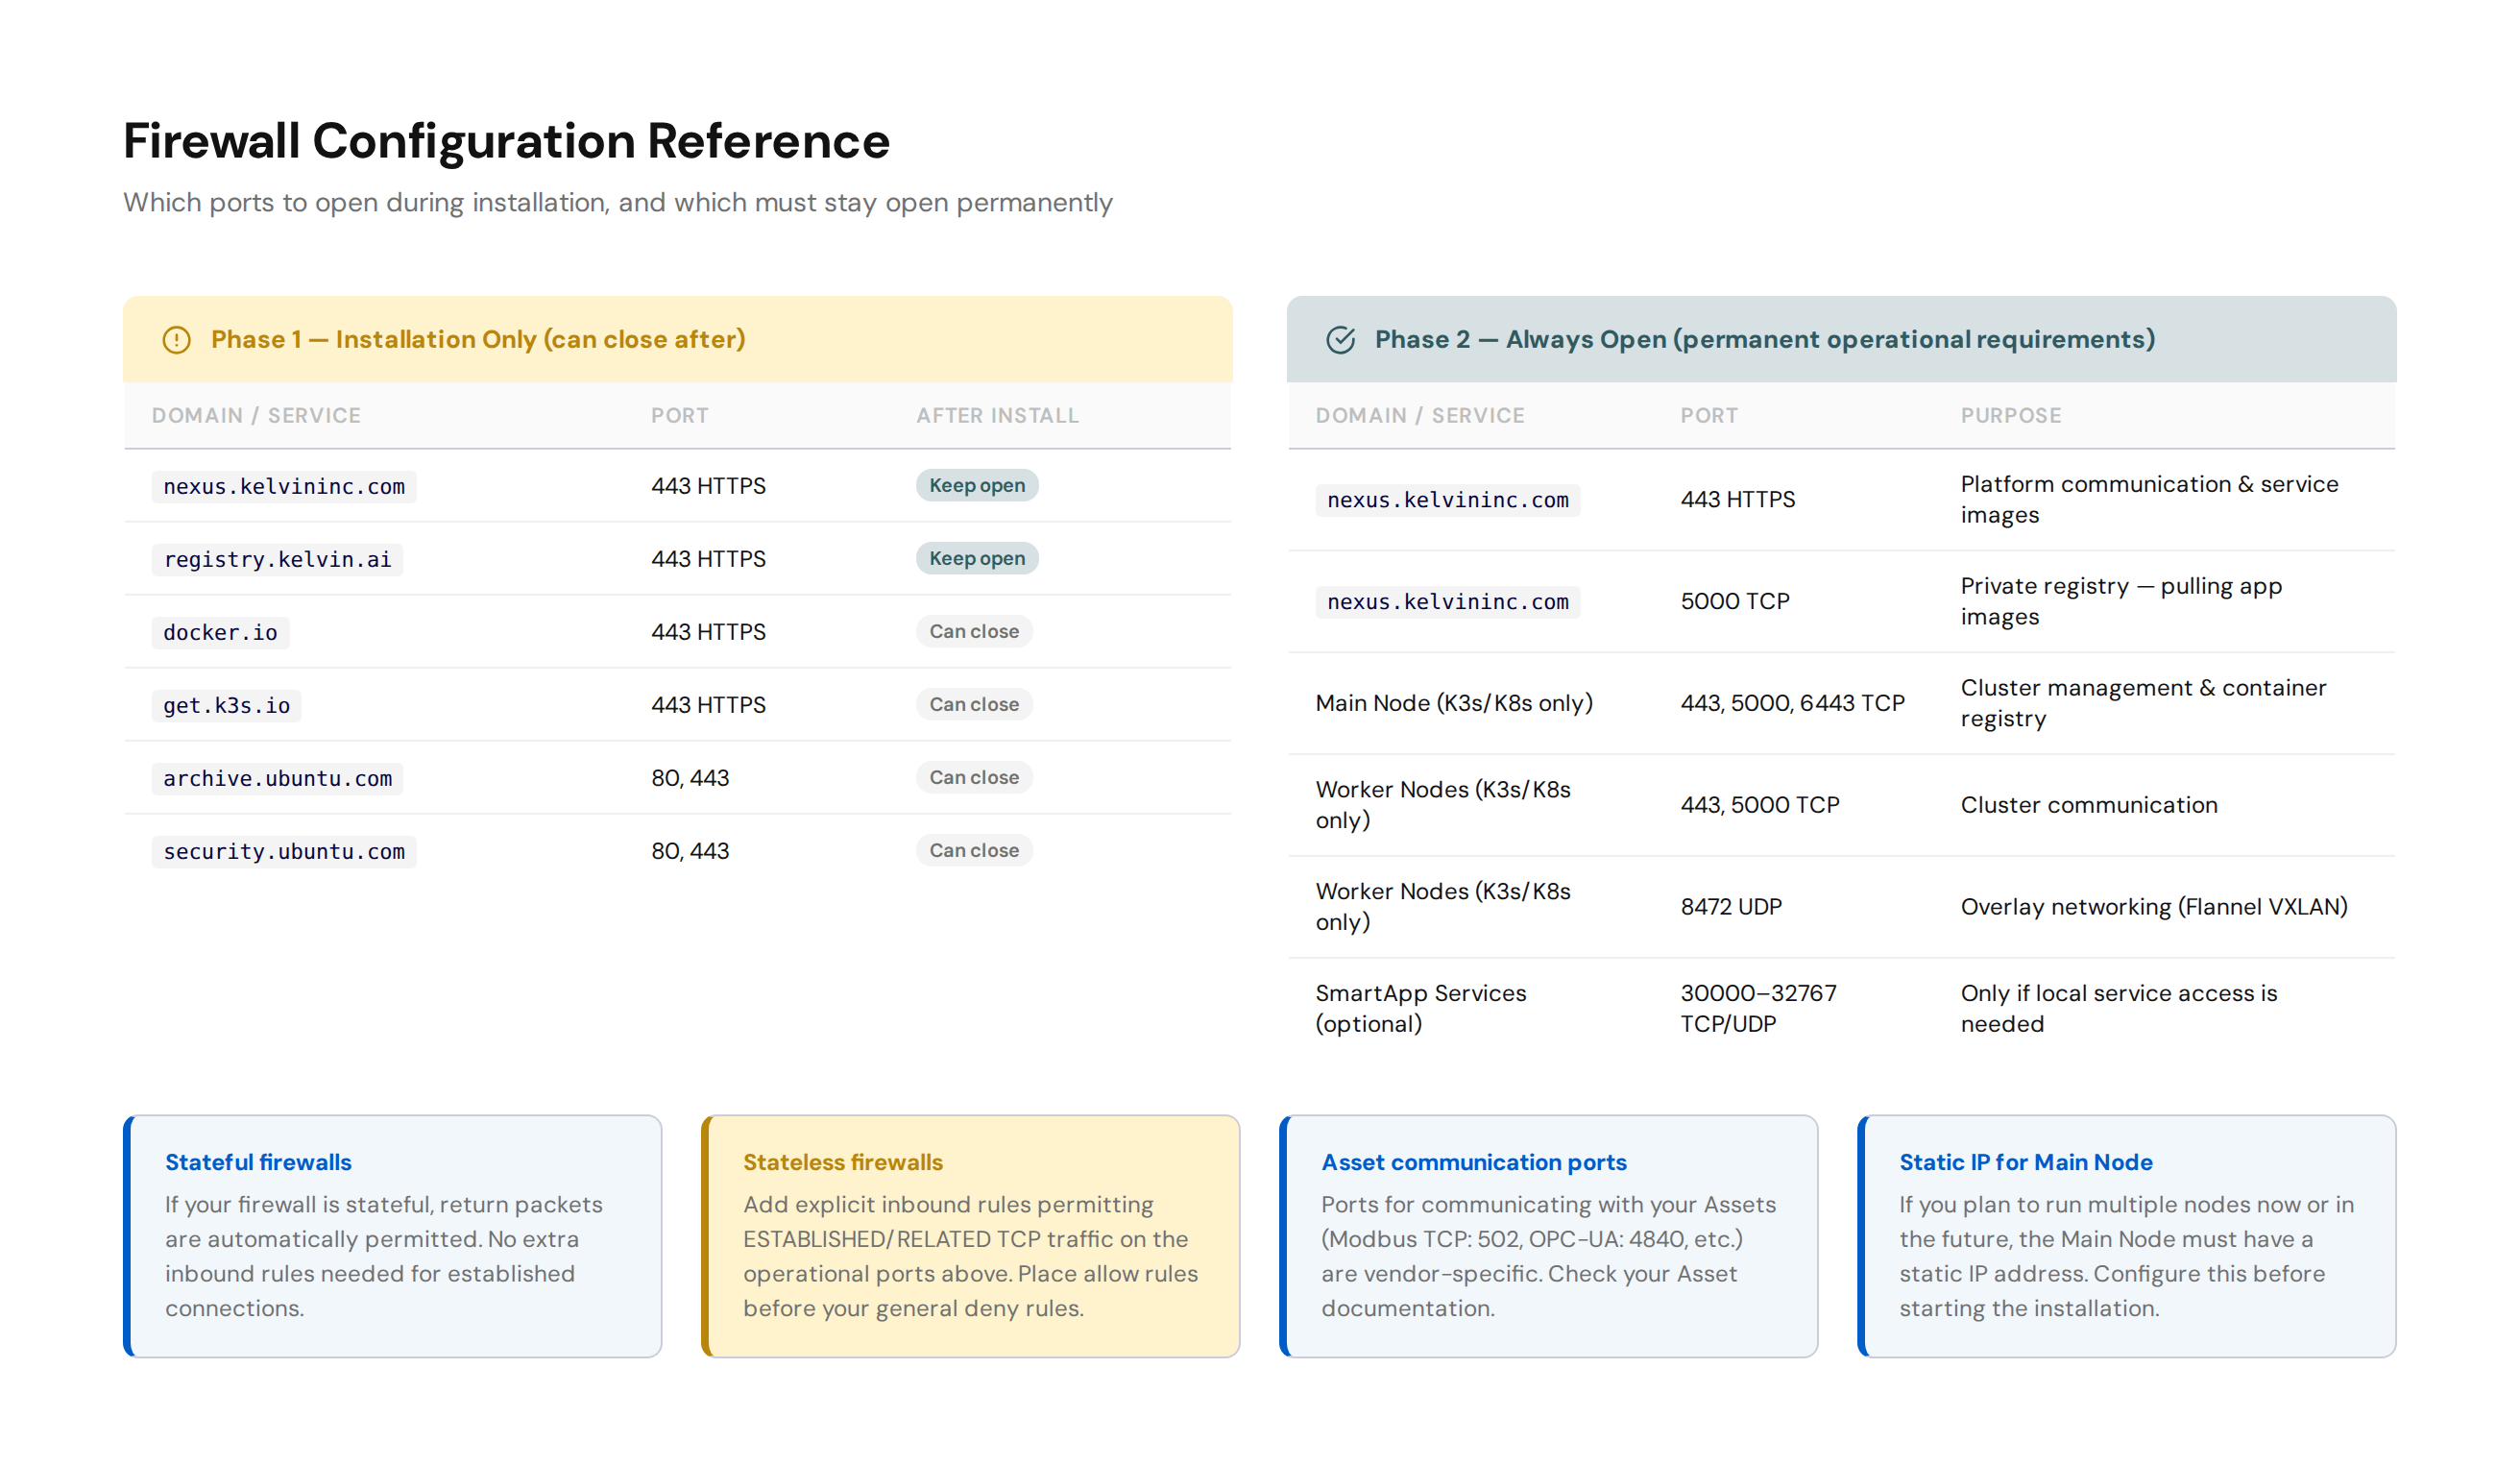
During installation, open outbound access to the domains shown in the Installation phase above. Once installation completes, you can close all of them except nexus.kelvininc.com and registry.kelvin.ai.
After installation, keep the following open permanently.
| Service | Port | Protocol | Purpose |
|---|---|---|---|
| nexus.kelvininc.com | 443 | HTTPS | Platform communication and service image downloads |
| nexus.kelvininc.com | 5000 | TCP | Private registry — pulling application images when workloads deploy |
| Main Node (K3s/K8s only) | 443, 5000, 6443 | TCP | Cluster management and container registry |
| Worker Nodes (K3s/K8s only) | 443, 5000 | TCP | Inter-node cluster communication |
| Worker Nodes (K3s/K8s only) | 8472 | UDP | Overlay networking (Flannel VXLAN) |
Asset communication ports (Modbus TCP, OPC-UA, etc.) are vendor-specific. Check your asset documentation.
Pro Tip
If your firewall is stateful, return packets are permitted automatically. If it is stateless, add explicit inbound rules for ESTABLISHED/RELATED TCP traffic. Always place your allow rules before any general deny rules.
For the complete firewall and hardware requirements, visit:
2.4 Provisioning your cluster
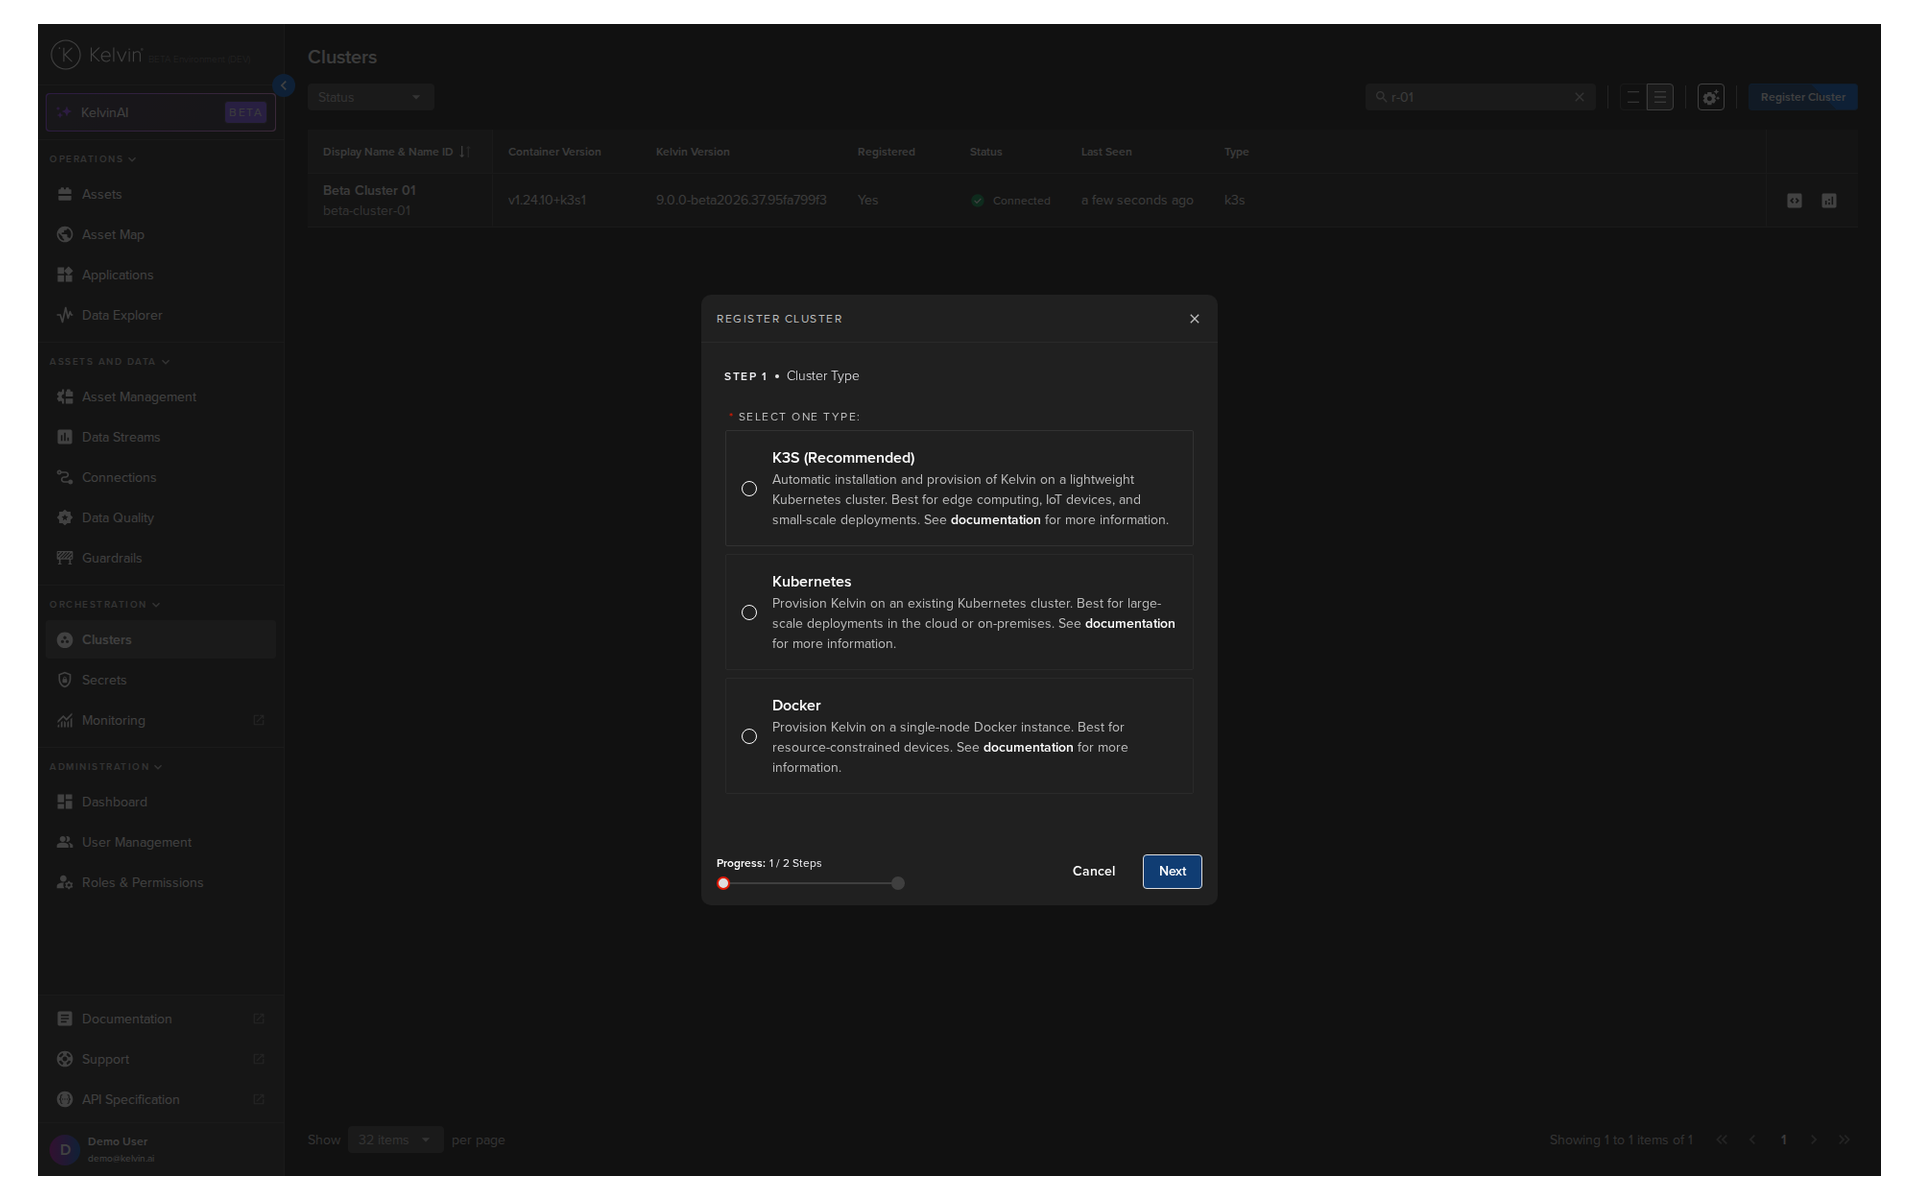
The provisioning process is the same for all cluster types. You register the cluster in the Kelvin UI first, then run the installation script on your edge system.
For K3S (recommended):
- In the Kelvin UI, go to Orchestration and click Register Cluster.
- Select K3S as the cluster type.
- Give the cluster a display name. The Name ID is generated automatically.
- Click Register. Kelvin generates an installation script.
- Copy the script and run it in the terminal of your edge system.
- Kelvin installs Kubernetes, configures the cluster, and registers it with the Kelvin Platform automatically.
The entire process takes around ten minutes depending on your internet speed.

Note
After the first (Main) Node is set up, you can add Worker Nodes to scale the cluster. If you plan to add nodes later, ensure the Main Node has a static IP address before starting installation.
For cloud deployments (EKS / AKS / GKE):
Set up your Kubernetes cluster first using your cloud provider's tools. Then follow the same Register Cluster flow in the Kelvin UI and select the Kubernetes option. Kelvin only installs its management pods onto your existing cluster — it does not touch the Kubernetes infrastructure itself.
2.5 Adding and managing nodes
Once your first cluster is running, you can add nodes to increase capacity. Each additional node you add runs SmartApps and Connections, distributing the workload.

| I want to... | Where to go |
|---|---|
| View all nodes and their status | Administration > Orchestration > Clusters > select cluster > Nodes |
| Add a new node | Nodes dashboard > Add Node |
| Remove a node | Nodes dashboard > select node > Delete |
For step-by-step guides, visit:
- Setup Architectures
- Provision a K3S Cluster
- Provision a Cloud Cluster
- Provision a Docker Cluster
- Add a Node
Part 3: Setting Up Platform Users and Permissions
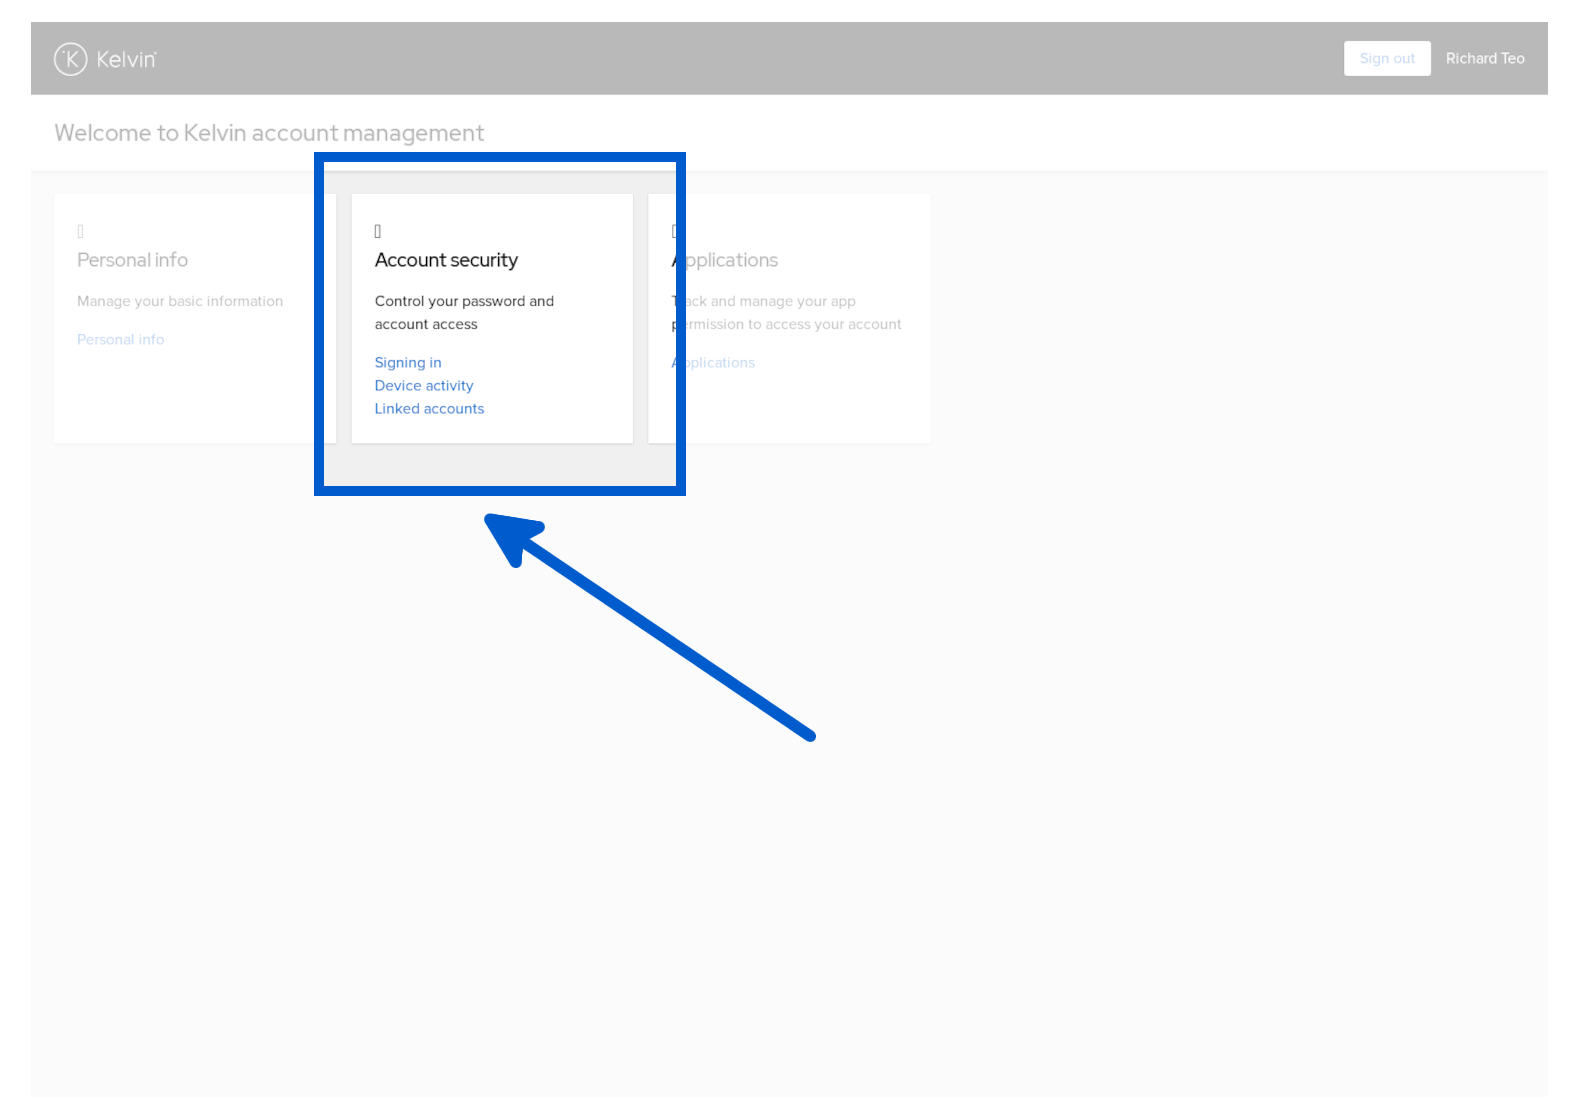
Users in this context means access to the Kelvin Platform — the UI, the API, and the Administration area. This is separate from cluster infrastructure (covered in Part 2) and from SmartApp-level logic. A user with Kelvin Platform access can log in, view assets, manage configurations, and perform actions based on the permissions you assign.
3.1 Authentication options
Kelvin supports two ways to authenticate Platform users. You choose one for your installation.
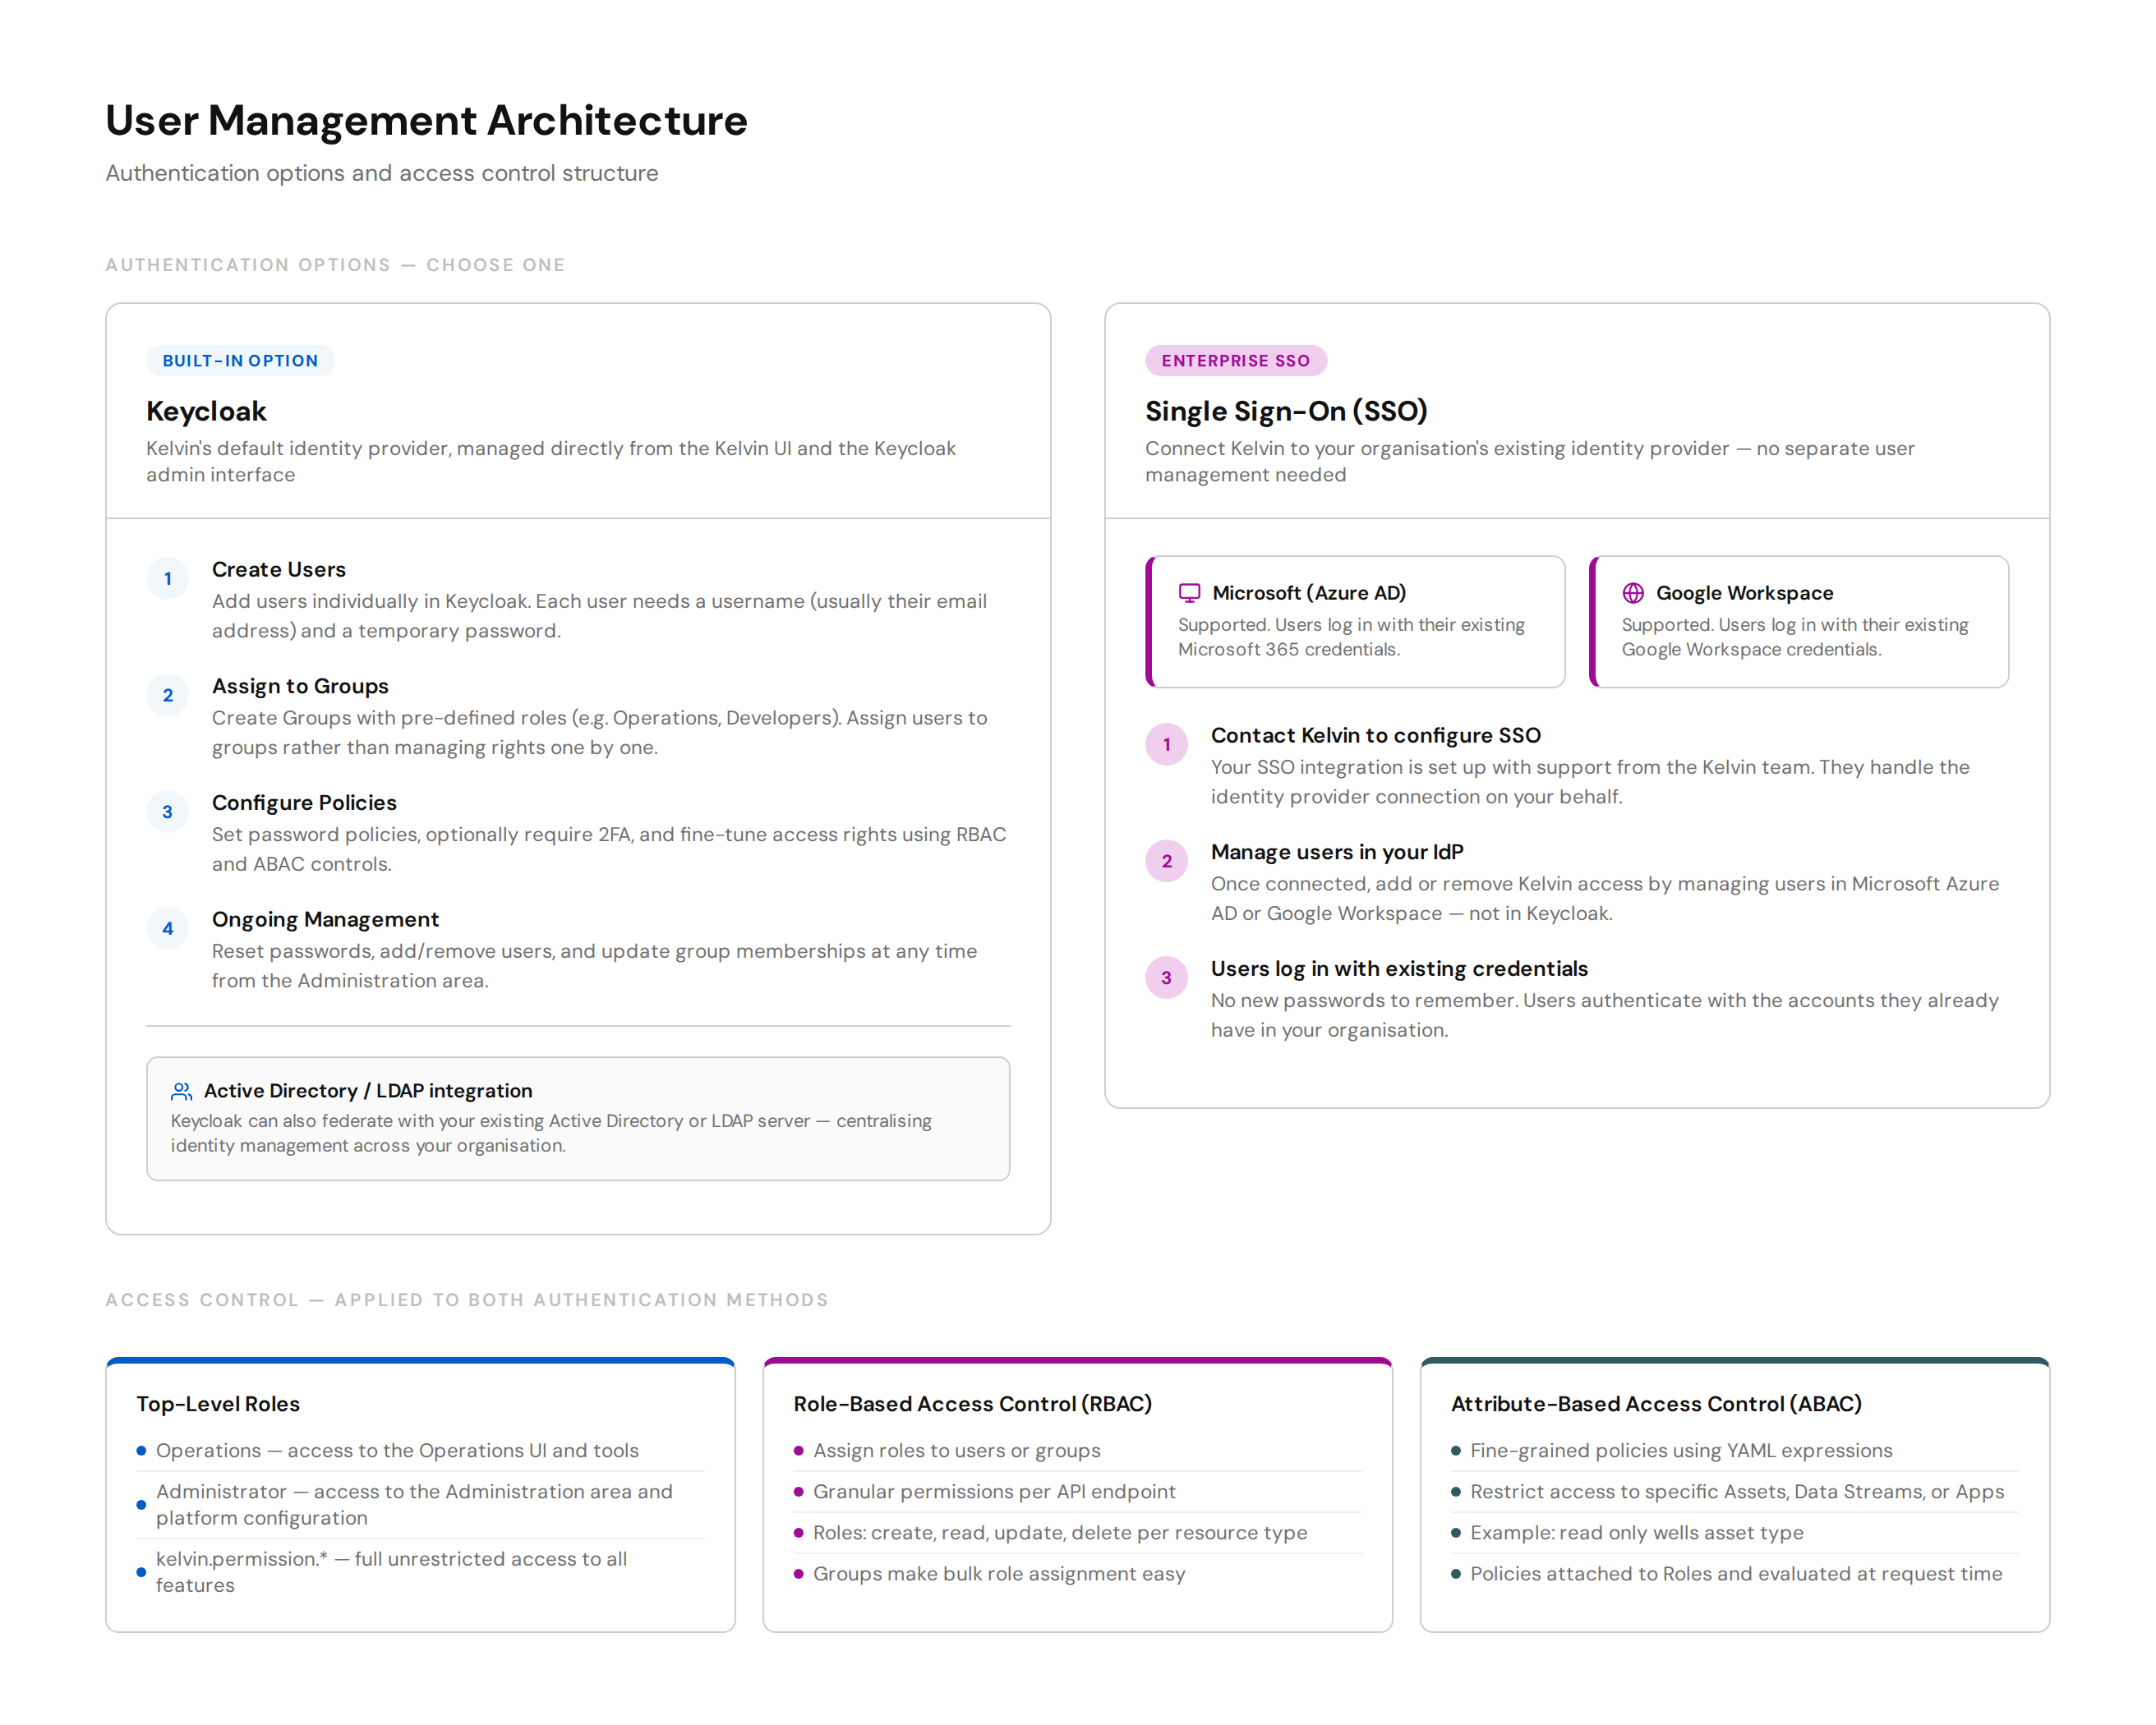
Keycloak is Kelvin's built-in identity provider. You manage users, groups, and passwords directly from Keycloak and the Kelvin UI. This is the default option for most installations.
SSO (Single Sign-On) connects Kelvin to your organisation's existing identity provider. Users log in with the credentials they already have. Kelvin supports Microsoft Azure AD and Google Workspace. SSO is configured with help from the Kelvin team.
Pro Tip
If your organisation already uses Microsoft 365 or Google Workspace, SSO removes the overhead of managing a separate set of Kelvin user accounts. After setup, you manage Platform access entirely through your existing IdP.
3.2 Setting up Platform users with Keycloak
If you are using the built-in Keycloak option, follow this order.
Step 1: Create groups before creating users.
Groups hold a standard set of roles. It is much faster to assign a user to a group than to assign roles individually. Create groups that match your organisational structure before adding any users.

Common groups to start with:
| Group name (example) | Roles to assign |
|---|---|
| Operations Engineers | Operations-level read and write permissions |
| Developers | Developer and deployment permissions |
| Administrators | Full administration access |
| Read Only | Read-only access across assets and streams |
Step 2: Create users and assign them to groups.
Each user needs a username (usually their email address) and an initial password. Assign them to the appropriate group. The group's roles apply immediately.
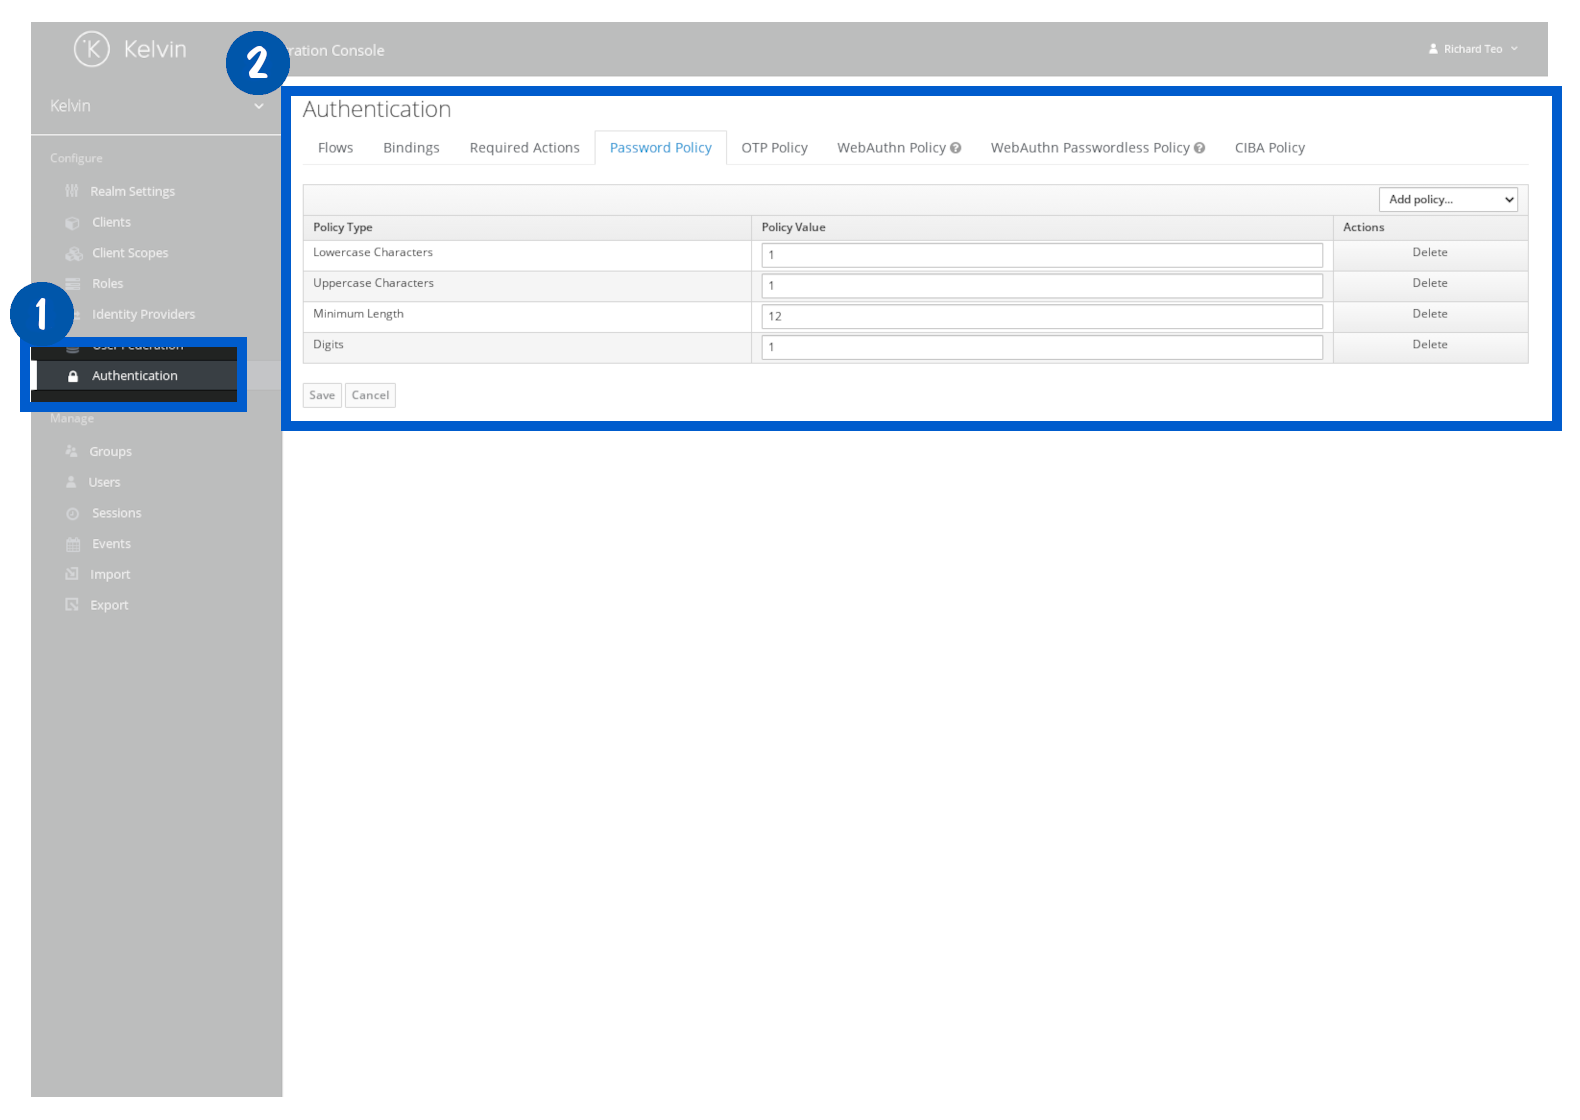
Step 3: Configure password policies.
Set a password policy that matches your organisation's security requirements. You can enforce minimum length, complexity, and expiry periods.
Step 4: Optionally enable Two-Factor Authentication (2FA).
2FA is not enabled by default. Users can set it up themselves from their personal account page. If your security policy requires it, you can make it mandatory.


3.3 Understanding roles and permissions
Kelvin uses a layered access control system. Once your groups and users are set up, you can fine-tune what each user can see and do.
Top-level roles control which area of the Kelvin UI a user can access.
| Role | Area of access |
|---|---|
| Operations | The Operations section of the Kelvin UI |
| Administrator | The Administration section of the Kelvin UI |
| kelvin.permission.* | Unrestricted access to all features |
Role-Based Access Control (RBAC) provides granular permissions per resource type. You can allow or deny create, read, update, and delete actions on Assets, Data Streams, Applications, and more.
Attribute-Based Access Control (ABAC) lets you write YAML-based policies that restrict access to specific resources by name or attribute. For example, you can allow a group to read only Assets that belong to a specific asset type.
# Example ABAC policy: allow read access to wells asset type only
actions:
  - read
condition:
  match:
    any:
      of:
        - expr: R.attr.asset_type_name == "wells"
Note
Because of the high granularity available, the list of permissions is very long. Spend time designing your group structure before creating users. Changing permissions after the fact is possible but time-consuming across large user bases.
For full documentation on access control, visit:
3.4 Ongoing user management
Once users are live, you will occasionally need to reset passwords, update group memberships, or disable accounts.
| Task | Where to do it |
|---|---|
| Reset a user's password | Administration > Users > select user > Reset Password |
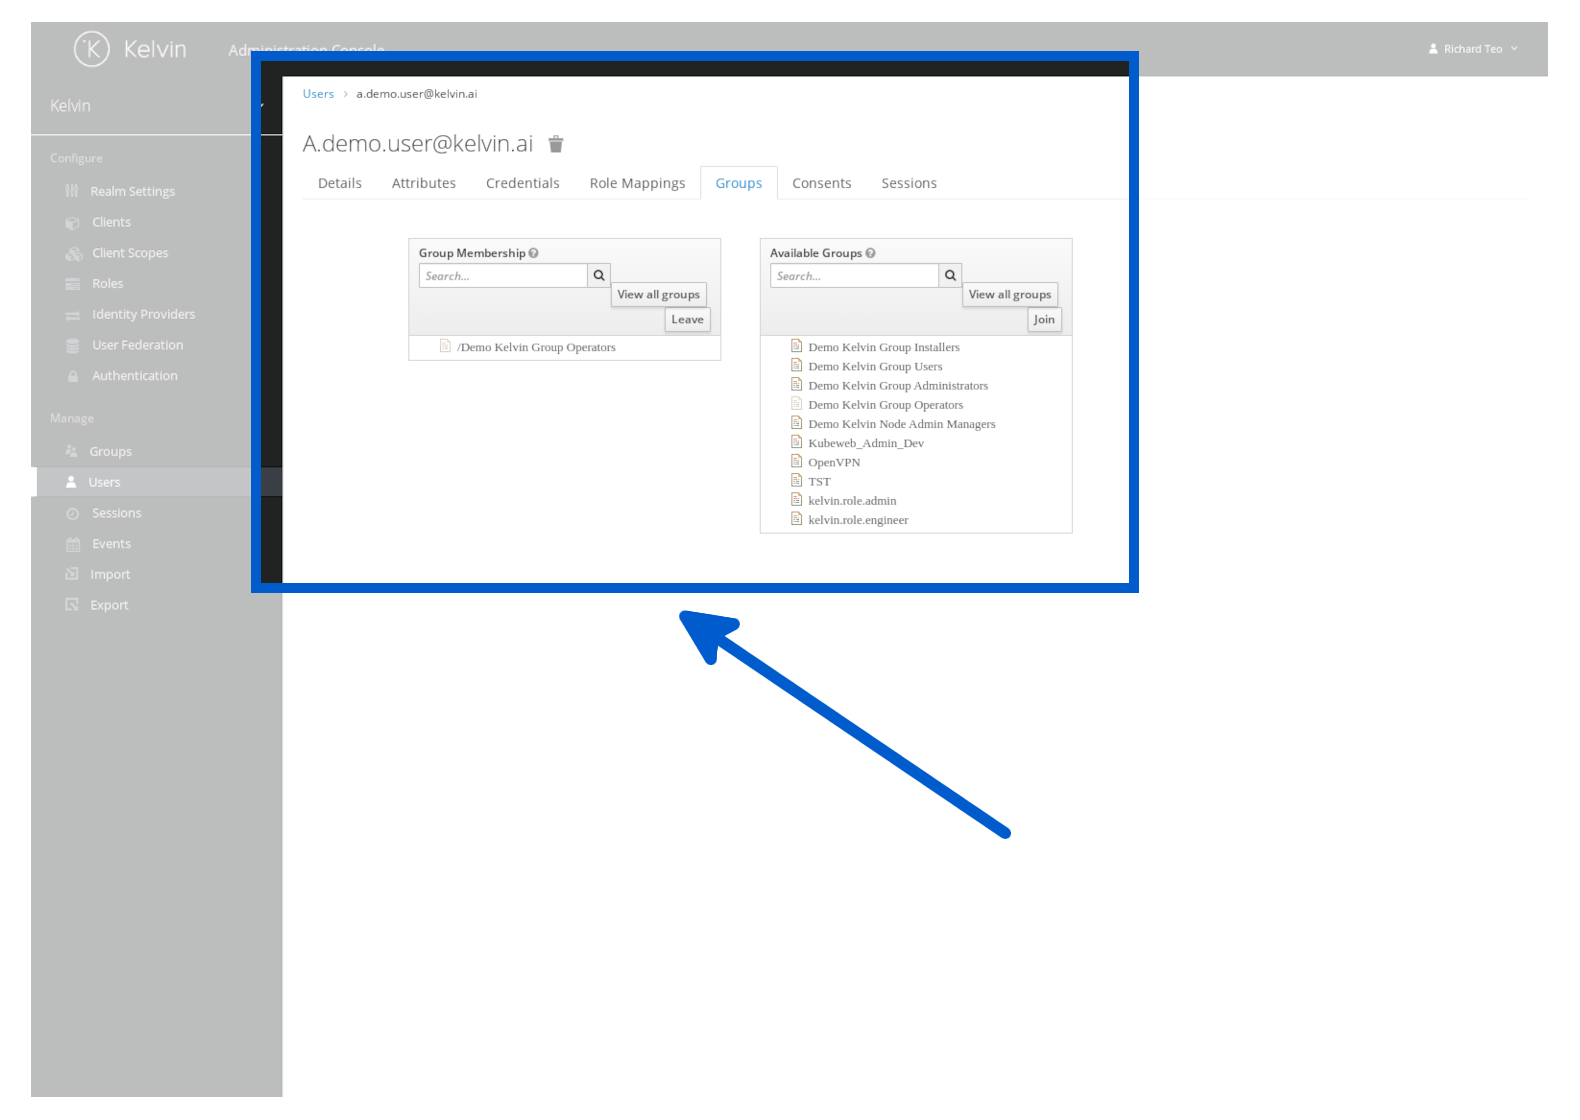
| Add user to a group | Keycloak admin > select user > Groups tab |
| Remove a user | Keycloak admin > select user > Delete |
| Update group roles | Keycloak admin > Groups > select group > Role Mappings |
Quick Reference
| I want to... | How |
|---|---|
| Understand what runs in the cloud vs the edge | See Part 1 diagram above |
| Choose the right cluster type | Use the Cluster Provisioning Options diagram |
| Register a new cluster | Orchestration > Register Cluster in the Kelvin UI |
| Add a node to an existing cluster | Orchestration > Clusters > select cluster > Add Node |
| Check firewall ports | See the Firewall Configuration Reference diagram |
| Create a new user | Keycloak admin > Users > Add User |
| Assign roles to a group | Keycloak admin > Groups > Role Mappings |
| Enable 2FA | Keycloak admin > user account page |
| Set up SSO | Contact Kelvin — supported for Microsoft and Google |
Quick Quiz
Quiz 1: What are the two layers that make up the Kelvin platform architecture?
Answer: The Cloud (the Kelvin Platform, managed by Kelvin) and the Edge (a cluster of computers running close to your assets, managed by you).
Quiz 2: Does the edge cluster always have to be physical, on-premise hardware?
Answer: No. If your assets communicate over IP (IIoT-compliant), the edge cluster can run as a virtual machine in the cloud. The term "edge" refers to where the cluster sits relative to your assets, not whether it is physical.
Quiz 3: Which cluster provisioning option is recommended for most Platform Administrators, and why?
Answer: K3S. Kelvin installs and manages Kubernetes automatically. You only need Ubuntu Server. No Kubernetes knowledge is required, and the cluster can be scaled by adding nodes later.
Quiz 4: After a K3S cluster is successfully installed, which firewall ports must remain permanently open?
Answer: nexus.kelvininc.com on port 443 (HTTPS) and port 5000 (TCP). For multi-node K3s/K8s clusters, also open ports 443, 5000, and 6443 on the Main Node, and ports 443, 5000, and 8472 UDP on Worker Nodes.
Quiz 5: Where do AI engines run in Kelvin — in the cloud or at the edge?
Answer: At the edge. AI engines are not cloud-hosted. They run embedded inside SmartApps, wherever those SmartApps are deployed on a cluster. This keeps AI processing close to the data source.
Quiz 6: What is the correct order for setting up Platform users in Keycloak?
Answer: Create Groups first (with the appropriate roles for Kelvin Platform access), then create Users and assign them to groups. This avoids having to assign roles to each user individually and makes ongoing management much faster.
Quiz 7: What is the difference between RBAC and ABAC in Kelvin?
Answer: RBAC (Role-Based Access Control) assigns permissions at the role level — for example, allowing a user to read all Assets. ABAC (Attribute-Based Access Control) adds fine-grained policies based on resource attributes — for example, allowing a user to read only Assets that belong to a specific asset type.
Summary
You now have a complete picture of how to stand up a new Kelvin installation: the physical architecture, how to choose and provision a cluster, what firewall rules to apply, and how to manage users and their access rights.
The key things to remember:
- The Edge is a Kelvin Cluster — it can be physical hardware or a cloud VM depending on how your assets communicate. SmartApps and AI engines run here, not in the cloud.
- K3S is the recommended cluster type for most installations — Kelvin manages Kubernetes for you
- For restricted networks, open the installation firewall ports first, then close them after, leaving only
nexus.kelvininc.compermanently open - Create Groups before creating Users in Keycloak — it saves significant time at scale
- RBAC handles role-level access; ABAC adds resource-level policy filtering on top
For full documentation, visit:
- Cluster Concepts
- Setup Architectures
- Edge Requirements
- Provision a K3S Cluster
- Kelvin Edge Services
- User Authentication
- RBAC
- ABAC
Good luck and Happy Learning !