Provision an AKS Cluster - How to
On this page you will learn how to setup an edge system with an Azure Kubernetes Service (AKS) cluster using the cluster installation tools in the Kelvin UI.
If you want Kelvin to be responsible to also install the Kubernetes cluster directly and handle all the management of the cluster, you can choose the K3S option.
Amazon Kubernetes Service (AKS)
![]()
Amazon Elastic Kubernetes Service (Amazon AKS) is a fully-managed service that simplifies the deployment and management of Kubernetes clusters. It provides a highly available and scalable platform to deploy containerized Kelvin SmartApps™ using Kubernetes, without the need to manage the underlying infrastructure.
Requirements & Limitations
Cloud Kubernetes implementations vary across providers, and even within the same provider, there can be different types of stacks based on the selected services.
So it is not possible to list all the requirements, limitations and fixed design options available and will heavily depend on your project and budgets.
When setting up your cluster on AKS here are some links to the AKS documentation that can help you decide what type of setup to implement.
- Kubernetes core concepts for Azure Kubernetes Service
- Azure Well-Architected Framework review
- Quotas, virtual machine size restrictions, and region availability
- Azure Kubernetes Service (AKS) architecture design
- Optimize costs in Azure Kubernetes Service
Installation
This step will install all the Kelvin services to your AKS cluster.
Setup AKS Cluster
To start you need to setup your own AKS cluster following Amazon's instructions. There are four basic steps to installing and setting up AKS clusters;
- Create AKS Cluster: Use the Azure portal, Azure CLI, or Azure SDKs to create an AKS cluster.
- Configure Kubernetes Tools: Set up kubectl, the Kubernetes command-line tool, to interact with your AKS cluster.
- Configure Node Pools: Define and configure node pools, which are groups of nodes within your AKS cluster.
- Access the Cluster: Use kubectl or the Azure portal to manage and access your AKS cluster.
Install Cluster
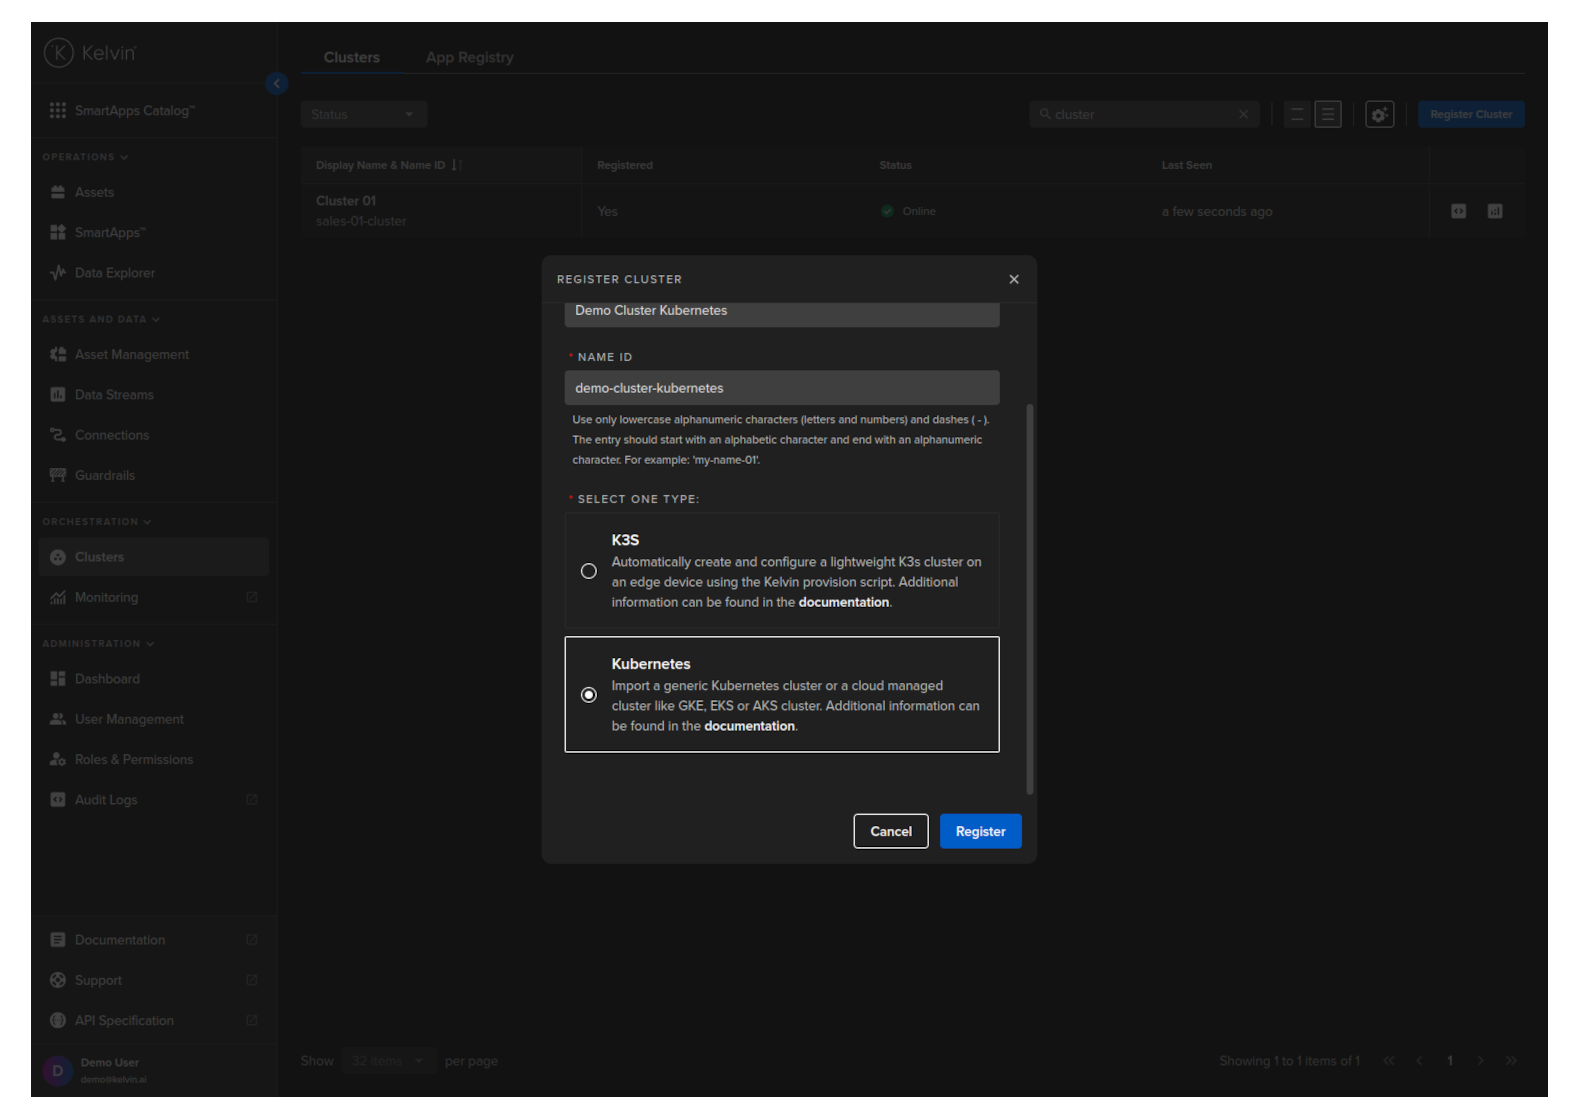
To start, go to the Orchestration page and click on the Register Cluster button;

Then in the popup options, select Kubernetes and type in a display name and optionally a name ID for this new AKS cluster.
| Display Name | This can be any characters and spaces that gives your cluster a memorable name for reference |
| Name ID | A unique lower-case alphanumeric name which uniquely identifies this cluster. This will be automatically filled in when you type the Display Name. Normally you do not need to change unless the Name ID clashes with another cluster's Name ID. |
The Name ID is the unique identifier name for the cluster. This must contain only lowercase alphanumeric characters. The ., _ and - characters are also allowed to separate words instead of a space BUT can not be at the beginning or end of the name.
You can then download the manifest YAML file and then run the CLI command in your AKS environment.
Make sure the manifest YAML file is locally accessible to the kubectl command.
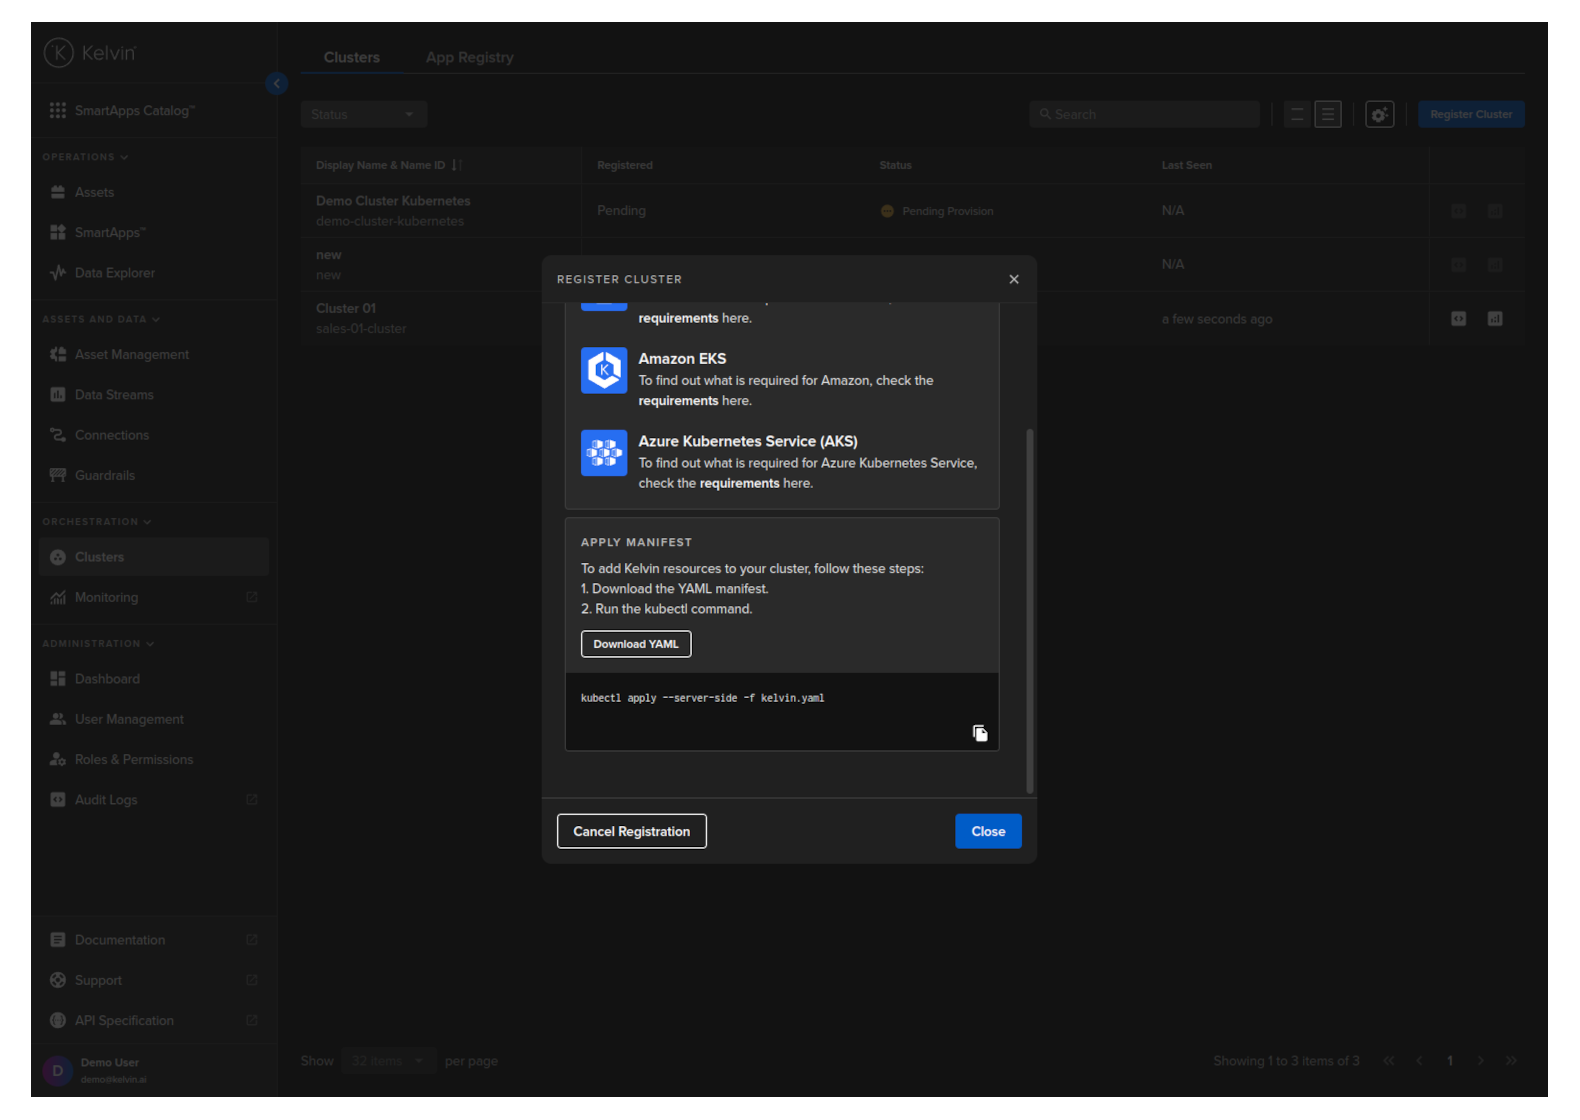
The actual CLI command is;
kubectl apply --server-side -f kelvin.yaml
Congratulations, after a few minutes depending on your Internet speed your new cluster is ready for use.
curl -X "POST" \
"https://<url.kelvin.ai>/api/v4/orchestration/clusters/create" \
-H "Authorization: Bearer <Your Current Token>" \
-H "Accept: application/json" \
-H "Content-Type: application/json" \
-d '{
    "name": "doc-demo-cluster-aks",
    "title": "Doc Demo Cluster AKS",
    "type": "kubernetes"
}'
The response will look something like this;
{
   "name":"doc-demo-cluster-aks",
   "title":"Demo Cluster AKS",
   "type":"kubernetes",
   "ready":false,
   "status":"pending_provision",
   "last_seen":null,
   "sync_scrape_interval":120,
   "manifests_scrape_interval":130,
   "manifests_scrape_enabled":false,
   "version":{
      "k8s_version":"",
      "kelvin_version":""
   },
   "created":"2024-05-23T12:27:34.632388Z",
   "updated":"2024-05-23T12:27:34.632388Z",
   "service_account_token":"bm9kZS1jbGllbnQtZG9jLWRlbW8tY2x1c3Rlci1rdWJlcm5ldGVzOnI3OUJFMEFLSjF5UkZHWWloRDV1bGtnSDhuUDZlZm0y",
   "provision_script":"kubectl apply --server-side -f kelvin.yaml",
   "join_script":"",
   "telemetry_scrape_interval":110,
   "telemetry_enabled":false,
   "telemetry_buffer_size":10,
   "forward_logs_enabled":false,
   "forward_logs_buffer_size":10,
   "upgrade_status":{
      "state":"idle",
      "message":""
   },
   "upgrade_pre_download":false,
   "upgrade_instantly_apply":true
}
You can then get the manifest YAML file that is mentioned in the provision script with the API request;
curl -X "GET" \
"https://<url.kelvin.ai>/api/v4/orchestration/clusters/doc-demo-cluster-aks/provision/get" \
-H "Authorization: Bearer <Your Current Token>" \
-H "Accept: application/json"
which will give a YAML response starting like this;
kind: Namespace
apiVersion: v1
metadata:
  name: kelvin-admin
---
apiVersion: v1
kind: Secret
type: kubernetes.io/tls
metadata:
  name: kelvin-certificate
  namespace: kelvin-admin
  labels:
    app.kubernetes.io/part-of: kelvin
data:
  ca.crt:

  ...
Copy and paste this into a file called kelvin.yaml and then run the CLI command given in the key provision_script in your AKS environment.
Make sure the manifest YAML file is locally accessible to the kubectl command.
The actual CLI command is;
kubectl apply --server-side -f kelvin.yaml
Congratulations, after a few minutes depending on your Internet speed your new cluster is ready for use.
from kelvin.api.client import Client

# Login
client = Client(config={"url": "https://<url.kelvin.ai>", "username": "<your_username>"})
client.login(password="<your_password>")

# Set or Update the Default Cluster in an Instance
response = client.orchestration.create_orchestration_clusters(data={
    "name": "doc-demo-cluster-aks",
    "title": "Doc Demo Cluster AKS",
    "type": "kubernetes"
    })

print(response)
You can save the manifest YAML file that is mentioned in the provision script with;
kelvin_yaml = client.orchestration.get_orchestration_clusters_provision(cluster_name=response.name)
with open("kelvin.yaml", 'w') as file:
    file.write(str(kelvin_yaml))
Make sure the manifest YAML file is locally accessible to the kubectl command.
And then run the CLI command given in the key provision_script in your AKS environment. The actual CLI command is;
kubectl apply --server-side -f kelvin.yaml
Congratulations, after a few minutes depending on your Internet speed your new cluster is ready for use.