3. Test

In the Kelvin SDK there is a test tool to help you ingest data to the inputs and debug the outputs to test the performance of your Kelvin SmartApp™. Some of the features include:
- Ingest Simulated Data: Inject random values at a specified interval to the app inputs using the command
kelvin app test simulator - Ingest CSV file: Read a CSV file and send the data to the app inputs using the command
kelvin app test csv - Verify outputs: Verify the outputs of the app like control changes and recommendations
Testing with historical CSV file
The Kelvin SDK test csv tool is designed to allow testers to ingest messages from a CSV file for testing purposes.
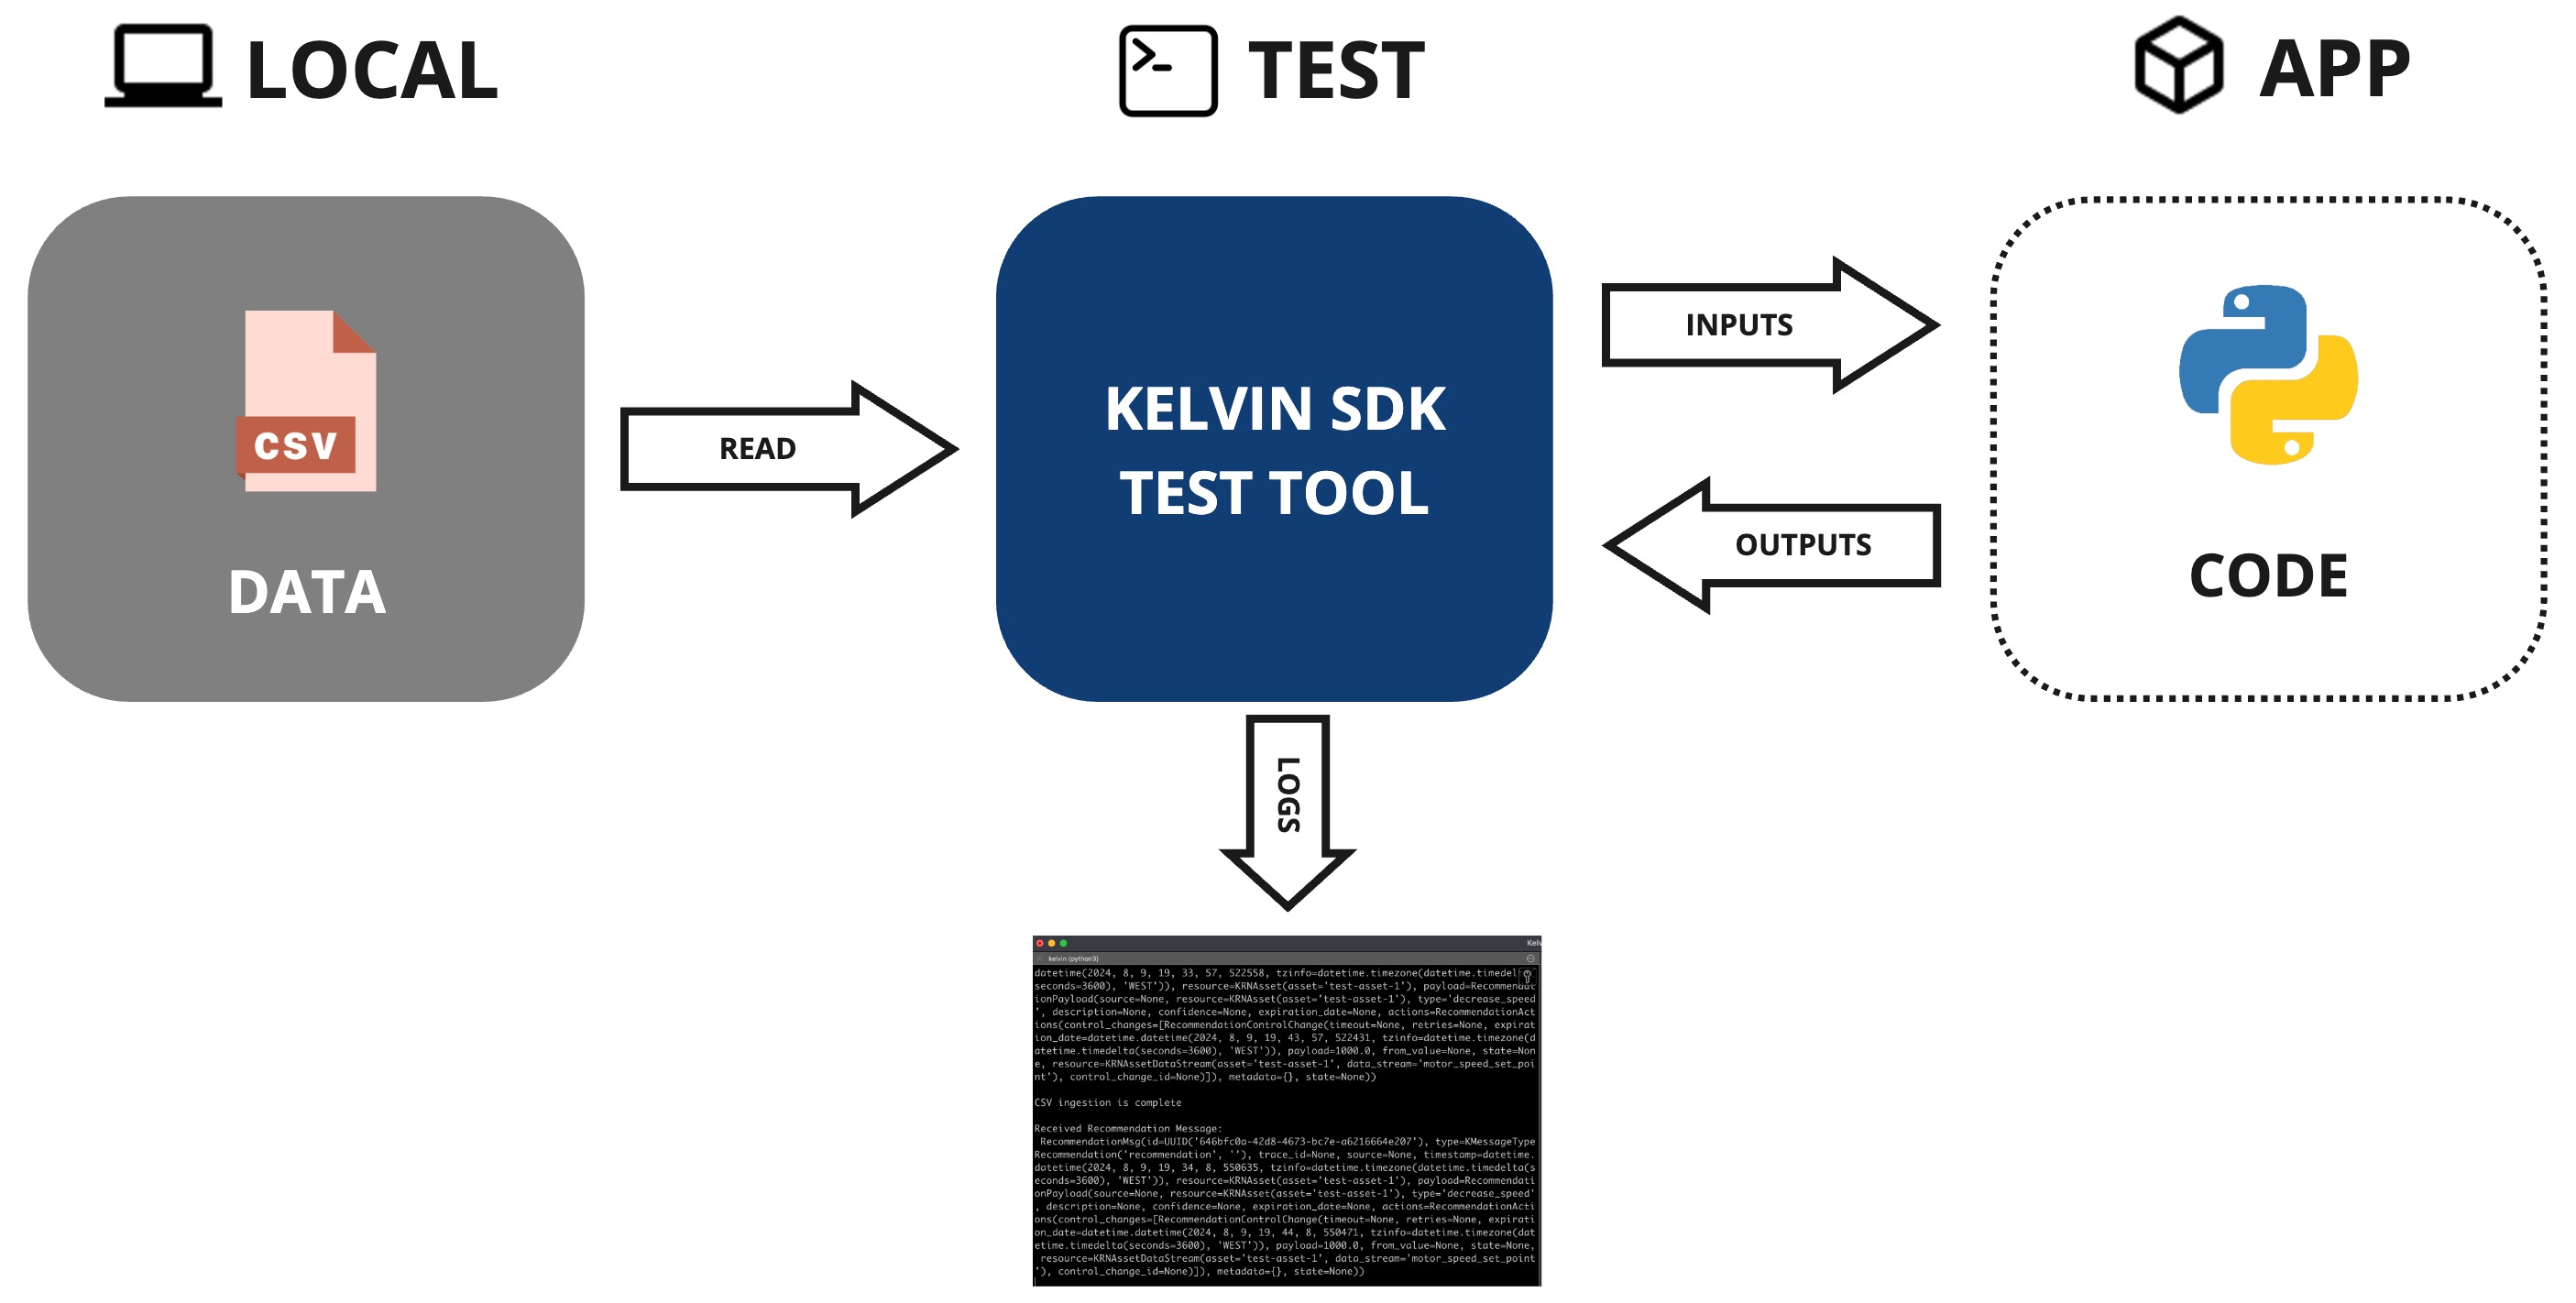
CSV Tool Overview
The test csv tool supports a variety of options to customize its behavior. Below is a list of the available options:
| Parameter | Required | Description | Note |
|---|---|---|---|
--csv TEXT |
required | Path to the CSV file | N/A |
--config TEXT |
optional | Path to the app.yaml |
Default: Current directory |
--publish-interval CSV|FLOAT |
optional | Publish interval. Set either to "csv" to use the interval between csv rows or to a number to set afixed publishing interval in seconds. | Default: csv |
--ignore-timestamps |
optional | Ignore CSV timestamps | N/A |
--now-offset |
optional | Offsets the first csv timestamp to the current time | N/A |
--replay |
optional | Continuously publish data from CSV when reaching EOF | N/A |
--asset-count INTEGER |
optional | Number of Assets (test-asset-N) | Default: 1 |
--assets PATH |
optional | Assets Info (Properties) CSV file | N/A |
--asset-parameter TEXT |
optional | Sets App Parameter | Can be used multiple times |
CSV File Structure
To structure the CSV file for your application, please follow the rules outlined below:
-
Timestamp Column:
- The first column should be labeled as timestamp.
- The timestamp should follow one of the supported formats by the Arrow library. Examples of accepted formats include:
YYYY-MM-DD HH:mm:ssYYYY/M/D HH:mmYYYYDDDD HH:mm- Other Arrow-compatible formats
-
Asset Column:
Note
If you use the
--asset-countoption, then thisassetcolumn and external asset CSV file will be ignored.- Optionally include an
assetcolumn to link it to a list of assets and their properties stored in another CSV file, as specified by the--assetoption. - During testing, the
assetname in the CSV column will be matched with theassetname in the external asset CSV file, injecting all associated asset properties.
The asset CSV file contains the asset name and associated properties.
The first column must contain the asset names, and any subsequent columns should define property names and their corresponding values, with each column representing one property.
Example of an asset CSV file with asset names and the properties
diameterandtype:Test Data CSV File Example 1 2 3 4
asset,diameter,type asset1,47,plunger asset2,23.1,motor (...) - Optionally include an
-
Input Columns:
Note
If you do not use the
--assetoption mentioned above then you can define the number of assets to test using the--asset-countoption.- Include additional columns for each input defined in your
app.yamlfile. These columns represent the various data stream inputs your application receives. - Example input columns might include:
- motor_temperature
- pressure
- gas_flow
- Include additional columns for each input defined in your
-
Optional App Parameters:
- If you have optional app parameters defined in your
app.yamlfile, include them as additional columns. These parameters can be useful for evaluating different operational behaviors. - Example optional parameter columns might include:
- temperature_max_threshold
- speed_decrease_set_point
- closed_loop
- If you have optional app parameters defined in your
Download CSV Test File
Now that you're familiar with the basics of the test csv tool, it's time to put the Event Detection SmartApp to the test using a CSV file.
Download the CSV file from the link below and save it to your local machine:
Important Reminder
Make sure to copy the downloaded CSV file into the directory of your Kelvin SmartApp™ project before proceeding.
The CSV file you downloaded contains the following data:
| Sample Test Data CSV File | |
|---|---|
1 2 3 4 5 6 7 8 9 10 11 12 | |
You can view the guide in our video tutorial or read our step by step written guide.
Video Guide
Watch the test section of the develop quick start guide.
Success
This will start the video playback at the 5 minute 30 second mark. You can rewind to see the full process of developing and testing a Kelvin SmartApp™ in under 8 minutes.
Written Guide
Test your Event Detection SmartApp
Open a terminal window on the folder of your Kelvin SmartApp™ project and follow the steps below to test your Event Detection SmartApp using the CSV file you downloaded:
-
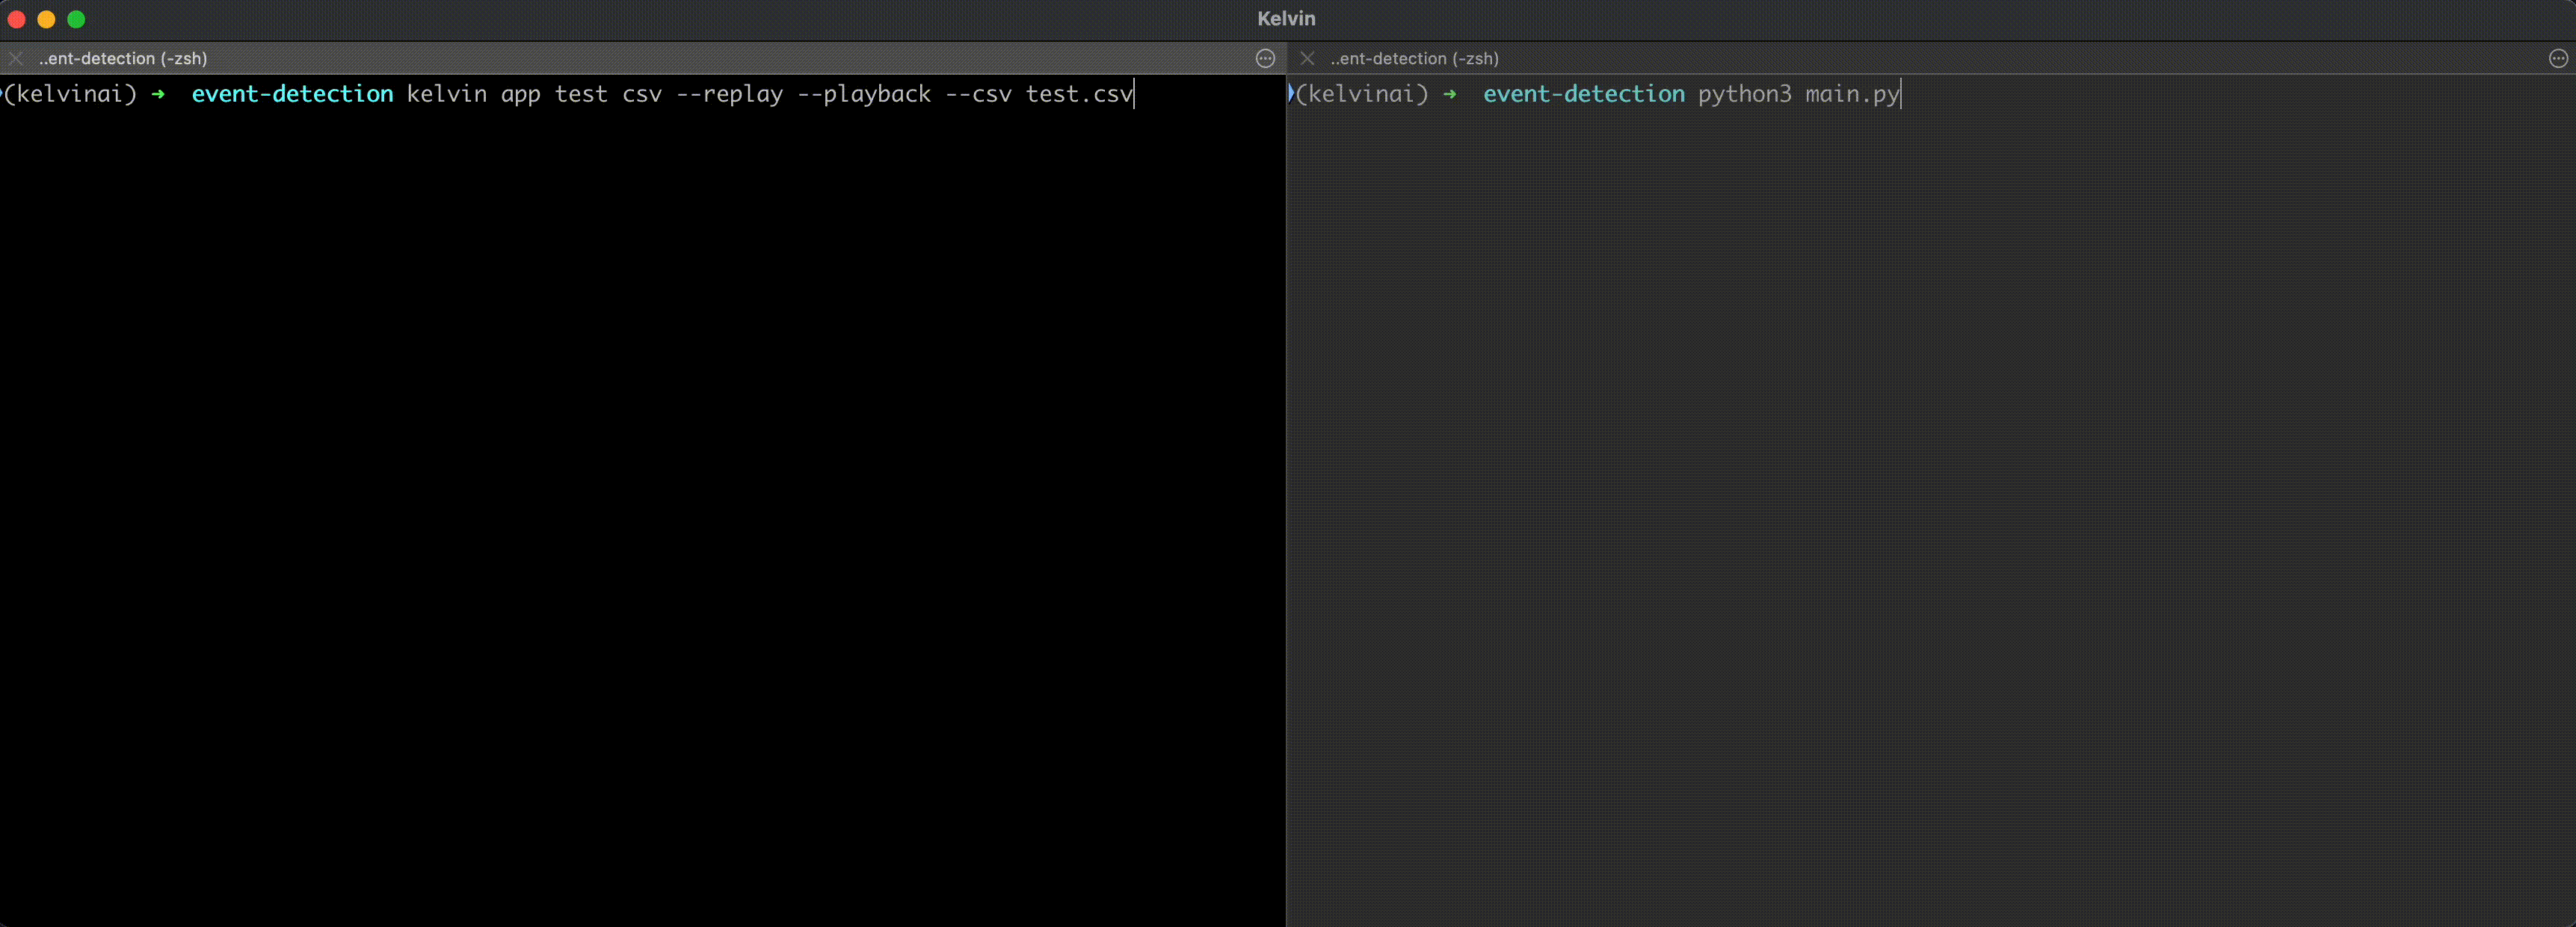
Run the CSV Test Tool:
Starting Test Tool with CSV File Data 1kkelvin app test csv --replay --now-offset --csv test.csvand you should see the following output:
Test Tool Output 1Publisher started. -
Open a NEW terminal window and run the SmartApp:
python3 main.pyand you should see the following output:
Kelvin SmartApp™ Python Example Output 1 2 3 4 5 6 7 8 9 10 11 12 13 14 15 16 17 18 19 20 21 22 23 24 25
Received Motor Temperature | Asset: test-asset-1 | Value: 50.0 Received Motor Temperature | Asset: test-asset-1 | Value: 51.0 Received Motor Temperature | Asset: test-asset-1 | Value: 52.0 Received Motor Temperature | Asset: test-asset-1 | Value: 53.0 Received Motor Temperature | Asset: test-asset-1 | Value: 54.0 Received Motor Temperature | Asset: test-asset-1 | Value: 55.0 Received Motor Temperature | Asset: test-asset-1 | Value: 56.0 Received Motor Temperature | Asset: test-asset-1 | Value: 57.0 Received Motor Temperature | Asset: test-asset-1 | Value: 58.0 Received Motor Temperature | Asset: test-asset-1 | Value: 59.0 Received Motor Temperature | Asset: test-asset-1 | Value: 60.0 Published Motor Speed SetPoint (Control Change) Recommendation: 1000.0 (...) -
Go to the CSV Tool terminal and check the logs:
Test Tool Output 1 2 3 4 5 6 7
Publisher started.
Connected

CSV ingestion is complete

Received Recommendation Message:
RecommendationMsg(id=UUID('e5cc136a-5ae1-4014-a106-6699b6423e62'), type=KMessageTypeRecommendation('recommendation', ''), trace_id=None, source=None, timestamp=datetime.datetime(2024, 8, 9, 18, 10, 40, 231994, tzinfo=datetime.timezone(datetime.timedelta(seconds=3600), 'WEST')), resource=KRNAsset(asset='test-asset-1'), payload=RecommendationPayload(source=None, resource=KRNAsset(asset='test-asset-1'), type='decrease_speed', description=None, confidence=None, expiration_date=None, actions=RecommendationActions(control_changes=[RecommendationControlChange(timeout=None, retries=None, expiration_date=datetime.datetime(2024, 8, 9, 18, 20, 40, 231843, tzinfo=datetime.timezone(datetime.timedelta(seconds=3600), 'WEST')), payload=1000.0, from_value=None, state=None, resource=KRNAssetDataStream(asset='test-asset-1', data_stream='motor_speed_set_point'), control_change_id=None)]), metadata={}, state=None))
And here is a video showing the test in action:
As you can see, the SmartApp is receiving the motor temperature data and publishing a control change recommendation to decrease the motor speed set point.
Success
Congratulations! You have successfully tested your Kelvin SmartApp™.
Next Step
After successfully testing your Kelvin SmartApp™, we can now move onto packaging and uploading it to your Kelvin Cloud instance.