Create Kelvin SmartApp™

On this page you will learn how to create and configure a Kelvin SmartApp™.
Version used in Video Tutorial = v5.13
This demonstration video was done in v5.13 using the latest application structures.
Video Guide
Watch this quick start guide performed in real time in less than 8 minutes.
Written Guide
Create Folder
Type the following command to create a Kelvin SmartApp™:
| Kelvin SDK Command Line Example | |
|---|---|
1 | |
Kelvin SDK will create a new folder named after the project name and automatically create the required files and add a sample Python program for reference. You can now open the folder in your favorite IDE (like Visual Studio Code) and start to modify the files.
Below is a brief description of each file.
| File | Description |
|---|---|
| app.yaml | The app.yaml file serves as the configuration file for the Kelvin SmartApp™, detailing specific parameters and settings of the app. We will modify this file as part of this tutorial in the next couple of steps.You can read more about the |
| main.py | The main.py is used as the entry point of this Kelvin SmartApp™. When it runs, main.py is typically the first script that gets executed, and it usually contains the main logic or orchestrates the flow of apps. We will modify this file as part of this tutorial in the next couple of steps.You can read more about the |
| requirements.txt | This is a list of Python libraries that need to be installed when compiling the Kelvin SmartApp™. This is treated like any normal Python requirements.txt file.The sample You can read more about the |
| Dockerfile | This is a standard Dockerfile that is used to compile the Kelvin SmartApp™ into a Docker image. The sample Dockerfile comes with the minimum steps required. This is adequate for this example and does not require any changes. You can read more about the |
| ui_schemas/configuration.json | This JSON file contains all the information on how to display the Kelvin SmartApp™ configurations in the Kelvin UI. For example, you can define custom titles or set min/max limit inputs, etc. This is optional, and if not provided, the Kelvin UI will display the configuration settings in a raw JSON or YAML file format without verifying the structure or content before applying them to the Kelvin SmartApp™. |
| ui_schemas/parameters.json | This JSON file contains all the information on how to display the Kelvin SmartApp™ parameters in the Kelvin UI. For example, you can define custom titles or set min/max limit inputs, etc. This is optional, and if not provided, the Kelvin UI will display a simple UI interface with the keys as the titles and no restrictions beyond the type of input. |
Inputs and Outputs
The Kelvin SmartApp™ stands out for its seamless integration with streaming data. As a developer, you're given a simplified interface. Simply define:
- Inputs: The streaming data your app will consume.
- Outputs: The streaming data your app will produce.
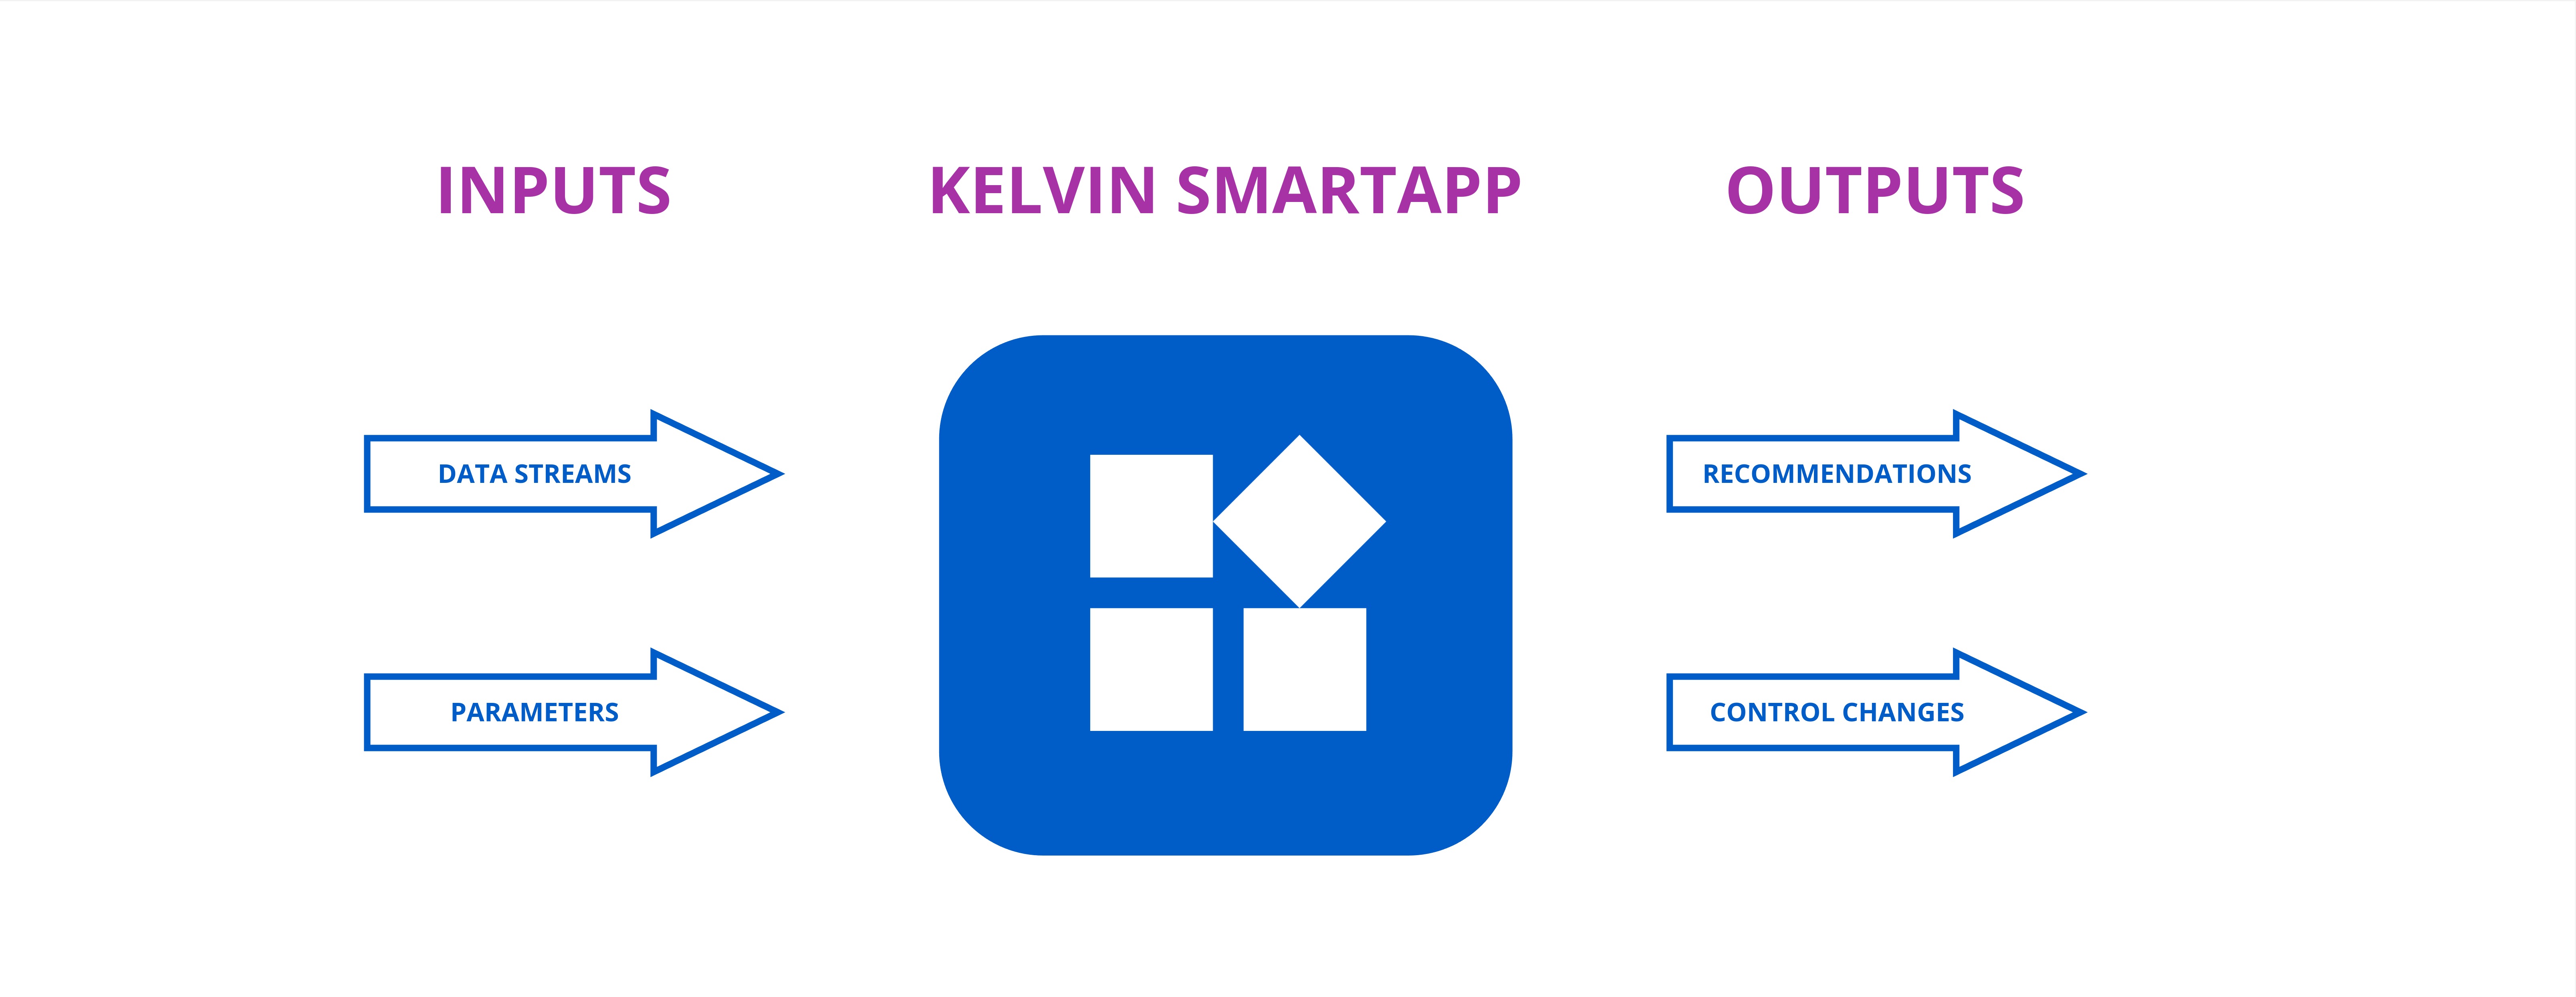
Kelvin takes care of the rest, ensuring reliable communication, fault-tolerance, data serialization, and data integrity.
Data Types
When declaring your inputs and outputs you will need to define the data_type.
Check out our concepts page to understand what a data_type is and what options you have available.
Define Inputs
Inputs are specified within the app.yaml file. Each input requires:
- A unique name to identify the input. This will be used in the Python code to reference the input. It must contain only lowercase alphanumeric characters. The characters
.,_and-are allowed to separate words instead of a space BUT can not be at the beginning or end of the name. - An expected data type, which can be:
number,boolean,stringor an object. All are self-explanatory except object
For this guide, the Event Detection SmartApp is monitoring a motor's temperature.
Edit the app.yaml and add the following input:
| app.yaml Example | |
|---|---|
1 2 3 4 | |
Define Outputs
Outputs, similar to inputs, are defined in the app.yaml file. Each output needs:
- A unique name to identify the output. This will be used in the Python code to reference the output. It must contain only lowercase alphanumeric characters. The characters
.,_and-are allowed to separate words instead of a space BUT can not be at the beginning or end of the name. - An expected data type, which can be:
number,boolean,string.
Additionally, some outputs might initiate control changes. For instance, the Event Detection SmartApp determines a need to modify a motor speed.
Edit the app.yaml and add the following output:
There are two types of output, data_streams and control_changes.
data_streams will write the value to the Asset/Data Stream pair on the Kelvin Platform only.
control_changes will also send the value to the Asset at the edge through a Connector.
In this example we want to send this as a control change to the motor.
| app.yaml Example | |
|---|---|
1 2 3 4 | |
App Parameters
Kelvin SmartApps™ App Parameters allow developers to create dynamic, updatable variables that Operations can edit in the Kelvin UI.
The value of each App Parameter is unique to each Asset in a Kelvin SmartApp™, allowing Operations to set different values for each Asset individually.
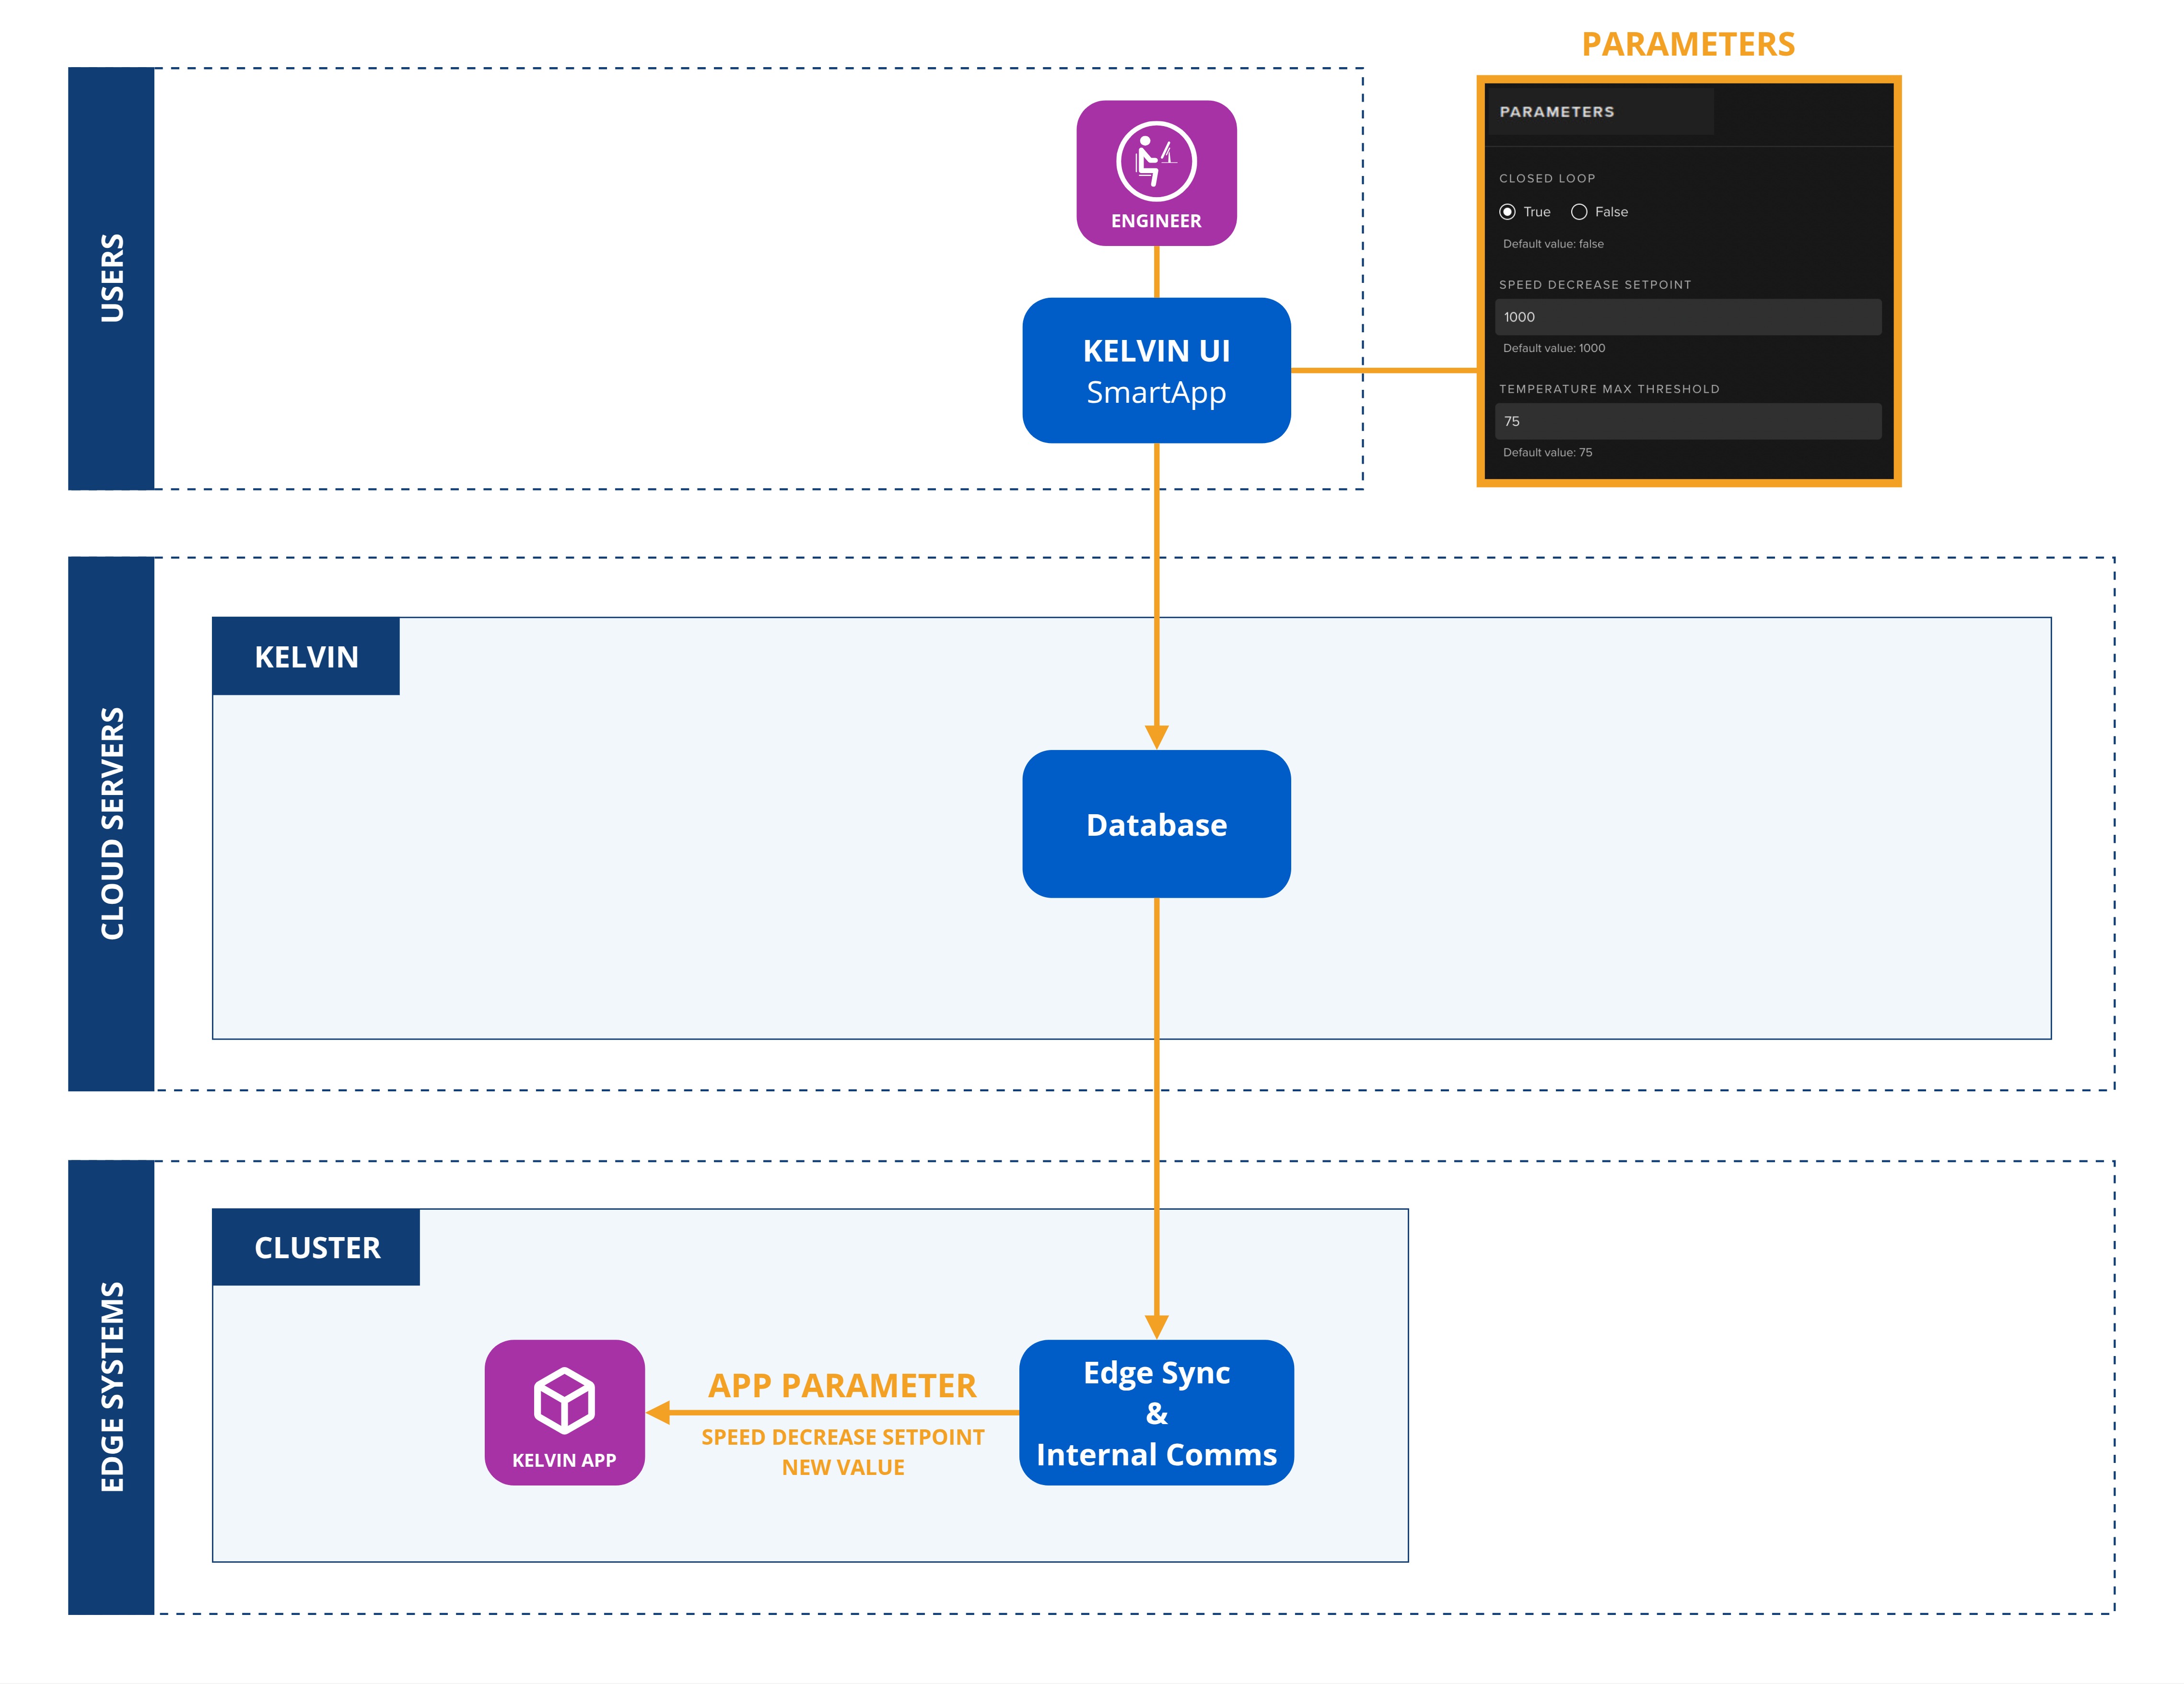
Define App Parameters
Kelvin SmartApp™ App Parameters are defined in three sections in the app.yaml file;
parametersdefines the name and type of the App Parameter.ui_schemasis a link to a JSON file containing all the information about how to display App Parameters in the Kelvin UI.defaults/parametersdefine the default values assigned to each Asset when it is first created or when a Kelvin SmartApp™ update introduces a new App Parameter to existing Assets.
App Parameters and default values are also defined in the app.yaml file as follows:
| app.yaml Example | |
|---|---|
1 2 3 4 5 6 7 8 9 10 11 12 13 14 15 16 | |
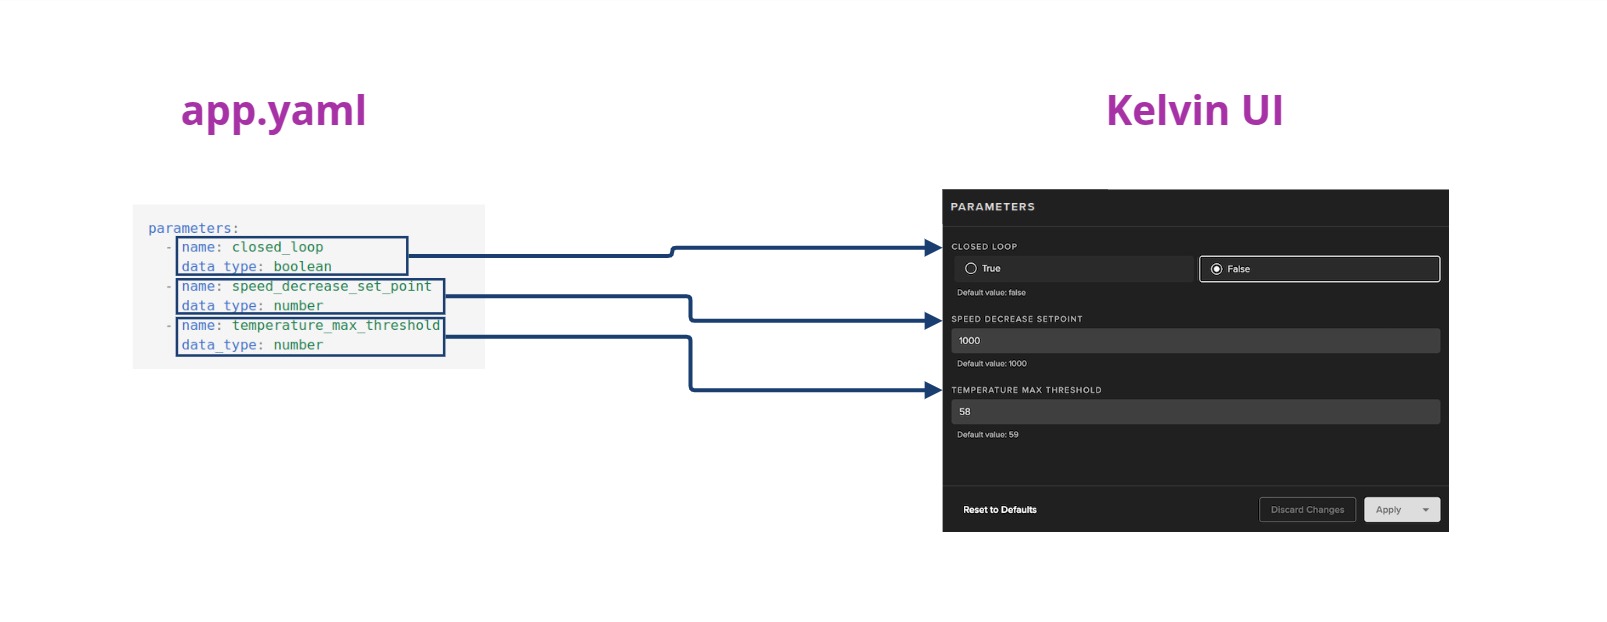
The actual schema on how App Parameters will look and act in the Kelvin UI is kept in a JSON file.
ui_schemas/parameters.json
| Default ui_schemas/parameters.json | |
|---|---|
1 2 3 4 5 6 7 8 9 10 11 12 13 14 15 16 17 18 19 20 21 22 23 24 25 26 | |
Which will be displayed on the Kelvin UI as:
Final app.yaml
Your final app.yaml file with Inputs, Outputs and App Parameters should look like:
| app.yaml Example | |
|---|---|
1 2 3 4 5 6 7 8 9 10 11 12 13 14 15 16 17 18 19 20 21 22 23 24 25 26 27 28 29 30 31 32 33 34 35 36 37 38 39 40 41 42 43 44 45 46 47 48 49 50 51 | |
Next, we’ll proceed to the Python code.
Python Code
The main.py file defines the code that will be executed by the Kelvin SmartApp™. In the case of the Event Detection SmartApp we want the code to be like this:
| main.py Python Example | |
|---|---|
1 2 3 4 5 6 7 8 9 10 11 12 13 14 15 16 17 18 19 20 21 22 23 24 25 26 27 28 29 30 31 32 33 34 35 36 37 38 39 40 41 42 43 44 45 46 47 48 49 50 51 52 53 | |
Code Explanation
This script establishes a connection to the Kelvin system and sets up a Python Async Generator (Stream) to listen for motor_temperature messages. The script continuously monitors incoming motor temperature data and reacts according to predefined parameters.
-
Temperature Monitoring: The script listens for motor temperature messages via an asynchronous stream.
-
Threshold Check: Upon receiving a temperature message, the script compares the temperature value (payload) to a predefined threshold, specified by the temperature_max_threshold App Parameter.
-
Control Action: If the received temperature exceeds the temperature_max_threshold, the script triggers an action based on the closed_loop parameter:
-
closed_loop=True: The script sends a direct Control Change command to the Kelvin system to adjust the motor speed to the value specified by speed_decrease_set_point. -
closed_loop=False: The script sends a Recommendation to adjust the motor speed to the speed_decrease_set_point value, without making the change directly. This Recommendation will be shown on the Kelvin UI for users to accept or reject.
-
-
Continuous Operation: The Async Generator (Stream) operates in a loop, constantly checking for new motor temperature messages and applying the logic described above as needed.
Success
Congratulations! You have successfully created your Kelvin SmartApp™.
Next Step
Once you have successfully created your first SmartApp, it's crucial to test it locally to ensure it works as expected. Local testing allows you to catch and fix issues early, improving the quality and reliability of your app.
Let's now move on to testing this SmartApp.