Asset - How to
Asset Type
Reference:
| Field | Description |
|---|---|
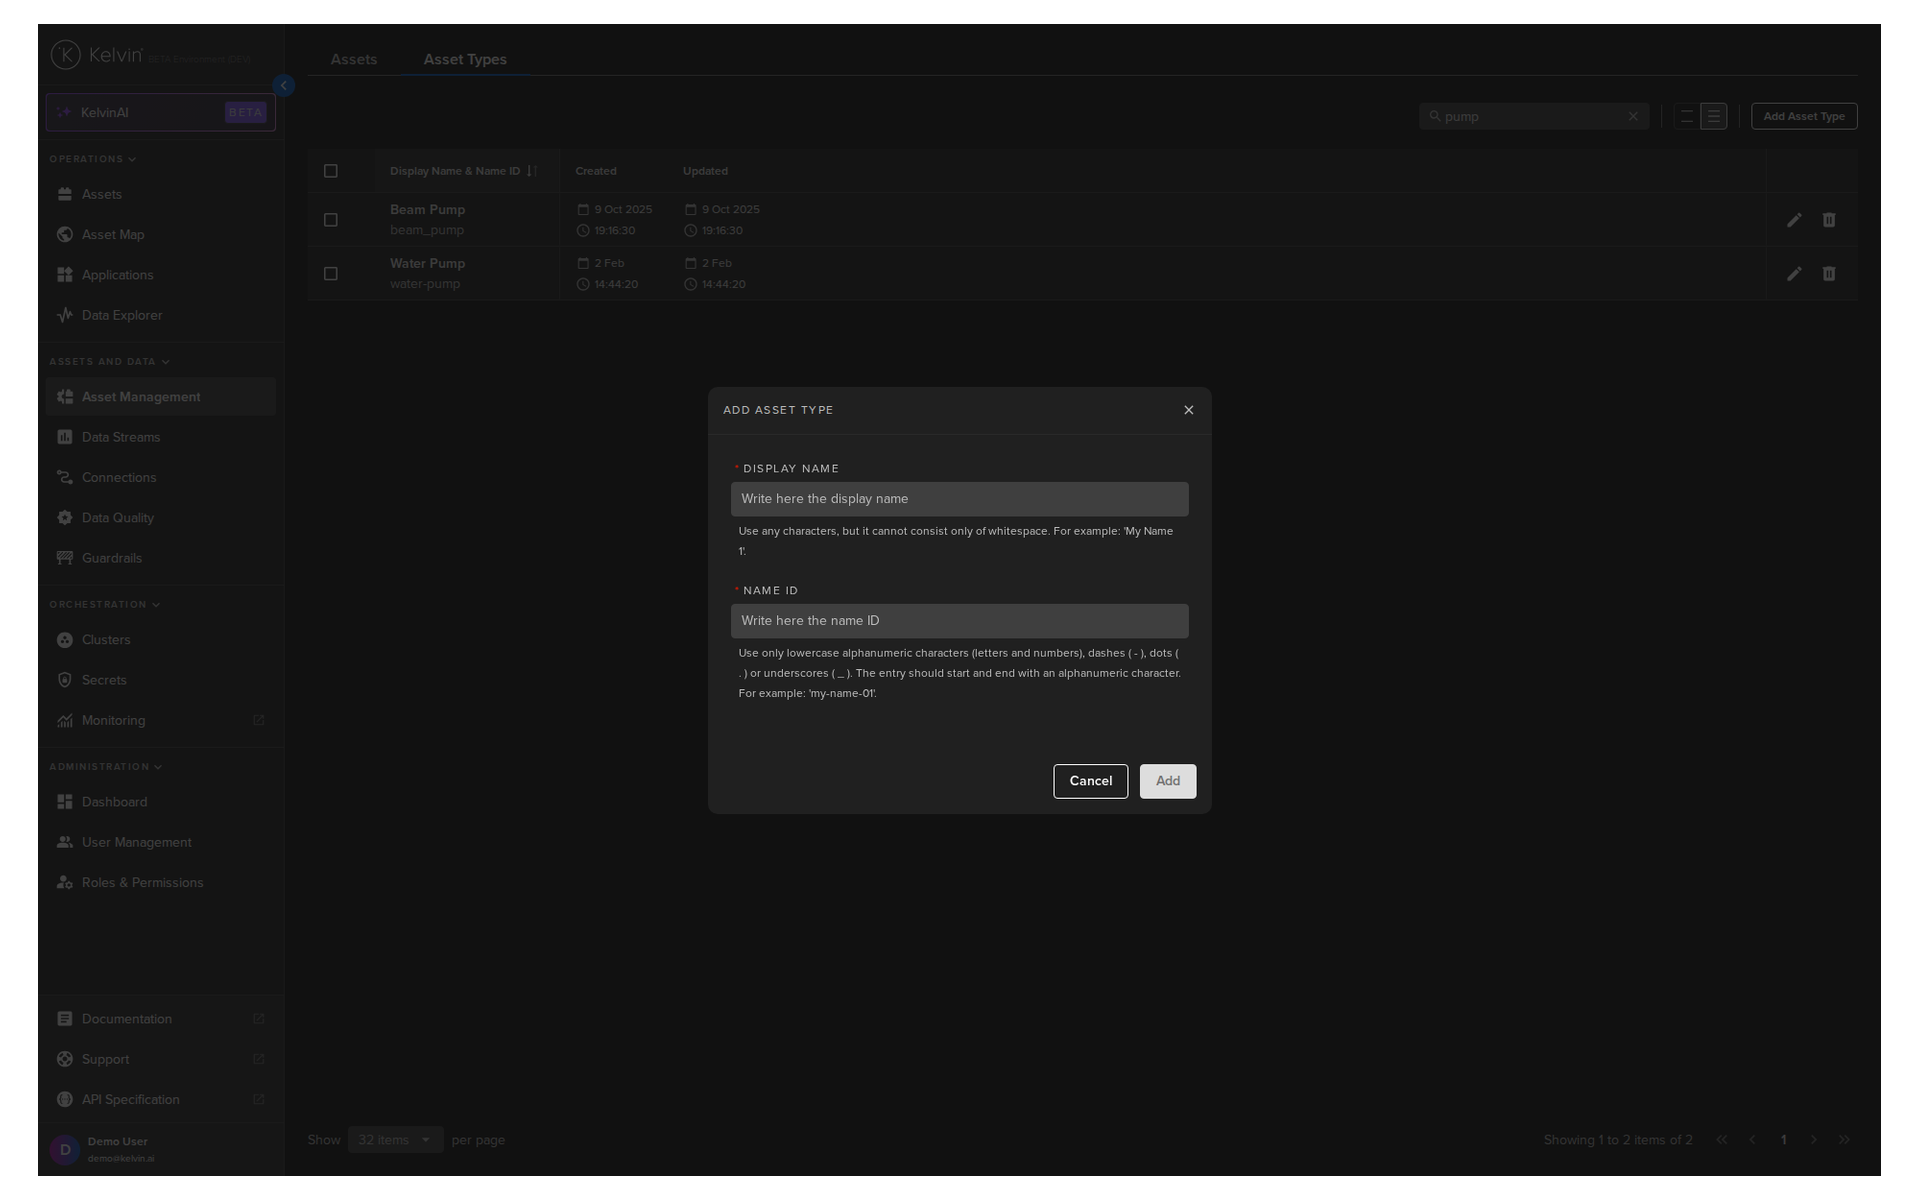
| Name (Name ID) | Unique name identifier. It must contain only lowercase alphanumeric characters. The characters ., _ and - are allowed to separate words instead of a space BUT can not be at the beginning or end of the name. |
| Title (Display Name) | The display name to show on the Kelvin UI. It can contain any characters, including spaces. |
Create Asset Type
In this example we will create an Asset Type.
Asset Types can be managed from the Administration section of the UI.
Do not get confused with the Asset management in the Operations section which is designed for the Production Engineers.
You can watch this short demo video or read the full step-by step written tutorial below.
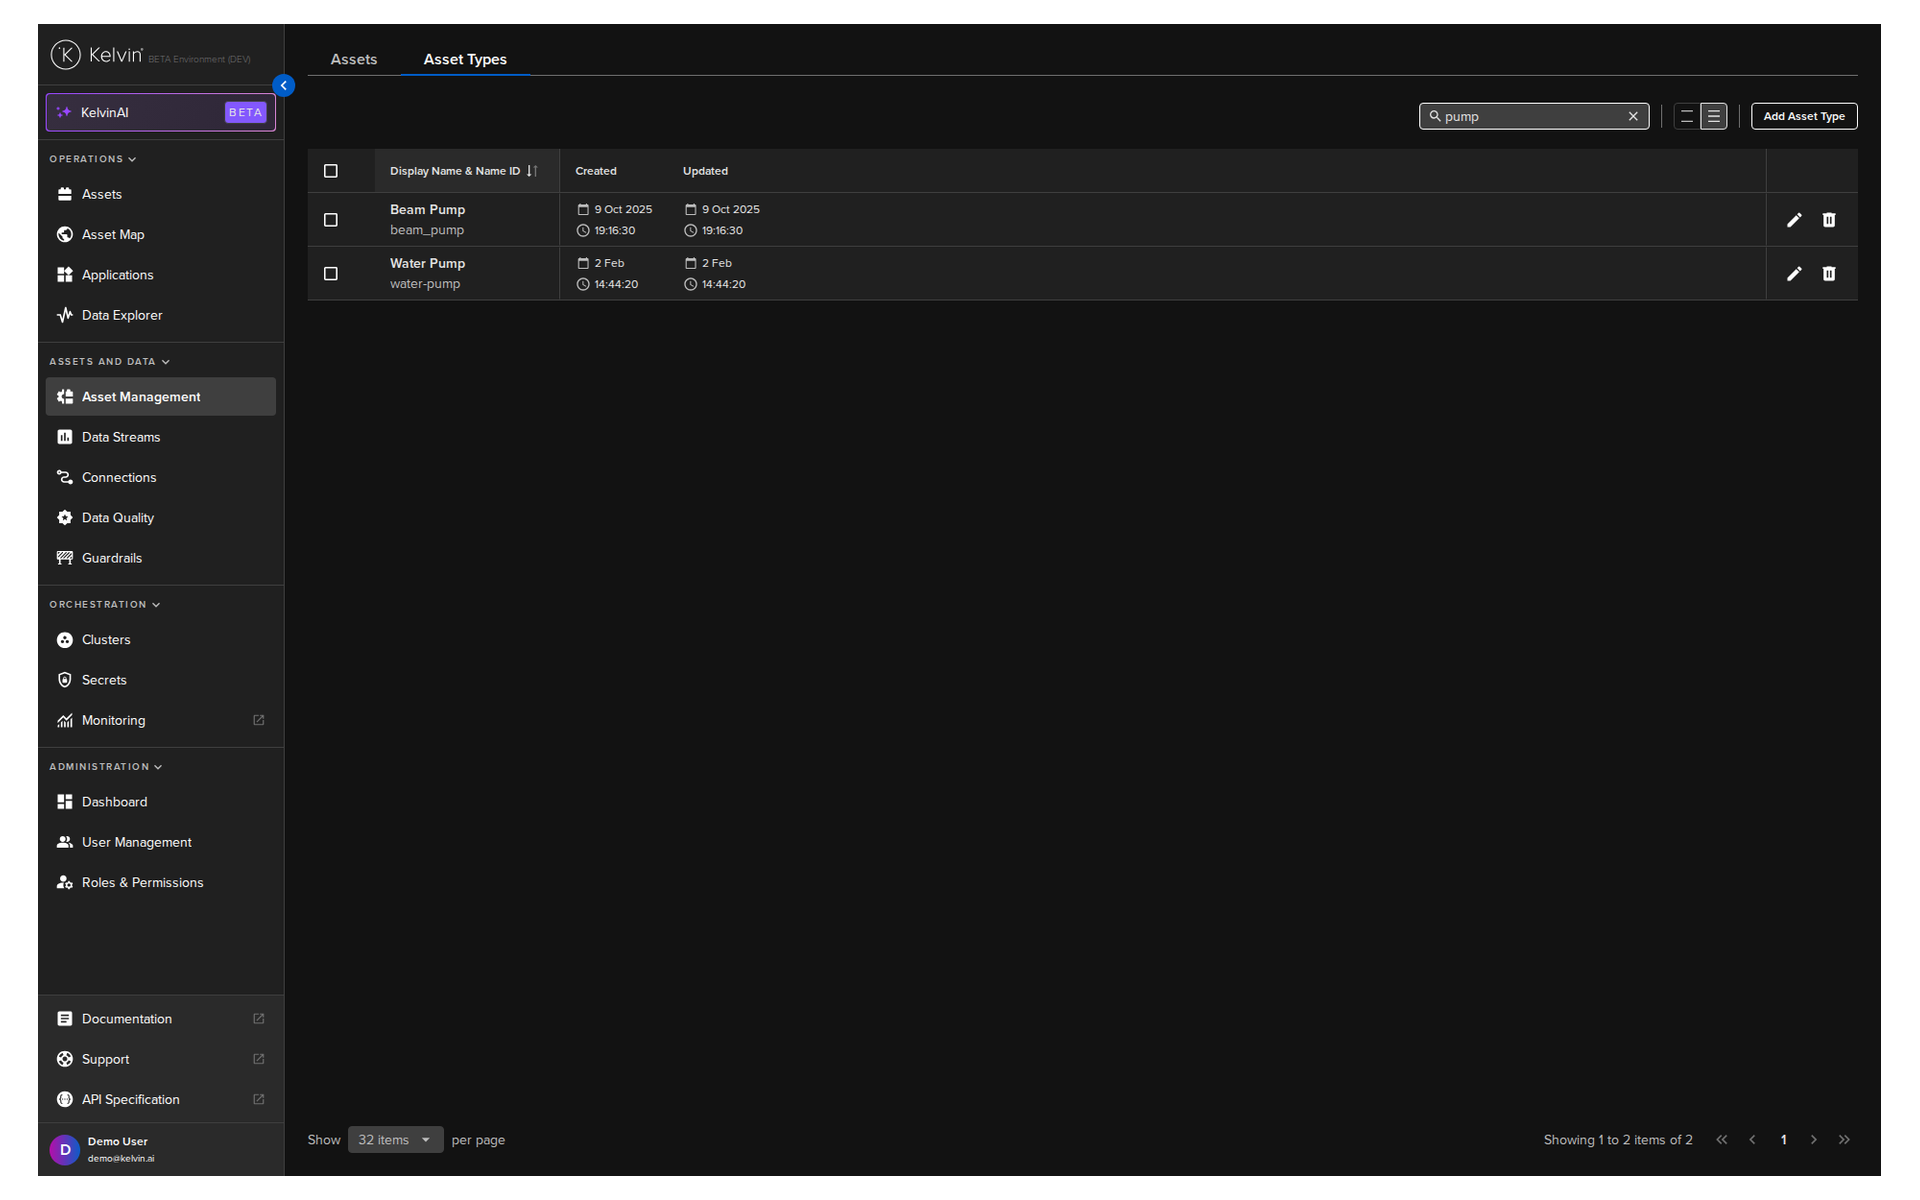
To start, go to the Assets in the Administration section of the left side bar and then click on the Asset Types tab.
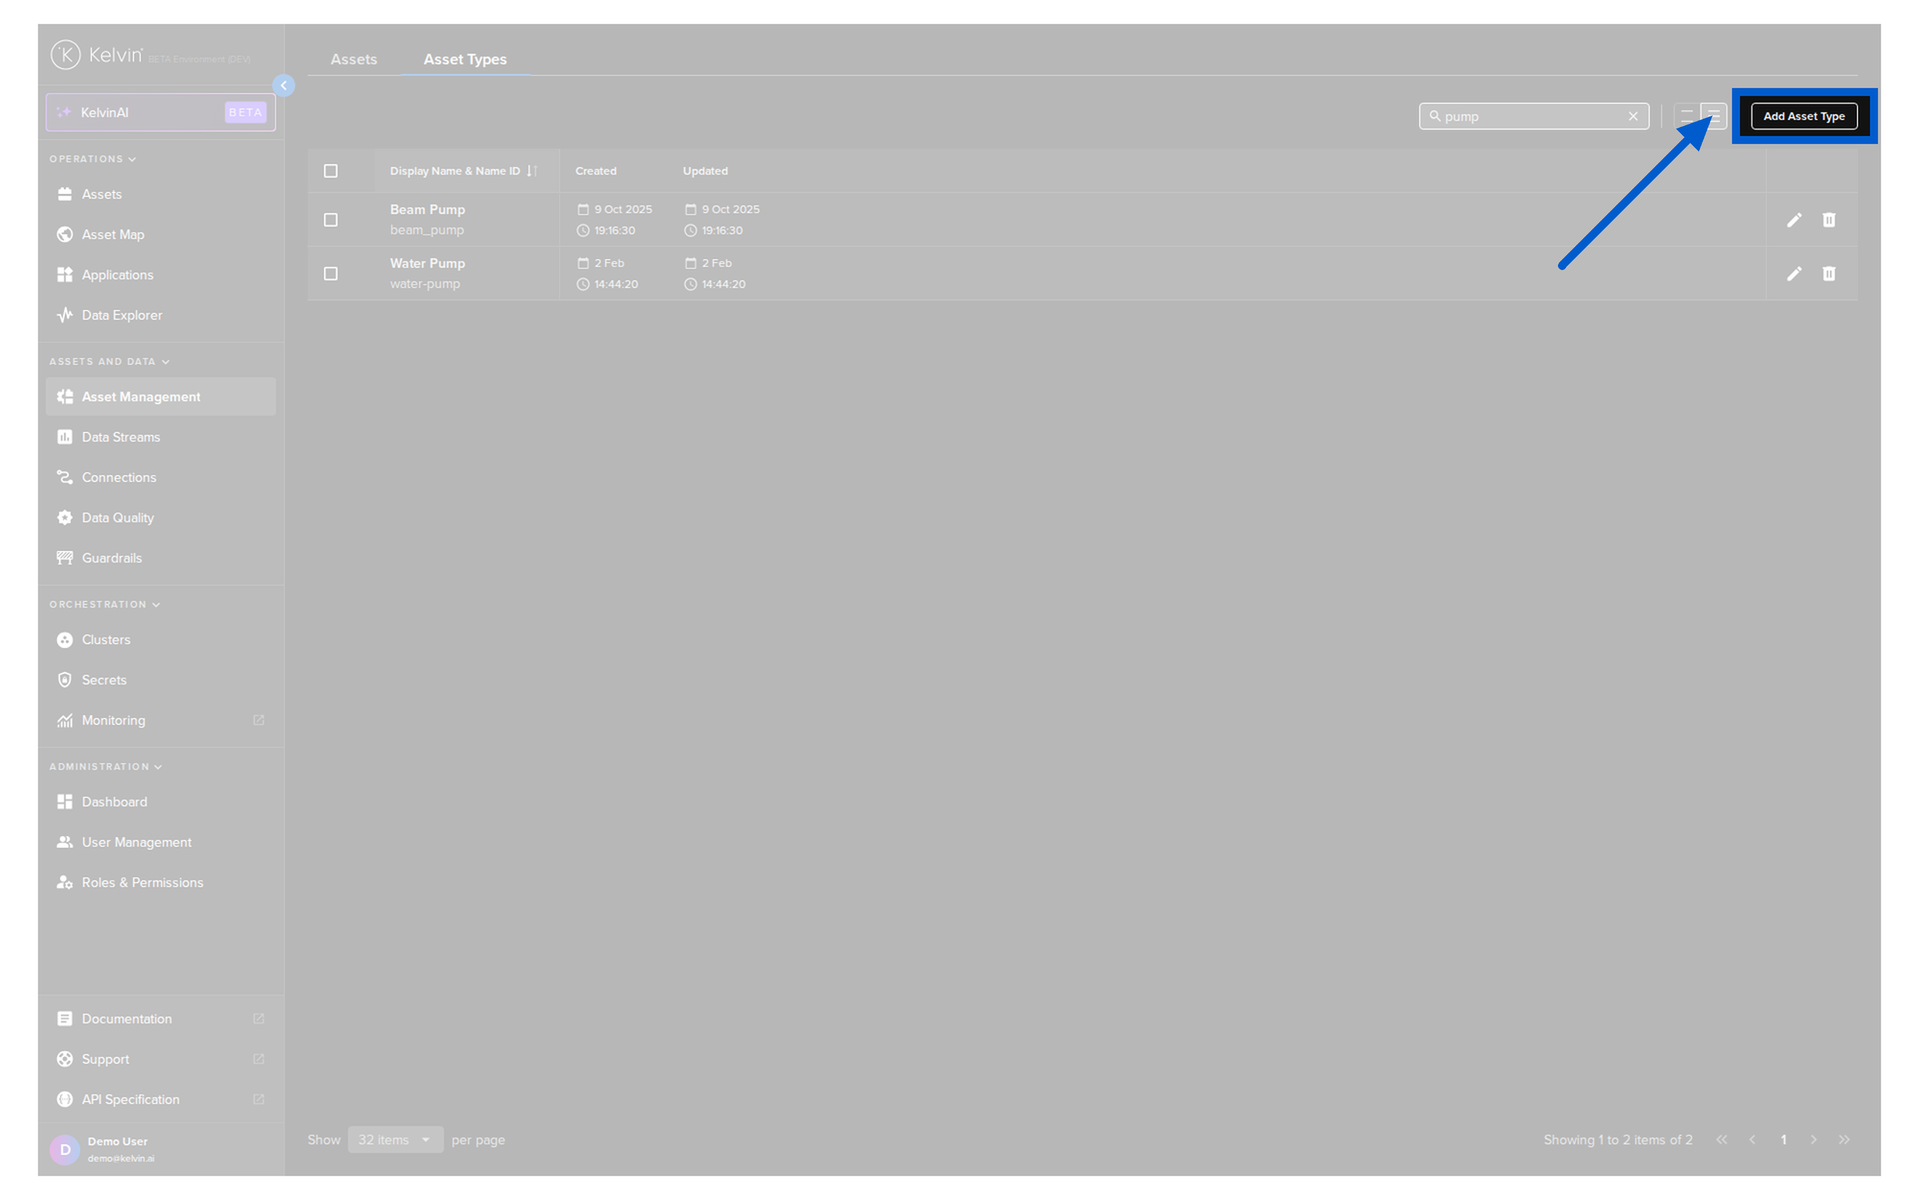
To add an Asset Type, click on the Add Asset Type button;
Then type in the Asset Type details and click Add.
curl -X 'POST' \
'https://<url.kelvin.ai>/api/v4/assets/types/create' \
-H 'Authorization: Bearer <Your Current Token>' \
-H 'accept: application/json' \
-H 'Content-Type: application/json' \
-d '{
        "name": "doc_demo_asset_type",
        "title": "Documentation Demo Asset Type"
    }'
You will get a response similar to this;
<Response [201]>
{"name":"doc_demo_asset_type","title":"Documentation Demo Asset Type","created":"2024-05-23T08:53:28.650245Z","updated":"2024-05-23T08:53:28.650245Z"}
from kelvin.api.client import Client

# Login
client = Client(config={"url": "https://<url.kelvin.ai>", "username": "<your_username>"})
client.login(password="<your_password>")

# Create Asset Type
response = client.asset.create_asset_type(data={
    "name": "doc_demo_asset_type",
    "title": "Documentation Demo Asset Type"
})

print(response)
You will get a response similar to this;
created=datetime.datetime(2024, 5, 23, 8, 52, 7, 803281, tzinfo=datetime.timezone.utc) name='doc_demo_asset_type' title='Documentation Demo Asset Type' updated=datetime.datetime(2024, 5, 23, 8, 52, 7, 803281, tzinfo=datetime.timezone.utc)
Update Asset Type
Updating an Asset Type closely mirrors its creation process. However, the name of the Asset Type is non-editable. To modify the name, you must create a new Asset Type.
Asset Types can be managed from the Administration section of the UI.
Do not get confused with the Asset management in the Operations section which is designed for the Production Engineers.
To start, go to the Assets in the Administration section of the left side bar and then click on the Asset Types tab.
To edit an Asset Type, click on the pencil icon on the right hand side of of an Asset Type row;

Then a popup will be displayed where you can edit the Title of an Asset Type.

curl -X 'POST' \
'https://<url.kelvin.ai>/api/v4/assets/types/doc_demo_asset_type/update' \
-H 'Authorization: Bearer <Your Current Token>' \
-H 'accept: application/json' \
-H 'Content-Type: application/json' \
-d '{
        "title": "Updated Demo Asset Type"
    }'
You will get a response similar to this;
<Response [200]>
{"name":"doc_demo_asset_type","title":"Updated Demo Asset Type","created":"2024-05-23T08:53:28.650245Z","updated":"2024-05-23T08:53:29.891434Z"}
from kelvin.api.client import Client

# Login
client = Client(config={"url": "https://<url.kelvin.ai>", "username": "<your_username>"})
client.login(password="<your_password>")

# Update Asset Type
response = client.asset.update_asset_type(
    asset_type_name="doc_demo_asset_type",
    data={
        "title": "Updated Demo Asset Type"
    }
)

print(response)
You will get a response similar to this;
created=datetime.datetime(2024, 5, 23, 8, 52, 7, 803281, tzinfo=datetime.timezone.utc) name='doc_demo_asset_type' title='Updated Demo Asset Type' updated=datetime.datetime(2024, 5, 23, 8, 52, 14, 881512, tzinfo=datetime.timezone.utc)
Delete Asset Type
Deleting an Asset Type is very simple. The only information you need is the actual name of the Asset Type.
Asset Types can be managed from the Administration section of the UI.
Do not get confused with the Asset management in the Operations section which is designed for the Production Engineers.
To start, go to the Assets in the Administration section of the left side bar and then click on the Asset Types tab.
To delete an Asset Type, click on the rubbish bin icon on the right hand side of of an Asset Type row;
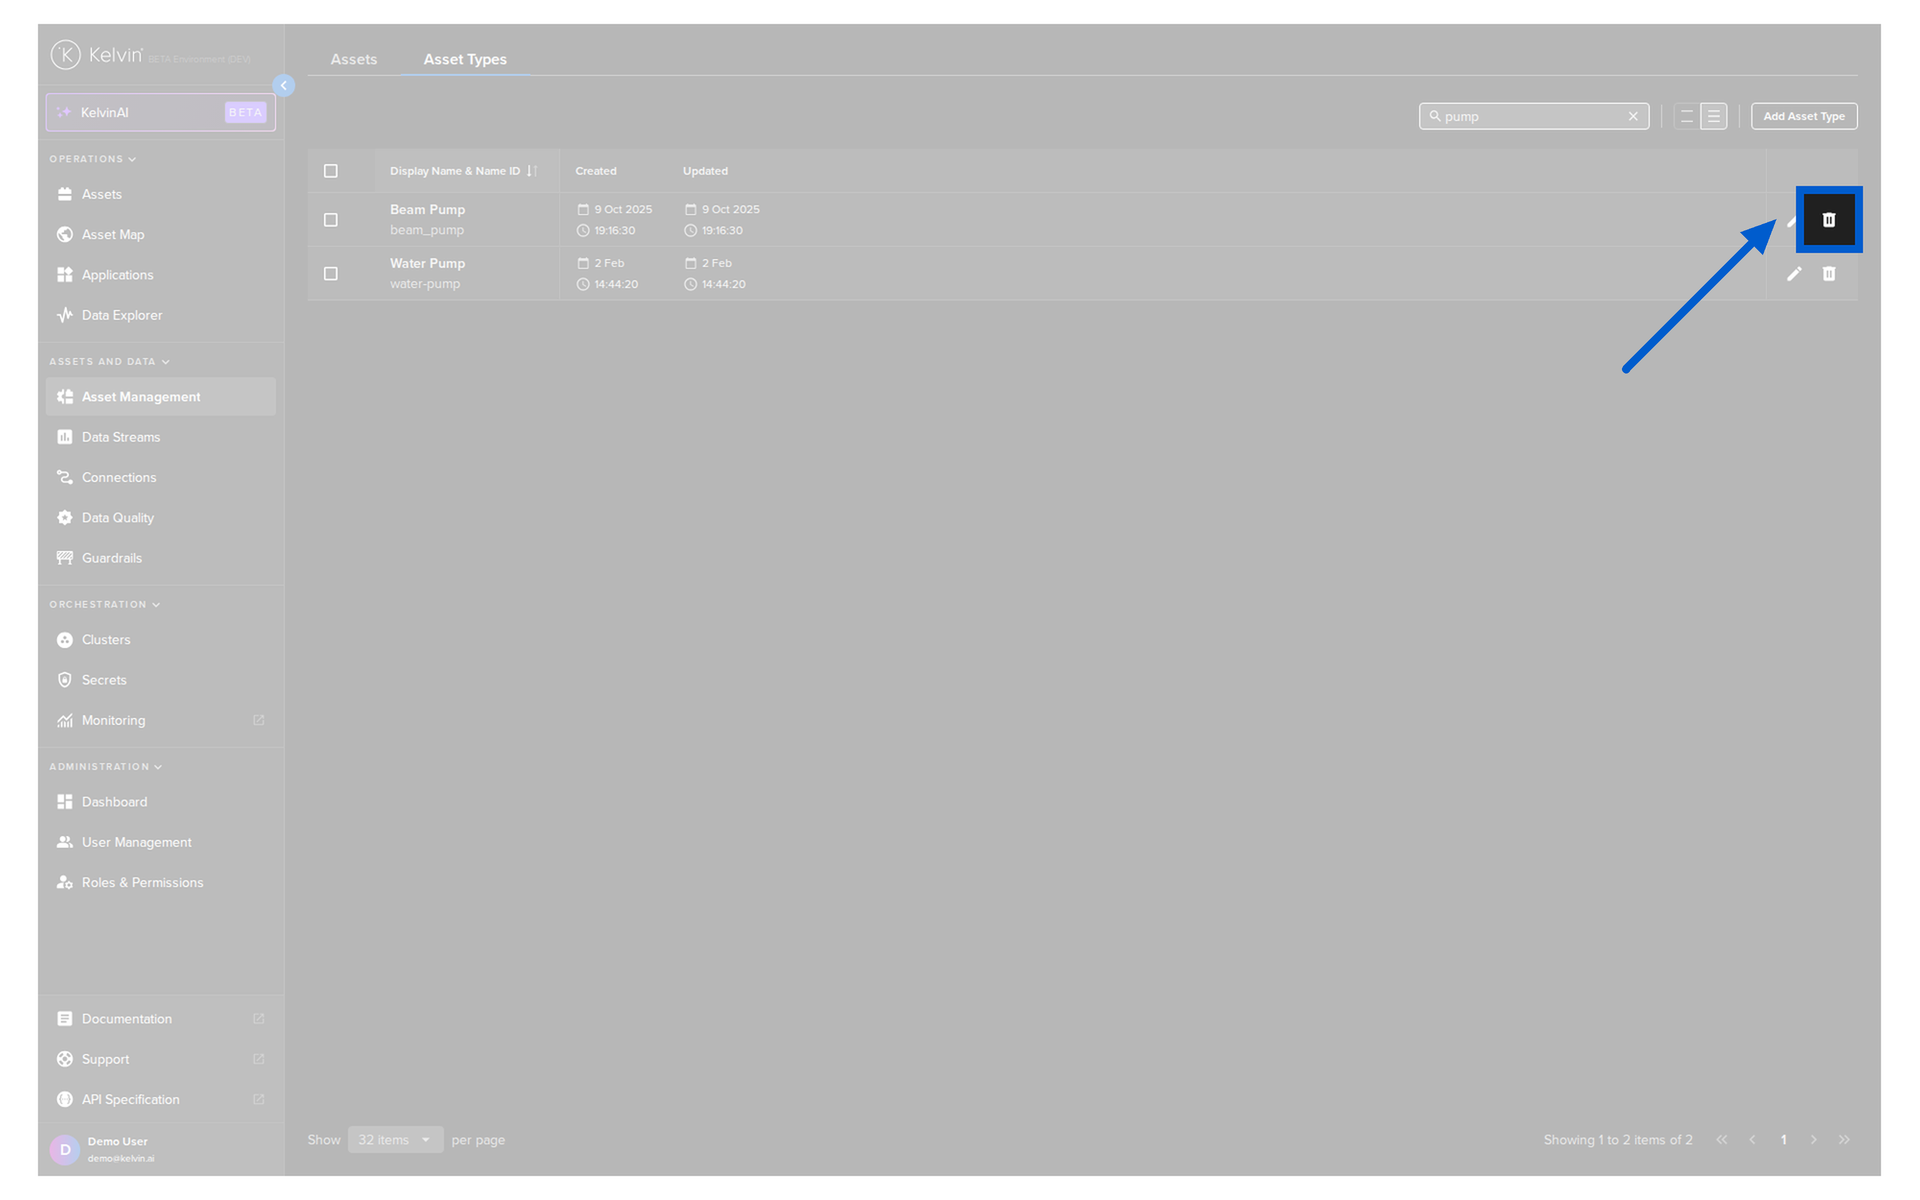
Then in the popup type PERMANENTLY DELETE to confirm the delete action.
curl -X 'POST' 'https://<url.kelvin.ai>/api/v4/assets/types/doc_demo_asset_type/delete'
-H 'Authorization: Bearer <Your Current Token>' \
-H 'accept: application/json' \
-d ''
You will get a response similar to this;
<Response [200]>
from kelvin.api.client import Client

# Login
client = Client(config={"url": "https://<url.kelvin.ai>", "username": "<your_username>"})
client.login(password="<your_password>")

# Delete Asset Type
response = client.asset.delete_asset_type(asset_type_name="doc_demo_asset_type")

print(response)
You will not receive a response;
Bulk Delete Asset Type
Deleting in bulk Asset Types is very simple. The only information you need is the actual name of each of the Asset Types.
Asset Types can be managed from the Administration section of the UI.
Do not get confused with the Asset management in the Operations section which is designed for the Production Engineers.
To start, go to the Assets in the Administration section of the left side bar and then click on the Asset Types tab.
To bulk delete Asset Types, select all the Asset Types you want to delete and then click the Delete button at the top;
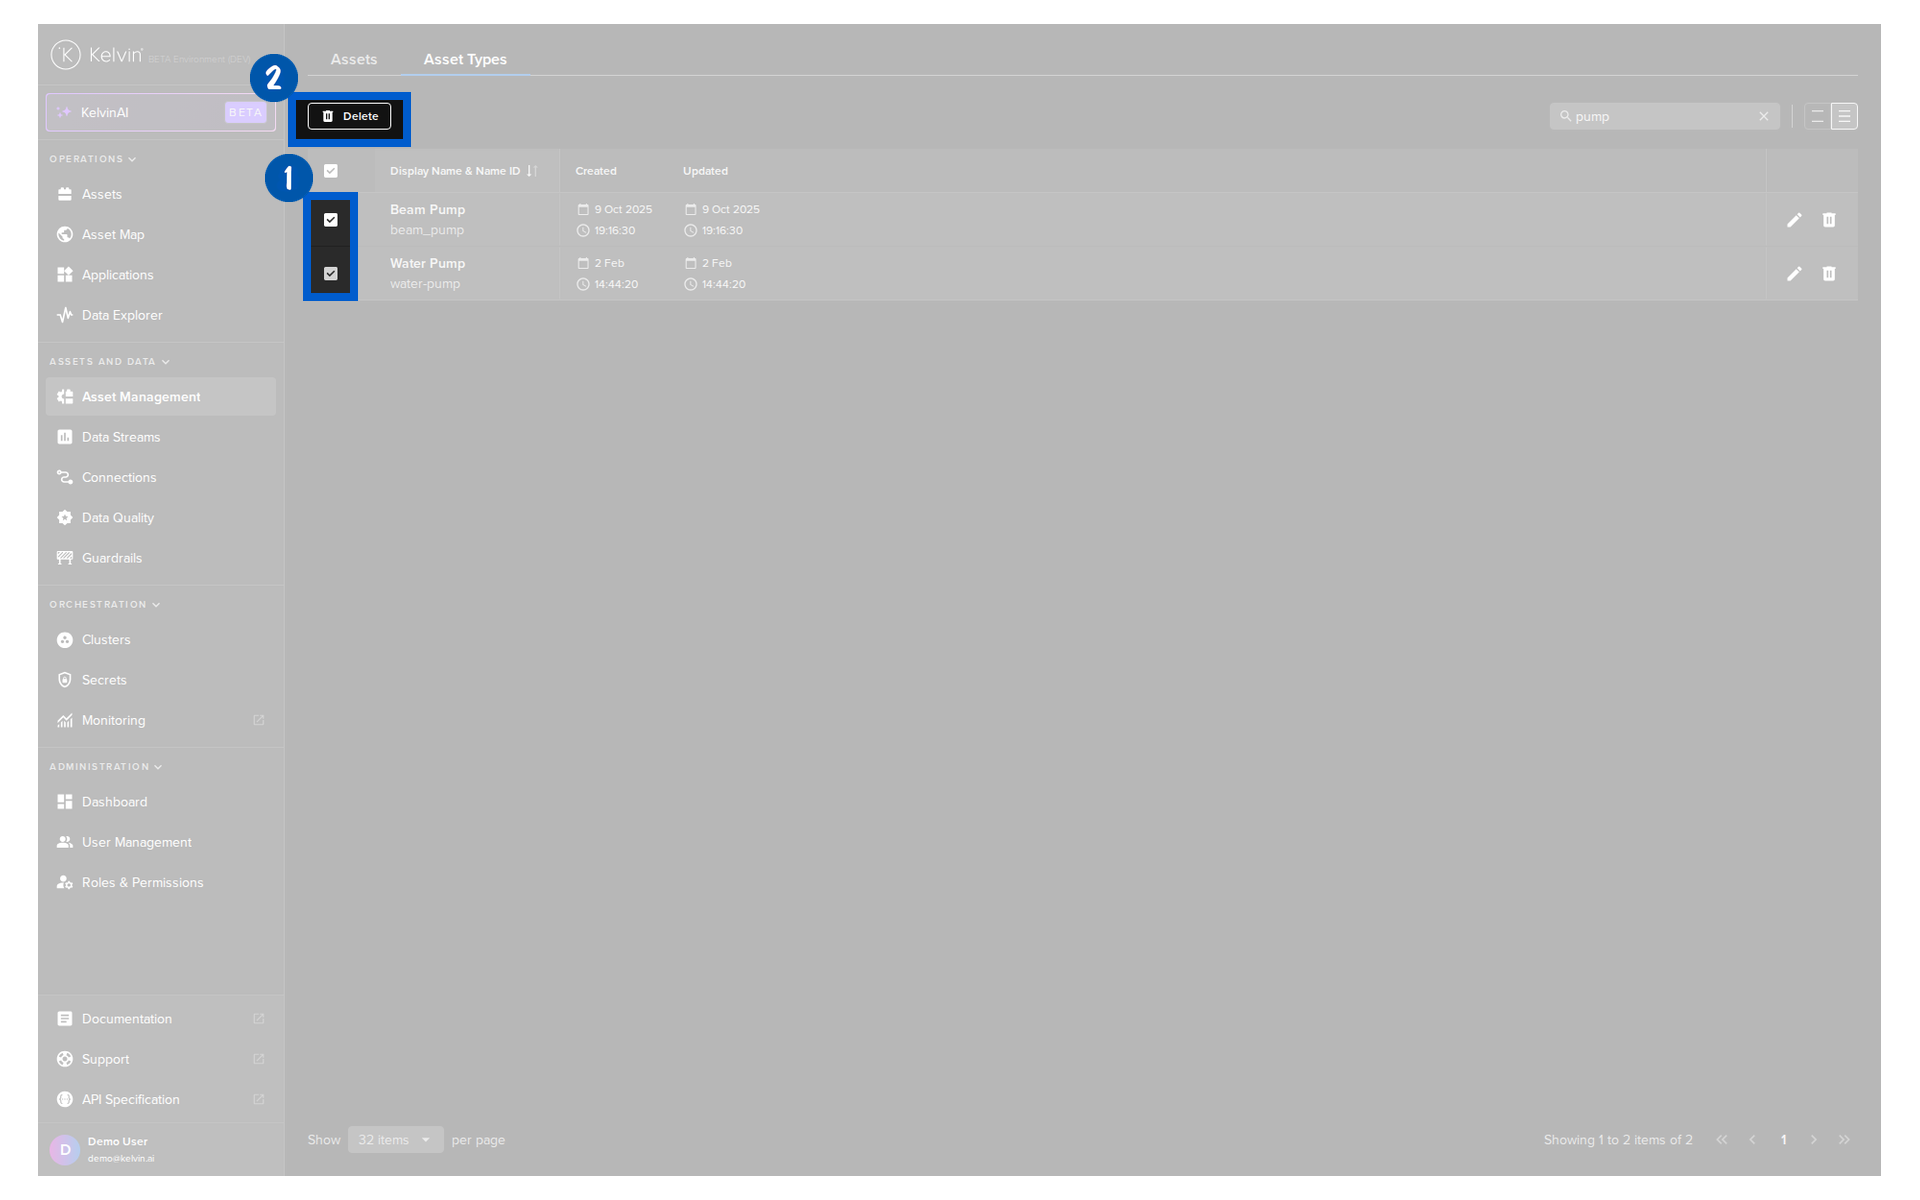
Then in the popup type PERMANENTLY DELETE to confirm the delete action.
curl -X 'POST' \
  'https://<url.kelvin.ai>/api/v4/assets/types/delete' \
-H 'Authorization: Bearer <Your Current Token>' \
-H 'accept: application/json' \
-H 'Content-Type: application/json' \
-d '{
"names": [
  "doc_demo_asset_type_01","doc_demo_asset_type_02","doc_demo_asset_type_03"
]
}'
You will get a response similar to this;
<Response [200]>
from kelvin.api.client import Client

# Login
client = Client(config={"url": "https://<url.kelvin.ai>", "username": "<your_username>"})
client.login(password="<your_password>")

# Delete Asset Types in Bulk
asset_type_names = {
  "names": [
    "doc_demo_asset_type_01",
    "doc_demo_asset_type_02",
    "doc_demo_asset_type_03"
  ]
}
response = client.asset.delete_asset_type_bulk(data=asset_type_names)

print(response)
You will not receive a response;
Asset
Reference:
| Field | Description |
|---|---|
| Name (Name ID) | Unique name identifier. It must contain only lowercase alphanumeric characters. The characters ., _ and - are allowed to separate words instead of a space BUT can not be at the beginning or end of the name. |
| Title (Display Name) | The display name to show on the Kelvin UI. It can contain any characters, including spaces. |
| Asset Type | The name of the Asset Type that this Asset belongs to. This must be a valid Asset Type name. |
| Properties | A list of key/value pairs that define custom properties of the asset. Use this to define attributes like: Location, Site, PLC Type, Manufacturer, Serial Number, etc. |
| Entity Type | Deprecated. Entity type should always be asset. |
| Parent Name | Deprecated. Parent should always be null. |
| Hierarchy | Deprecated. Hierarchy should always be an empty list []. |
Create Asset
In this example we will create an Asset.
Please make sure the Asset Type beam_pump exists before creating the Asset.
Assets can be managed from the Administration section of the UI.
Do not get confused with the Asset management in the Operations section which is designed for the Production Engineers.
You can watch this short demo video or read the full step-by step written tutorial below.
To start, go to the Assets in the Administration section of the left side bar.

To create a new Asset click on the Add Asset button;
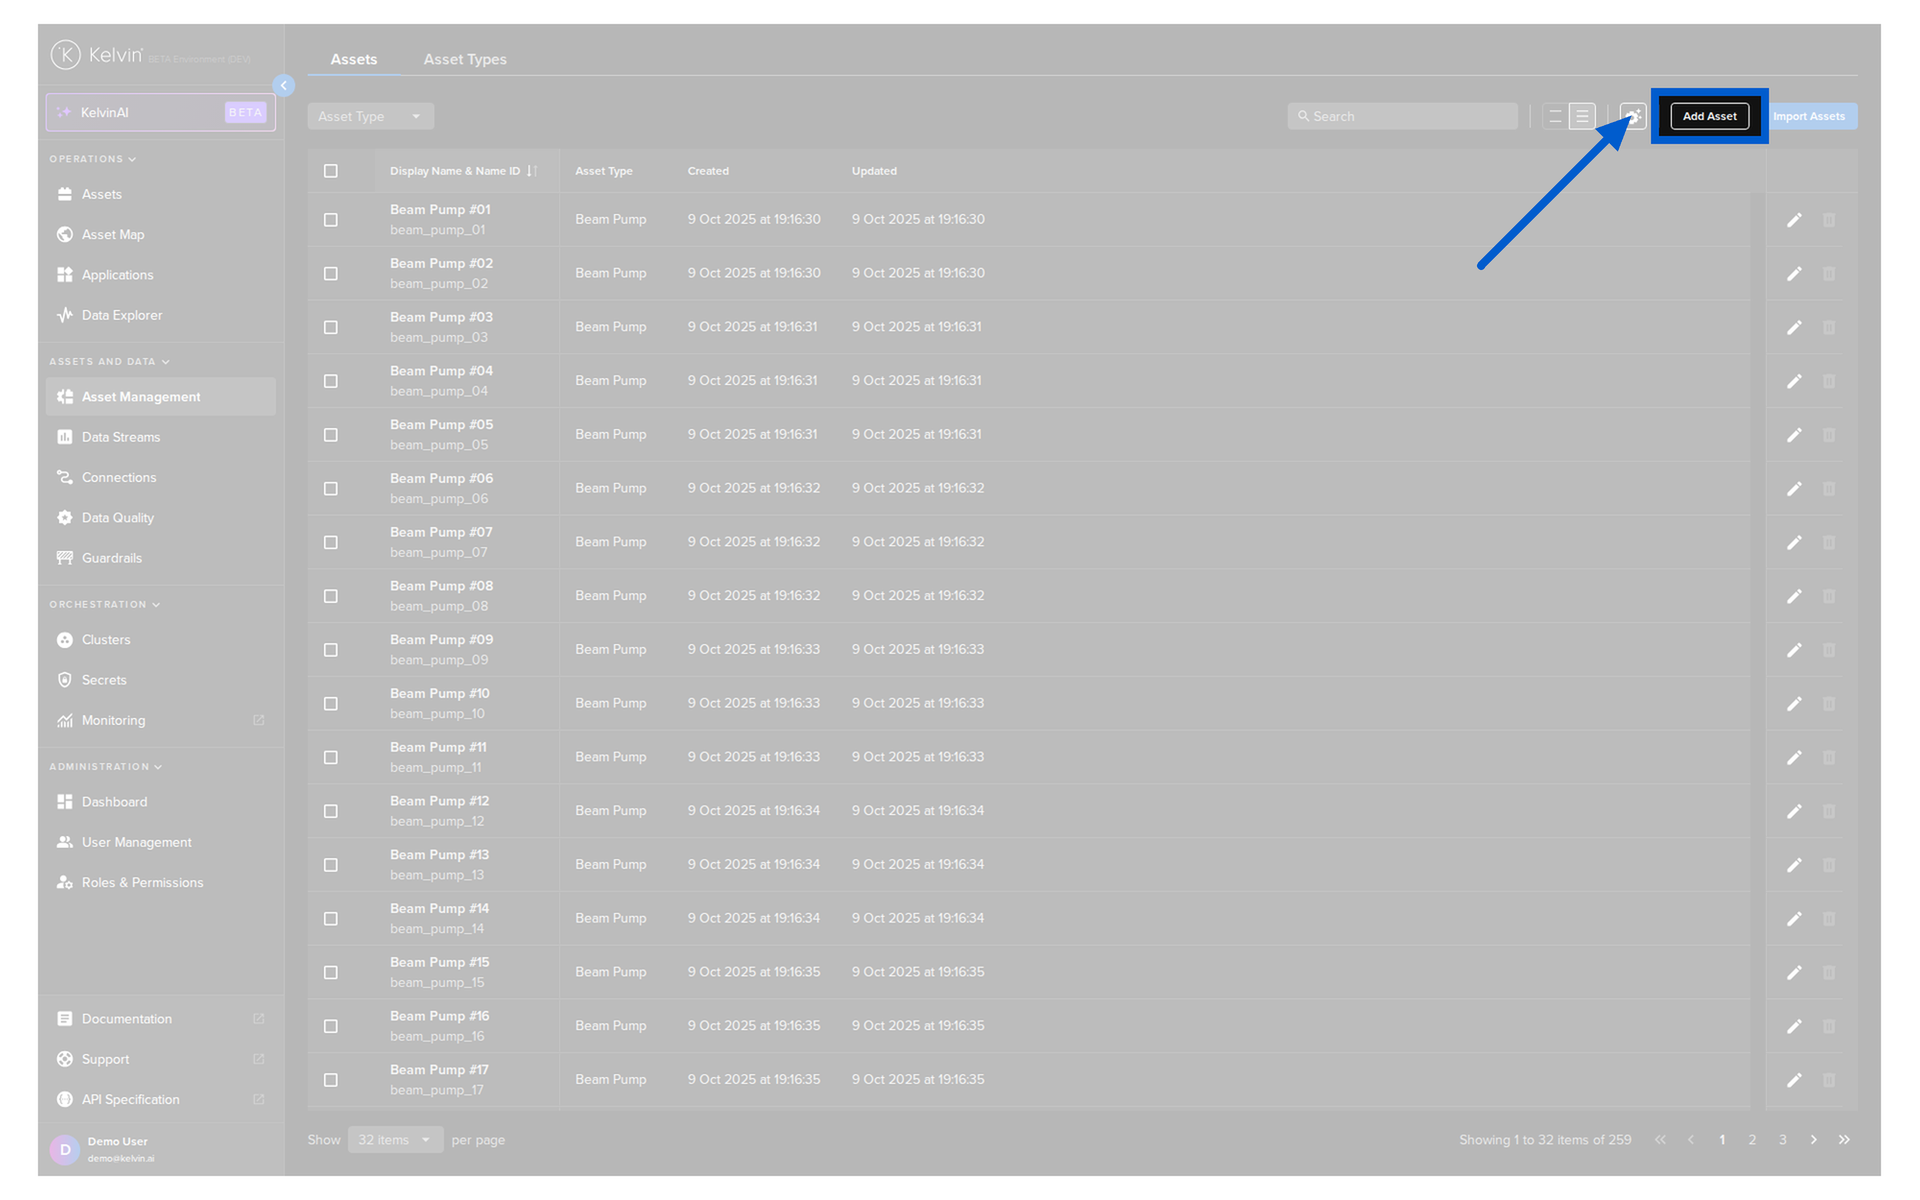
In Step 1, give your new Asset a Display Name, Name ID (optional, will be auto filled) and the Asset Type (must exist already) and then click Next.

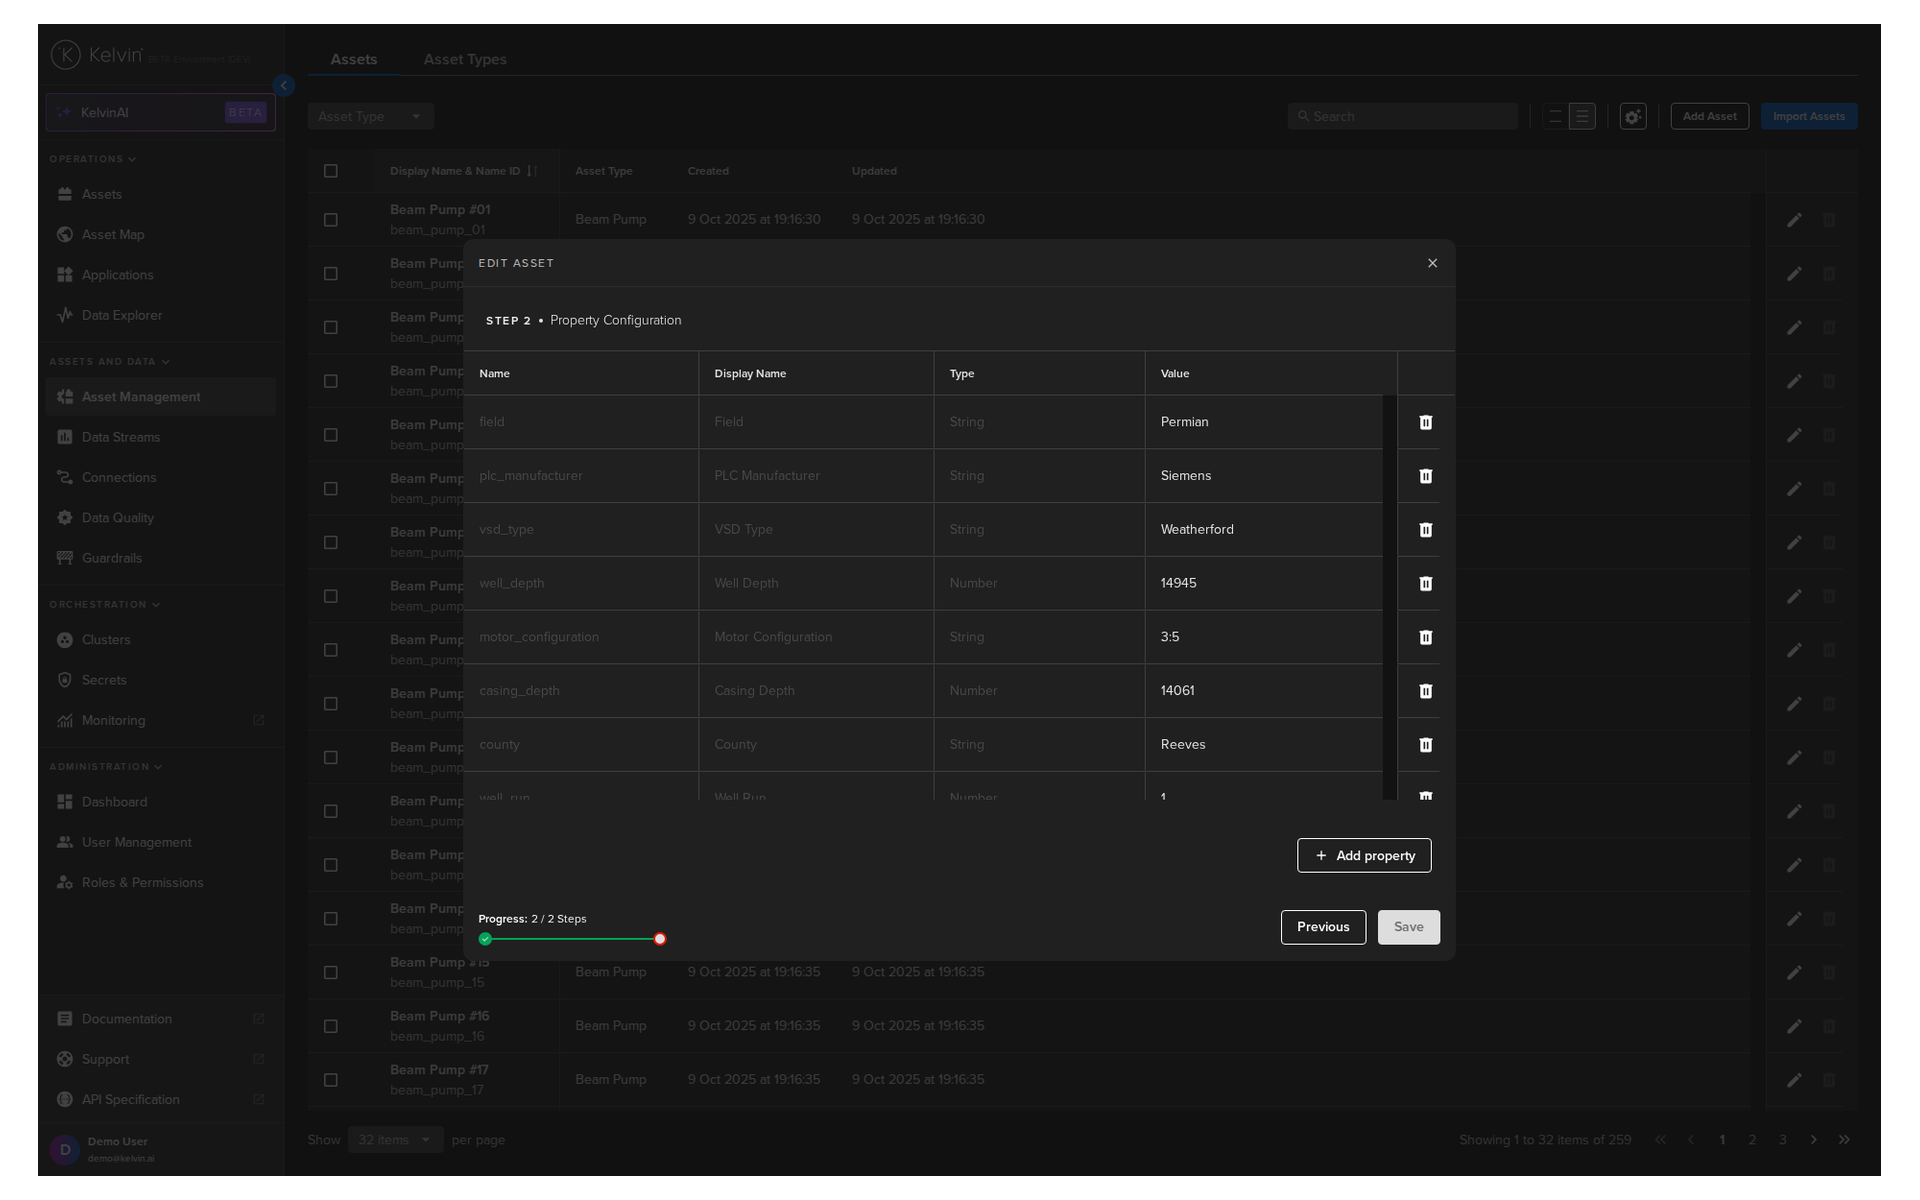
Then in Step 2 add any Asset Properties related to this Asset.
Asset Properties are any extra information you want to hold about an Asset. This can be retrieved by a Kelvin SmartApp™ for use in a program. For example you could have a Beam Pump 01 Asset, and then create an Asset Property Model to be able to distinguish between the Assets. This can be used to target the Kelvin SmartApp™ for only certain types of Models.
Once a Type is selected (Number, String or Boolean) you can no longer change this type when editing. You will need to make a new Property to select a new Type.
 .
.
When done your Asset Properties should look something like this;
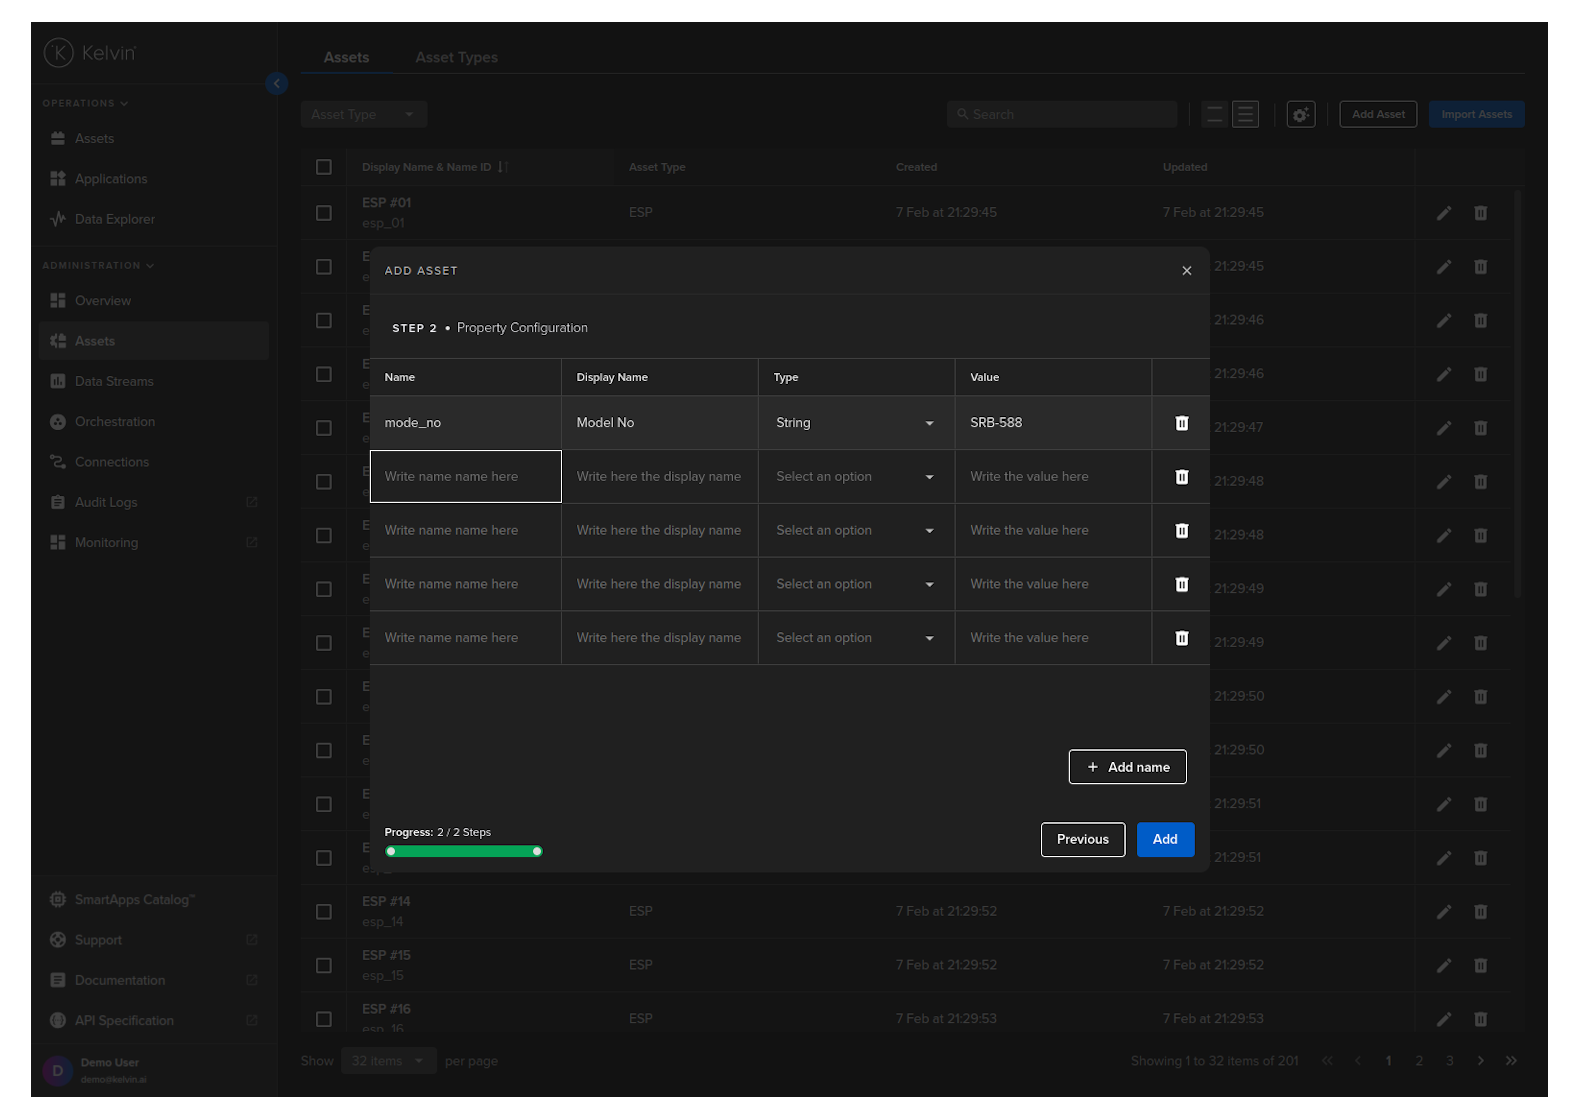
When finished, click Add and your Asset is created.
Adding properties will not work in the built-in Swagger tool provided by Kelvin. If you need to add properties, then you will need to use a different API client or use curl.
curl -X 'POST' \
'https://<url.kelvin.ai>/api/v4/assets/create' \
-H 'Authorization: Bearer <Your Current Token>' \
-H 'accept: application/json' \
-H 'Content-Type: application/json' \
-d '{
        "name": "doc_demo_asset",
        "title": "Documentation Demo Asset",
        "asset_type_name": "pcp",
        "properties": [
            {
              "name": "plc_manufacturer",
              "title": "PLC Manufacturer",
              "value": "Siemens"
            }
        ]
    }'
The response will look like this;
{
   "name":"doc_demo_asset",
   "title":"Documentation Demo Asset",
   "status":{
      "state":"unknown",
      "last_seen":null
   },
   "asset_type_name":"pcp",
   "asset_type_title":"Doc Demo Asset",
   "properties":[
      {
         "name":"plc_manufacturer",
         "title":"PLC Manufacturer",
         "value":"Siemens"
      }
   ],
   "created":"2024-04-27T04:00:32.747852Z",
   "updated":"2024-04-27T04:00:32.747852Z"
}
from kelvin.api.client import Client

# Login
client = Client(config={"url": "https://<url.kelvin.ai>", "username": "<your_username>"})
client.login(password="<your_password>")

# Create Asset
response = client.asset.create_asset(
    data={
        "name": "doc_demo_asset",
        "title": "Documentation Demo Asset",
        "asset_type_name": "pcp",
        "properties": [
            {
              "name": "plc_manufacturer",
              "title": "PLC Manufacturer",
              "value": "Siemens"
            },
        ]
    }
)

print(response)
You will get a response similar to this;
asset_type_name='pcp' asset_type_title='Progressing Cavity Pump' created=datetime.datetime(2024, 5, 23, 8, 52, 58, 422300, tzinfo=datetime.timezone.utc) name='doc_demo_asset' properties=[AssetProperty(name='plc_manufacturer', title='PLC Manufacturer', value='Siemens')] status=AssetStatusItem(last_seen=None, state=<AssetState.unknown: 'unknown'>) title='Documentation Demo Asset' updated=datetime.datetime(2024, 5, 23, 8, 52, 58, 422300, tzinfo=datetime.timezone.utc)
Bulk Create Assets
If you need to create multiple Assets at once, you can use the following example to create them in bulk.
You can create Assets in bulk using the import Assets option in Assets.
You can watch this short demo video or read the full step-by step written tutorial below.
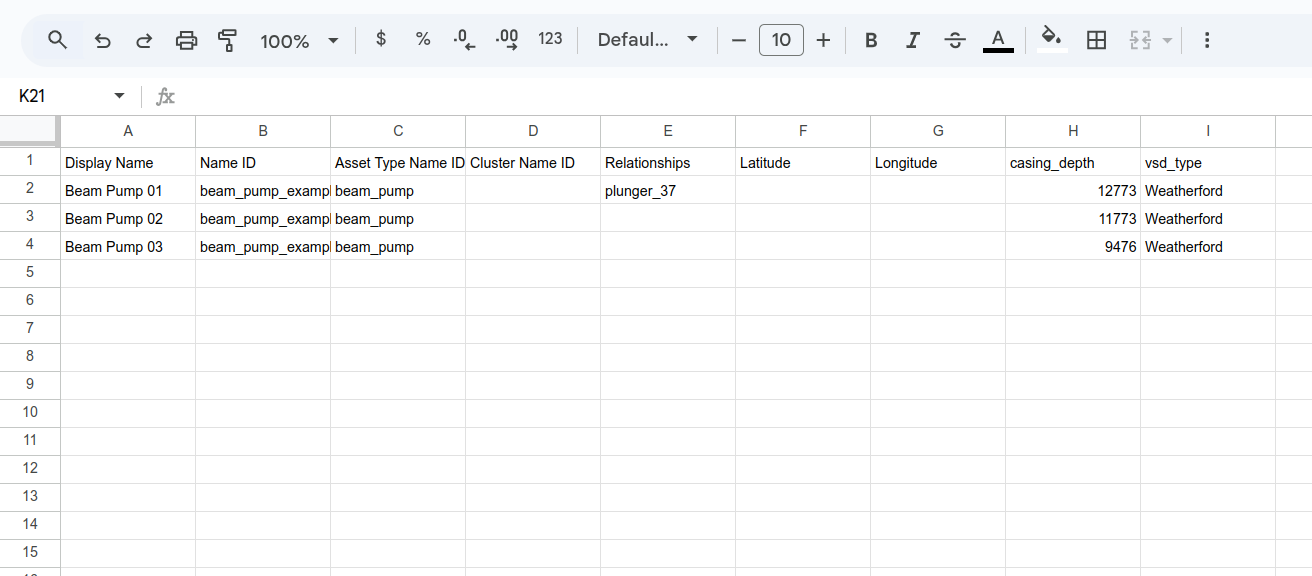
To start you need to create your Asset list in Excel, Google Sheets or any program that can save to a CSV file format.
You can get the latest template from the Kelvin UI. Read further down to . You can have as many headings after the Asset Type Name and each one will be treated as a new Asset Property.
Name ID and Asset Type Name values must follow the name format which must contain only lowercase alphanumeric characters. The ., _ and - characters are also allowed to separate words instead of a space but not at the beginning or end.
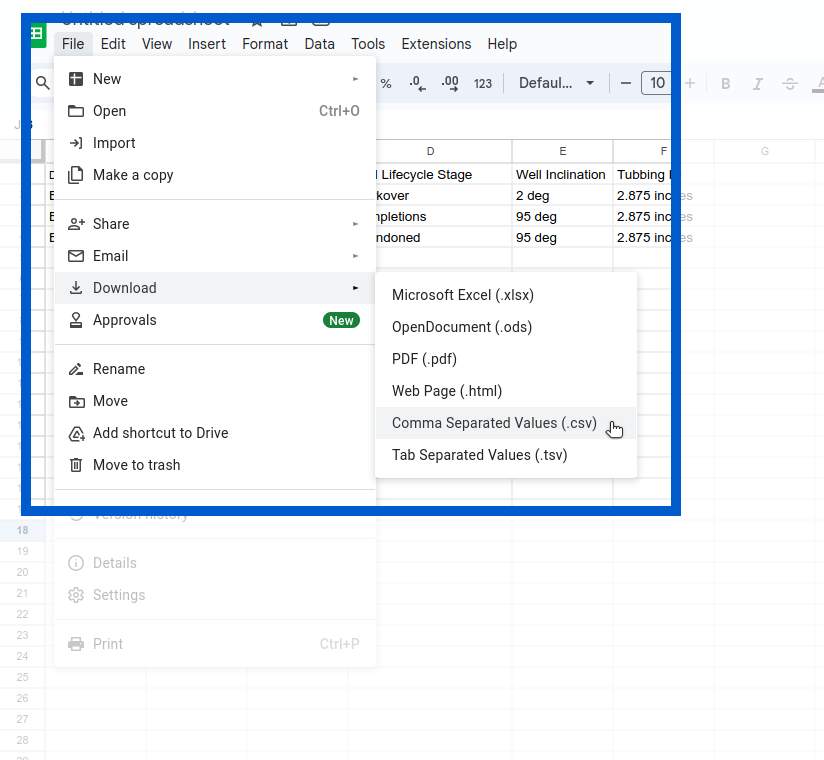
When finished, make sure you save it in a CSV file format using comma to define the field delimiter and UTF-8 as the Character set. This is usually the default settings. This is an example location for saving csv files in Google Sheets.
In Google Sheets, there are no options and will save with the defaults we mention above.
Once you have a filled in template file available locally on your machine, you can initiate the bulk create Assets as follows;
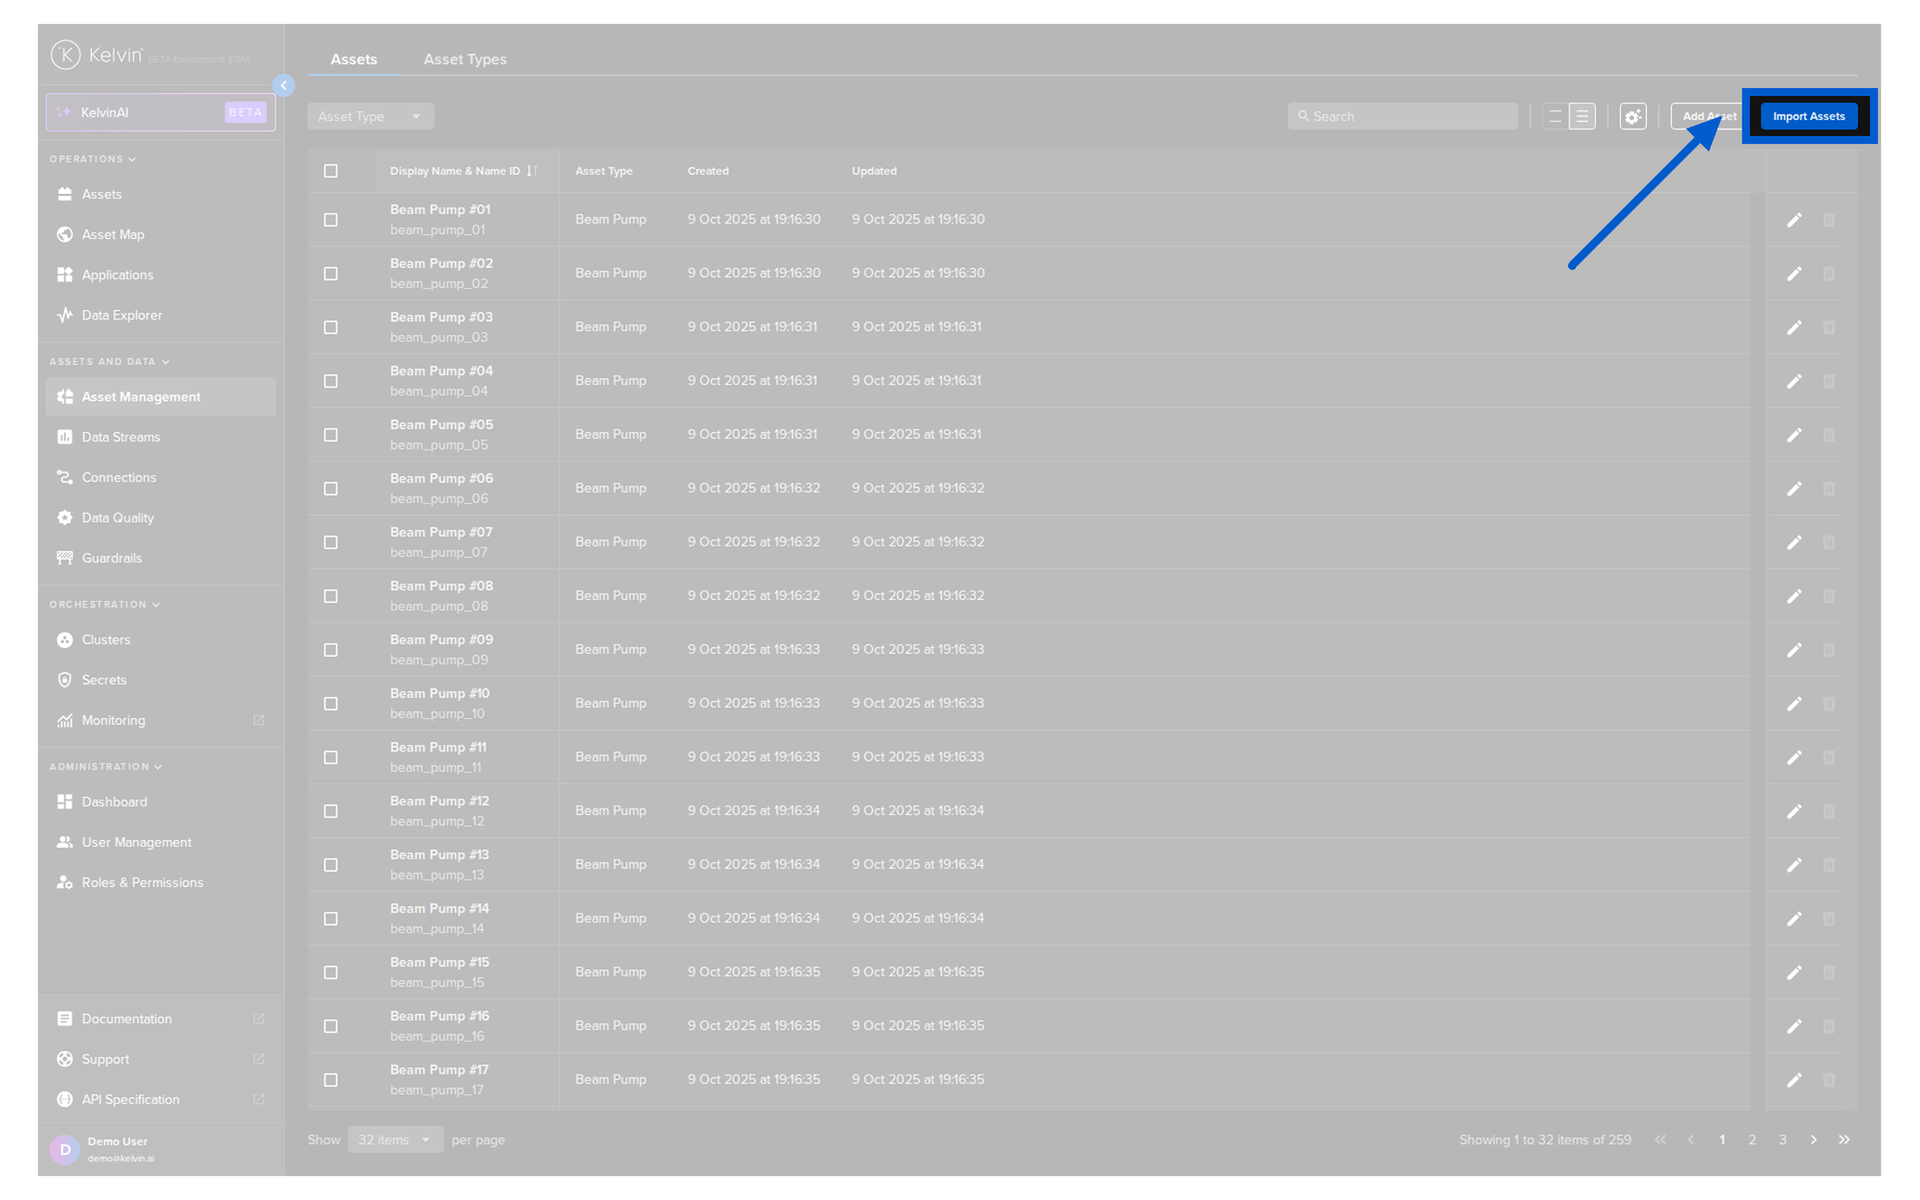
First go to the Assets under Administration.
Do not get confused with the Asset management in the Operations section which is designed for the Production Engineers.
Click on the Import Assets button.
Either select the CSV file you have created or drag and drop it into the box and click Next.
This will only accept files with a CSV extension.
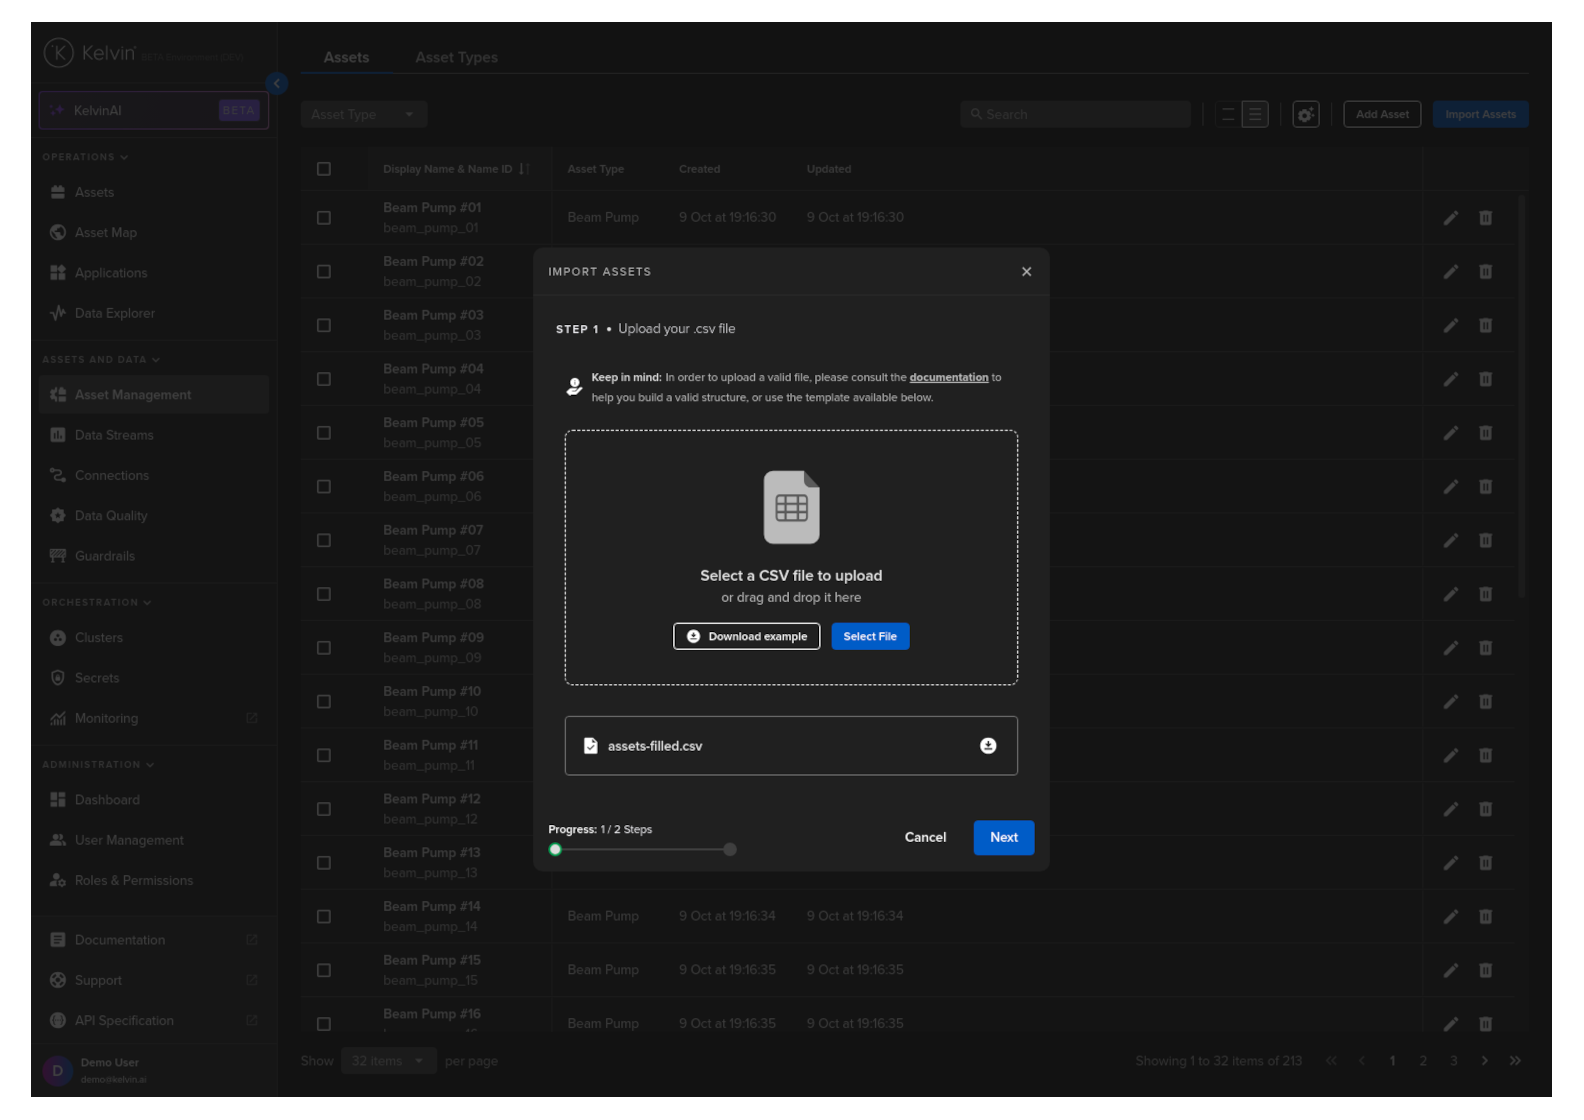
Wait for the file and data verification process to be completed. If there are any issues, check and correct the issues, go back to step 1 and reupload the file for a recheck.
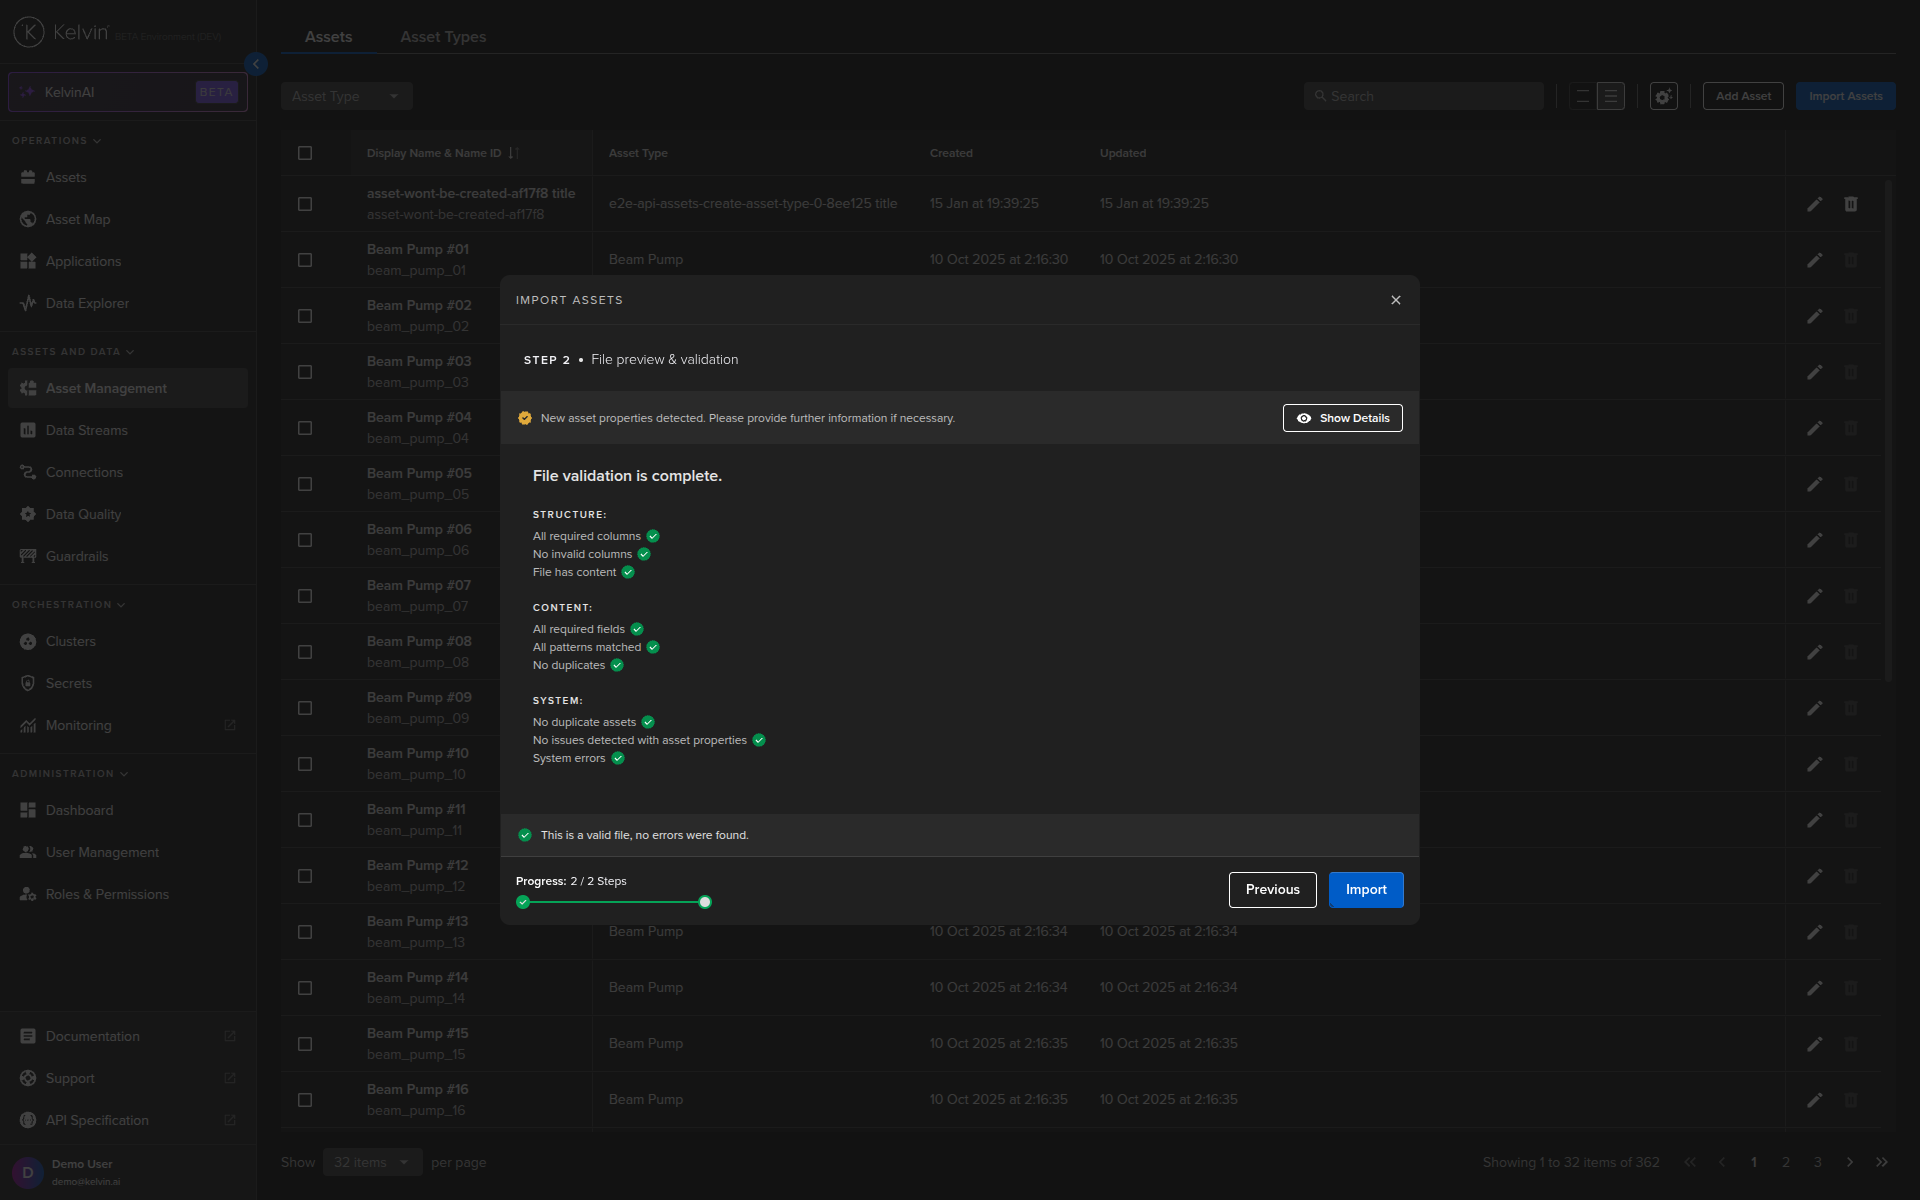
When all is ok, click on the Import button and all your Assets will be created.
This request will create 2 Assets.
curl -X 'POST' \
  'https://<url.kelvin.ai>/api/v4/assets/bulk/create' \
  -H 'Authorization: Bearer <Your Current Token>' \
  -H 'accept: application/json' \
  -H 'Content-Type: application/json' \
  -d '{
  "assets": [
    {
      "name": "doc_demo_asset_01",
      "title": "Documentation Demo Asset 01",
      "asset_type_name": "pcp",
      "properties": [
        {
          "name": "plc_manufacturer",
          "title": "PLC Manufacturer",
          "value": "Siemens"
        }
      ]
    },
    {
      "name": "doc_demo_asset_02",
      "title": "Documentation Demo Asset 02",
      "asset_type_name": "pcp",
      "properties": [
        {
          "name": "plc_manufacturer",
          "title": "PLC Manufacturer",
          "value": "Siemens"
        }
      ]
    }
  ]
}'
This script will create 2 Assets.
from kelvin.api.client import Client

# Login
client = Client(config={"url": "https://<url.kelvin.ai>", "username": "<your_username>"})
client.login(password="<your_password>")

# Create Assets in Bulk
response = client.asset.create_asset_bulk(
                dry_run=False,
                data={"assets": [
                                {
                                "name": "doc_demo_asset_01",
                                "title": "Documentation Demo Asset 01",
                                "asset_type_name": "pcp",
                                "properties": [
                                    {
                                    "name": "plc_manufacturer",
                                    "title": "PLC Manufacturer",
                                    "value": "Siemens"
                                    }
                                ]
                                },
                                {
                                "name": "doc_demo_asset_02",
                                "title": "Documentation Demo Asset 02",
                                "asset_type_name": "pcp",
                                "properties": [
                                    {
                                    "name": "plc_manufacturer",
                                    "title": "PLC Manufacturer",
                                    "value": "Siemens"
                                    }
                                ]
                                }
                            ]
                        }
)

print(response)
You will not receive a response;
Update Asset
Updating an Asset closely mirrors its creation process. However, the name of the Asset is non-editable. To modify the name, you must create a new Asset.
Assets can be managed from the Administration section of the UI.
Do not get confused with the Asset management in the Operations section which is designed for the Production Engineers.
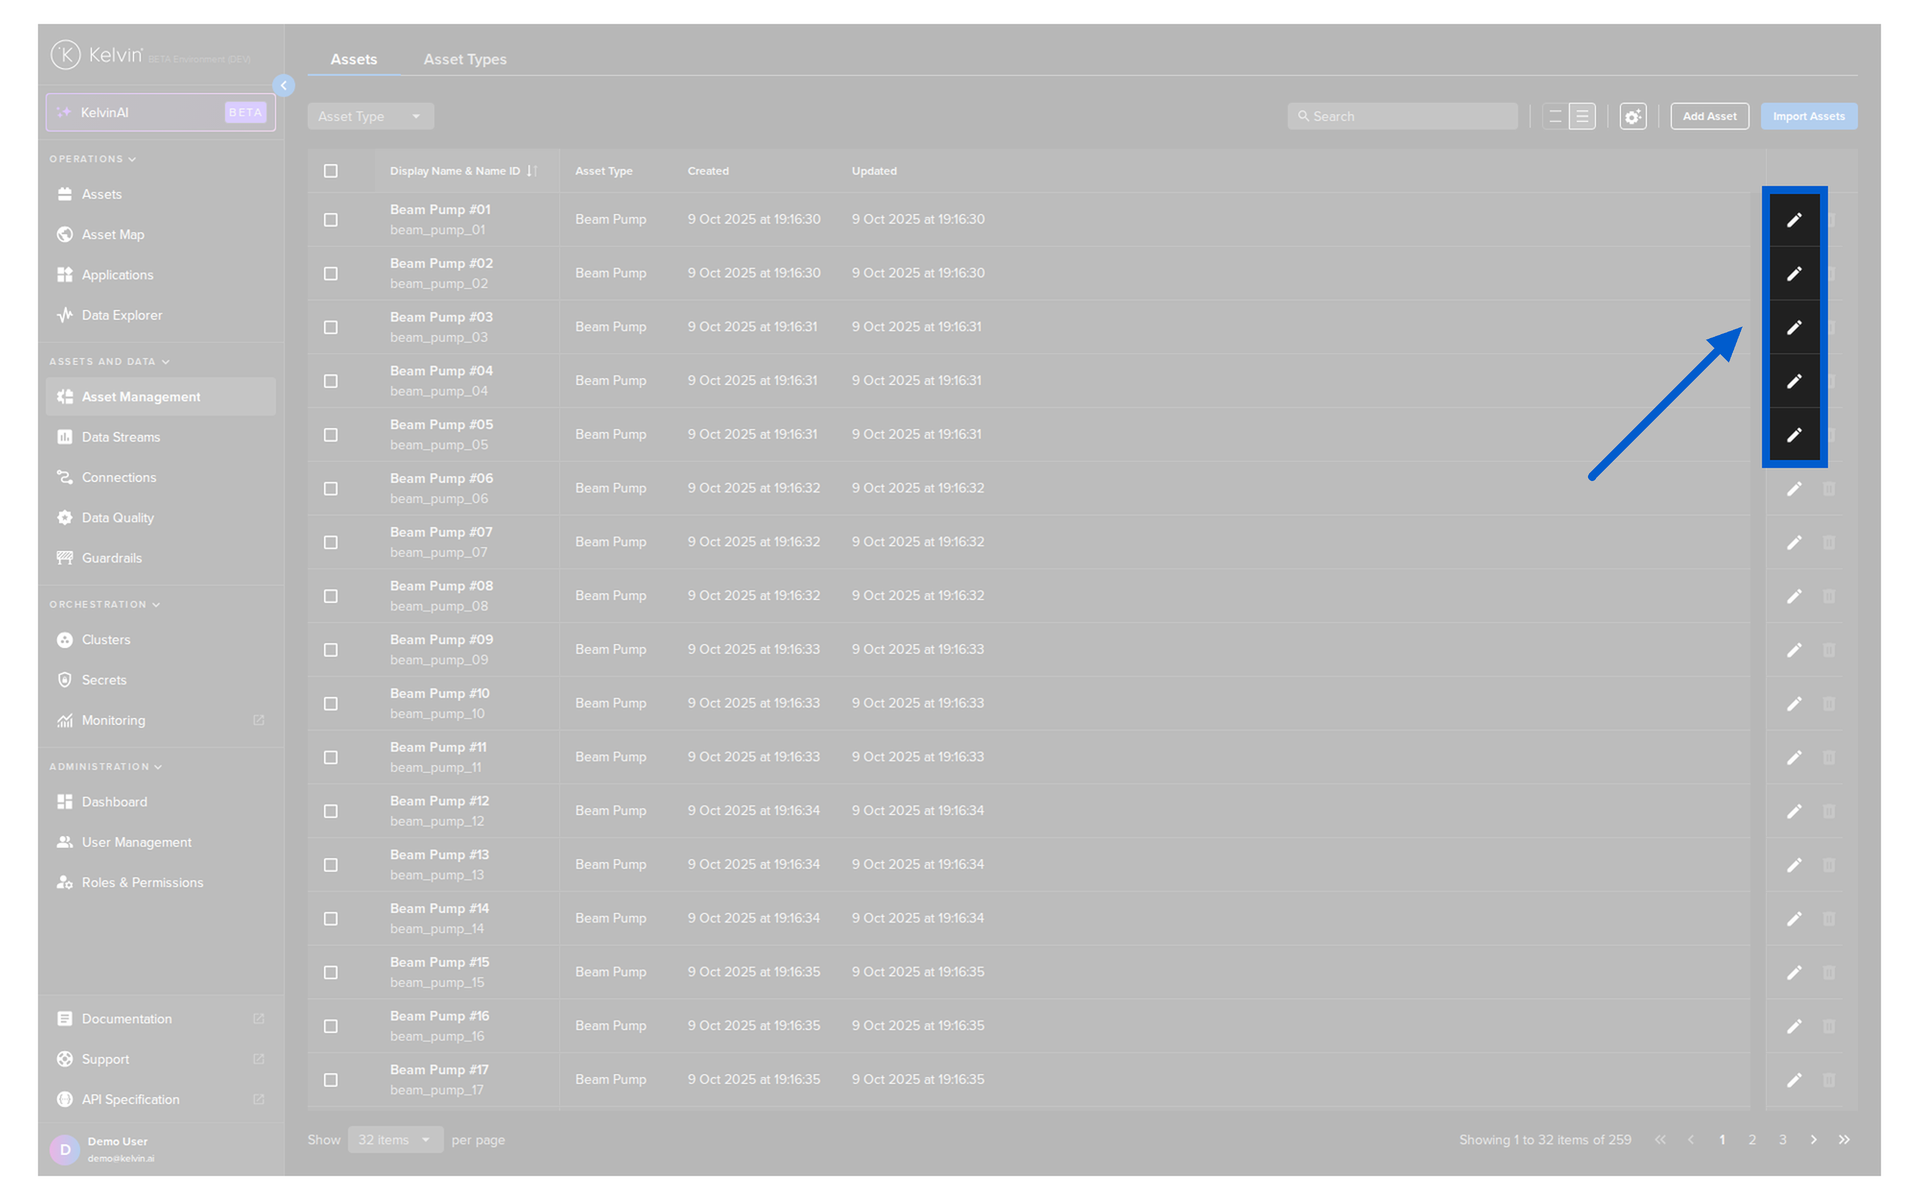
To start, go to the Assets in the Administration section of the left side bar.
To edit an Asset, click on the pencil icon to the right of the Asset you want to edit.
The popup will appear with the current information. The only value you can not edit is the Name ID.
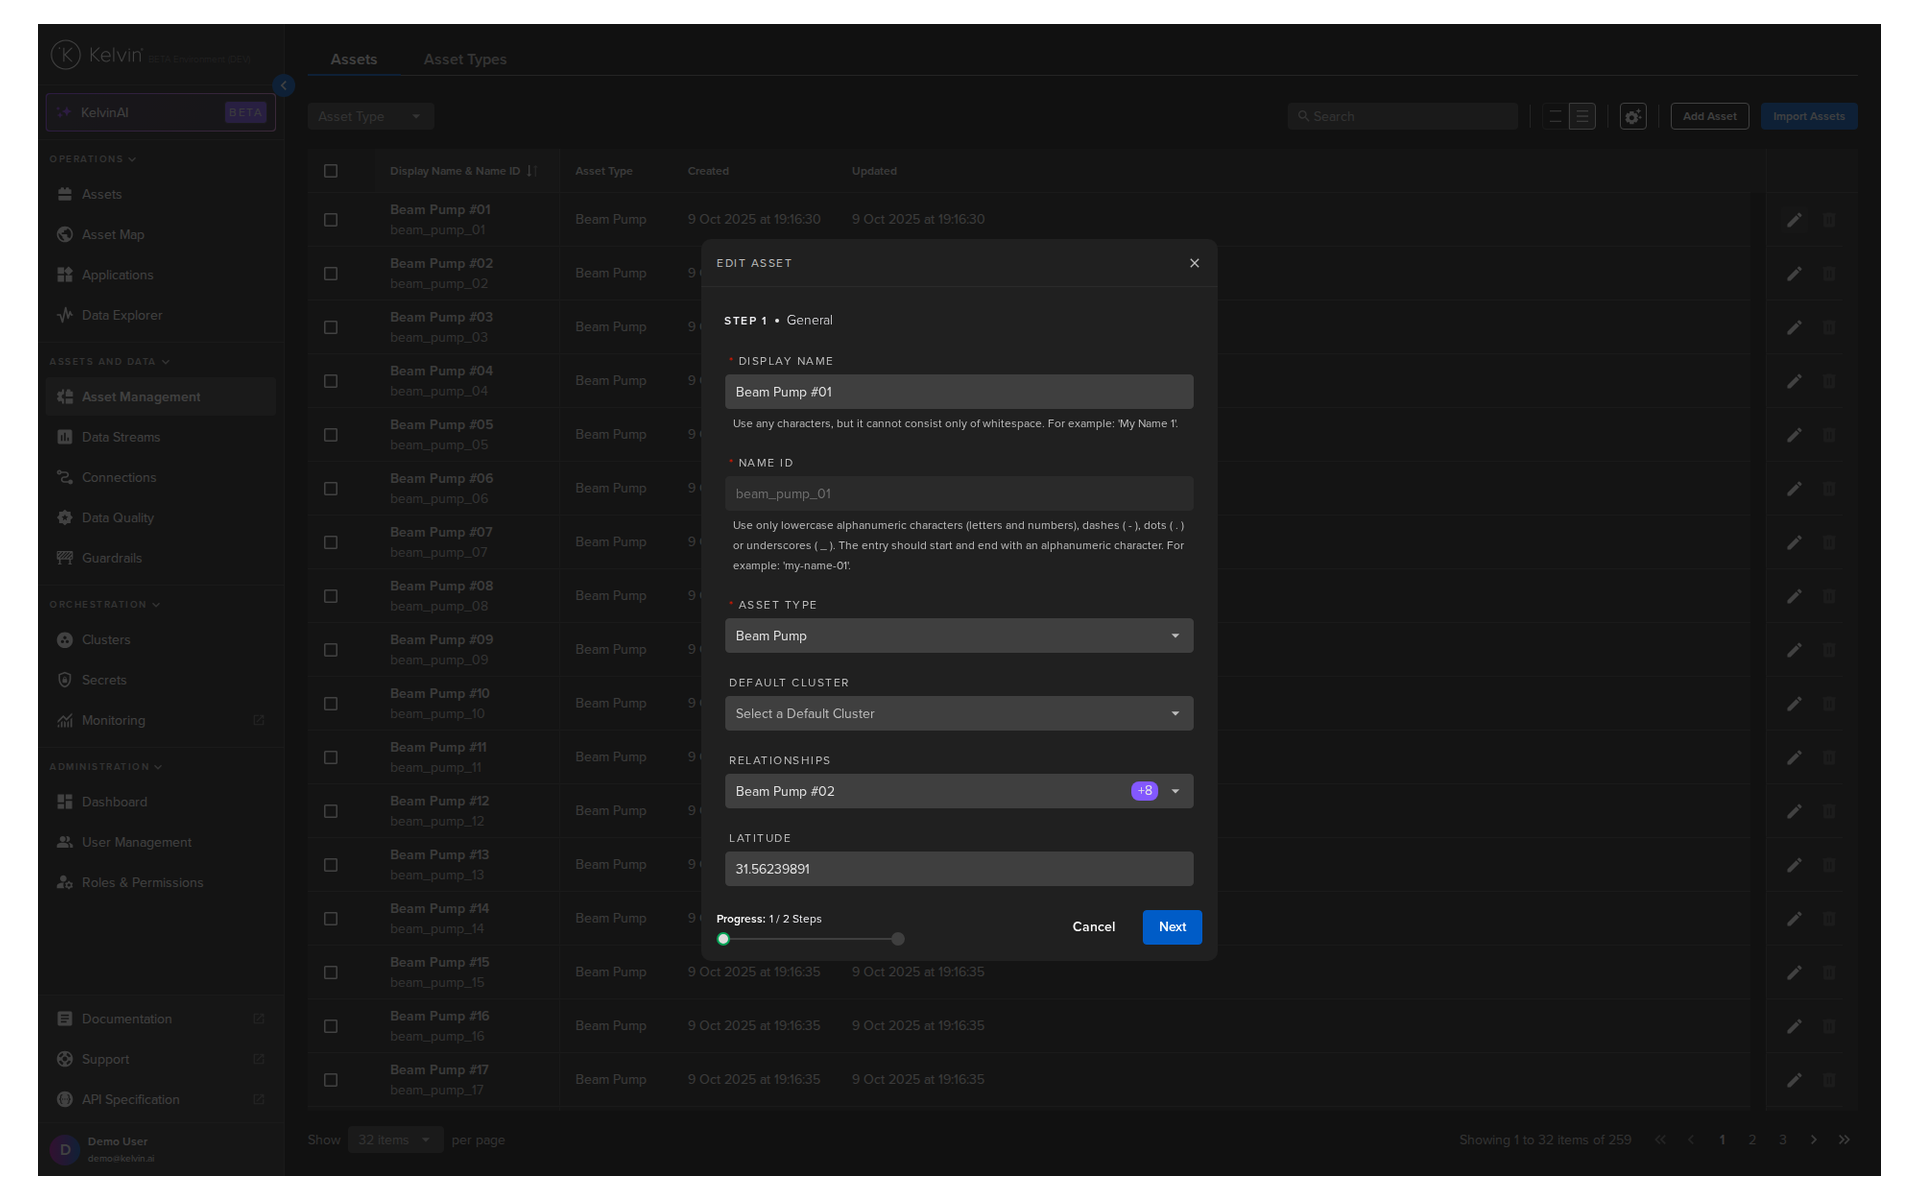
Then click Next to go to the Asset Properties editing. The only value you can not edit is the Type.
When ready, click Save to update.
To make life easier, you can copy the Asset Name from the Kelvin UI in Operations → Assets. Hover over the Asset Name below the Asset Title in the table, then click on the copy icon that will appear to the right of the name.
curl -X 'POST' \
'https://<url.kelvin.ai>/api/v4/assets/doc_demo_asset/update' \
-H 'Authorization: Bearer <Your Current Token>' \
-H 'accept: application/json' \
-H 'Content-Type: application/json' \
-d '{
        "title": "My Demo Asset Updated"
    }'
To make life easier, you can copy the Asset Name from the Kelvin UI in Operations → Assets. Hover over the Asset Name below the Asset Title in the table, then click on the copy icon that will appear to the right of the name.
from kelvin.api.client import Client

# Login
client = Client(config={"url": "https://<url.kelvin.ai>", "username": "<your_username>"})
client.login(password="<your_password>")

response = client.asset.update_asset(
    asset_name="doc_demo_asset",
    data={
        "title": "My Demo Asset Updated"
    },
)

print(response)
You will get a response similar to this;
asset_type_name='pcp' asset_type_title='Progressing Cavity Pump' created=datetime.datetime(2024, 5, 23, 8, 52, 58, 422300, tzinfo=datetime.timezone.utc) name='doc_demo_asset' properties=None status=AssetStatusItem(last_seen=None, state=<AssetState.unknown: 'unknown'>) title='My Demo Asset Updated' updated=datetime.datetime(2024, 5, 23, 8, 53, 12, 783789, tzinfo=datetime.timezone.utc)
Delete Asset
Deleting an Asset is very simple. The only information you need is the actual name of the Asset.
Assets can be managed from the Administration section of the UI.
Do not get confused with the Asset management in the Operations section which is designed for the Production Engineers.
To start, go to the Assets in the Administration section of the left side bar.
To delete an Asset, click on the rubbish bin icon on the right hand side of of an Asset row;
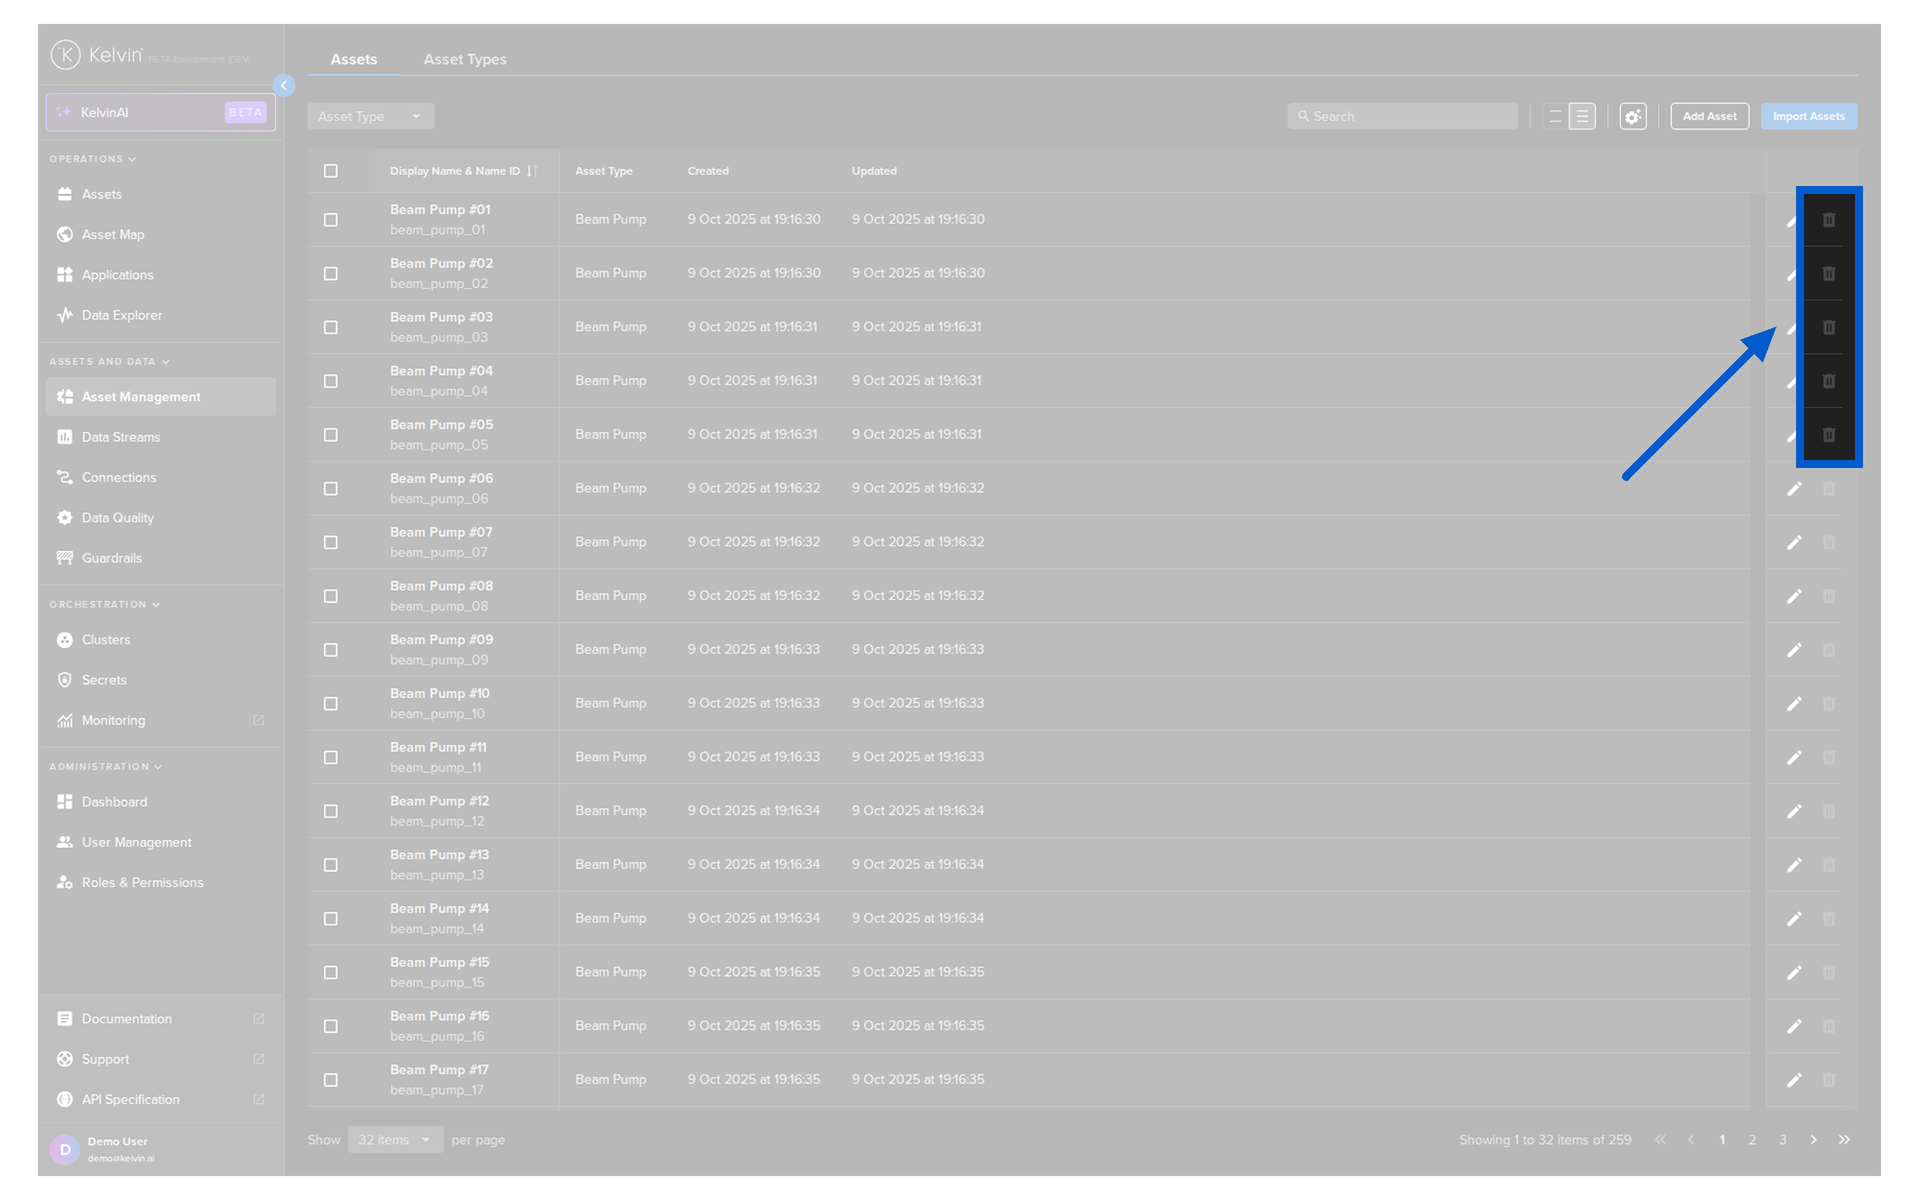
Then in the popup type PERMANENTLY DELETE to confirm the delete action.
To make life easier, you can copy the Asset Name from the Kelvin UI in Operations → Assets. Hover over the Asset Name below the Asset Title in the table, then click on the copy icon that will appear to the right of the name.
curl -X 'POST' \
'https://<url.kelvin.ai>/api/v4/assets/doc_demo_asset/delete' \
-H 'Authorization: Bearer <Your Current Token>' \
-H 'accept: application/json' \
-d ''
To make life easier, you can copy the Asset Name from the Kelvin UI in Operations → Assets. Hover over the Asset Name below the Asset Title in the table, then click on the copy icon that will appear to the right of the name.
from kelvin.api.client import Client

# Login
client = Client(config={"url": "https://<url.kelvin.ai>", "username": "<your_username>"})
client.login(password="<your_password>")

# Delete Asset
response = client.asset.delete_asset(asset_name="doc_demo_asset")

print(response)
You will not receive a response.
Bulk Delete Assets
Deleting many Assets with one command is very simple. The only information you need is the actual name of all the Assets.
Assets can be managed from the Administration section of the UI.
Do not get confused with the Asset management in the Operations section which is designed for the Production Engineers.
To start, go to the Assets in the Administration section of the left side bar.
To delete an Asset, check multiple Assets and a Delete button will appear above the table. When ready click on the button to delete the selected Assets.
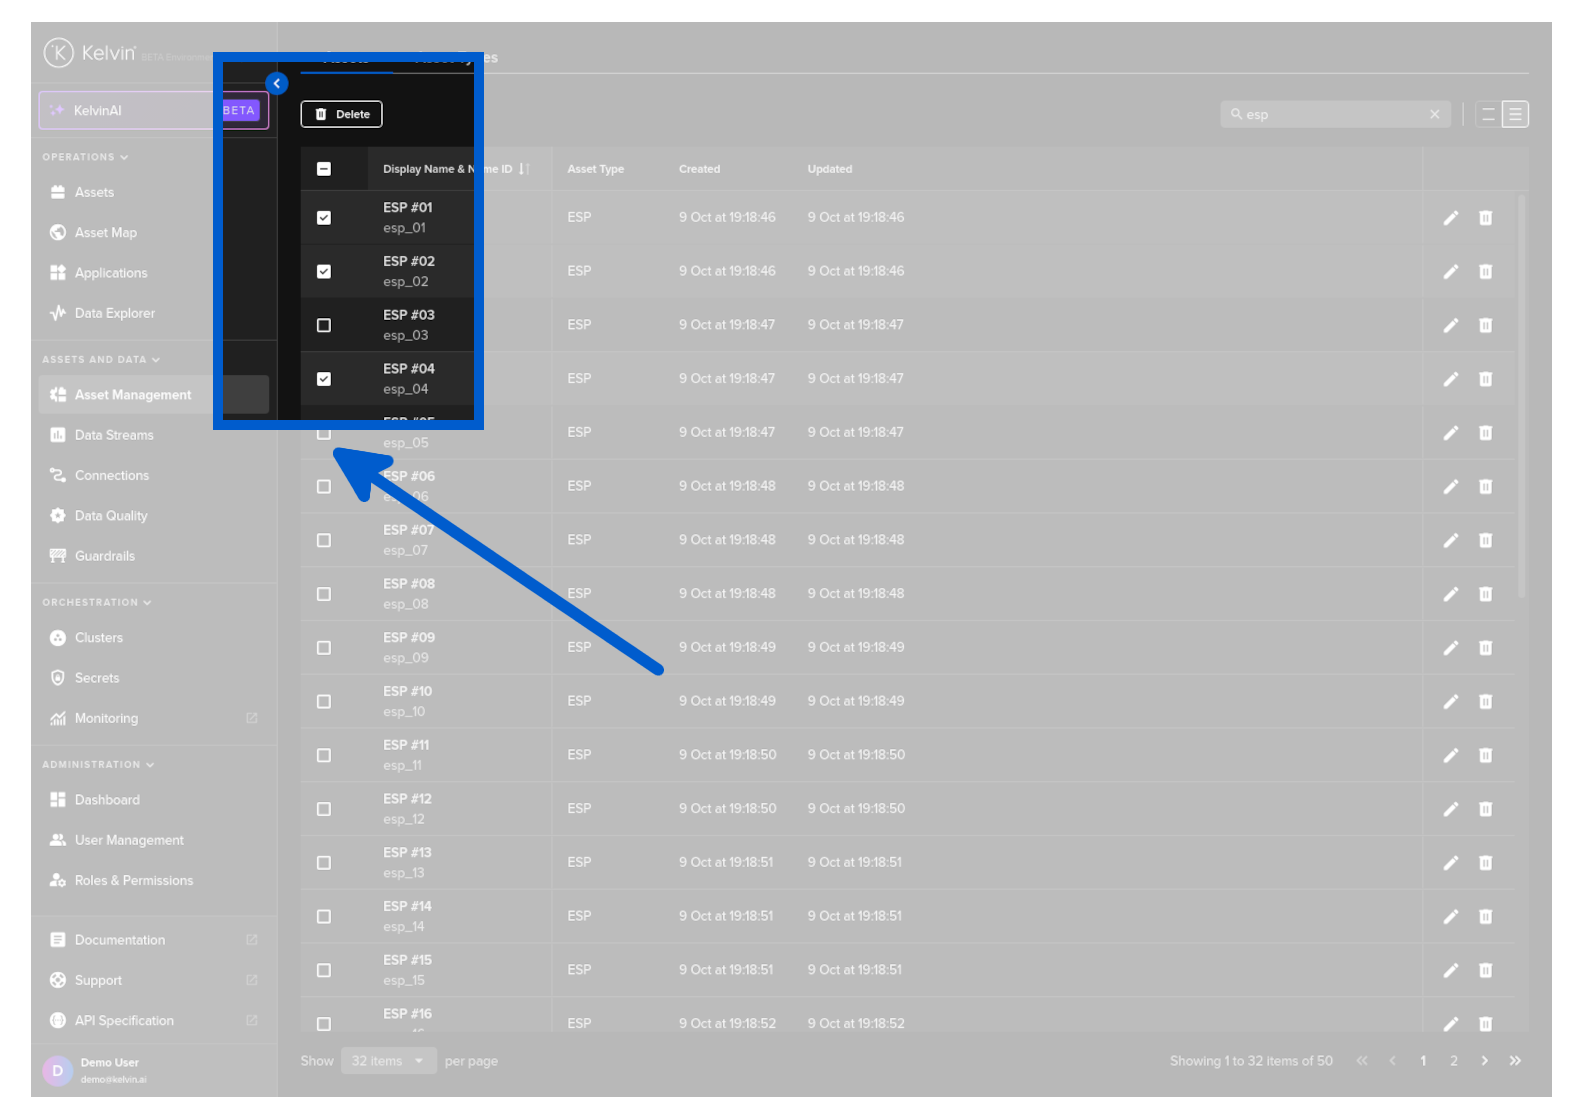
Then in the popup type PERMANENTLY DELETE to confirm the delete action.
To make life easier, you can copy the Asset Name from the Kelvin UI in Operations → Assets. Hover over the Asset Name below the Asset Title in the table, then click on the copy icon that will appear to the right of the name.
curl -X 'POST' \
'https://<url.kelvin.ai>/api/v4/assets/delete' \
-H 'Authorization: Bearer <Your Current Token>' \
-H 'accept: application/json' \
-H 'Content-Type: application/json' \
-d '{
"names": [
    "doc_demo_asset_01",
    "doc_demo_asset_02"
]
}'
To make life easier, you can copy the Asset Name from the Kelvin UI in Operations → Assets. Hover over the Asset Name below the Asset Title in the table, then click on the copy icon that will appear to the right of the name.
from kelvin.api.client import Client

# Login
client = Client(config={"url": "https://<url.kelvin.ai>", "username": "<your_username>"})
client.login(password="<your_password>")

# Delete Asset
response = client.asset.delete_asset_bulk(data={
    "names": [
        "doc_demo_asset_01",
        "doc_demo_asset_02"
    ]
})

print(response)
You will not receive a response.
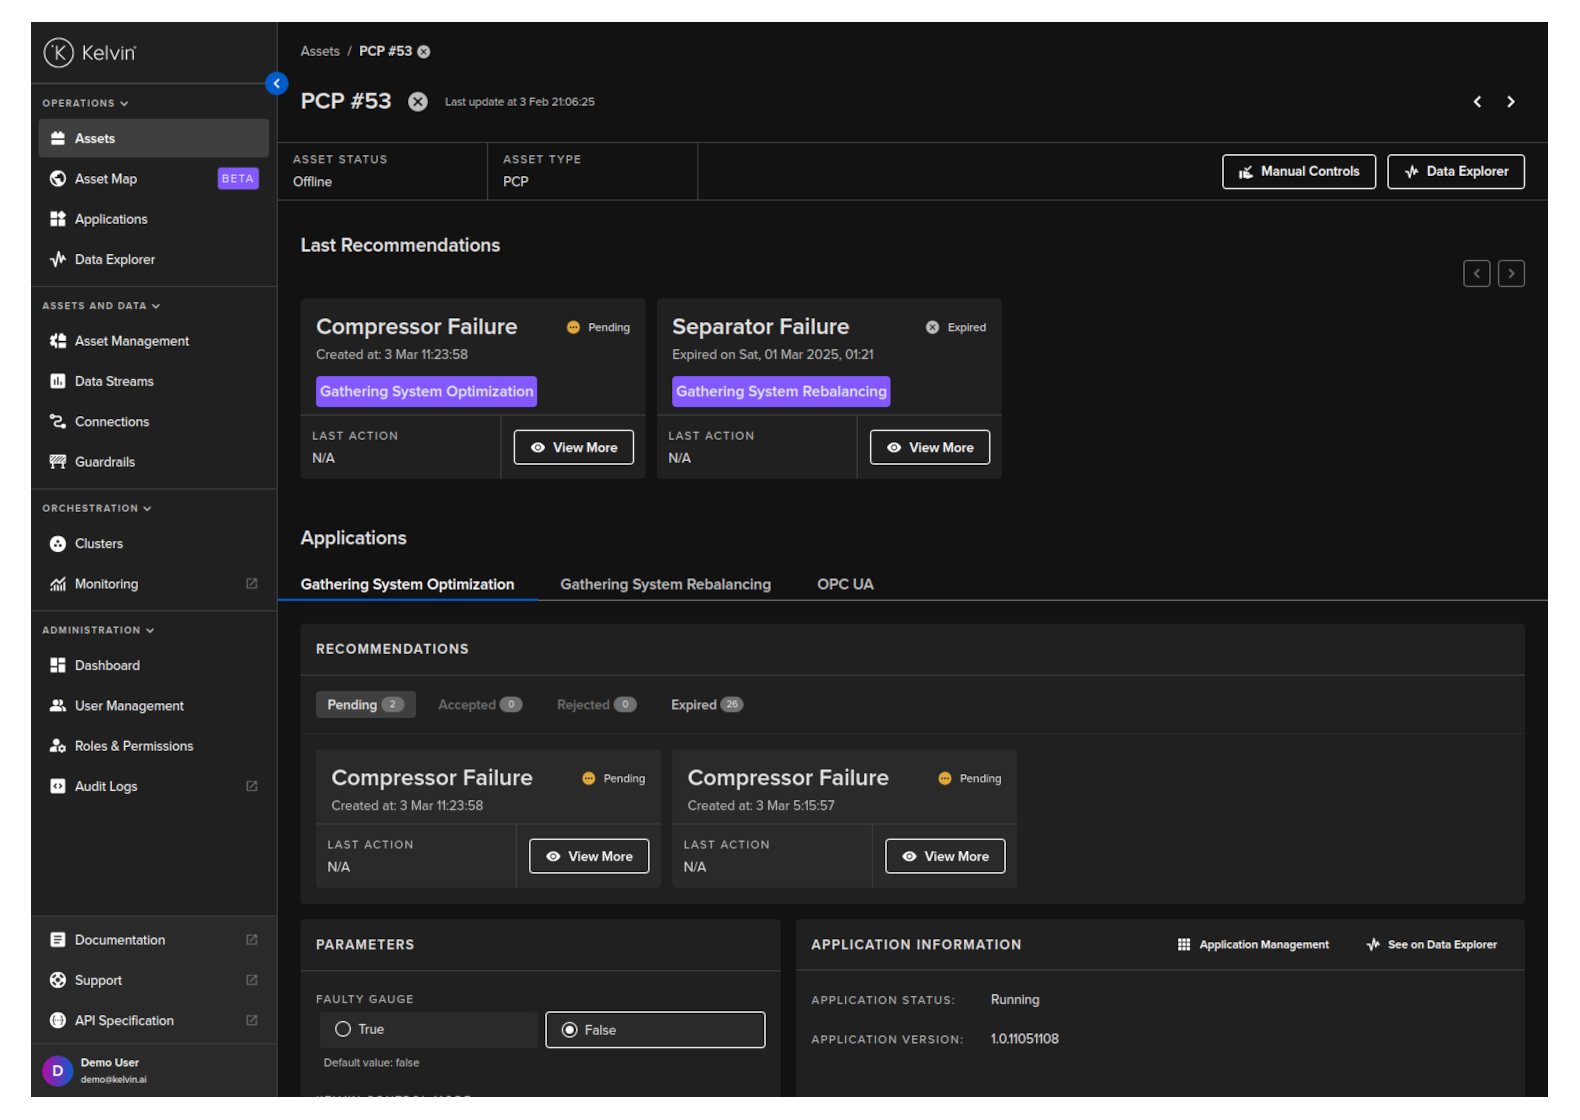
Visualize Assets
Please note that this is the Asset management in the Operations section, NOT the Administration section, which is designed for the Production Engineers.
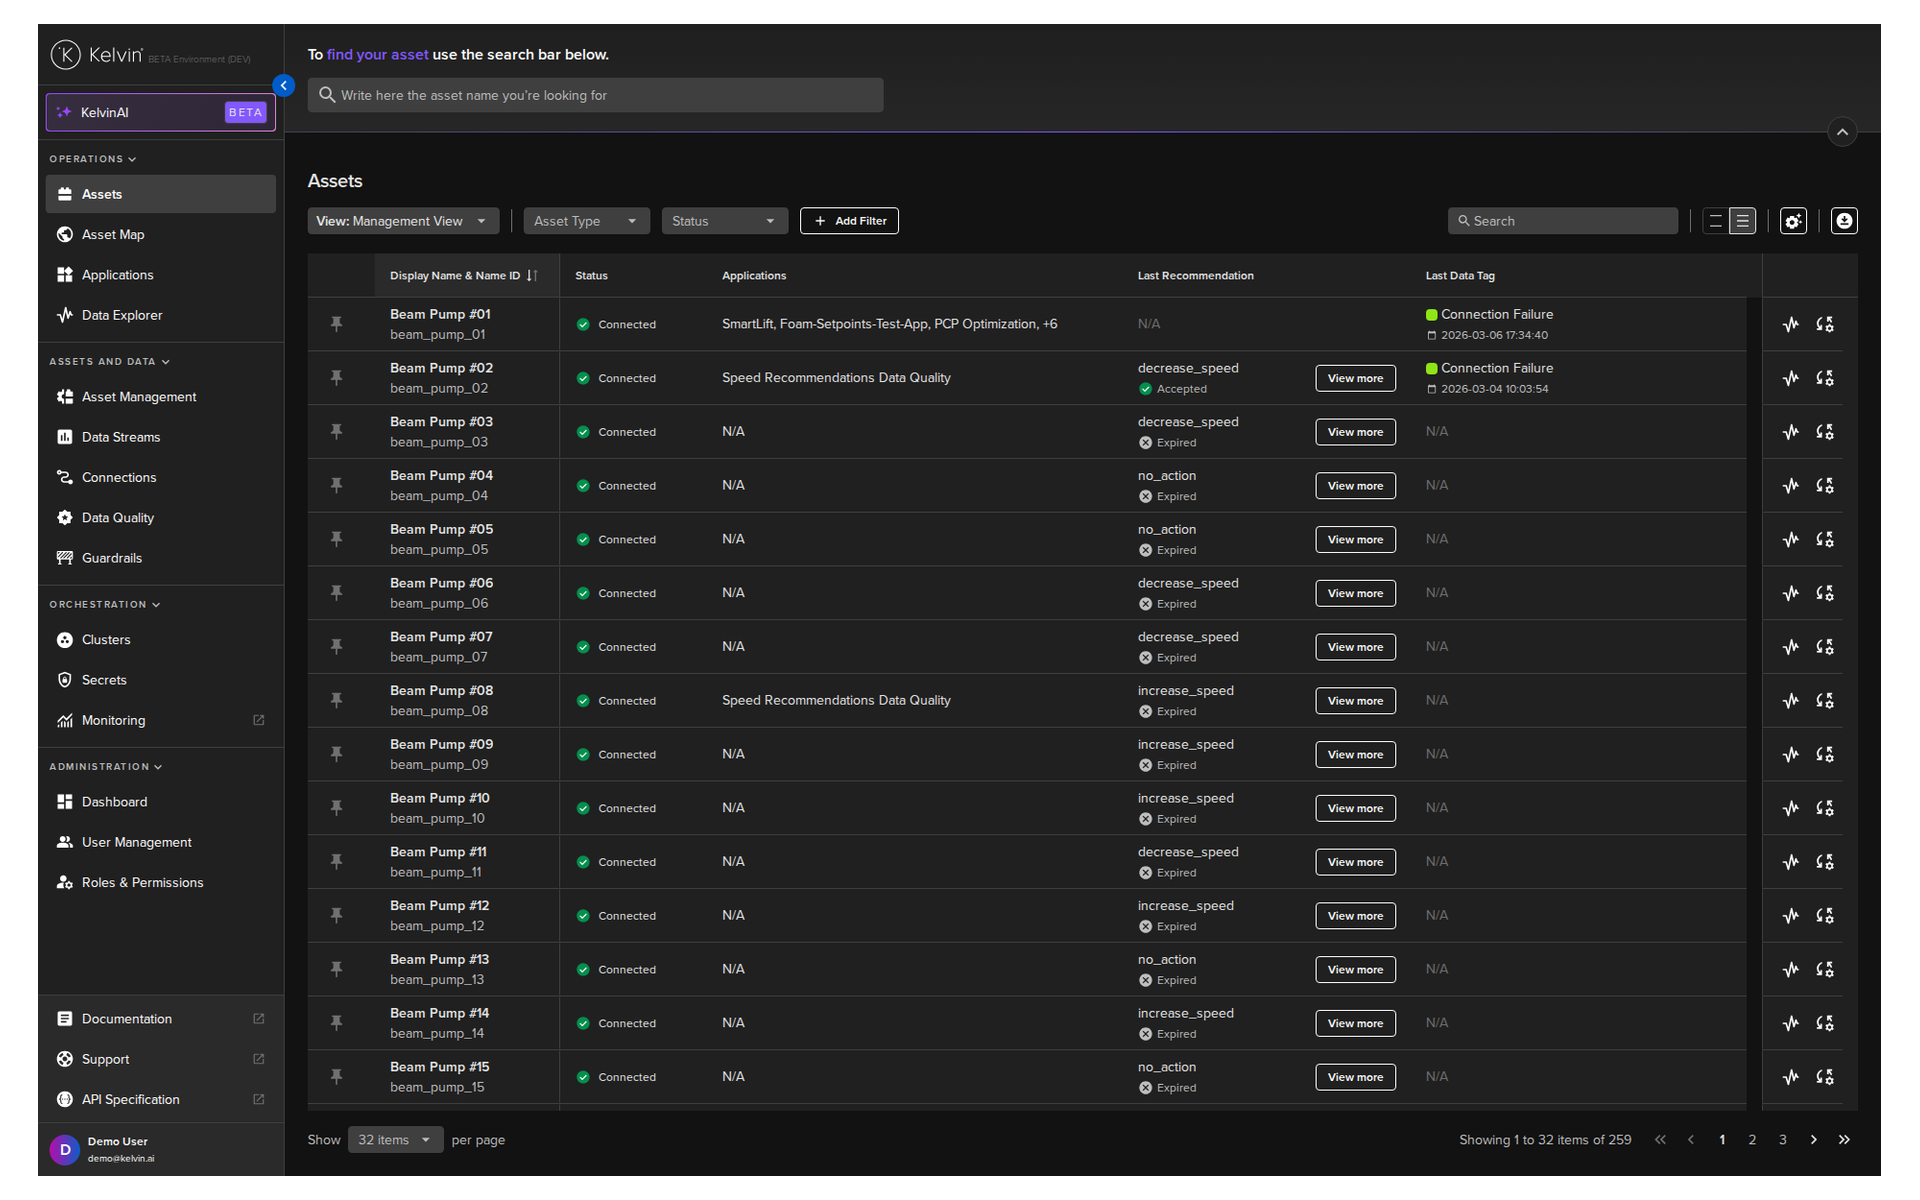
Through Kelvin UI, users can seamlessly manage the following Asset functionalities:
- Data Streams Overview: View all associated Data Streams.
- Last Recommendations: Check and manage any active recommendations related to each asset and Kelvin SmartApp™.
- Comprehensive Recommendation Dashboard: Access a full list of recommendations and detailed information for each associated Kelvin SmartApp™.
- Manual Data Stream Control: Directly control Data Streams without relying on Kelvin SmartApps™.
When selecting an Asset, all the above details will be displayed for your convenience.