How To
Create a Kelvin SmartApp™
You can build for both x86_64 and arm64 devices.
$ kelvin app create
[kelvin.sdk][2023-10-19 18:39:54][I] Refreshing metadata..
Please provide a name for the application: event-detection
After providing Kelvin SmartApps™ name (i.e.: event-detection):
[kelvin.sdk][2023-10-19 18:43:36][I] Creating new application "event-detection"
[kelvin.sdk][2023-10-19 18:43:36][I] Retrieving the latest schema version
[kelvin.sdk][2023-10-19 18:43:39][R] Successfully created new application: "event-detection".
This will automatically create a Kelvin SmartApp™ bootstrap within a directory named as event-detection. It contains 5 different files (app.yaml, main.py, requirements.txt, Dockerfile and .dockerignore) which are gonna be explained in the next section.
Folder Structure
You can now open the folder in your favorite IDE or editor and start to modify the files to create your Kelvin SmartApp™.
$ cd event-detection
$ ls -la
-rw-rw-r-- 1 ubuntu ubuntu  361 Oct  2 21:57 .dockerignore
-rw-rw-r-- 1 ubuntu ubuntu  133 Oct  2 21:57 Dockerfile
-rw-rw-r-- 1 ubuntu ubuntu  436 Oct  2 21:57 app.yaml
-rw-rw-r-- 1 ubuntu ubuntu  610 Oct  2 21:57 main.py
-rw-rw-r-- 1 ubuntu ubuntu   17 Oct  2 21:57 requirements.txt
Below is a brief description of each file.
The app.yaml is the main configuration file that holds both Kelvin SmartApps™ definition as well as the deployment/runtime configuration. It is composed by the following sections:
spec_version key
The spec_version key is automatically injected and specifies Kelvin SmartApps™ JSON Schema (latest) version which both defines and validates the app.yaml structure.
```yaml
spec_version: 4.12.0
```
info section
The info section holds Kelvin SmartApps™ basic information required to make itself uploadable to Kelvin's App Registry.
```yaml
info:
name: event-detection
title: Event Detection
description: Monitors if a motor is overheating. If so, it will send a Control Change to reduce the Motor Speed.
version: 1.0.0
```
The `name` is Kelvin SmartApps™ unique identifier.
The `title` and `description` will appear on the Kelvin UI once Kelvin SmartApps™ is uploaded.

!!! info
The `version` should be bumped everytime Kelvin SmartApps™ gets an update, and before it gets uploaded to the _App Registry_.
app section
The app:kelvin can be considered the app.yaml "main" section. It defines what are Kelvin SmartApps™ inputs and outputs, as well as define Kelvin SmartApps™ "global" configuration(s) and its (asset) parameters definition. We'll go through each of these sections individually with a more detailed analysis later on this guide.
```yaml
app:
    type: kelvin
    kelvin:
        inputs: []
        outputs: []
        configuration: {}
        parameters: []
```

!!! info
    All of these are **[optional]**, and can be left empty.
system section
The system section is [optional] and can be used to set different system requirements/constraints within Kelvin SmartApps™ running environment. i.e. Resources, Environment Variables, Volumes, Ports, etc:
```yaml
system:
    resources: {}
    privileged: Boolean
    environment_vars: []
    ports: []
    volumes: []
```
resources section
The resources defines the reserved (requests) and limits the resources allocated to Kelvin SmartApps™:
```yaml
system:
    resources:
        requests:   # Reserved
            cpu: 100m
            memory: 256Mi
        limits:     # Limits
            cpu: 200m
            memory: 512Mi
```
environment_vars section
The environment_vars is used to define Environment Variables available within Kelvin SmartApps™ container. i.e.:
```yaml
system:
    environment_vars:
        - name: KELVIN_GW_MODE
          value: SOCKETS
```

!!! info
    `KELVIN_GW_MODE` is an Environment Variable that is **[required]** by Kelvin's platform. Others can optionally be added.
volumes section
Mounted volumes are [optional] and their main purpose is to share and persist data generated by Kelvin SmartApps™ or used by it in a specific place. They act like a shared folder between Kelvin SmartApps™ and the host. Kelvin supports directory volumes, such as folders or serial ports, persistent, and file/test volumes:
```yaml
system:
    volumes:
        # Folder Volume
        - name: serial-rs232
          target: /dev/rs232 # Container path
          type: host
          host:
            source: /dev/ttyS0 # Host path

        # Persistent Volume
        - name: extremedb
          target: /extremedb/data
          type: persistent

        # File/Text Volume
        - name: model-parameters
          target: /opt/kelvin/data/parameters.bin
          type: text # Renders data into a file
          text:
            base64: true
            encoding: utf-8
            data: |-
                SGVsbG8gUHJvZHVjdCBHdWlsZCwgZnJvbSB0aGUgRW5naW5lZXJpbmcgR3VpbGQhCg==
```
ports section
The ports is [optional] and used to define network port mappings. i.e.:
```yaml
system:
    ports:
        - name: http
          type: host # Exposed on the host
          host:
            port: 80

        - name: opcua
          type: service # Exposed as a service for other containers
          service:
            port: 48010
            exposed_port: 30120
            exposed: true
```
privileged key
The privileged key is [optional] and used to grant extended privileges to Kelvin SmartApps™, allowing it to access any devices on the host, such as a Serial device:
```yaml
system:
    privileged: true
```
The main.py is used as the entry point of Kelvin SmartApps™. When it runs, main.py is typically the first script that gets executed, and it usually contains the main logic or orchestrates the flow of Kelvin SmartApps™. However, naming a file "main.py" is just a convention, and it's not mandatory. The name helps developers quickly identify where the primary logic of Kelvin SmartApps™ begins.
The following code example will be generated upon kelvin app create:
import asyncio

from kelvin.application import KelvinApp # KelvinApp import


async def main() -> None:
    # Creating instance of Kelvin SmartApp™ Client
    app = KelvinApp()

    # Connect the App Client
    await app.connect()

    while True:
        # Custom Loop
        await asyncio.sleep(1)


if __name__ == "__main__":
    asyncio.run(main())
The requirements.txt file is used to list all the dependencies a Python Kelvin SmartApps™ needs. It can be used to easily install all the required packages, ensuring Kelvin SmartApps™ runs correctly.
The Dockerfile is a script used to define the instructions and configuration for building a Docker image. It specifies the base image, installation of software, file copying, and other setup tasks needed to create a reproducible and isolated environment for running Kelvin SmartApps™ in Docker containers.
FROM python:3.10-slim

ENV PYTHONUNBUFFERED=1
WORKDIR /opt/kelvin/app
COPY . /opt/kelvin/app
RUN pip install -r requirements.txt

ENTRYPOINT python main.py
Info
If main.py is not the intended entry point, it also needs to be replaced on the Dockerfile.
Specifies which files and directories should be excluded when building Kelvin SmartApps™ Docker image. It helps reducing the build context, resulting in smaller, more efficient Docker image.
Consume
In order to consume streaming data, the inputs section needs to filled upon the app.yaml. That means that Kelvin SmartApps™ is only going to be able to consume the specified inputs. i.e.:
app:
  type: kelvin
  kelvin:

    inputs:
        - data_type: number
          name: motor_temperature

        - data_type: string
          name: motor_state
inputs is an array (list) composed by two fields:
- A unique name to identify the input. This will be used in the Python code to reference the input. It must contain only lowercase alphanumeric characters. The characters
.,_and-are allowed to separate words instead of a space BUT can not be at the beginning or end of the name. - An expected data type, which can be:
number,boolean,string.
Now that we've defined Kelvin SmartApps™ inputs, there are a few ways to consume them within the Kelvin Python library:
- Filters
- Streams
- Callbacks
These will be explained in the following sections.
Filters
Filters can be used to filter a specific subset of the Kelvin Inputs as a Python Message Queue based upon a filter function.
Info
Different Data filters are available within the filters class, such as input_equals(input: str), resource_equals(resource: KRN) and asset_equals(asset: str). On the following example we're gonna use the most common and expected use case (input_equals(input: str)).
Usage of filters.input_equals(input: str):
import asyncio
from asyncio import Queue # Queue import

from kelvin.application import KelvinApp, filters # filters import
from kelvin.message import Number # Number (Input Type) import


async def main() -> None:
    app = KelvinApp()

    # Create a Filtered Queue with Temperature (Number) Input Messages
    motor_temperature_msg_queue: Queue[Number] = app.filter(filters.input_equals("motor_temperature"))

    await app.connect()

    while True:
        # Wait & Read new Temperature Inputs
        motor_temperature_msg = await motor_temperature_msg_queue.get()

        print("Received Motor Temperature: ", motor_temperature_msg)


if __name__ == "__main__":
    asyncio.run(main())
Streams
Streams are a different way of filtering inputs as a Python Async Generator, also based upon a filter function.
Usage of filters.input_equals(input: str):
import asyncio
from typing import AsyncGenerator # AsyncGenerator import

from kelvin.application import KelvinApp, filters # filters import
from kelvin.message import Number # Number (Input Type) import


async def main() -> None:
    app = KelvinApp()

    # Create a Filtered Stream with Temperature (Number) Input Messages
    motor_temperature_msg_stream: AsyncGenerator[Number, None] = app.stream_filter(filters.input_equals("motor_temperature"))

    await app.connect()

    # Wait & Read new Temperature Inputs
    async for motor_temperature_msg in motor_temperature_msg_stream:
        print("Received Motor Temperature: ", motor_temperature_msg)


if __name__ == "__main__":
    asyncio.run(main())
Callbacks
The callback on_asset_input can be used to read every input flowing into Kelvin SmartApps™:
import asyncio

from kelvin.application import KelvinApp
from kelvin.message.primitives import AssetDataMessage # AssetDataMessage import


# on_asset_input Callback
async def on_asset_input(msg: AssetDataMessage):
    print("Received Data Message: ", msg)

    # Get Asset and Value
    asset = msg.resource.asset
    value = msg.payload

async def main() -> None:
    app = KelvinApp()
    # Set on_asset_input Callback
    app.on_asset_input = on_asset_input

    await app.connect()

    # [Required] Forces Kelvin SmartApps™ to run forever
    while True:
        await asyncio.sleep(1)


if __name__ == "__main__":
    asyncio.run(main())
Produce
Kelvin's Python library allows its users to publish messages to the platform dataflow by using a publish(msg: Message) interface embedded within KelvinApp:
import asyncio

from kelvin.application import KelvinApp


async def main() -> None:
    app = KelvinApp()
    await app.connect()

    await app.publish(...)
publish(msg: Message) can handle different types of messages:
- Data Messages (
Number,BooleanandString) - Control Changes
- Recommendations
We'll go through those examples in the following sections.
Data Messages
In order to publish an output Data Message, the first requirement is to add the intended outputs to the app.yaml as follows:
app:
  type: kelvin
  kelvin:

    outputs:
    - data_type: number
      name: motor_temperature_fahrenheit

    - data_type: boolean
      name: motor_error

    - data_type: string
      name: motor_error_description
Afterwards, the user needs to create and publish each output Data Message according to its data_type:
- Number:
from kelvin.message import Number
from kelvin.krn import KRNAssetDataStream

(...)

# Create and Publish a Number
await app.publish(
    Number(resource=KRNAssetDataStream(asset, "motor_temperature_fahrenheit"), payload=97.3)
)
Boolean:
from kelvin.message import Boolean
from kelvin.krn import KRNAssetDataStream

(...)

# Create and Publish a Boolean
await app.publish(
    Boolean(resource=KRNAssetDataStream(asset, "motor_error"), payload=True)
)
String:
from kelvin.message import String
from kelvin.krn import KRNAssetDataStream

(...)

# Create and Publish a String
await app.publish(
    String(resource=KRNAssetDataStream(asset, "motor_error_description"), payload="Temperature is too high")
)
Control Change Messages
Control Changes are a different kind of output Message, therefore, they require and extra flag to be set under its output definition (control_change: True):
app:
  type: kelvin
  kelvin:

    outputs:
    - data_type: number
      name: motor_speed_set_point
      control_change: true
And this is how to create and publish them:
from datetime import timedelta

from kelvin.application import KelvinApp
from kelvin.message import ControlChange
from kelvin.krn import KRNAssetDataStream

(...)

# Create and Publish a Control Change
await app.publish(
    ControlChange(
        resource=KRNAssetDataStream("my-motor-asset", "motor_speed_set_point"),
        payload=1000,
        expiration_date=timedelta(minutes=5)
    )
)
Recommendation Messages
Kelvin SmartApps™ can publish a Recommendation Message if the goal is to recommend one or more Control Changes to a given Asset. These will asyncronously reach the cloud and get to a state where they'll be pending user's Approval.
This is how they can be created and published:
from datetime import timedelta

from kelvin.application import KelvinApp
from kelvin.message import ControlChange, Recommendation
from kelvin.krn import KRNAssetDataStream, KRNAsset

(...)

# Create a Control Change
control_change = ControlChange(
    resource=KRNAssetDataStream("my-motor-asset", "motor_speed_set_point"),
    payload=1000,
    expiration_date=timedelta(minutes=5)
)

# Create and Publish a Recommendation
await app.publish(
    Recommendation(
        resource=KRNAsset("my-motor-asset"),
        type="decrease_speed",
        control_changes=[control_change]
    )
)
There is also the option to add Dynacard data that can be viewed in the Recommendation.
In the Kelvin UI, the Dynacard is named Production in the Recommendation.
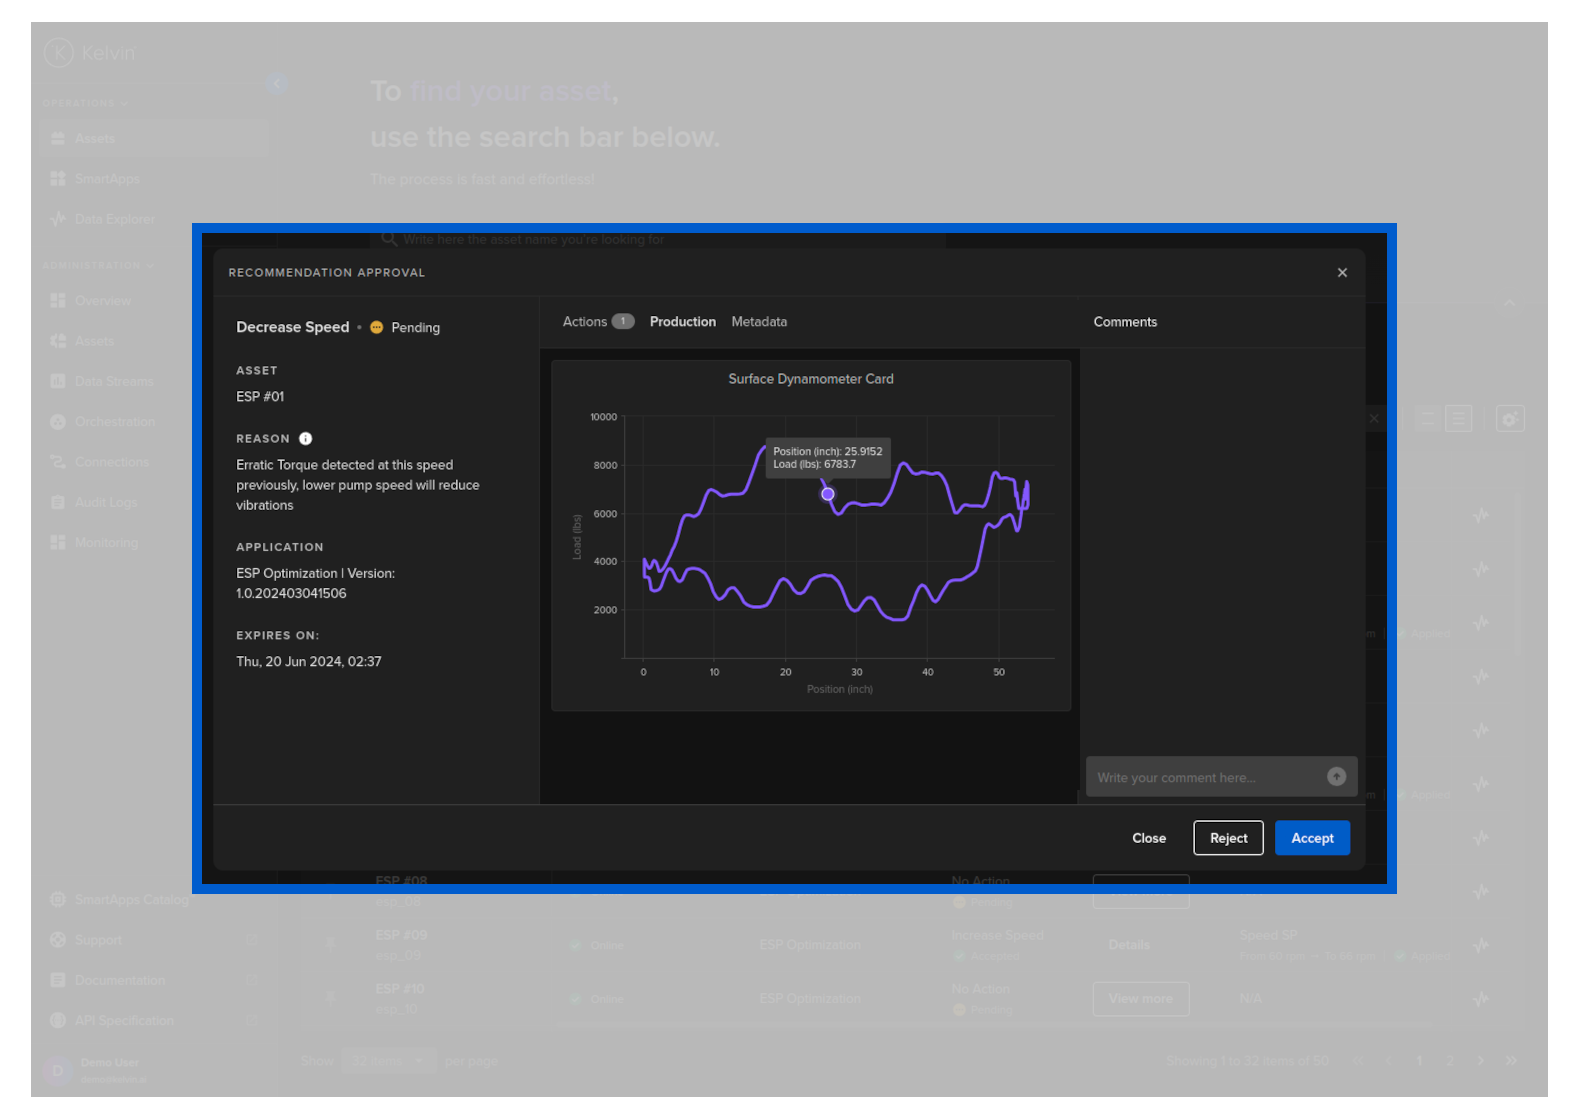
To add Dynacard data, add an evidence key inside metadata with the following structure;
| Key | Description |
|---|---|
| type | dynacard to make the Kelvin UI treat this as Production data |
| title | Title to be used by Kelvin UI |
| payload / data | The actual data to be plotted in Prodcution graph |
| payload / axisLabel | The labels for the x and y axis |
# Create and Publish a Recommendation
await app.publish(
    Recommendation(
        resource=KRNAsset("my-motor-asset"),
        type="decrease_speed",
        control_changes=[control_change],
        metadata={  evidence: [
                        {
                            type: 'dynacard',
                            title: 'Shutdown Dynacard',
                            payload: {
                                data: [
                                    [0, 0],
                                    [1, 1],
                                    [2, 2],
                                    [3, 3],
                                    [4, 4],
                                    [5, 5],
                                    [6, 6],
                                    [7, 7],
                                    [8, 8],
                                    [9, 9]
                                ],
                                axisLabel: {
                                    x: 'Position',
                                    y: 'Load'
                                }
                            }
                        }
                    ],
                    ...otherMetadata
                }
    )
)
Asset Parameters
Asset Parameters can optionally be defined and accessed by Kelvin SmartApps™ in order to parameterize the assets to which Kelvin SmartApps™ has been deployed to. This use case is gonna be explained in the following section.
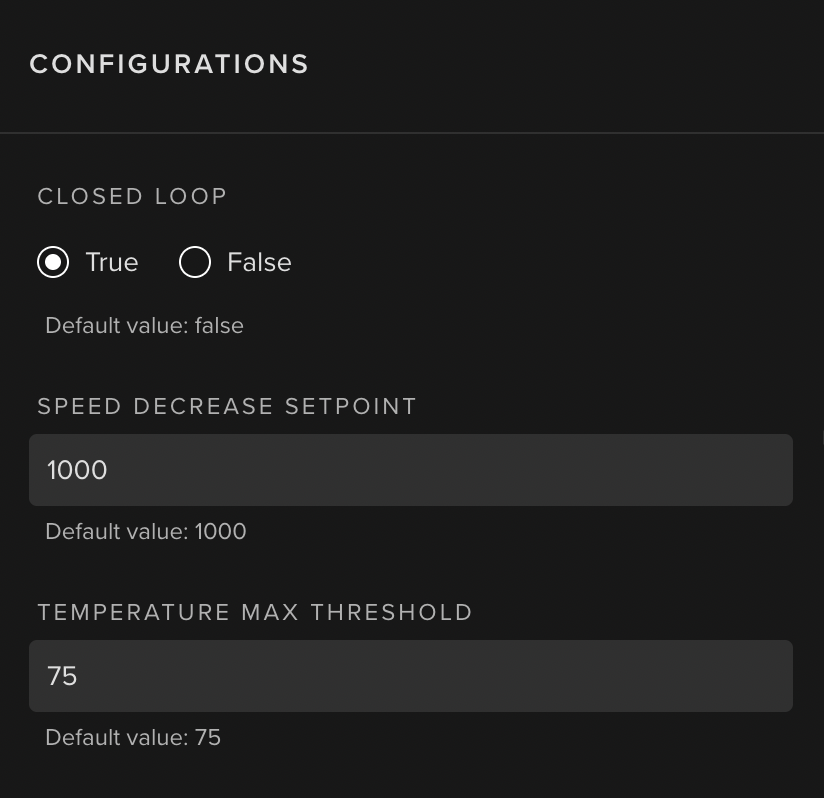
In order to support Asset Parameters, Kelvin SmartApps™ needs to define each parameter upon the app.yaml:
app:
  type: kelvin
  kelvin:

    parameters:
    - name: speed_decrease_set_point
      data_type: number
      default:
        value: 1000
      schema:
        title: "Speed Decrease SetPoint"
        minimum: 1000
        maximum: 3000
    - name: temperature_max_threshold
      data_type: number
      default:
        value: 75
      schema:
        title: "Temperature Max Threshold"
        minimum: 50
        maximum: 100
- name: This will be used in the Python code to reference the input. It must contain only lowercase alphanumeric characters. The characters
.,_and-are allowed to separate words instead of a space BUT can not be at the beginning or end of the name. - data_type:
number,booleanorstring. - default: [optional] sets a
defaultvaluethat will be applied to each - schema: [optional] sets a
titleand/or itsminimumandmaximumvalue boundaries
This is how to access Asset Parameters:
-
assetsObjectAccess a single
Asset Parametervalue directly from anassetsDictionary Object embedded withinKelvinApp:import asyncio from kelvin.application import KelvinApp async def main() -> None: app = KelvinApp() await app.connect() (...) # Get Asset Parameter temperature_max_threshold = app.assets["my-motor-asset"].parameters["temperature_max_threshold"]Info
app.assetswill only be available afterapp.connect()
Asset Parameter updates can be done through the UI:
Kelvin SmartApps™ Configuration
Kelvin SmartApps™ Configuration can optionally be defined and accessed by Kelvin SmartApps™ in order to configure Kelvin SmartApps™ as a whole. This use case is gonna be explained in the following section.
It holds "global" Kelvin SmartApps™ configurations that can be defined through an arbitrarily Object structure upon the app.yaml. i.e.:
app:
  type: kelvin
  kelvin:

    configuration:
      connection:
        ip: 192.168.0.1
        port: 4747
      credentials:
        username: my-username
        password: my-password

      temperature_threshold_tolerance: 5
This is how to access the Kelvin SmartApps™ Configuration:
-
app_configurationObjectAccess a single
Kelvin SmartApps™ Configurationvalue directly from anapp_configurationDictionary Object embedded withinKelvinApp:import asyncio from kelvin.application import KelvinApp async def main() -> None: app = KelvinApp() await app.connect() (...) # Get IP ip = app.app_configuration["connection"]["ip"]Info
app.app_configurationwill only be available afterapp.connect()
Test
Kelvin SmartApps™ testing is available in the Kelvin SDK. It consists on a tool that publishes Messages based upon a Kelvin SmartApp™ Inputs, Asset Parameters and Kelvin SmartApps™ Configuration.
It can be used via the application test command:
Ensure that your terminal is opened in Kelvin SmartApps™ directory before executing these commands. This step is crucial since the Kelvin command utilizes files in the current directory for initialization and operation.
$ kelvin application test

Usage: application test [OPTIONS] COMMAND [ARGS]...

  Test local application.

Options:
  --help  Show this message and exit.

Commands:
  csv        Publishes data from a csv to the application
  simulator  Generates random data to application inputs
This tool has two different ways of publishing test Data Messages:
- Simulator
- CSV (Ingestion)
We will go through each one of them in the following sections.
Simulator
$ kelvin application test simulator
The simulator allows the tester to simulate Data Messages based upon Kelvin SmartApps™ app.yaml inputs.
It supports the following options:
| Parameter | Required | Description | Note |
|---|---|---|---|
--config TEXT |
optional | Path to the app.yaml |
Default: Current directory |
--random / --counter |
optional | Random values / Incremental values | Default: Random values |
--min FLOAT |
optional | Minimum value | Default: 0 |
--max FLOAT |
optional | Maximum value | Default: 100 |
--period FLOAT |
optional | Publishing period in seconds | Default: 5 |
--asset-count INTEGER |
optional | Number of Assets (test-asset-N) | Default: 1 |
--asset-parameter TEXT |
optional | Sets Asset Parameter | Can be used multiple times |
How to use it
Info
In order to show how to use it, we're gonna test the Event Detection (Complex) sample Kelvin SmartApps™.
-
Run the Simulator Tool:
$ kelvin app test simulator --config ~/event-detection-complex/app.yaml --counter --min 50 --max 60 --period 1 --asset-parameter temperature_max_threshold=55 --asset-parameter speed_decrease_set_point=1050 --asset-parameter closed_loop=true -
Run the Kelvin SmartApp™:
$ python3 main.py Application Parameters: {'temperature_threshold_tolerance': 0} Asset Parameters: {'test-asset-1': {'closed_loop': 'true', 'speed_decrease_set_point': '1050', 'temperature_max_threshold': '55'}} (...) Received Motor Temperature | Asset: test-asset-1 | Value: 55.0 Received Motor Temperature | Asset: test-asset-1 | Value: 56.0 Published Motor Speed SetPoint Control Change: 1050 (...) -
Validate Simulator Test Logs:
Client Connected

(...)

Received Data Message:
 Number(id=UUID('b384fdfc-6f70-4a62-a6be-8881e1eb99dc'), type=KMessageTypeData('data', 'pt=number'), trace_id=None, source=None, timestamp=datetime.datetime(2023, 10, 27, 2, 56, 0, 488586, tzinfo=datetime.timezone(datetime.timedelta(seconds=3600), 'WEST')), resource=KRNAssetDataStream(asset='test-asset-1', data_stream='motor_temperature_fahrenheit'), payload=129.2)

Received Data Message:
 Number(id=UUID('a9a5bfb6-d284-4b32-967b-90db550cb037'), type=KMessageTypeData('data', 'pt=number'), trace_id=None, source=None, timestamp=datetime.datetime(2023, 10, 27, 2, 56, 1, 496926, tzinfo=datetime.timezone(datetime.timedelta(seconds=3600), 'WEST')), resource=KRNAssetDataStream(asset='test-asset-1', data_stream='motor_temperature_fahrenheit'), payload=131.0)

Received Control Change Message:
 ControlChangeMsg(id=UUID('3a5ffc75-69b8-4e38-b57c-fabd05d6097b'), type=KMessageTypeControl('control', ''), trace_id=None, source=None, timestamp=datetime.datetime(2023, 10, 27, 2, 56, 2, 497650, tzinfo=datetime.timezone(datetime.timedelta(seconds=3600), 'WEST')), resource=KRNAssetDataStream(asset='test-asset-1', data_stream='motor_speed_set_point'), payload=ControlChangePayload(timeout=None, retries=None, expiration_date=datetime.datetime(2023, 10, 27, 3, 1, 2, 497532, tzinfo=datetime.timezone(datetime.timedelta(seconds=3600), 'WEST')), payload='1050'))

(...)
CSV (Ingestion)
$ kelvin app test csv
The csv tool allows the tester to ingest Messages from a CSV file.
It supports the following options:
| Parameter | Required | Description | Note |
|---|---|---|---|
--csv TEXT |
required | Path to the CSV file | N/A |
--config TEXT |
optional | Path to the app.yaml |
Default: Current directory |
--publish-rate FLOAT |
optional | Overrides CSV Publishing rate (in seconds) | 0 forces instant feed |
--playback |
optional | Offsets the first csv timestamp to the current time | N/A |
--replay |
optional | Continuously publish data from CSV when reaching EOF | N/A |
--asset-count INTEGER |
optional | Number of Assets (test-asset-N) | Default: 1 |
--asset-parameter TEXT |
optional | Sets Asset Parameter | Can be used multiple times |
CSV Structure
Event Detection CSV Data Example:
timestamp,motor_temperature
2023-10-27 10:00:01.0,50
2023-10-27 10:00:02.0,51
2023-10-27 10:00:03.0,52
2023-10-27 10:00:04.0,53
2023-10-27 10:00:05.0,54
2023-10-27 10:00:06.0,55
2023-10-27 10:00:07.0,56
2023-10-27 10:00:08.0,57
2023-10-27 10:00:09.0,58
2023-10-27 10:00:10.0,59
2023-10-27 10:00:11.0,60
The CSV file structure needs to be built according to the following rules:
- timestamp can be any Arrow supported format
- i.e.:
Unix timestamp,Datetime, etc
- i.e.:
- Supports 1 to N
inputs- i.e.: motor_temperature, etc
Asset Parametercolumns can be added- i.e.: temperature_max_threshold, speed_decrease_set_point, closed_loop, etc
How to use it
Info
In order to show how to use it, we're gonna test the Event Detection (Complex) sample Kelvin SmartApps™.
-
Run the CSV Tool:
$ kelvin app test csv --config ~/event-detection-complex/app.yaml --csv ~/event-detection-complex/csv/data_export.csv --asset-parameter temperature_max_threshold=55 --asset-parameter speed_decrease_set_point=1050 --asset-parameter closed_loop=true -
Run the Kelvin SmartApp™:
$ python main.py Kelvin SmartApps™ Parameters: {'temperature_threshold_tolerance': 0} Asset Parameters: {'test-asset-1': {'closed_loop': 'true', 'speed_decrease_set_point': '1050', 'temperature_max_threshold': '55'}} (...) Received Motor Temperature | Asset: test-asset-1 | Value: 55.0 Received Motor Temperature | Asset: test-asset-1 | Value: 56.0 Published Motor Speed SetPoint Control Change: 1050 (...) -
Validate CSV Test Logs:
Client Connected

(...)

Received Data Message:
 Number(id=UUID('f8771d05-e086-4124-9c28-8ee6b27e053d'), type=KMessageTypeData('data', 'pt=number'), trace_id=None, source=None, timestamp=datetime.datetime(2023, 10, 27, 18, 47, 14, 941906, tzinfo=datetime.timezone(datetime.timedelta(seconds=3600), 'WEST')), resource=KRNAssetDataStream(asset='test-asset-1', data_stream='motor_temperature_fahrenheit'), payload=129.2)

Received Data Message:
 Number(id=UUID('d23f7899-0452-4e40-a3ec-6fa3c69c8210'), type=KMessageTypeData('data', 'pt=number'), trace_id=None, source=None, timestamp=datetime.datetime(2023, 10, 27, 18, 47, 15, 944177, tzinfo=datetime.timezone(datetime.timedelta(seconds=3600), 'WEST')), resource=KRNAssetDataStream(asset='test-asset-1', data_stream='motor_temperature_fahrenheit'), payload=131.0)

Received Control Change Message:
 ControlChangeMsg(id=UUID('b7eed53c-3b62-4809-9c43-2b0b70451fc5'), type=KMessageTypeControl('control', ''), trace_id=None, source=None, timestamp=datetime.datetime(2023, 10, 27, 18, 47, 16, 944724, tzinfo=datetime.timezone(datetime.timedelta(seconds=3600), 'WEST')), resource=KRNAssetDataStream(asset='test-asset-1', data_stream='motor_speed_set_point'), payload=ControlChangePayload(timeout=None, retries=None, expiration_date=datetime.datetime(2023, 10, 27, 18, 52, 16, 944690, tzinfo=datetime.timezone(datetime.timedelta(seconds=3600), 'WEST')), payload='1050'))

(...)

CSV ingestion is complete
Upload
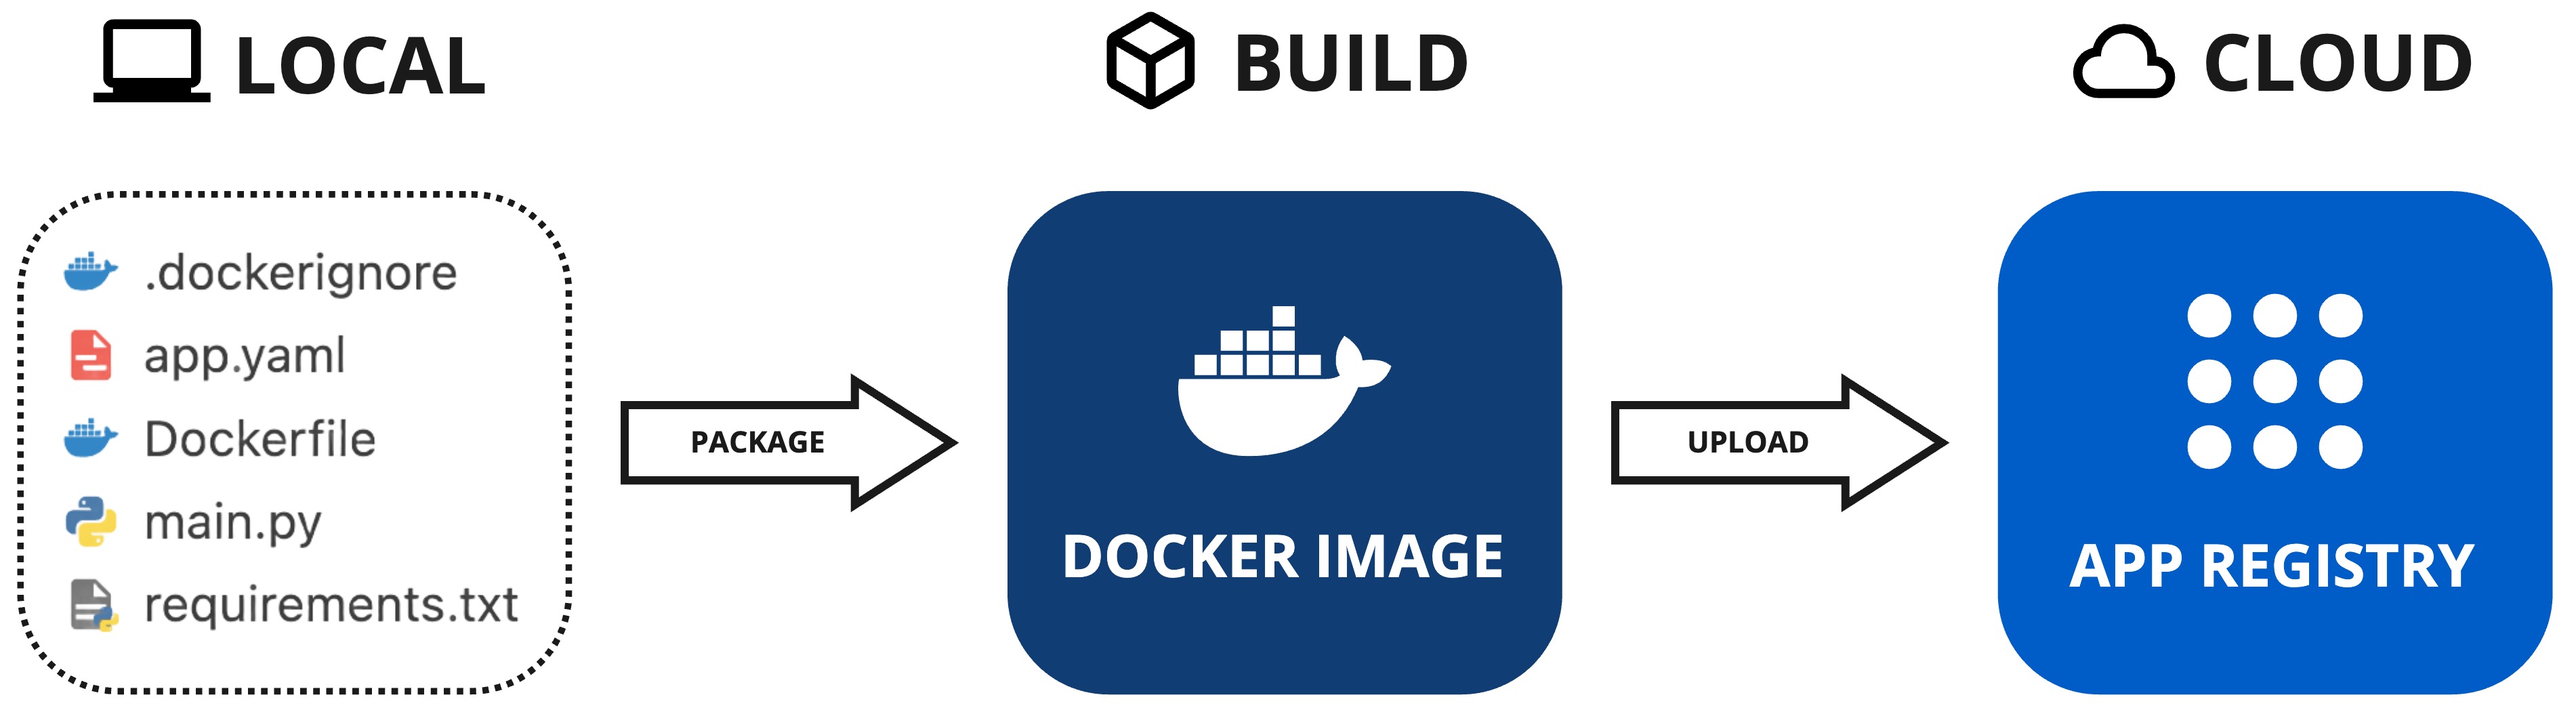
In this step you will upload your Kelvin SmartApp™ to the App Registry.
The info section in the app.yaml file defines the unique name, display name, description and version of Kelvin SmartApps™. Here's your app.yaml file:
info:
  name: event-detection
  title: Event Detection
  description: Monitors if a motor is overheating. If so, it will send a Control Change to reduce the Motor Speed.
  version: 1.0.0
Every time you upload your Kelvin SmartApp™ to the App Registry, you need to increment the version number. The version number is in the format of major.minor.patch.
You will get an error if you try to upload your Kelvin SmartApp™ to the App Registry if it already exists in the App Registry with the same version number.
Uploading the Kelvin SmartApp™ is very easy and only needs a one instruction line. To do this, open a new terminal in the folder where your program and all the associated files are located and type;
kelvin app upload
For this step Docker must be installed and running as it is used to package and upload ะ้ำ Kelvin SmartApp™ to the App Registry.
As the command runs, you will observe Kelvin SmartApps™ being packaged and subsequently uploaded to the App Registry. Here's a sample output:
[kelvin.sdk][2023-10-03 20:53:51][R] Image successfully built: "event-detection:1.0.0"
[kelvin.sdk][2023-10-03 20:53:51][I] Pushing application content to "https://<url.kelvin.ai>"
       [elapsed: 00:19] - [Layer: 2e1bc7550524] - [Pushed]
       [elapsed: 00:19] - [Layer: f15701d79da8] - [Layer already exists]
[kelvin.sdk][2023-10-03 20:54:10][R] Application "event-detection:1.0.0" successfully pushed to registry "https://<url.kelvin.ai>"
[kelvin.sdk][2023-10-03 20:54:10][R]

            Application successfully uploaded:
                Name: event-detection
                Version: 1.0.0
Congratulations! You've successfully uploaded your Kelvin SmartApp™ and are now ready to deploy it to assets.