Index
Deploying Python Apps
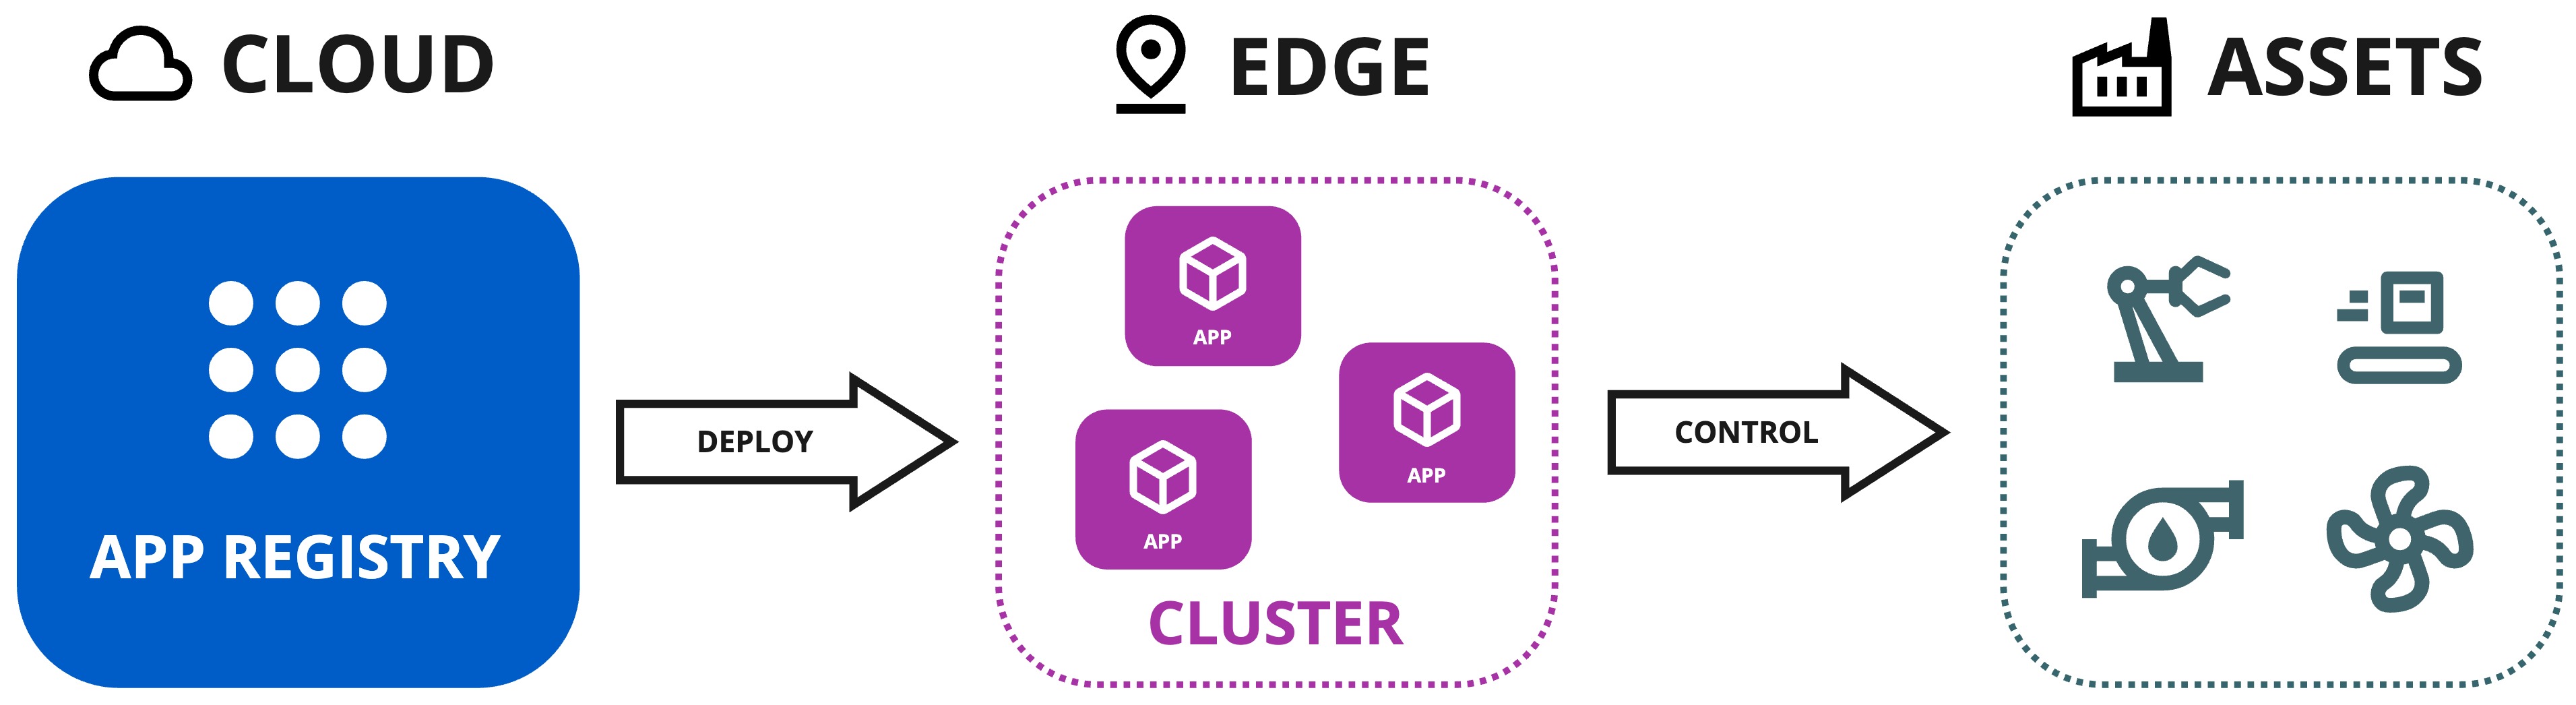
When you have created and uploaded your Python Apps to the App Registry, you will then deploy the Python Apps to the edge.
There are two methods for deploying them to the edge.
-
As Kelvin SmartApps™ (Recommended) : This method will usually be performed by the Production Engineers, though Developers will need to test this functionality during the development phase.
This automates many steps of the deployment process to ensure the Productions Engineers can deploy without requiring a detailed knowledge of the Instance infrastructure and underlying components.
Behind the scenes Kelvin SmartApps™ are special workloads and advanced users can still see the detailed operations in the Orchestration section.
-
As Workloads : This is the advanced method which gives users full flexibility in the configuration of the yaml file and the target edge device.
This is designed for Developers or Platform Administrators and is more suitable for programs that will provide local services (open ports), apps that require deployment to specific hardware or need custom yaml file settings to work properly.
Kelvin SmartApps™ can be deployed from the Kelvin API, Kelvin API Client (Python), Kelvin SDK (terminal) and Kelvin UI.
For Production Engineers they will only use the Kelvin UI. For Developers and Platform Administrators it is strongly recommended to use the Kelvin UI when testing Python Apps to simulate the Production Engineers workflow.
If Developers only want to do quick deploys for logic testing, then it is recommended you use the Kelvin SDK in the terminal with Kelvin SmartApp™ deploy. This allows you to do stay within the same environment after you upload your Kelvin SmartApp™.
You will need to have a Cluster available on your Instance and set the default Cluster name as the target edge device for Kelvin SmartApps™. Details can be found in the Cluster section under Platform Administration.
Workloads can be deployed from the Kelvin API, Kelvin API Client (Python), Kelvin SDK (terminal) and Kelvin UI.
Developers and Platform Administrators can choose the deployment method most suited to their workflow.
Deploying Kelvin SmartApps™ (Recommended)
You can follow a detailed step-by-step guide to deploy Kelvin SmartApps™ in the Quick Start guides here.
Deploying a Workload
When you deploy a workload, you can choose whether to deploy immediately or to stage the workload at the edge and apply it at a later time.
To learn more about Staging and how to send the apply ( start / upgrade ) command to the edge, you can read more below in the chapter Staged Workload Deploy
| Field | Option | Description |
|---|---|---|
| Standard | None | This will use the standard Kubernetes deployment process for workload containers and the workload will be automatically started after downloaded to the edge. |
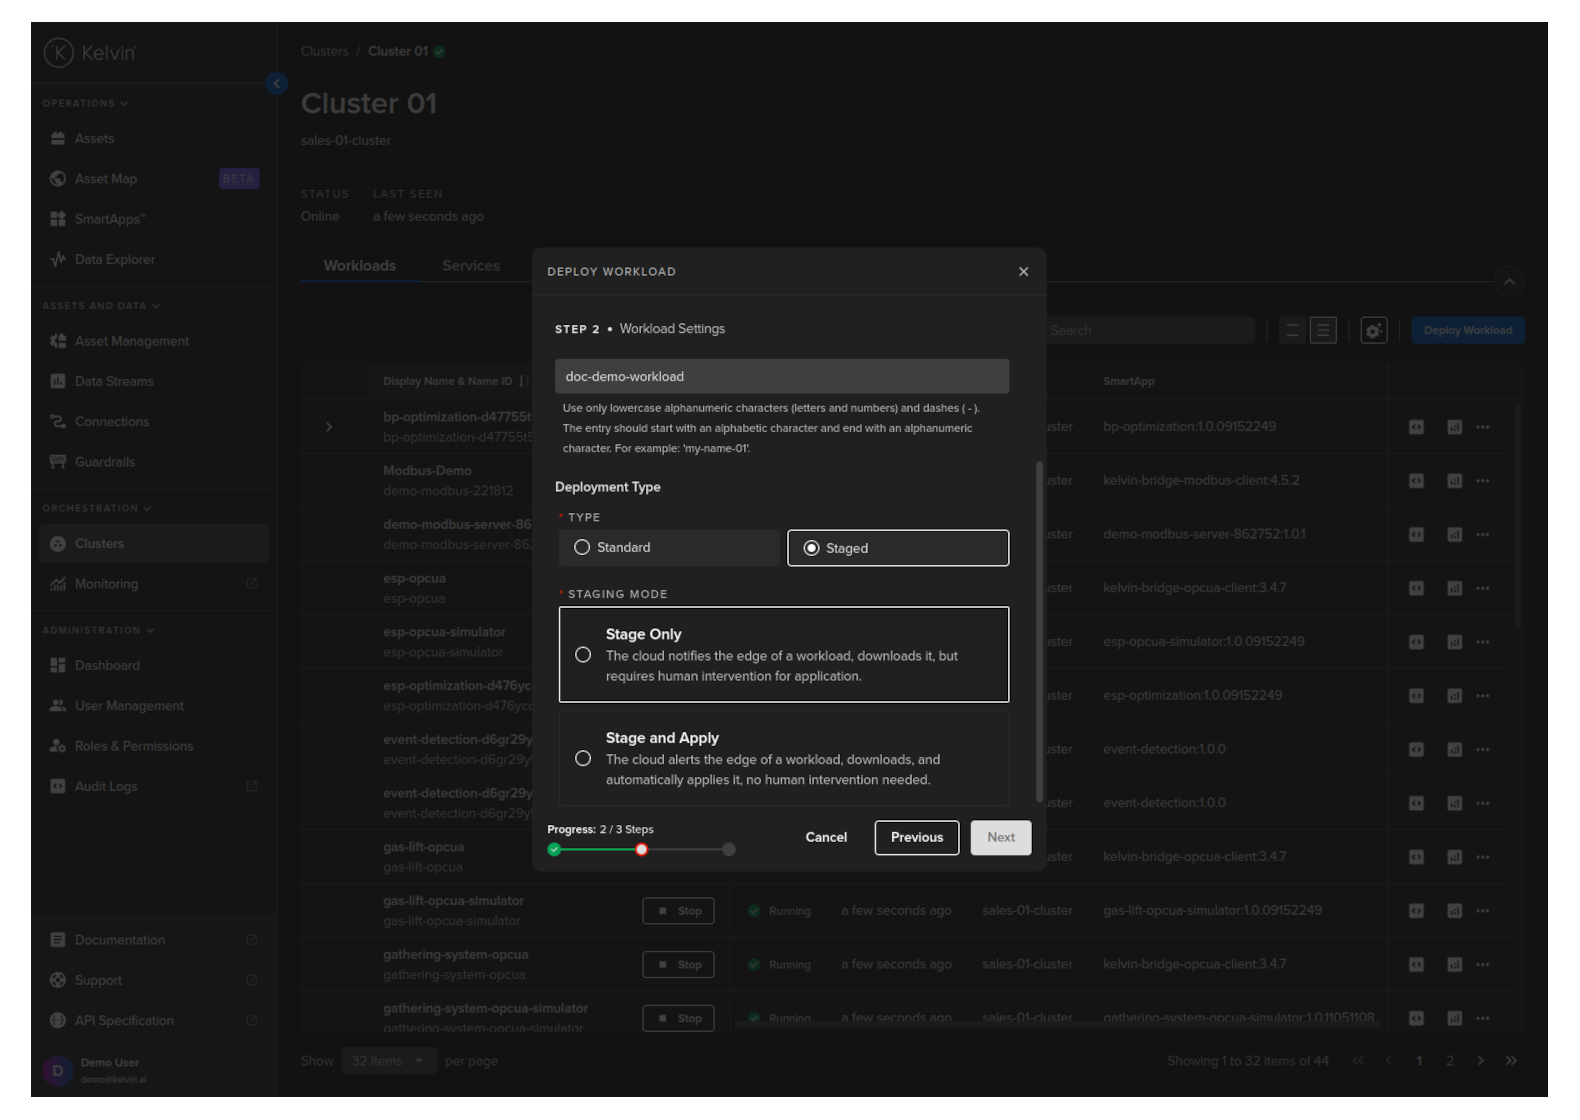
| Staged | Stage Only | This will download the workload to the edge but will not start the workload. You will need to send an additional command to start the workload either through the Kelvin API or locally in the terminal of the edge computer |
| Staged | Stage and Apply | This will use Kelvin's deployment process for workload containers and the workload will be automatically started after downloaded to the edge. The difference to the Kubernetes deployment process is that Kelvin will download all workloads and stage them first. Only when all workloads have been successfully downloaded will the start command be given to all the workloads. |
You can deploy a Workload from the list of Kelvin SmartApps™ available from the Kelvin SmartApp™ Registry using the Kelvin UI. This deployment method gives you full access to all the parameters and options to fine tune how Kelvin SmartApps™ is deployed and which Edge device it is deployed to.
This method of Deployment is different from Kelvin SmartApps™ deployment used mainly by Operations from Kelvin SmartApps™ page. If you use this method, you will not see the running Kelvin SmartApp™ in Kelvin SmartApps™ section.
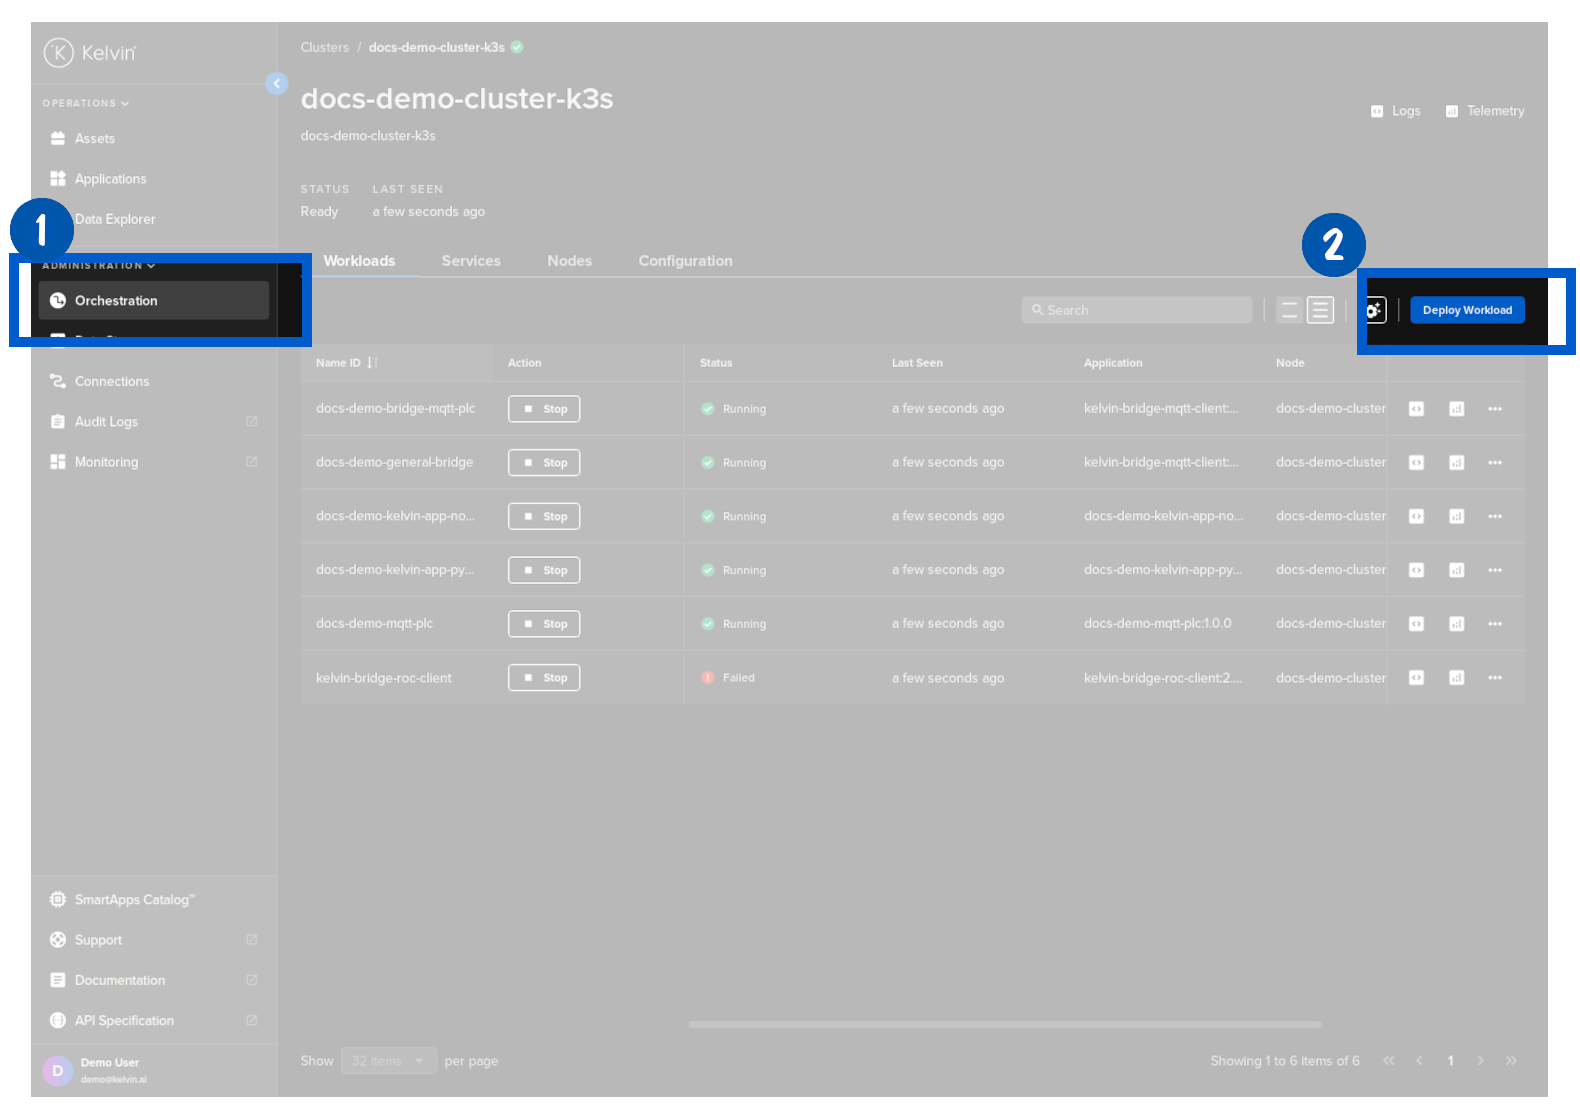
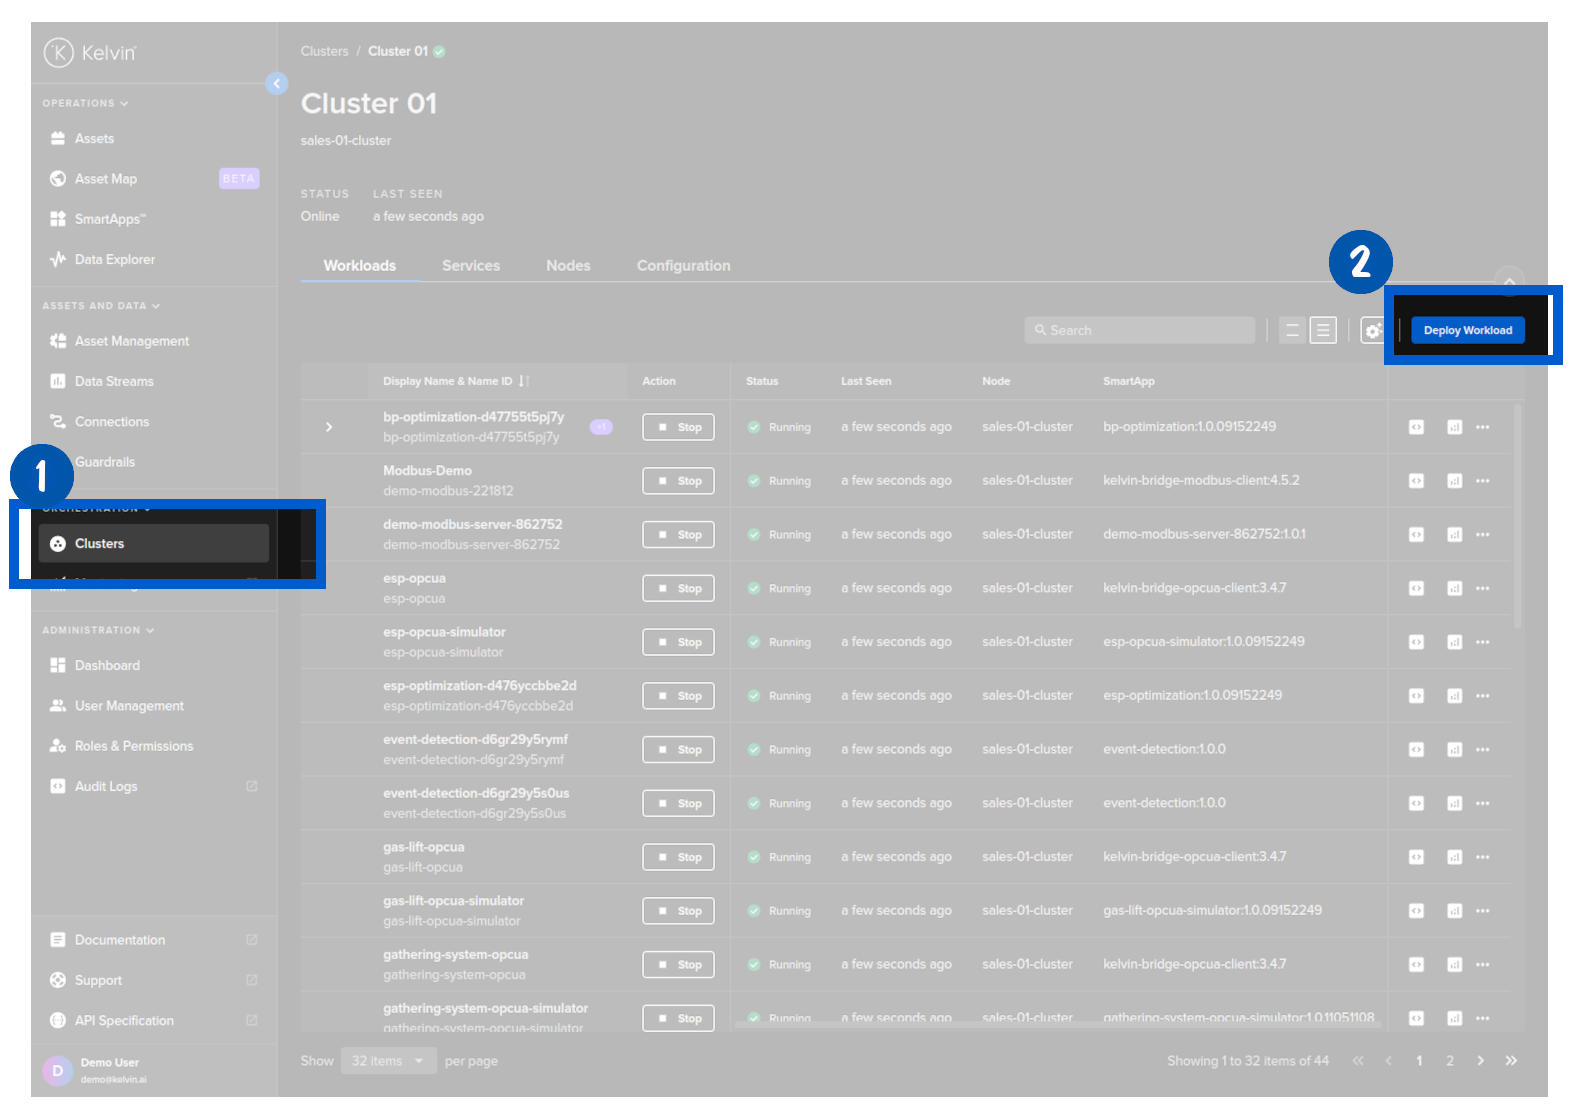
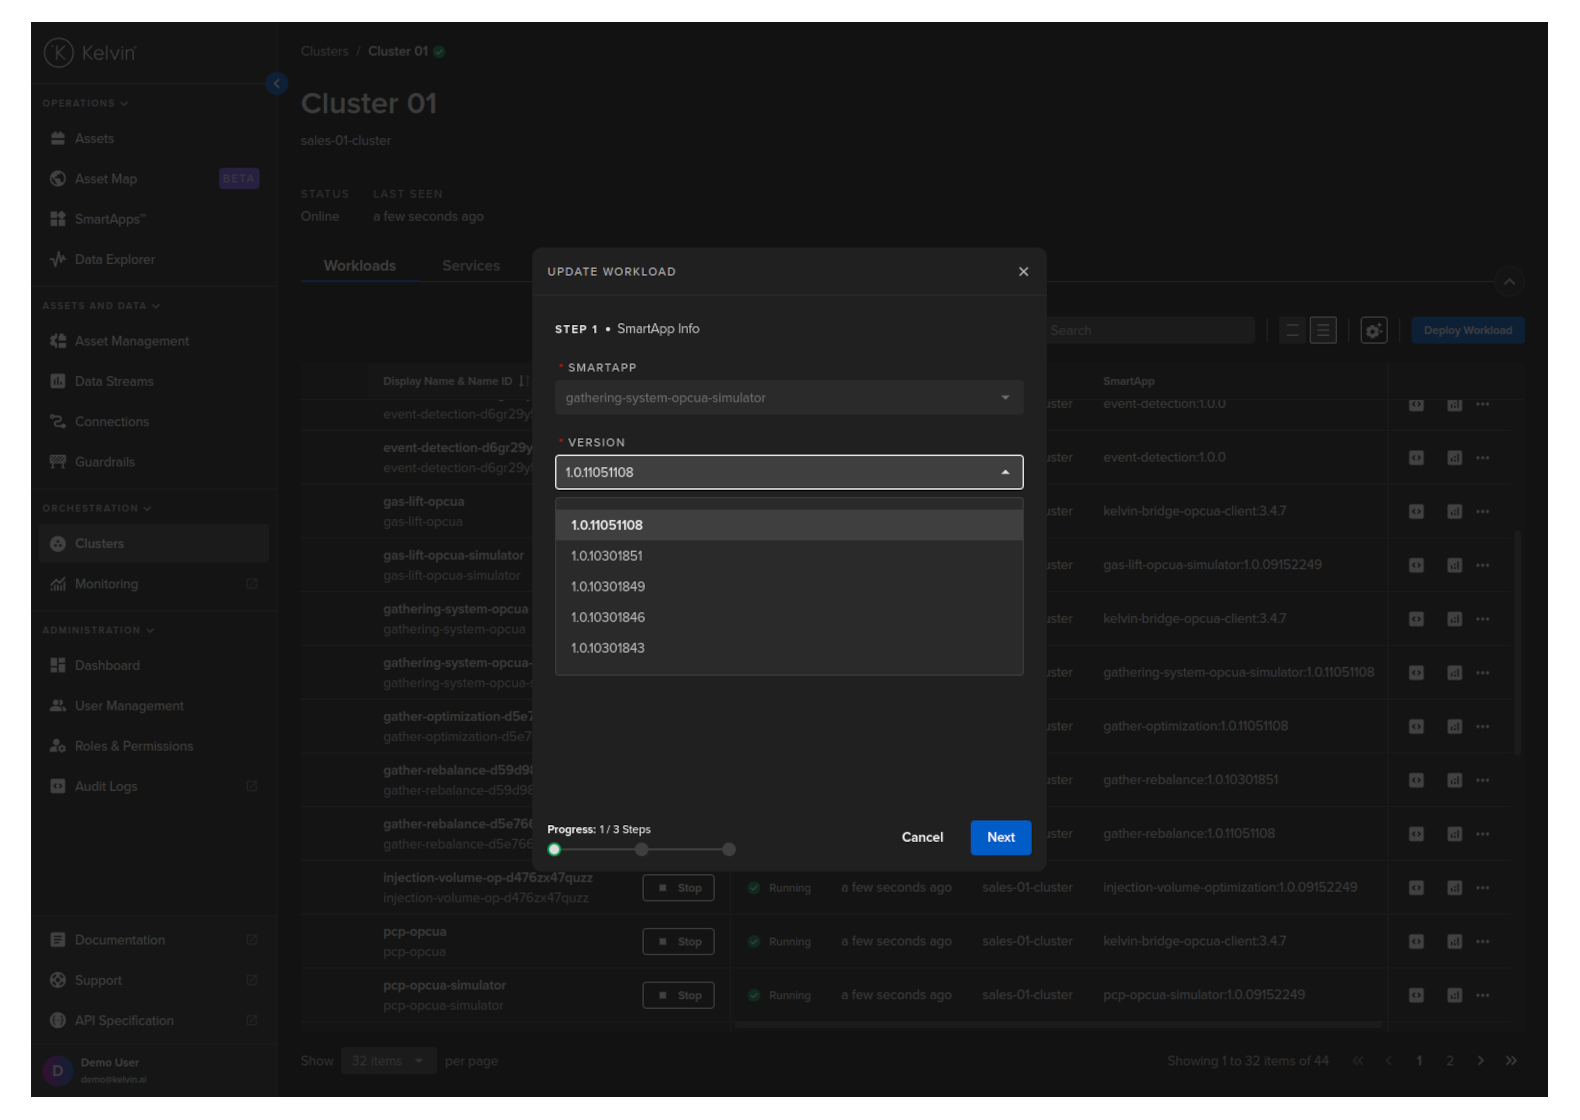
To start, click on the Deploy Workload button;
Then you select Kelvin SmartApps™ from the Kelvin SmartApp™ Registry and choose the version to deploy. When ready click Next to go to Step 2.
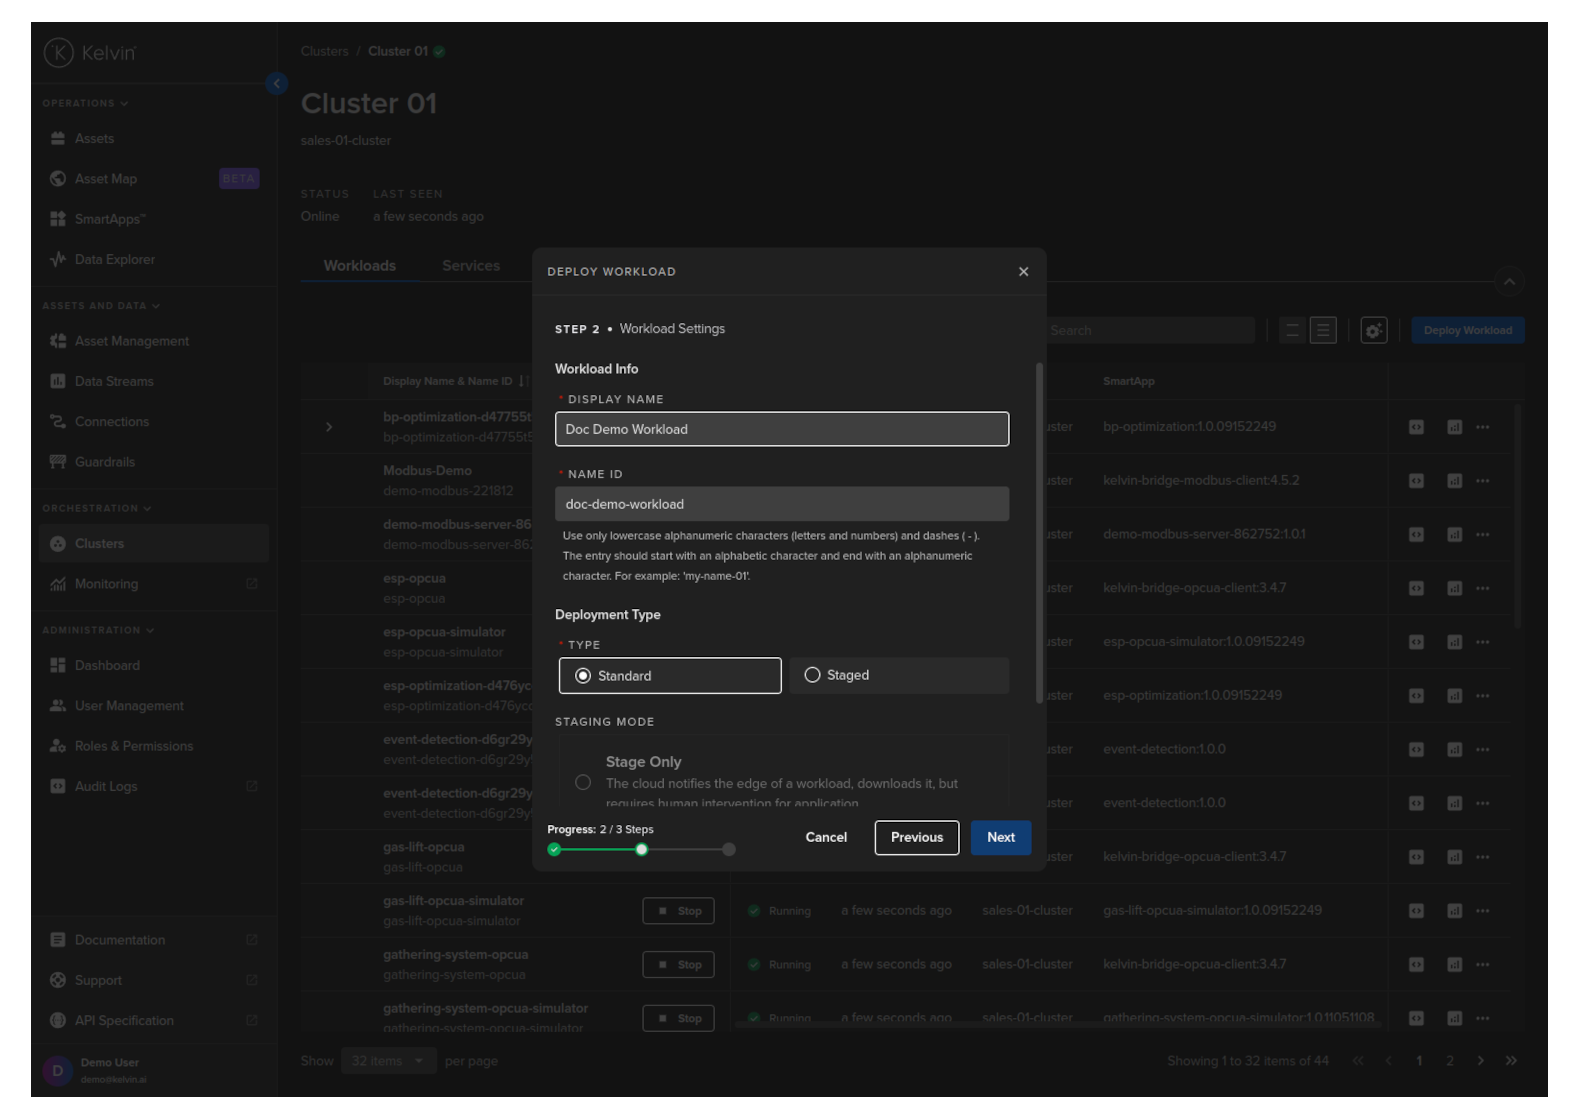
When you deploy Kelvin SmartApps™, the resulting program that is deployed is called a Workload.

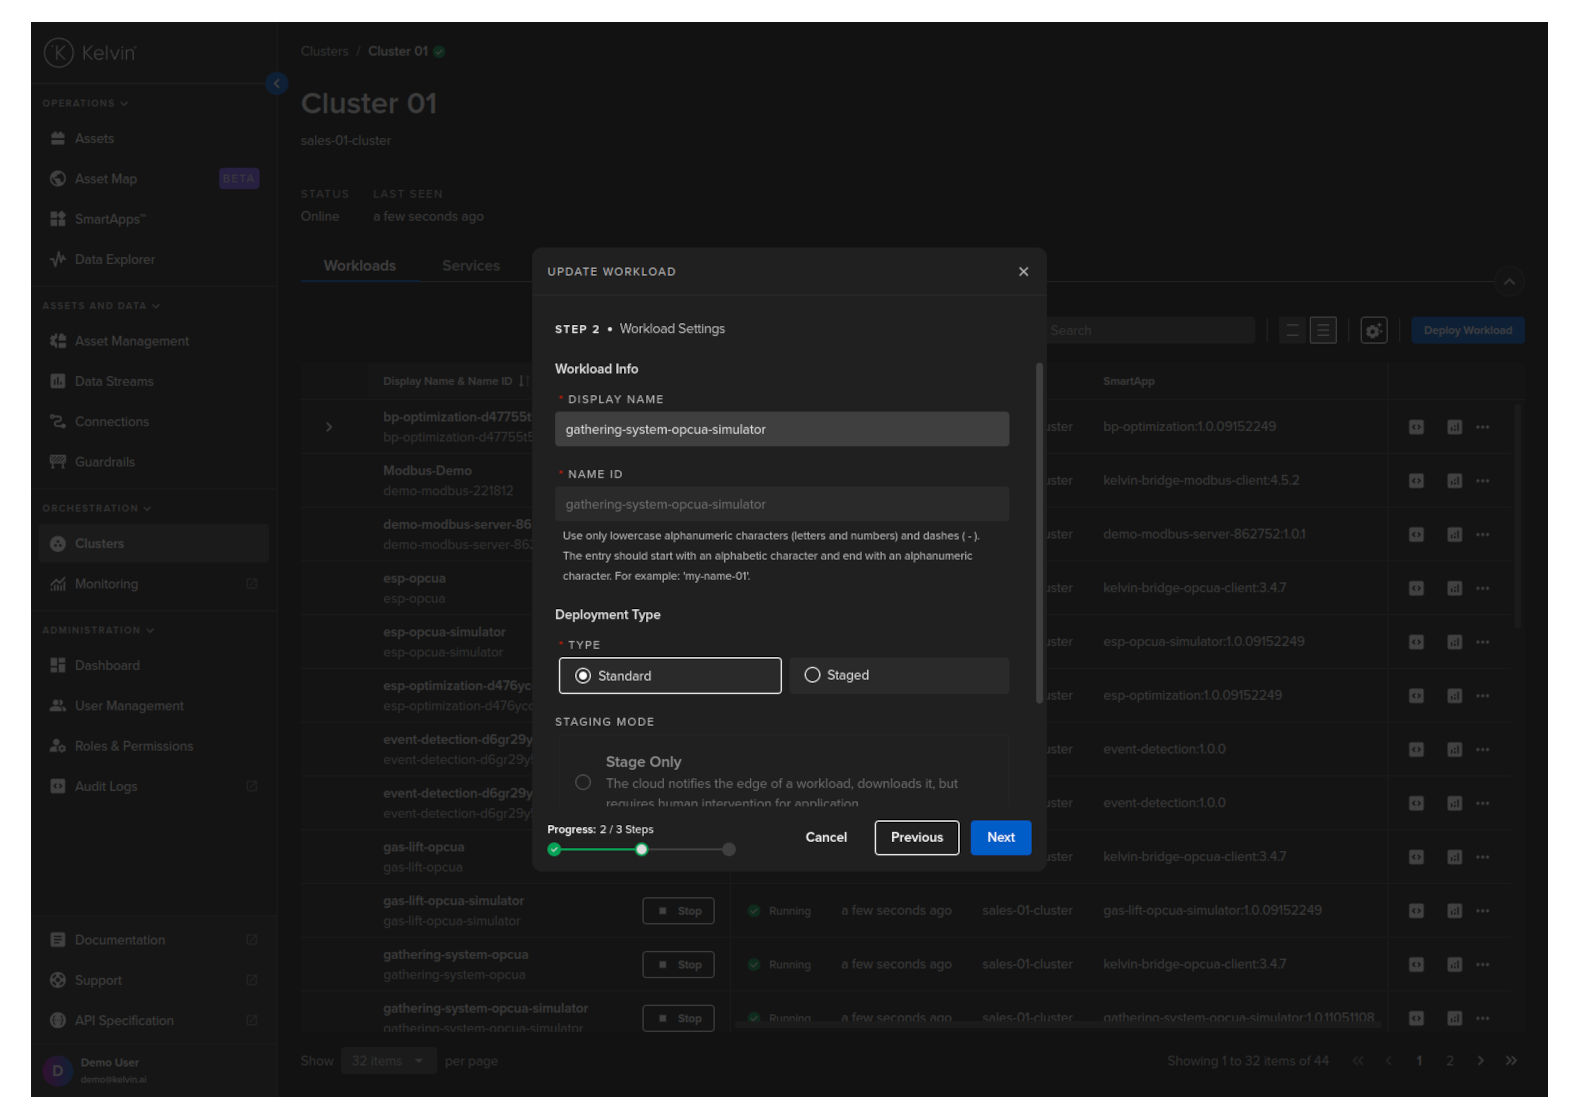
In Step 2 you can provide a custom Workload name for Kelvin SmartApps™ and choose whether it is to be Standard or Staged deployment.
The staged process is very useful in cases where you have poor Internet connection and want to ensure that all workloads are downloaded first before they are started.
It is also useful in cases where you want to have the new/upgrade workload downloaded and ready at the edge but only want to do the change at a time that minimizes disruptions to the operations, like during maintenance shifts. This procedure allows the Operations to initiate the workload start/upgrade regardless of the Internet connectivity and reliability.
For Standard mode, you do not have any other options.
For Staged mode, you have two options;
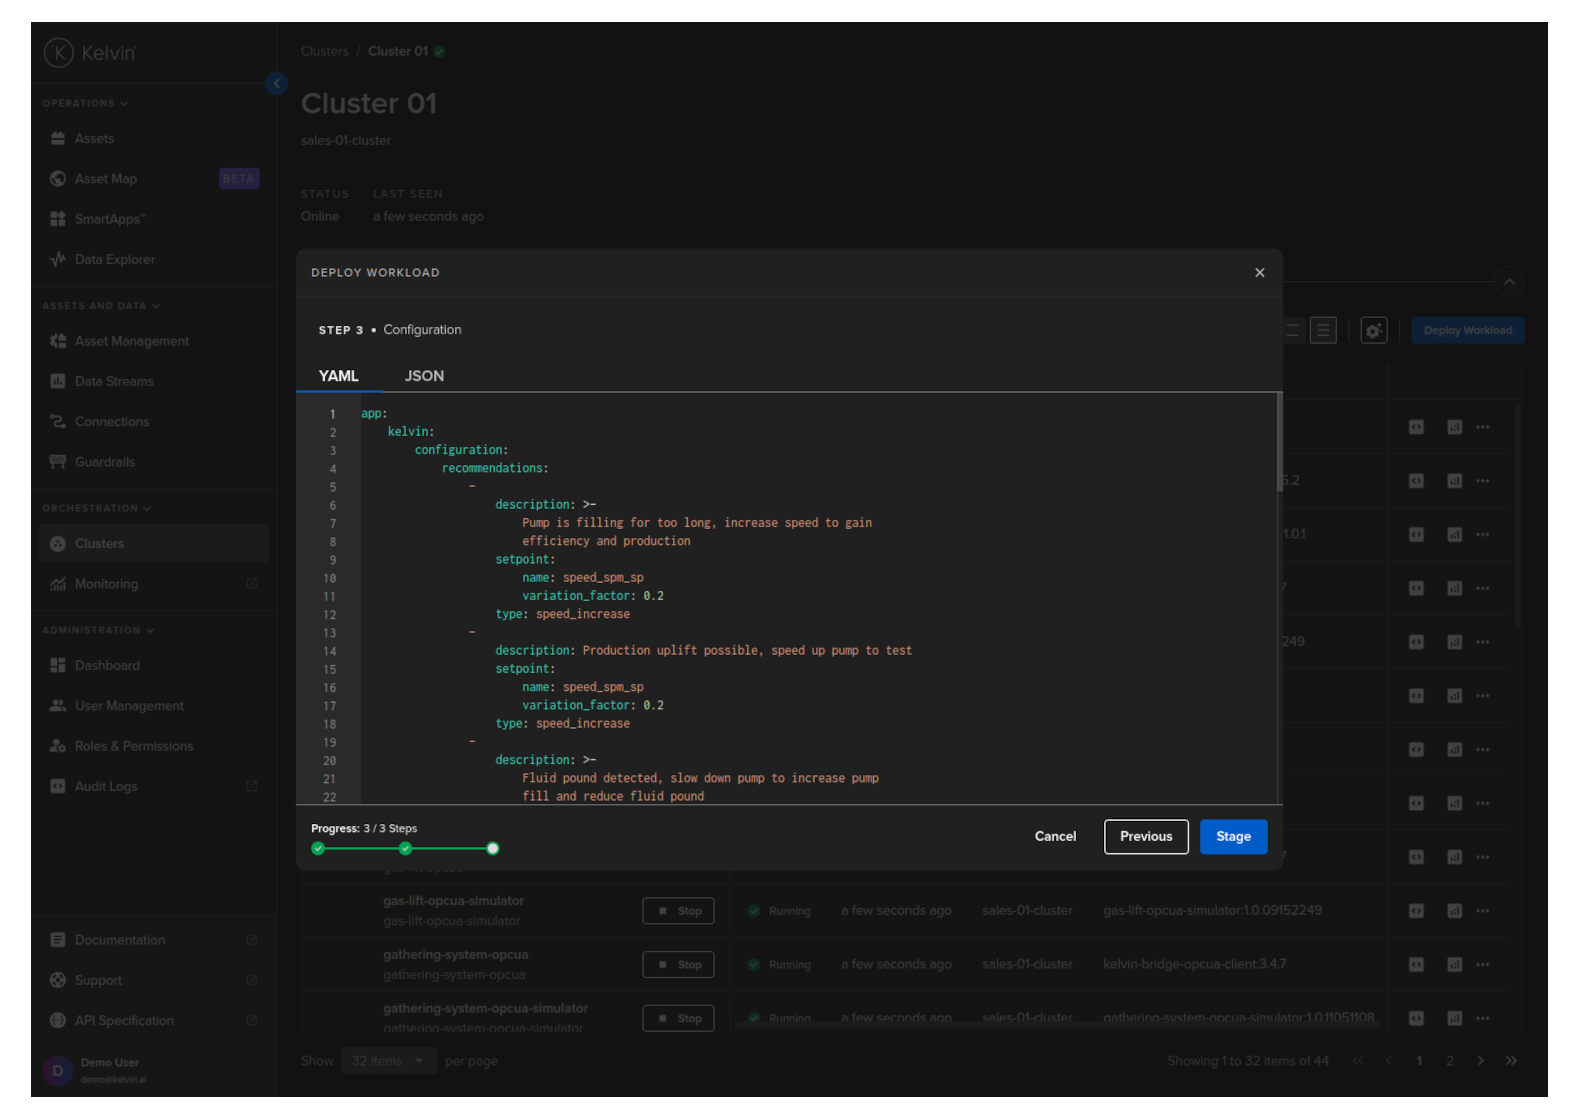
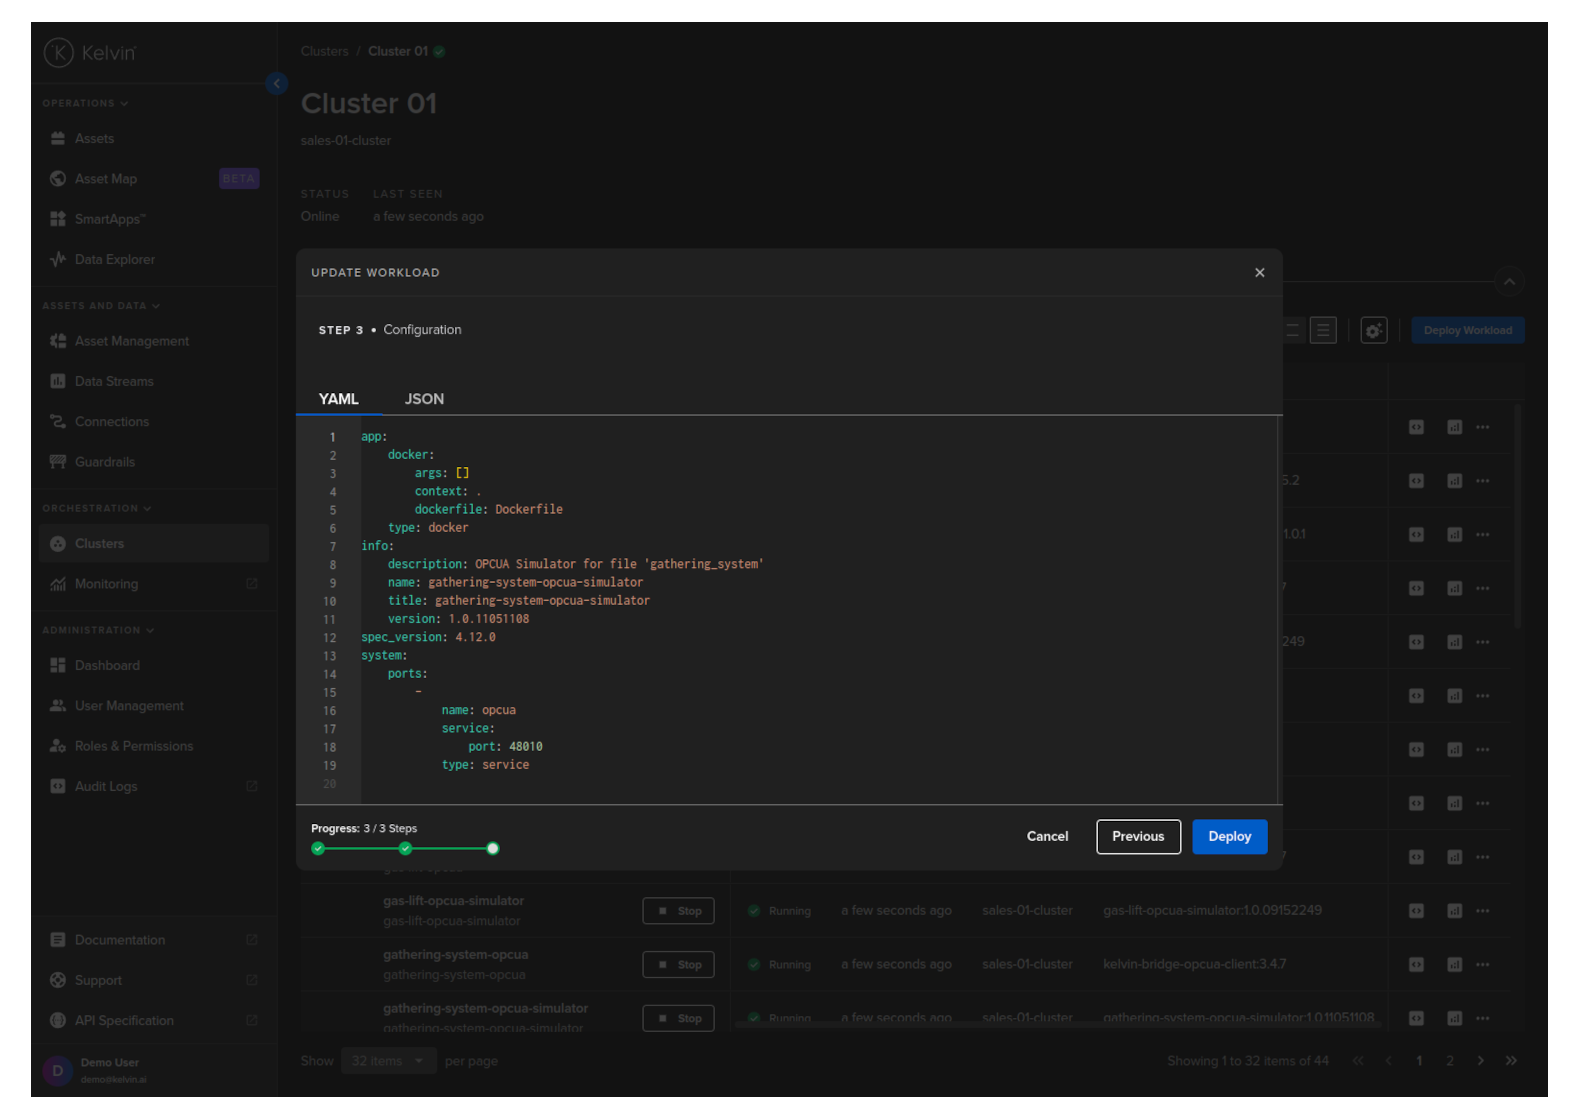
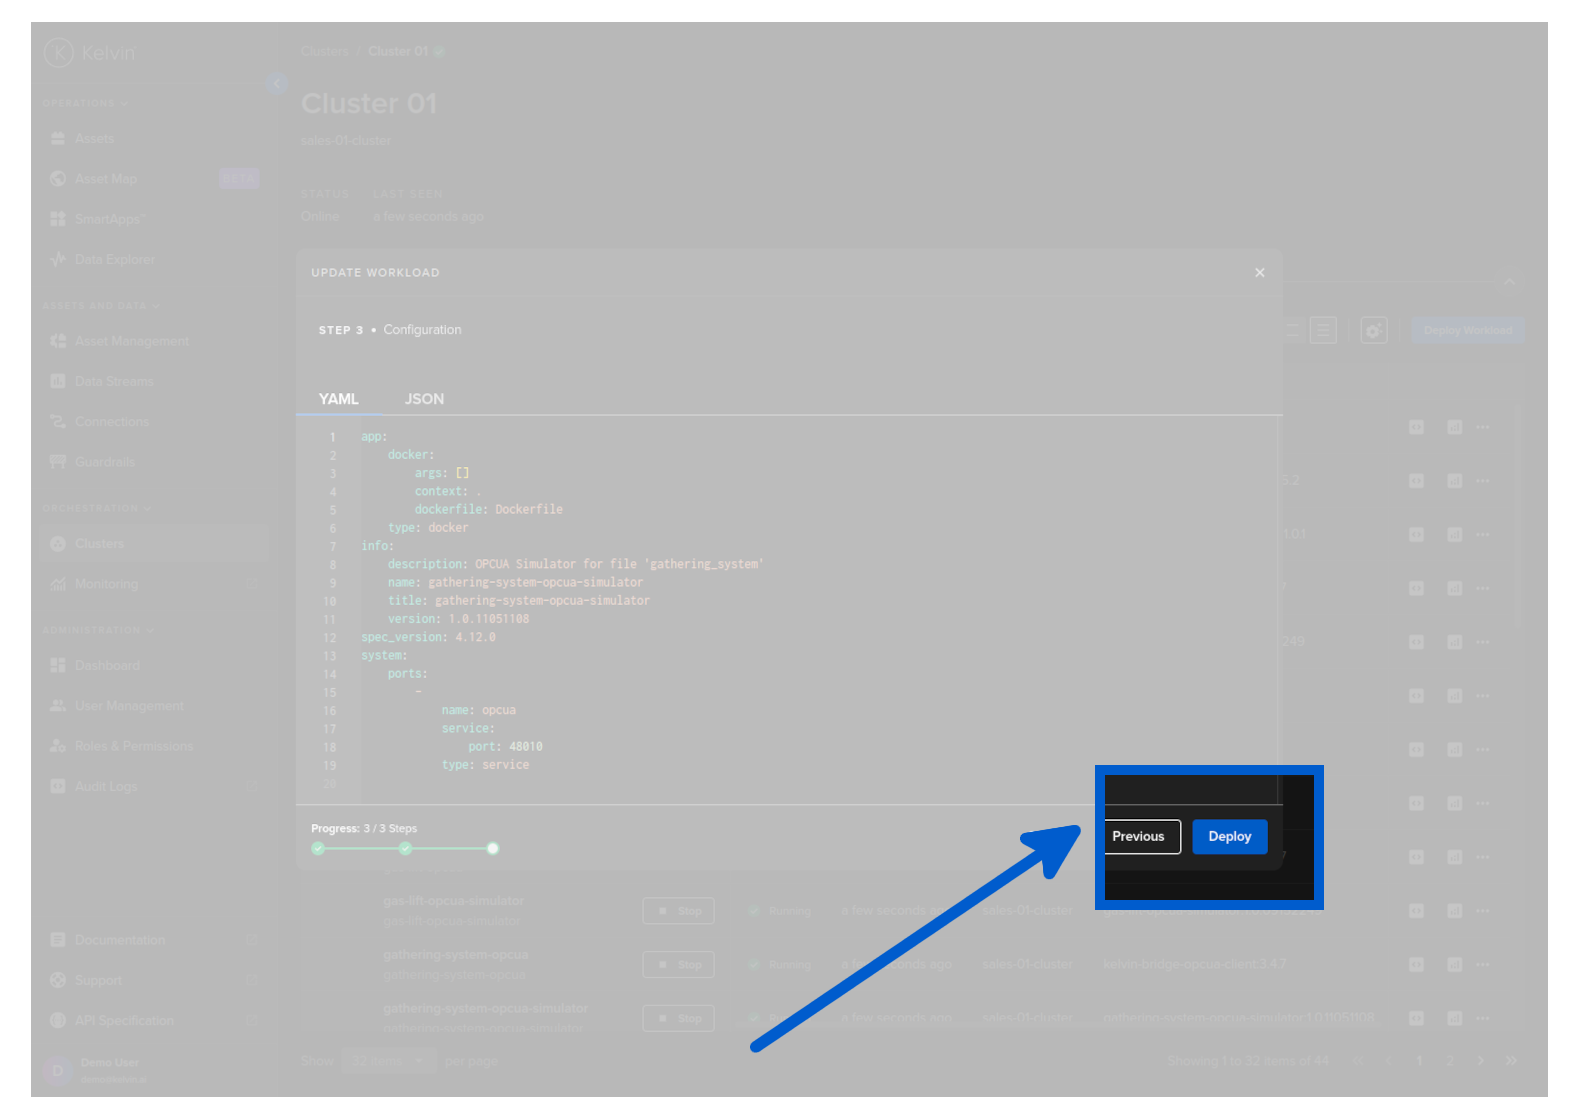
Click next to continue to Step 3. Here you can modify the app.yaml configuration file to suit your requirements and then click on Deploy. Confirm the deployment, then the Workload will be deployed to the edge.
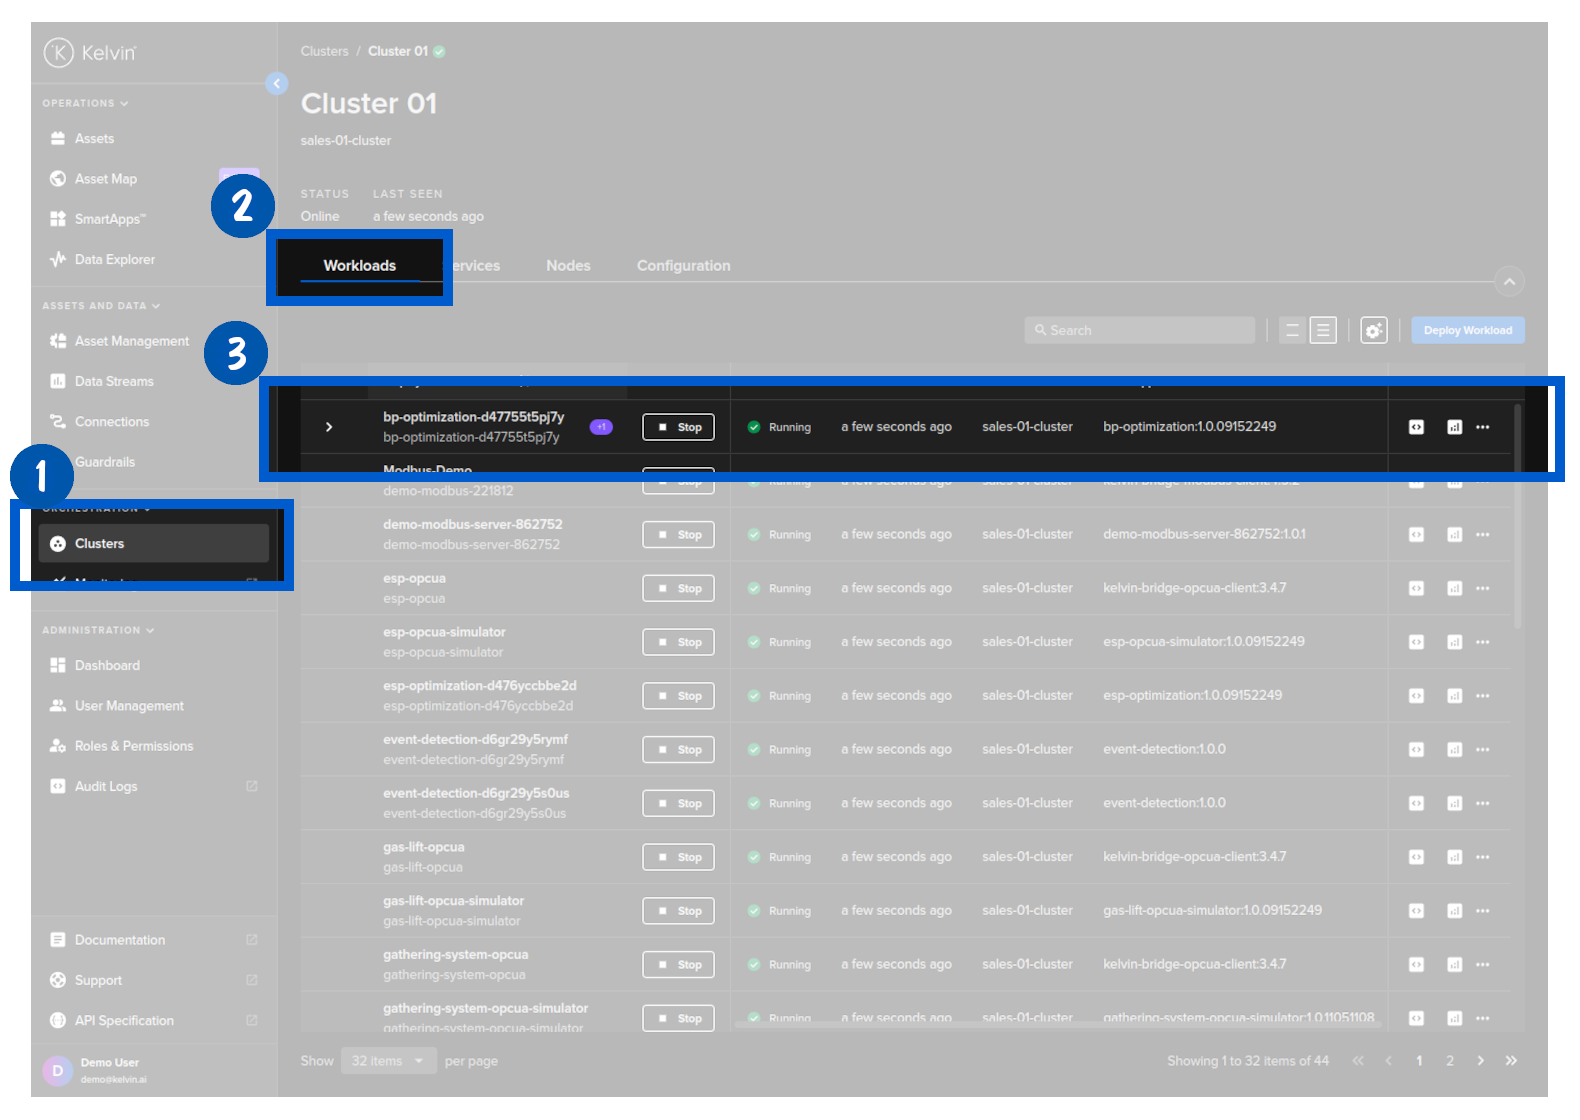
You can then see the status of the Workload in the Workloads list going from Pending, Deploying to Running.
You can even deploy the Kelvin SmartApp™ if the Cluster is offline. It will be placed in a queue with a status of Pending and will be automatically deployed when the Cluster comes back online.
This example only does a standard workload deploy. For staged workload documentation read more below in the chapter Staged Workload Deploy
curl -X 'POST' \
  'https://<url.kelvin.ai>/api/v4/workloads/deploy' \
  -H 'Authorization: Bearer <Your Current Token>' \
  -H 'accept: application/json' \
  -H 'Content-Type: application/json' \
  -d '{
"app_name":"esp-optimization",
"app_version":"1.0.05221921",
"cluster_name":"dev-01-cluster",
"name":"doc-demo-staged-workload",
"payload":{
    "app":{
        "kelvin":{
            "assets":[
            {
                "metrics":{
                    "casing_pressure":{
                        "remote":true
                    },
                    "gas_flow_rate":{
                        "remote":true
                    },
                    "speed":{
                        "remote":true
                    },
                    "speed_sp":{
                        "remote":true
                    }
                },
                "name":"esp_21"
            },
            {
                "metrics":{
                    "casing_pressure":{
                        "remote":true
                    },
                    "gas_flow_rate":{
                        "remote":true
                    },
                    "speed":{
                        "remote":true
                    },
                    "speed_sp":{
                        "remote":true
                    }
                },
                "name":"esp_26"
            }
            ],
            "configuration":{
            "recommendations":[
                {
                    "description":"Water level increasing, higher pump speed will lead water level to return to optimal.",
                    "setpoint":{
                        "name":"speed_sp",
                        "variation_factor":0.1
                    },
                    "type":"increase_speed"
                },
                {
                    "description":"Production gain possible after step test, with higher pump speed",
                    "setpoint":{
                        "name":"speed_sp",
                        "variation_factor":0.1
                    },
                    "type":"increase_speed"
                }
            ]
            },
            "inputs":[
            {
                "data_type":"number",
                "name":"casing_pressure"
            },
            {
                "data_type":"number",
                "name":"gas_flow_rate"
            },
            {
                "data_type":"number",
                "name":"speed"
            },
            {
                "data_type":"number",
                "name":"speed_sp"
            }
            ],
            "language":{
            "python":{
                "entry_point":"app:App"
            },
            "type":"python"
            },
            "outputs":[
            {
                "control_change":true,
                "data_type":"number",
                "name":"speed_sp",
                "storage":"node-and-cloud"
            }
            ]
        },
        "type":"kelvin"
    },
    "info":{
        "description":"This application uses the values coming from the well control system such as flow rate, pressure, and motor speed, to optimize the speed of the ESP motor. As a byproduct we have a lower energy use by the equipment.",
        "name":"esp-optimization",
        "title":"ESP Optimization",
        "version":"1.0.05221921"
    },
    "spec_version":"4.12.0",
    "system":{
        "environment_vars":[
            {
            "name":"KELVIN_GW_MODE",
            "value":"SOCKETS"
            }
        ]
    }
},
"instantly_apply": true,
"staged": false,
"source": "krn:user:demo@kelvin.ai",
"title":"Doc Demo Staged Workload"
}'
You will get a response similar to this;
created=datetime.datetime(2024, 5, 23, 8, 52, 7, 803281, tzinfo=datetime.timezone.utc) name='doc_demo_asset_type' title='Documentation Demo Asset Type' updated=datetime.datetime(2024, 5, 23, 8, 52, 7, 803281, tzinfo=datetime.timezone.utc)
This example only does a standard workload deploy. For staged workload documentation read more below in the chapter Staged Workload Deploy
from kelvin.api.client import Client

# Login
client = Client(config={"url": "https://<url.kelvin.ai>", "username": "<your_username>"})
client.login(password="<your_password>")

# Deploy Standard Workload
response = client.workload.deploy_workload(data={
    "app_name":"esp-optimization",
    "app_version":"1.0.05221921",
    "cluster_name":"dev-01-cluster",
    "name":"doc-demo-staged-workload",
    "payload":{
        "app":{
            "kelvin":{
                "assets":[
                {
                    "metrics":{
                        "casing_pressure":{
                            "remote":True
                        },
                        "gas_flow_rate":{
                            "remote":True
                        },
                        "speed":{
                            "remote":True
                        },
                        "speed_sp":{
                            "remote":True
                        }
                    },
                    "name":"esp_21"
                },
                {
                    "metrics":{
                        "casing_pressure":{
                            "remote":True
                        },
                        "gas_flow_rate":{
                            "remote":True
                        },
                        "speed":{
                            "remote":True
                        },
                        "speed_sp":{
                            "remote":True
                        }
                    },
                    "name":"esp_26"
                }
                ],
                "configuration":{
                "recommendations":[
                    {
                        "description":"Water level increasing, higher pump speed will lead water level to return to optimal.",
                        "setpoint":{
                            "name":"speed_sp",
                            "variation_factor":0.1
                        },
                        "type":"increase_speed"
                    },
                    {
                        "description":"Production gain possible after step test, with higher pump speed",
                        "setpoint":{
                            "name":"speed_sp",
                            "variation_factor":0.1
                        },
                        "type":"increase_speed"
                    }
                ]
                },
                "inputs":[
                {
                    "data_type":"number",
                    "name":"casing_pressure"
                },
                {
                    "data_type":"number",
                    "name":"gas_flow_rate"
                },
                {
                    "data_type":"number",
                    "name":"speed"
                },
                {
                    "data_type":"number",
                    "name":"speed_sp"
                }
                ],
                "language":{
                "python":{
                    "entry_point":"app:App"
                },
                "type":"python"
                },
                "outputs":[
                {
                    "control_change":True,
                    "data_type":"number",
                    "name":"speed_sp",
                    "storage":"node-and-cloud"
                }
                ]
            },
            "type":"kelvin"
        },
        "info":{
            "description":"This application uses the values coming from the well control system such as flow rate, pressure, and motor speed, to optimize the speed of the ESP motor. As a byproduct we have a lower energy use by the equipment.",
            "name":"esp-optimization",
            "title":"ESP Optimization",
            "version":"1.0.05221921"
        },
        "spec_version":"4.12.0",
        "system":{
            "environment_vars":[
                {
                "name":"KELVIN_GW_MODE",
                "value":"SOCKETS"
                }
            ]
        }
    },
    "instantly_apply": True,
    "staged": False,
    "source": "krn:user:demo@kelvin.ai",
    "title":"Doc Demo Staged Workload"
    })

print(response)
You will get a response similar to this;
acp_name='beta-dev-01-cluster' app_name='esp-optimization' app_version='1.0.05221921' cluster_name='dev-01-cluster' created=datetime.datetime(2024, 6, 17, 9, 54, 46, 510308, tzinfo=datetime.timezone.utc) download_status=<WorkloadDownloadStatus.pending: 'pending'> enabled=True instantly_apply=None name='doc-demo-staged-workload' networking=[] node_name=None payload={'app': {'kelvin': {'assets': [{'metrics': {'casing_pressure': {'remote': True}, 'gas_flow_rate': {'remote': True}, 'speed': {'remote': True}, 'speed_sp': {'remote': True}}, 'name': 'esp_21'}, {'metrics': {'casing_pressure': {'remote': True}, 'gas_flow_rate': {'remote': True}, 'speed': {'remote': True}, 'speed_sp': {'remote': True}}, 'name': 'esp_26'}], 'configuration': {'recommendations': [{'description': 'Water level increasing, higher pump speed will lead water level to return to optimal.', 'setpoint': {'name': 'speed_sp', 'variation_factor': 0.1}, 'type': 'increase_speed'}, {'description': 'Production gain possible after step test, with higher pump speed', 'setpoint': {'name': 'speed_sp', 'variation_factor': 0.1}, 'type': 'increase_speed'}]}, 'inputs': [{'data_type': 'number', 'name': 'casing_pressure'}, {'data_type': 'number', 'name': 'gas_flow_rate'}, {'data_type': 'number', 'name': 'speed'}, {'data_type': 'number', 'name': 'speed_sp'}], 'language': {'python': {'entry_point': 'app:App'}, 'type': 'python'}, 'outputs': [{'control_change': True, 'data_type': 'number', 'name': 'speed_sp', 'storage': 'node-and-cloud'}]}, 'type': 'kelvin'}, 'info': {'description': 'This application uses the values coming from the well control system such as flow rate, pressure, and motor speed, to optimize the speed of the ESP motor. As a byproduct we have a lower energy use by the equipment.', 'name': 'esp-optimization', 'title': 'ESP Optimization', 'version': '1.0.05221921'}, 'spec_version': '4.12.0', 'system': {'environment_vars': [{'name': 'KELVIN_GW_MODE', 'value': 'SOCKETS'}]}} pre_download=None status=WorkloadStatus(last_seen=datetime.datetime(2024, 6, 17, 9, 54, 46, 540447, tzinfo=datetime.timezone.utc), message='Pending for deploy', state=<WorkloadStatus.pending_deploy: 'pending_deploy'>, warnings=None) title='Doc Demo Staged Workload' updated=datetime.datetime(2024, 6, 17, 9, 54, 46, 510308, tzinfo=datetime.timezone.utc) staged=None
Staged Workload Deploy
When deploying a Workload to the edge, you can decide how Kelvin will perform the task. This is called Staged Workload. There are pros and cons for each method, and the right method will depend on your requirements.
This is particular useful if your edge system has unreliable Internet connection and/or you want to minimize operational disruptions by having all Workloads downloaded and ready on the edge system before deploying.
| Deploy | Deployment Method | Description | Pros | Cons |
|---|---|---|---|---|
| By Kelvin Separately | Download and deploy processes are separate | All workload images will be downloaded in the background, in the end, the workload definition/spec will not be deployed in the cluster. The cluster will wait forever until it receives a signal to apply the new workload definition/spec or there is a new deploy spec for the same workload. | Useful for Edge systems with unreliable Internet. Downloads can be done at any time and the deploy can be manually initiated to cause minimal disruptions | Requires manual initiation of workload upgrade |
| By Kubernetes Combined | Download and deploy processes are done simultaneously with one command by Kuberentes | This is the default behavior (unless changed in the instance API). The workload definition/spec is applied to the cluster, and Kubernetes will be responsible for downloading the images and starting Kelvin SmartApps™. | No configurations required, everything is done by Kubernetes | No control over multiple workload deployment |
| By Kelvin Combined | Download and upgrade processes are done simultaneously with one command by Kelvin | All workload images will be downloaded in the background, and in the end, the workload definition/spec is automatically applied in the cluster. Even if we are updating an existing workload, the previous one will still be running until the download has finished. This acts as a rolling update since the previous workload will still be running. | Multiple Workloads can be deployed (or upgraded) after all Workloads are downloaded, giving minimal operational disruptions to multi-Workload environments | Depending on download speeds, it may take longer for the new Workloads to start |
By default, Kubernetes manages the deployment of the Workload.
With this information, you can use the Deploying a Workload chapter above to choose what type of deployment, standard or staged, that you want to initiate.
The staged deployment in Kelvin UI is explained in the Deploying a Workload chapter above.
So here we will give a simple example with an API request to show you the different key values required for staged and instantly_apply to achieve each of the three scenarios mentioned in the table above.
To separate the download and the deployment process of a workload separately, the following keys in the API and the Kelvin Api Client (Python) need to be set in this configuration;
| key | Value |
|---|---|
| staged | true |
| instantly_apply | false |
For example you can initiate the download by deploying the workload like this;
Once downloaded, the Workload is available in the Cluster but will not be deployed until manually initiated.
curl -X 'POST' \
  'https://<url.kelvin.ai>/api/v4/workloads/deploy' \
  -H 'Authorization: Bearer <Your Current Token>' \
    -H 'accept: application/json' \
  -H 'Content-Type: application/json' \
  -d '{
  "app_name": "motor-speed",
  "app_version": "2.3.0",
  "cluster_name": "docs-demo-cluster-k3s",
  "instantly_apply": false,                     <=== THIS KEY IS IMPORTANT
  "name": "docs-demo-motor-speed",
  "payload": {
    ...
  },
  "staged": true,                               <=== THIS KEY IS IMPORTANT
  "source": "krn:user:demo@kelvin.ai",
  "title": "Docs Demo Motor Speed"
}'
You will receive a response similar to this (Note that the staged section is not Null);
{
"name": "workload_name",
"title": "Workload Display Name (Title)",
"acp_name": "target_cluster_name (DEPRECATED)",
"app_name": "application_name",
"app_version": "application_version",
"cluster_name": "target_cluster_name",
"enabled": true,
"instantly_apply": false,
"networking": [],
"node_name": "",
"payload": { ... },
"status": {
    "last_seen": "2023-12-18T18:22:18.582724Z",
    "state": "pending_deploy",
    "message": "Pending for deploy",
    "warnings": []
},
"staged": {                    <=== NULL IF DOESN'T HAVE A STAGED VERSION
    "ready": false,
    "app_name": "application_name",
    "app_version": "application_version",
    "payload": {},
    "status": {
    "state": "received | processing | downloading | ready | failed",
    "message": "Received | Processing | Downloading | Ready | Failed",
    "warnings": []
    }
},
"download_status": "pending",
"created": "2023-12-26T18:22:18.582724Z",
"updated": "2023-12-18T18:22:18.582724Z"
}
When you are ready to deploy and start the Workload(s), you can do that either by Kelvin UI, Kelvin API, Kelvin APi Client (Python) or at the edge terminal using kelvin-provision.
This will only work if the workload was deployed with the correct keys (staged = true and instantly_apply = false)
To read how to apply or activate the staged Workload, you can read the documentation in the next Chapter below Apply Staged Workload.
You can also deploy using the Kelvin UI. You can read how to do this in the chapter Deploying a Workload
To download and deploy a workload using Kubernetes, the following keys in the API request /workloads/deploy need to be set in this configuration;
| key | Value |
|---|---|
| staged | false |
| instantly_apply | true |
For example you can deploy the workload like this;
curl -X 'POST' \
  'https://<url.kelvin.ai>/api/v4/workloads/deploy' \
  -H 'Authorization: Bearer <Your Current Token>' \
    -H 'accept: application/json' \
  -H 'Content-Type: application/json' \
  -d '{
  "app_name": "motor-speed",
  "app_version": "2.3.0",
  "cluster_name": "docs-demo-cluster-k3s",
  "instantly_apply": true,
  "name": "docs-demo-motor-speed",
  "payload": {
    ...
  },
  "staged": false,
  "source": "krn:user:demo@kelvin.ai",
  "title": "Docs Demo Motor Speed"
}'
The Workload will be automatically deployed and started through the default Kubernetes method.
You can check the status of all workloads at the edge with the API request /workloads/list and its parameter staged set to false.
For a comprehensive list of available statuses and their meanings, please continue reading.
curl -X 'GET' \
'https://<url.kelvin.ai>/api/v4/workloads/list?workload_name=docs-demo-motor-speed&staged=false&pagination_type=cursor&page_size=20&direction=asc&sort_by=name' \
  -H 'Authorization: Bearer <Your Current Token>' \
-H 'accept: application/json-cursor'
Under normal conditions where the deploy succeeds, the status will flow like this; pending_deploy → received → deploying → [running, failed]
You can also deploy using the Kelvin UI. You can read how to do this in the chapter Deploying a Workload
To download all Workloads to the edge first and then automatically deploy them, the following keys in the API request /workloads/deploy need to be set in this configuration;
| key | Value |
|---|---|
| staged | true |
| instantly_apply | true |
For example you can deploy the workload like this;
curl -X 'POST' \
  'https://<url.kelvin.ai>/api/v4/workloads/deploy' \
  -H 'Authorization: Bearer <Your Current Token>' \
    -H 'accept: application/json' \
  -H 'Content-Type: application/json' \
  -d '{
  "app_name": "motor-speed",
  "app_version": "2.3.0",
  "cluster_name": "docs-demo-cluster-k3s",
  "instantly_apply": true,
  "name": "docs-demo-motor-speed",
  "payload": {
    ...
  },
  "staged": true,
  "source": "krn:user:demo@kelvin.ai",
  "title": "Docs Demo Motor Speed"
}'
You will receive a response similar to this;
{
"name": "workload_name",
"title": "Workload Display Name (Title)",
"acp_name": "target_cluster_name (DEPRECATED)",
"app_name": "application_name",
"app_version": "application_version",
"cluster_name": "target_cluster_name",
"enabled": true,
"instantly_apply": false,
"networking": [],
"node_name": "",
"payload": { ... },
"status": {
    "last_seen": "2023-12-18T18:22:18.582724Z",
    "state": "pending_deploy",
    "message": "Pending for deploy",
    "warnings": []
},
"staged": null,
"download_status": "pending",
"created": "2023-12-26T18:22:18.582724Z",
"updated": "2023-12-18T18:22:18.582724Z"
}
The Workloads will be automatically deployed and started together once all Workloads are downloaded to the Edge System.
You can check the status of all workloads at the edge with the API request /workloads/list and its parameter staged set to false.
For a comprehensive list of available statuses and their meanings, please continue reading.
curl -X 'GET' \
'https://<url.kelvin.ai>/api/v4/workloads/list?workload_name=docs-demo-motor-speed&staged=false&pagination_type=cursor&page_size=20&direction=asc&sort_by=name' \
  -H 'Authorization: Bearer <Your Current Token>' \
  -H 'accept: application/json-cursor'
Under normal conditions where the deploy succeeds, the status will flow like this; pending_deploy → received → deploying → [running, failed]
There are a number of Workload Status messages available to know exactly as which stage the Staged Workload process is currently on.
| Status | Description |
|---|---|
pending_deploy |
Server state, eventually the cluster will sync with the server and deploy the workload. |
pending_start |
Server state, eventually the cluster will sync with the server and will start the workload. |
pending_stop |
Server state, eventually the cluster will sync with the server and will stop the workload. |
pending_apply |
Server state, eventually the cluster will sync with the server and apply the “ready” workload definition/spec. |
deploying |
The cluster is deploying a workload. |
running |
The workload is currently running without any issues. |
stopping |
The workload is being stopped. |
failed |
The workload failed to start. Check the warning messages. |
starting |
The workload is starting. |
received |
The cluster has received new workload changes to be applied. It will act soon to apply the changes. |
downloading |
The cluster is downloading all necessary workload images (pre_download is set to true) |
ready |
The cluster is waiting for a signal to apply the workload spec (instantly_apply is set to false) |
unreachable |
The cluster is unable to sync with the server. Could be a temporary communication problem. |
staged |
Means there is no currently running version of this workload, only a staged version of the workload exists. This is the case if you deploy a new workload as staged. |
Apply Staged Workload
If you staged a Workload and now want it to replace the current running Workload, you can send an apply or activate command to the Cluster to initiate the replacement of the current Workload with the staged Workload.
If you have an Internet connection to the Edge Cluster, then you can initiate this apply through the Kelvin UI, Kelvin API or the Kelvin API Client (Python).
If you do not have any Internet connectivity at the edge Cluster, then you can apply it locally through the terminal of the edge computer.
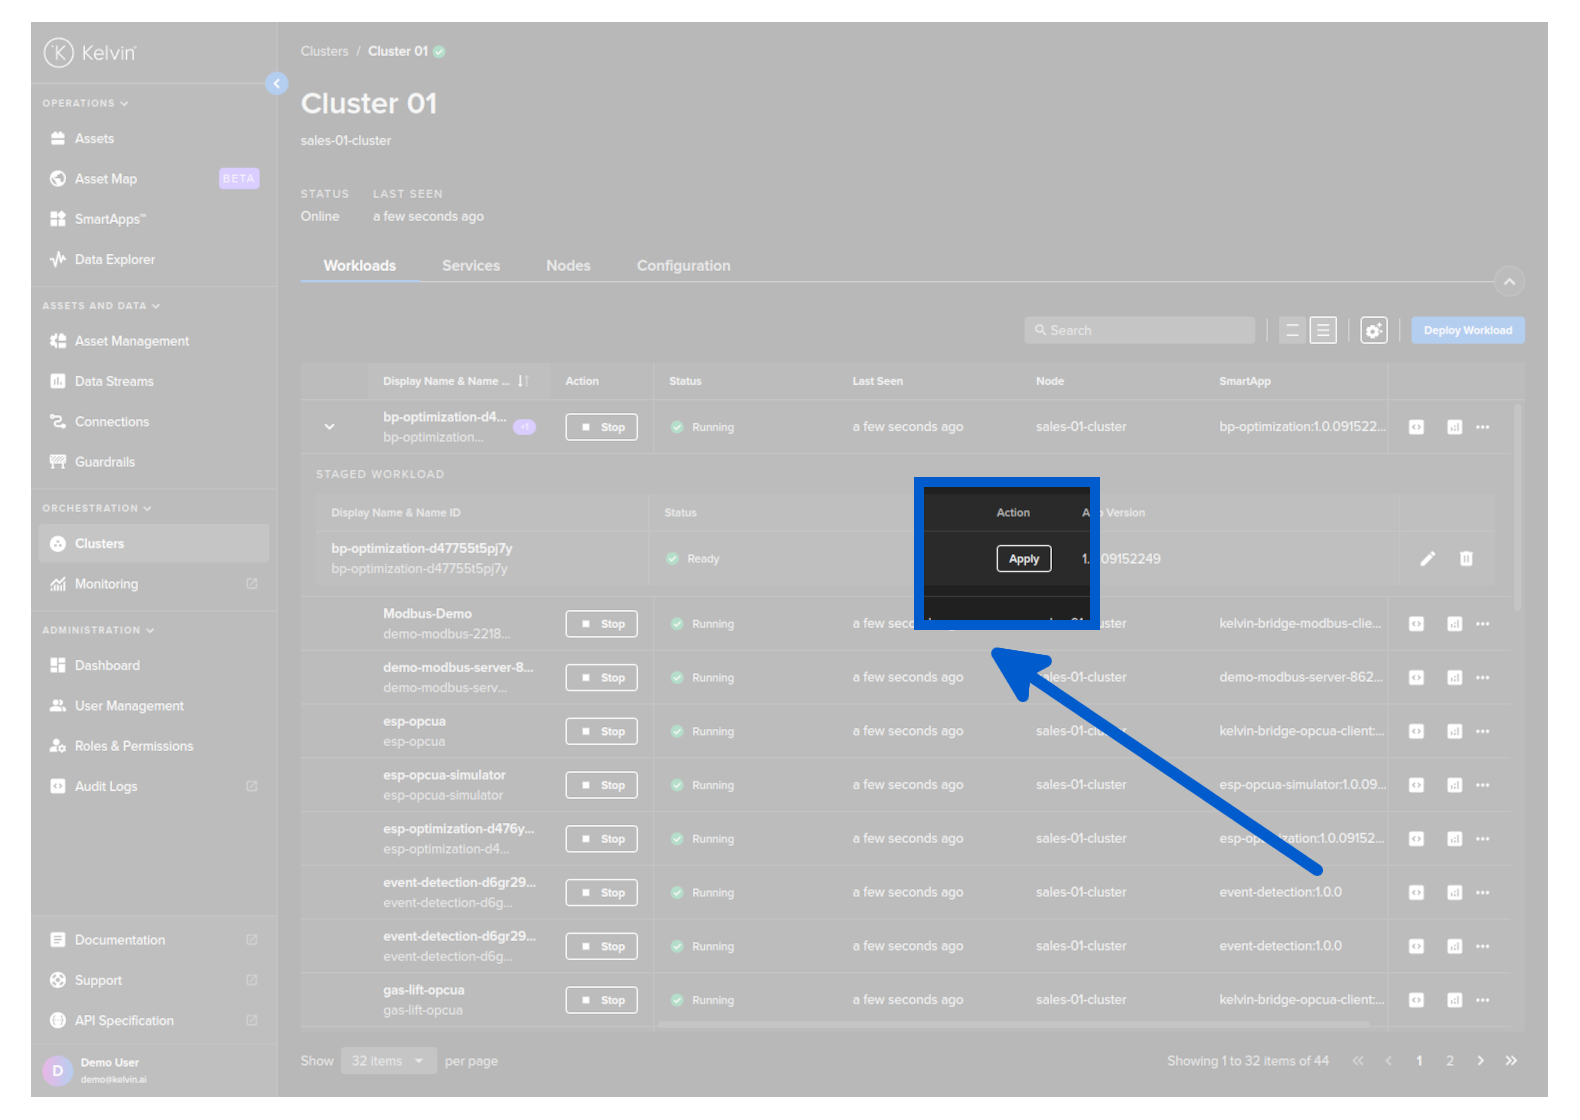
When you go to view the workloads in a Cluster (through the Orchestration page) you will see that the Workload has an arrow next to it.
For this method the Edge System needs to have an active Internet connection for the activate command to reach the Edge system.
Click on this and you will see the details of the staged Workload ready for deploying.

To depoy this staged workload and replace the current Workload running, click on the Activate button.
Using the API request /workloads/{workload_name}/apply. This will initiate the deploy when Kelvin Cloud next communicates with the Edge System.
For this method the Edge System needs to have an active Internet connection for the apply command to reach the Edge system.
curl -X 'POST' \
  'https://<url.kelvin.ai>/api/v4/workloads/apply' \
  -H 'Authorization: Bearer <Your Current Token>' \
  -H 'accept: */*' \
  -H 'Content-Type: application/json' \
  -d '{
  "workload_names": [
    "<workload_name1>",
    "<workload_name2>"
  ]
}'
You can check the status of only staged workloads at the edge with the API request /workloads/list and its parameter staged set to true.
curl -X 'GET' \
'https://<url.kelvin.ai>/api/v4/workloads/list?workload_name=docs-demo-motor-speed&staged=true&pagination_type=cursor&page_size=20&direction=asc&sort_by=name' \
  -H 'Authorization: Bearer <Your Current Token>' \
-H 'accept: application/json-cursor'
You can use Python to apply the staged workload.
For this method the Edge System needs to have an active Internet connection for the apply command to reach the Edge system.
from kelvin.api.client import Client

# Login
client = Client(config={"url": "https://<url.kelvin.ai>", "username": "<your_username>"})
client.login(password="<your_password>")

# Apply staged Workload
response = client.workload.apply_workload(workload_name="docs-demo-motor-speed")
Using the terminal of the Edge System. As the Workload is already downloaded to the Edge System.
For this method, you do not need an active Internet connection to deploy and run the Workload.
kelvin-provision workloads apply -n <workload_name>.
As you are working on the Edge System, the deploy will be immediately initiated regardless whether there is an Internet connection.
You can then check the status of the Workload using the command;
For a comprehensive list of available statuses and their meanings, please continue reading.
kelvin workloads list
You can also see the latest status of a staged workload in the response body;
This will be null if staged parameter was set to false.
Under normal conditions where the download succeeds, the staged → status parameter will flow like this; received → processing → downloading → ready (waiting for the apply signal).
The status section of the workload (not staged → status) will look like this; pending_deploy → running.
Start / Stop a Workload
You can start / stop a Workload.
This will not undeploy the workload from the edge system, so you can restart it at anytime without having to deploy the Workload again.
Using Kelvin Platform
Go to a Cluster in Kelvin UI and find the workload that you want to control.
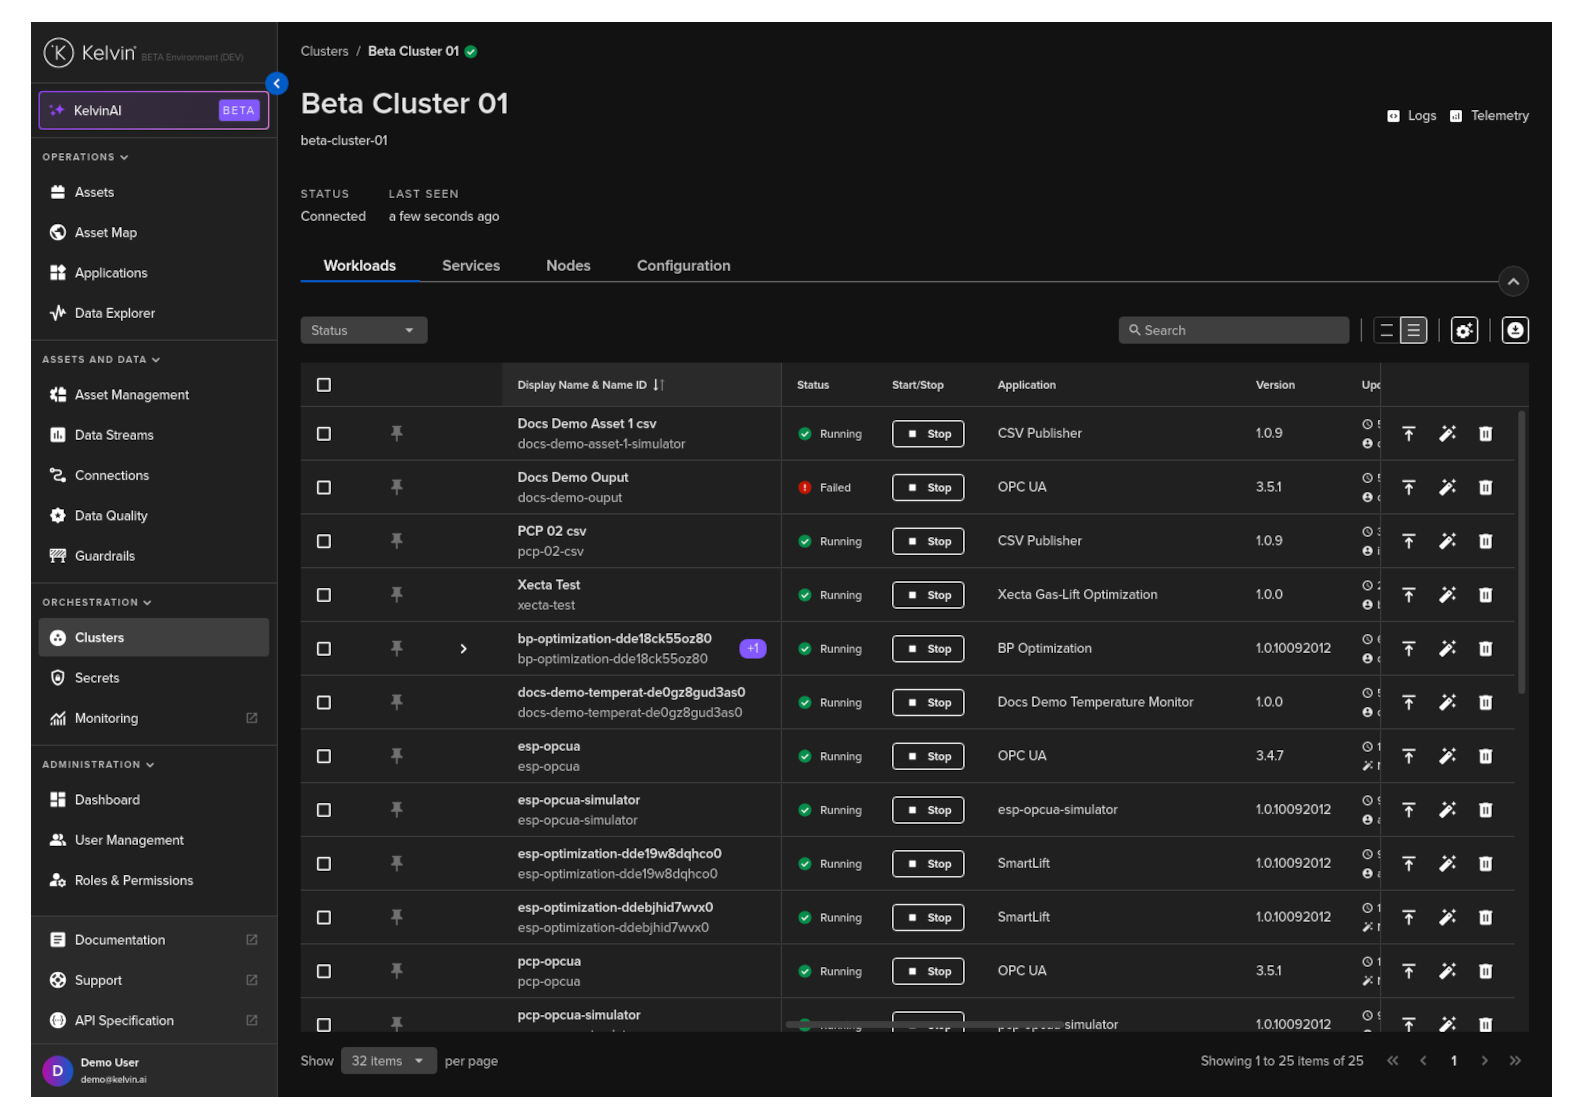
Then click on the Stat / Stop button to change it running status.
To stop a workload use the /workloads/{workload_name}/stop API request.
curl -X 'GET' \
  'https://<url.kelvin.ai>/api/v4/workloads/doc-demo-standard-deploy/stop' \
  -H 'Authorization: Bearer <Your Current Token>' \
  -H 'accept: */*'
You will get a response similar to this;
<Response [200]>
To start a workload use the /workloads/{workload_name}/start API request.
curl -X 'GET' \
  'https://<url.kelvin.ai>/api/v4/workloads/doc-demo-standard-deploy/start' \
  -H 'Authorization: Bearer <Your Current Token>' \
  -H 'accept: */*'
You will get a response similar to this;
<Response [200]>
To stop a workload;
from kelvin.api.client import Client

# Login
client = Client(config={"url": "https://<url.kelvin.ai>", "username": "<your_username>"})
client.login(password="<your_password>")

# Stop Workload
response = client.workload.stop_workload(workload_name="doc-demo-standard-deploy")

print(response)
You will get a response similar to this;
None
To start a workload;
from kelvin.api.client import Client

# Login
client = Client(config={"url": "https://<url.kelvin.ai>", "username": "<your_username>"})
client.login(password="<your_password>")

# Stop Workload
response = client.workload.start_workload(workload_name="doc-demo-standard-deploy")

print(response)
You will get a response similar to this;
None
Using Edge Services
You can start / stop a Workload using the Edge Services.
To understand how to access and login to the Edge Services, you can read the full documentation on Edge Services here.
This will not undeploy the workload from the edge system, so you can restart it at anytime without having to deploy the Workload again.
You have a few options to deploy the workload image using the Edge computer.
Edge Services
Open the Edge UI in a browser.

In the dashboard, find the Workload you want to control and then click the button in the action column on that row.
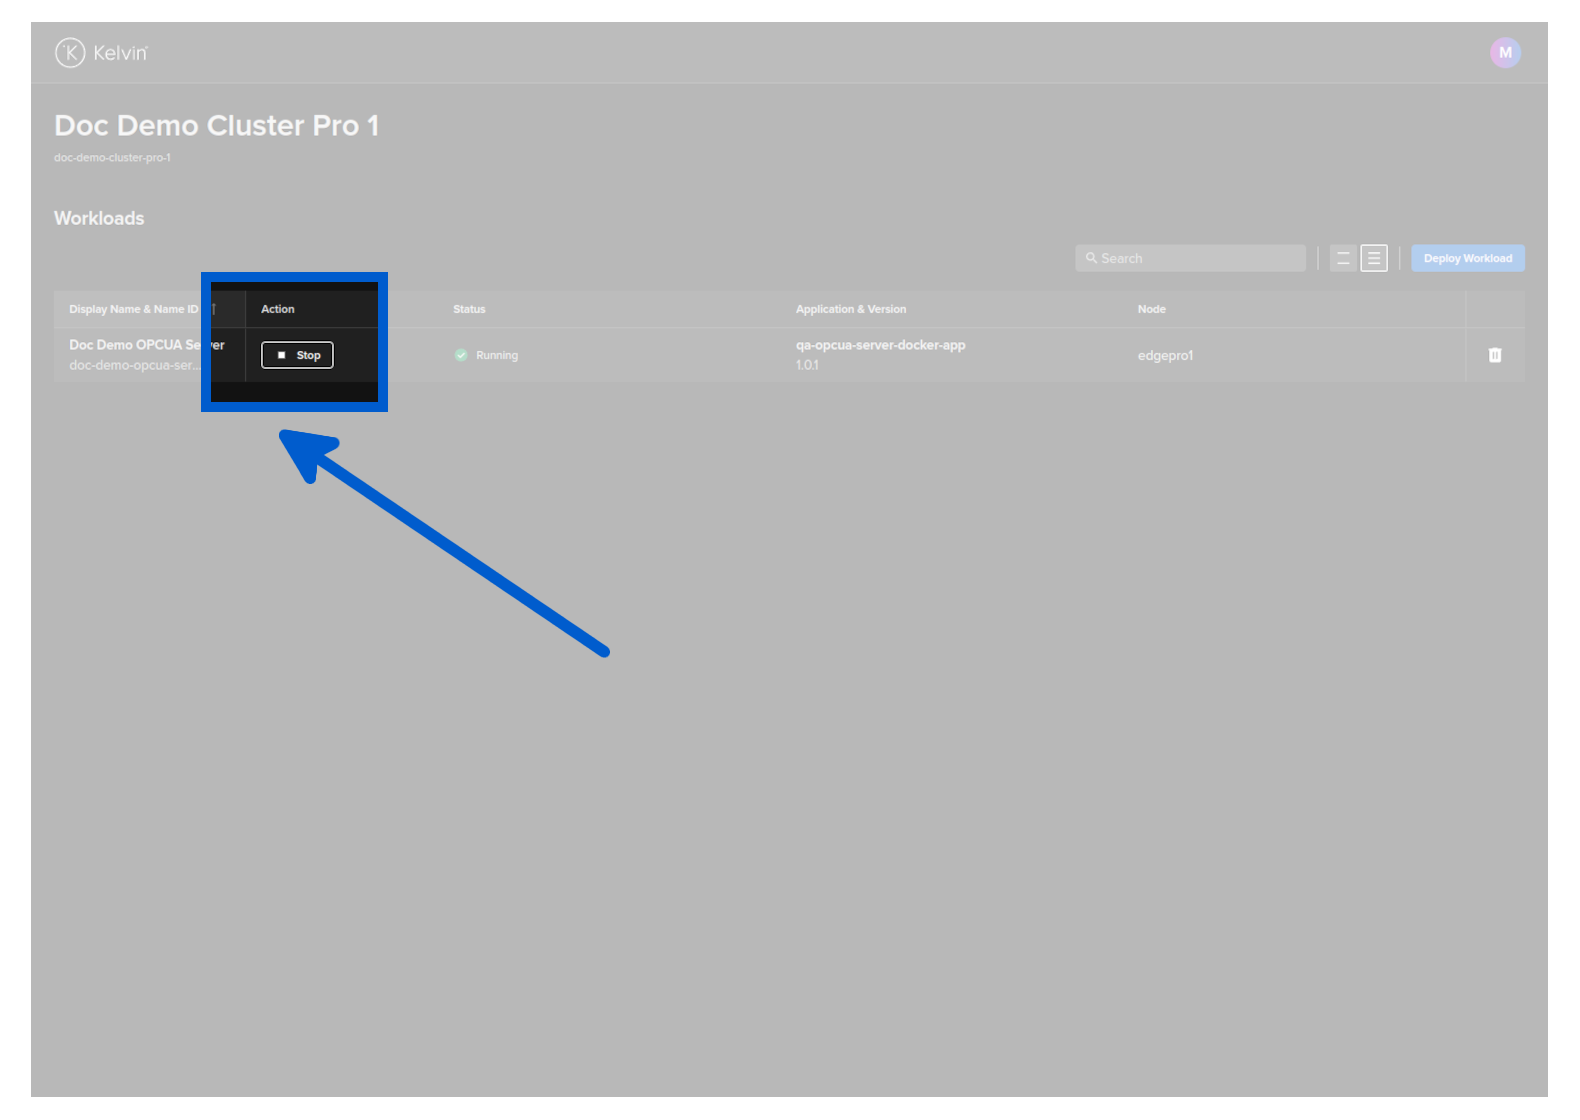
The Workload will start or stop depending on its current state.
Start Workload
You can start a Workload with the Edge API endpoint /workloads/{workload_name}/start.
curl -X 'GET' \
'http://<edge-computer-ip>/api/v4/workloads/doc-demo-opcua-server/start' \
-H 'Authorization: Bearer <Your Current Token>' \
-H 'accept: application/json'
You will get a response similar to this;
{
"name":"doc-demo-opcua-server",
"title":"Doc Demo OPCUA Server",
"app_name":"qa-opcua-server-docker-app",
"app_version":"1.0.1",
"node_name":null,
"status":{
    "state":"starting",
    "message":"Starting",
    "warnings":null
},
"staged":null
}
Stop Workload
You can stop a Workload with the Edge API endpoint /workloads/{workload_name}/stop.
curl -X 'GET' \
'http://<edge-computer-ip>/api/v4/workloads/doc-demo-opcua-server/stop' \
-H 'Authorization: Bearer <Your Current Token>' \
-H 'accept: application/json'
You will get a response similar to this;
{
"name":"doc-demo-opcua-server",
"title":"Doc Demo OPCUA Server",
"app_name":"qa-opcua-server-docker-app",
"app_version":"1.0.1",
"node_name":null,
"status":{
    "state":"stopping",
    "message":"Stopping",
    "warnings":null
},
"staged":null
}
To start a Workload;
kelvin-provision workloads start -n doc-demo-opcua-server
You will see a response like this;
Connecting to cluster API...[OK]
Reading cluster config...[OK]
Test cluster connection...[OK]
Then you can check the status of the workload to ensure it is started;
$ kelvin-provision workloads list
Connecting to cluster API...[OK]
Reading cluster config...[OK]
Test cluster connection...[OK]
Fetching workloads...[OK]
+-----------------------+---------+------+----------+
| Name                  | State   | Node | Warnings |
+-----------------------+---------+------+----------+
| doc-demo-opcua-server | running | n/a  |          |
+-----------------------+---------+------+----------+
To stop a Workload;
kelvin-provision workloads stop -n doc-demo-opcua-server
You will see a response like this;
Connecting to cluster API...[OK]
Reading cluster config...[OK]
Test cluster connection...[OK]
Then you can check the status of the workload to ensure it has stopped;
$ kelvin-provision workloads list
Connecting to cluster API...[OK]
Reading cluster config...[OK]
Test cluster connection...[OK]
Fetching workloads...[OK]
+-----------------------+---------+------+----------+
| Name                  | State   | Node | Warnings |
+-----------------------+---------+------+----------+
| doc-demo-opcua-server | stopped | n/a  |          |
+-----------------------+---------+------+----------+
Update a Workload
When you update a workload, you can choose whether to deploy immediately or to stage the workload at the edge and apply it at a later time.
To learn more about Staging and how to send the apply ( start / upgrade ) command to the edge, you can read more above in the chapter Staged Workload Deploy
| Field | Option | Description |
|---|---|---|
| Standard | None | This will use the standard Kubernetes deployment process for workload containers and the workload will be automatically started after downloaded to the edge. |
| Staged | Stage Only | This will download the workload to the edge but will not start the workload. You will need to send an additional command to start the workload either through the Kelvin API or locally in the terminal of the edge computer |
| Staged | Stage and Apply | This will use the kelvin's deployment process for workload containers and the workload will be automatically started after downloaded to the edge. The difference to the Kubernetes deployment process is that Kelvin will download all workloads and stage them first. Only when all workloads have been successfully downloaded will the start command be given to the workloads. |
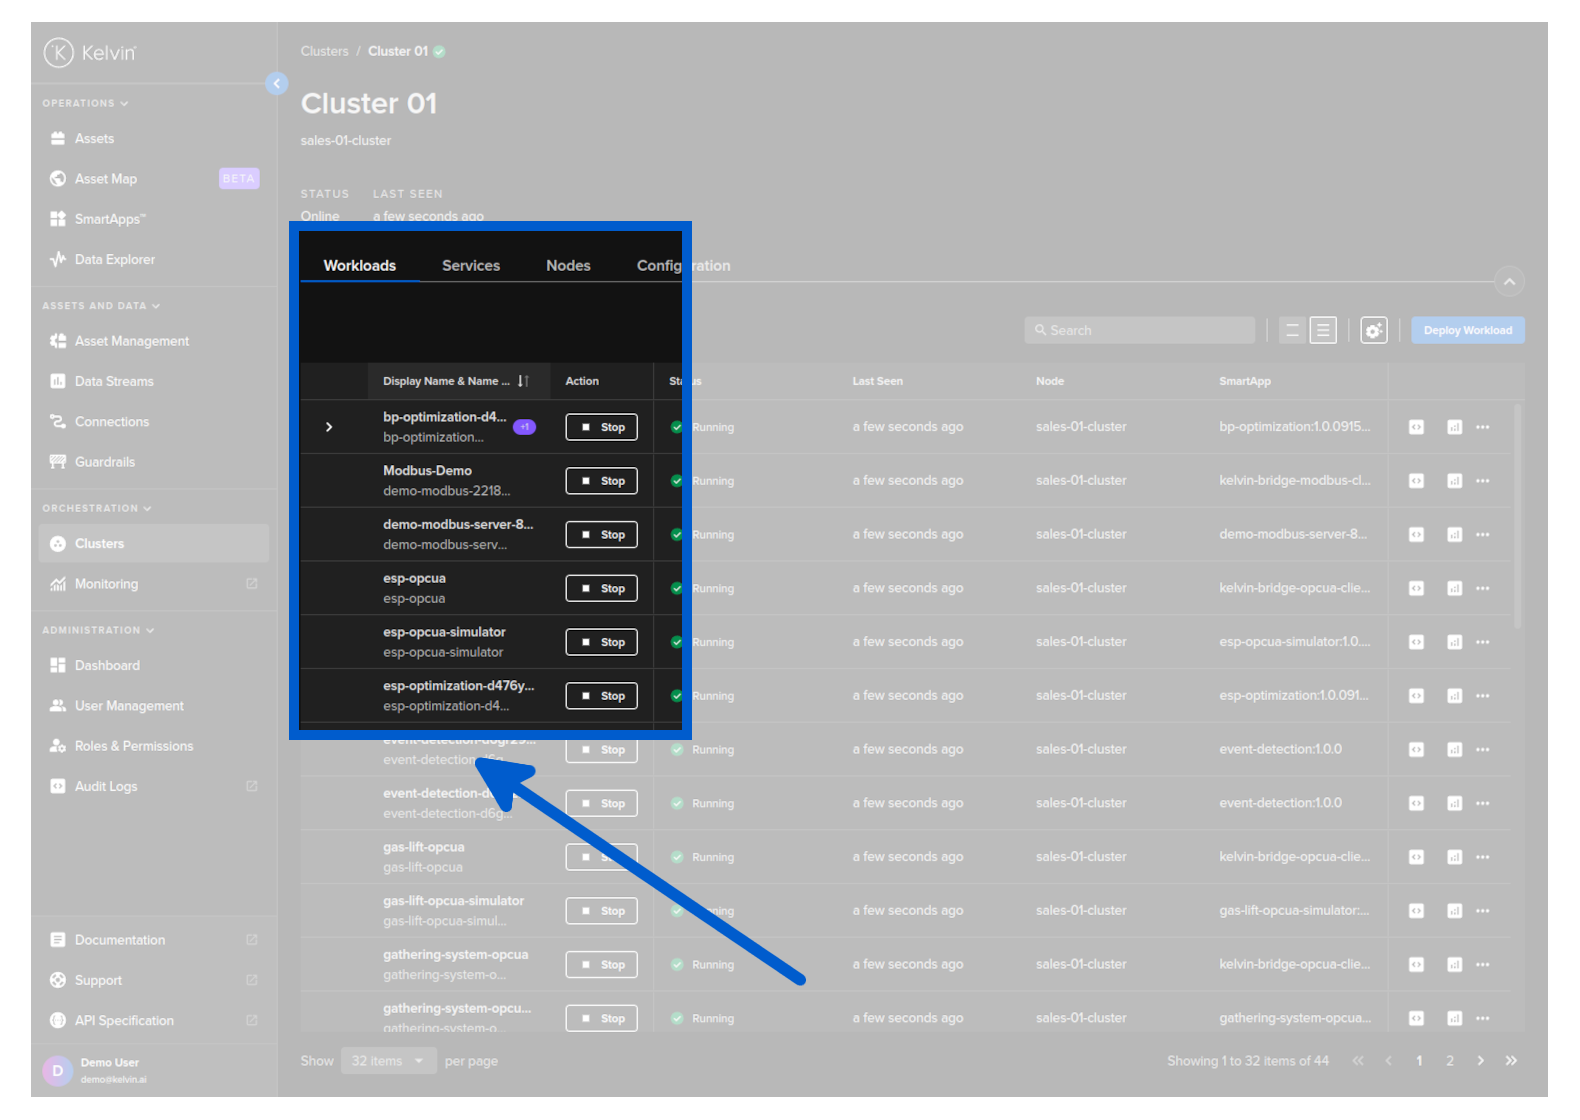
You can update any workload through the Orchestration page.
When you do an upgrade, you will have the option to stage the upgrade.
To start go to Orchestration menu, select a Cluster and find the Workload you want to upgrade. Then click on the dropdown menu on the Workload row.

The process is very similar to the Deploy Workload process.
In Step 1 you can select the version you want to upgrade to.
Click the Next button and choose what type of deploy you want to do.
For Standard mode, you do not have any other options.
For Staged mode, you have two options;
Click the Next button and check / edit the Workload yaml file.
Then you can click on the Save & Deploy button.
If you have selected to stage a Workload deploy, you can read more in the chapter above Staged Workload Deploy on how to activate the staged Workload.
To upgrade, simply select the same Workload name and cluster and do a normal /workloads/deploy API request.
The system will see the current version at the edge and will replace it with the new version dfined.
This example only does a standard Workload deploy. For staged workload documentation read more in the chapter above Staged Workload Deploy
curl -X 'POST' \
  'https://<url.kelvin.ai>/api/v4/workloads/deploy' \
  -H 'Authorization: Bearer <Your Current Token>' \
  -H 'accept: application/json' \
  -H 'Content-Type: application/json' \
  -d '{
  "acp_name": "docs-demo-cluster-k3s",
  "app_name": "esp-optimization",
  "app_version": "2.0",
  "cluster_name": "docs-demo-cluster-k3s",
  "instantly_apply": true,
  "name": "doc-demo-standard-deploy",
  "payload": {
        "app":{
           "kelvin":{
              "configuration":{
                 "recommendations":[
                    {
                       "description":"Water level increasing, higher pump speed will lead water level to return to optimal.",
                       "setpoint":{
                          "name":"speed_sp",
                          "variation_factor":0.1
                       },
                       "type":"increase_speed"
                    },

                    ...

                 ]
              },
              "inputs":[
                 {
                    "data_type":"number",
                    "name":"casing_pressure"
                 },

                 ...

              ],
              "language":{
                 "python":{
                    "entry_point":"kelvin_python_sdk"
                 },
                 "type":"python"
              },
              "outputs":[
                 {
                    "control_change":true,
                    "data_type":"number",
                    "name":"speed_sp"
                 }
              ]
           },
           "type":"kelvin"
        },
        "info":{
           "description":"This application uses the values coming from the well control system such as flow rate, pressure, and motor speed, to optimize the speed of the ESP motor. As a byproduct we have a lower energy use by the equipment.",
           "name":"esp-optimization",
           "title":"ESP Optimization",
           "version":"2.0"
        },
        "spec_version":"4.12.0",
        "system":{
           "environment_vars":[
              {
                 "name":"KELVIN_GW_MODE",
                 "value":"SOCKETS"
              }
           ],
           "ports":[

           ],
           "privileged":false,
           "volumes":[

           ]
        }
     },
  "staged": false,
  "source": "krn:user:demo@kelvin.ai",
  "title": "Motor Speed Control"
}'
You will get a response similar to this;
created=datetime.datetime(2024, 5, 23, 8, 52, 7, 803281, tzinfo=datetime.timezone.utc) name='doc_demo_asset_type' title='Documentation Demo Asset Type' updated=datetime.datetime(2024, 5, 23, 8, 52, 7, 803281, tzinfo=datetime.timezone.utc)
This example only does a standard Workload deploy. For staged workload documentation read more in the chapter above Staged Workload Deploy
from kelvin.api.client import Client

# Login
client = Client(config={"url": "https://<url.kelvin.ai>", "username": "<your_username>"})
client.login(password="<your_password>")

# Deploy Standard Workload
response = client.workload.deploy_workload(data={
    "app_name":"esp-optimization",
    "app_version":"2.0",
    "cluster_name":"docs-demo-cluster-k3s",
    "name":"doc-demo-standard-deploy",
    "payload":{
        "app":{
        "kelvin":{
            "configuration":{
                "recommendations":[
                    {
                    "description":"Water level increasing, higher pump speed will lead water level to return to optimal.",
                    "setpoint":{
                        "name":"speed_sp",
                        "variation_factor":0.1
                    },
                    "type":"increase_speed"
                    },

                    ...

                ]
            },
            "inputs":[
                {
                    "data_type":"number",
                    "name":"casing_pressure"
                },

                ...

            ],
            "language":{
                "python":{
                    "entry_point":"kelvin_python_sdk"
                },
                "type":"python"
            },
            "outputs":[
                {
                    "control_change":True,
                    "data_type":"number",
                    "name":"speed_sp"
                }
            ]
        },
        "type":"kelvin"
        },
        "info":{
        "description":"This application uses the values coming from the well control system such as flow rate, pressure, and motor speed, to optimize the speed of the ESP motor. As a byproduct we have a lower energy use by the equipment.",
        "name":"esp-optimization",
        "title":"ESP Optimization",
        "version":"2.0"
        },
        "spec_version":"4.12.0",
        "system":{
        "environment_vars":[
            {
                "name":"KELVIN_GW_MODE",
                "value":"SOCKETS"
            }
        ],
        "ports":[

        ],
        "privileged":False,
        "volumes":[

        ]
        }
    },
    "title":"Doc Demo Standard Deploy",
    "staged":False
})

print(response)
You will get a response similar to this;
acp_name='docs-demo-cluster-k3s' app_name='esp-optimization' app_version='2.0' cluster_name='docs-demo-cluster-k3s' created=datetime.datetime(2024, 6, 17, 4, 53, 1, 165847, tzinfo=datetime.timezone.utc) download_status=<WorkloadDownloadStatus.pending: 'pending'> enabled=True instantly_apply=None name='doc-demo-standard-deploy' networking=[] node_name=None payload={'app': {'kelvin': {'configuration': {'recommendations': [{'description': 'Water level increasing, higher pump speed will lead water level to return to optimal.', 'setpoint': {'name': 'speed_sp', 'variation_factor': 0.1}, 'type': 'increase_speed'}, {'description': 'Production gain possible after step test, with higher pump speed', 'setpoint': {'name': 'speed_sp', 'variation_factor': 0.1}, 'type': 'increase_speed'}, {'description': 'Erratic Torque detected at this speed previously, lower pump speed will reduce vibrations', 'setpoint': {'name': 'speed_sp', 'variation_factor': -0.1}, 'type': 'decrease_speed'}, {'description': 'Reducing Speed will save energy and keep production levels constant', 'setpoint': {'name': 'speed_sp', 'variation_factor': -0.1}, 'type': 'decrease_speed'}, {'description': 'Above max Drawdown, parameters stable', 'setpoint': None, 'type': 'no_action'}, {'description': 'Casing Pressure Event Detected, no changes allowed', 'setpoint': None, 'type': 'no_action'}, {'description': 'No action - monitoring', 'setpoint': None, 'type': 'no_action'}]}, 'inputs': [{'data_type': 'number', 'name': 'casing_pressure'}, {'data_type': 'number', 'name': 'gas_flow_rate'}, {'data_type': 'number', 'name': 'speed'}, {'data_type': 'number', 'name': 'speed_sp'}], 'language': {'python': {'entry_point': 'kelvin_python_sdk'}, 'type': 'python'}, 'outputs': [{'control_change': True, 'data_type': 'number', 'name': 'speed_sp'}]}, 'type': 'kelvin'}, 'info': {'description': 'This application uses the values coming from the well control system such as flow rate, pressure, and motor speed, to optimize the speed of the ESP motor. As a byproduct we have a lower energy use by the equipment.', 'name': 'esp-optimization', 'title': 'ESP Optimization', 'version': '1.0.05221921'}, 'spec_version': '4.12.0', 'system': {'environment_vars': [{'name': 'KELVIN_GW_MODE', 'value': 'SOCKETS'}], 'ports': [], 'privileged': False, 'volumes': []}} pre_download=None status=WorkloadStatus(last_seen=datetime.datetime(2024, 6, 17, 4, 53, 1, 381101, tzinfo=datetime.timezone.utc), message='Pending for deploy', state=<WorkloadStatus.pending_deploy: 'pending_deploy'>, warnings=None) title='Doc Demo Standard Deploy' updated=datetime.datetime(2024, 6, 17, 4, 53, 1, 165847, tzinfo=datetime.timezone.utc) staged=None
Staged Workload UnDeploy
There are times when you have staged a workload but want to undeploy it before you have done the apply.
In Kelvin undeploy a staged Workload is called delete.
To do this, go to the Cluster in Orchestration page where the staged workload is staged.
Then expland the line to see the staged workload.
Then click on the delete button to delete the staged workload.
This will not affect the Workload that is currently running.
For the API request /workloads/<workload_name>/undeploy there are two options available how to handle staged workloads and deployed workloads.
| Key | Value | Description |
|---|---|---|
| stage | true | undeploys ONLY the staged version |
| false | (default) undeploys the workload and (if exists) the staged version. |
So in this case where we want to undeploy a staged version but not affect the currently deployed version set the key staged to true. Here is and example API request;
curl -X 'POST' \
'https://<url.kelvin.ai>/api/v4/workloads/doc-demo-standard-deploy/undeploy?staged=true' \
    -H 'Authorization: Bearer <Your Current Token>' \
    -H 'accept: */*' \
-d ''
You will get a response similar to this;
<Response [200]>
At the moment you can only delete a staged and running workload together. There is no option to undeploy only the staged workload.
Delete a Workload
This option allows you to delete (undeploy) the Workload.
This action is permanent and can not be undone. You will need to deploy a new workload with all the right settings.
Using Kelvin Platform
This will also undeploy any staged versions of the workload as well.
To start go to Orchestration menu, select a Cluster and find the Workload you want to upgrade. Then click on the dropdown menu on the Workload row.
Click on the delete button for the workload you want to delete and type PERMANENTLY DELETE to confirm deletion.

You can undeploy a workload using the /workloads/{workload_name}/undeploy API request.
This will also undeploy any staged versions of the workload as well.
For the API request /workloads/<workload_name>/undeploy there are two options available how to handle staged workloads and deployed workloads.
| Key | Value | Description |
|---|---|---|
| staged | true | undeploys ONLY the staged version |
| false | (default) undeploys the workload and (if exists) the staged version. |
curl -X 'POST' \
'https://<url.kelvin.ai>/api/v4/workloads/doc-demo-standard-deploy/undeploy?staged=false' \
-H 'Authorization: Bearer <Your Current Token>' \
-H 'accept: */*' \
-d ''
You will get a response similar to this;
<Response [200]>
This will also undeploy any staged versions of the workload as well.
from kelvin.api.client import Client

# Login
client = Client(config={"url": "https://<url.kelvin.ai>", "username": "<your_username>"})
client.login(password="<your_password>")

# Create Asset Type
response = client.workload.undeploy_workload(workload_name="doc-demo-standard-deploy")


print(response)
You will get a response similar to this;
None
Using Edge Services
You can delete a Workload using the Edge Services.
This will also remove the workload registration from the Kelvin Platform.
You can NOT use the existing Workload image to reinstall the Workload. You will need to create a new image and use the new image for the new deploy.
You have a few options to delete the workload image using the Edge computer.
To understand how to access and login to the Edge Services, you can read the full documentation on Edge Services here.
Edge Services
Open the Edge UI in a browser.
In the dashboard, find the Workload you want to control and then click the delete button on that row.

You will then be asked to confirm the delete action.
Then the Workload will be deleted.
The Kelvin Platform will be updated with the delete action the next time the Edge computer is connected to the Internet.
You can delete a Workload with the Edge API endpoint /workloads/{workload_name}/delete.
curl -X 'POST' \
'http://<edge-computer-ip>/api/v4/workloads/doc-demo-opcua-server/delete' \
-H 'Authorization: Bearer <Your Current Token>' \
-H 'accept: */*' \
-d ''
You will get a 200 response if successful.
To delete a Workload;
kelvin-provision workloads delete -n doc-demo-opcua-server
You will see a response like this;
Connecting to cluster API...[OK]
Reading cluster config...[OK]
Test cluster connection...[OK]
Requesting workload to be deleted...
Successfully deleted the workload
Deploy Workload Offline
You can also deploy a Workload to any Cluster locally on the Edge computer/VM directly. This method does not need an Internet connection (unless you are remotely connecting to the computer with SSH or other remote control software through LAN or Internet).
This will require you to physically visit the targeted edge computer or ssh into a remote VM with the targeted Cluster and manually installing the Workload image.
Firstly we will work on the Kelvin Platform to create the Workload Image.
Create Your Workload
This method of Deployment can be done for Kelvin SmartApps™, Workloads and Connections.
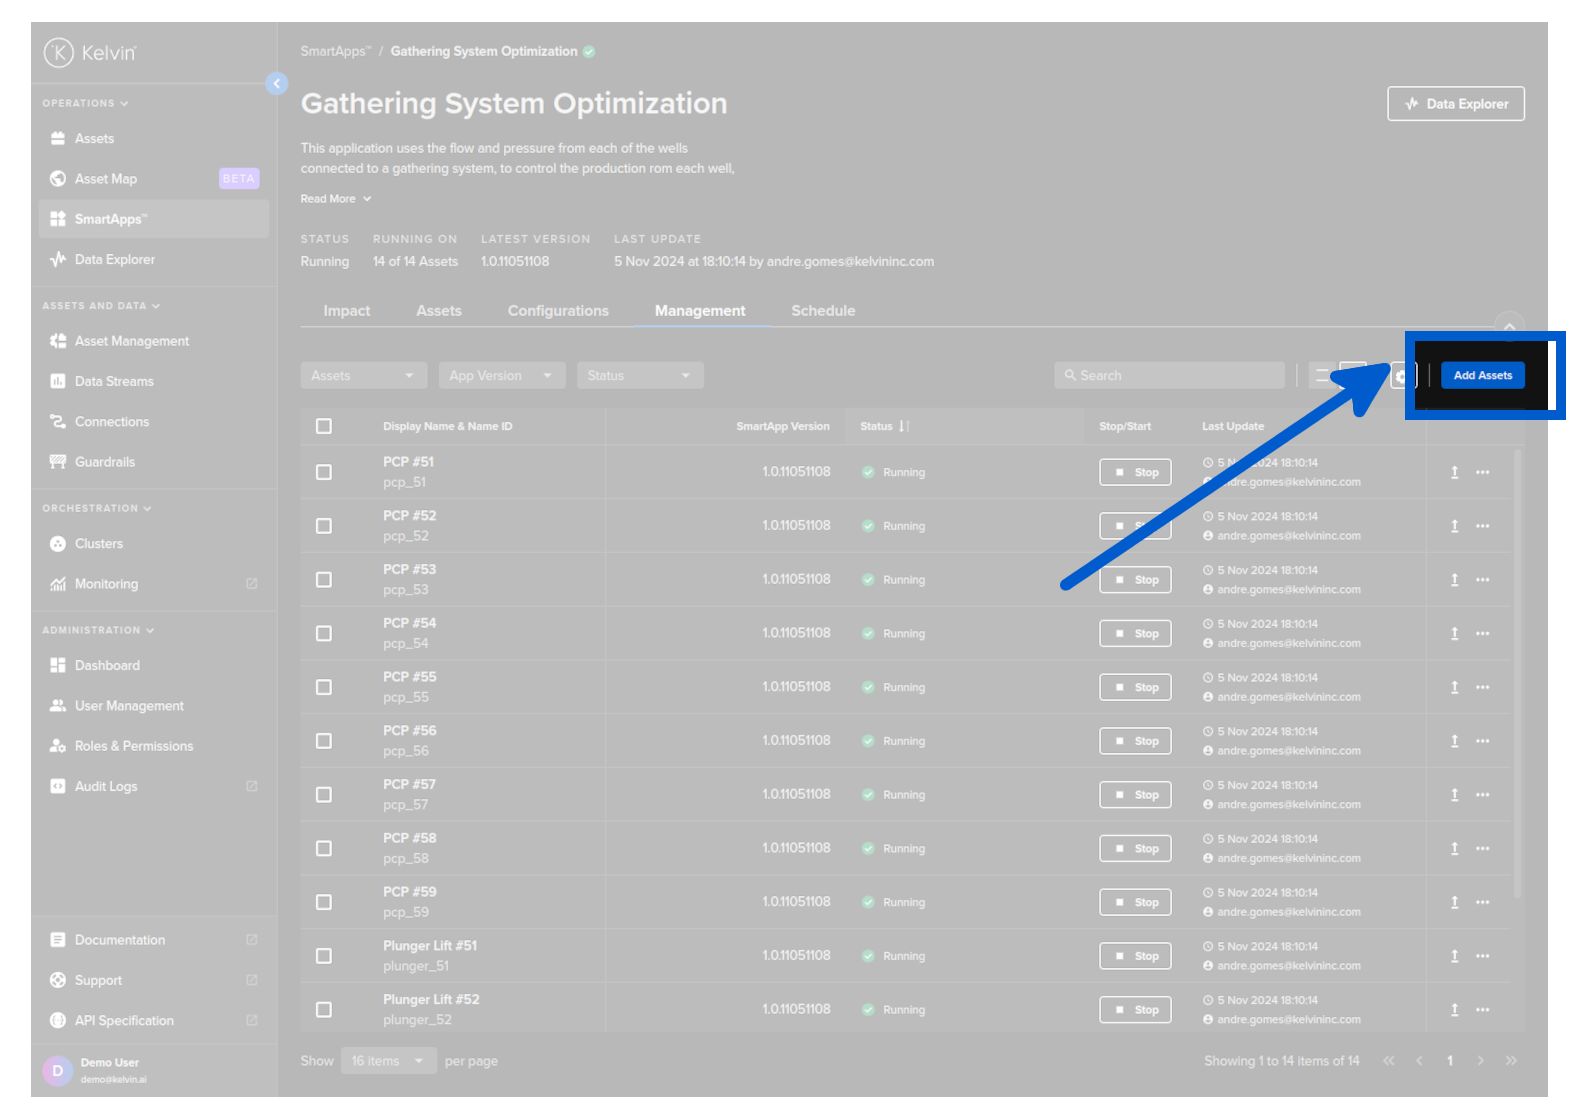
- For Kelvin SmartApps™ deployment you will need to first Add Assets to the Kelvin SmartApps™ in the SmartApps™ section of the Kelvin UI, then go to the default Cluster in Orchestration and find the workload with the status
Pending Deploy. Full details to add assets to a Kelvin SmartApps™ can be found here. - For Workload deployments you can deploy workloads (or
Create Image) in the Cluster section of the Orchestration menu. Full details to deploy a workload can be found here - For a Connection deployment, go to Connections and click on the
Create Connectionbutton. Once successfully created, then go to Orchestration and select the Cluster where you have deployed the Connection where you will see the workload that is your Connection.
Download Your Workload Image
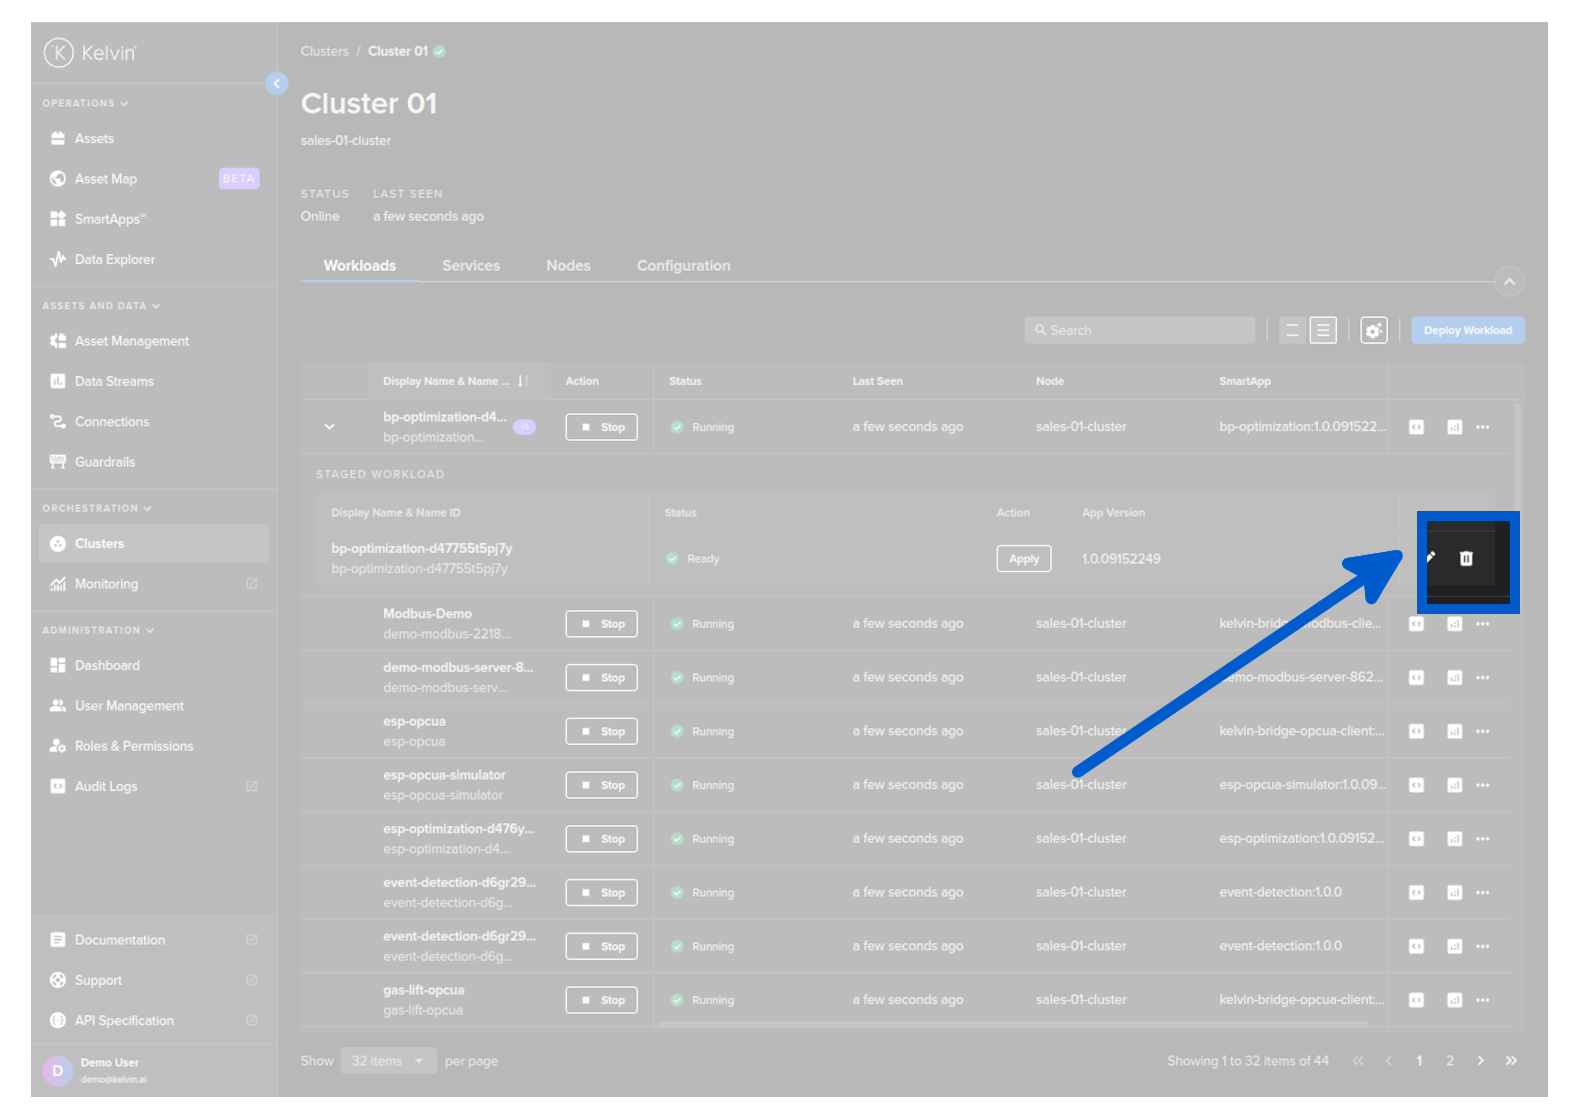
- Find the Workload you just deployed in the Cluster you chose through the Orchestration menu.
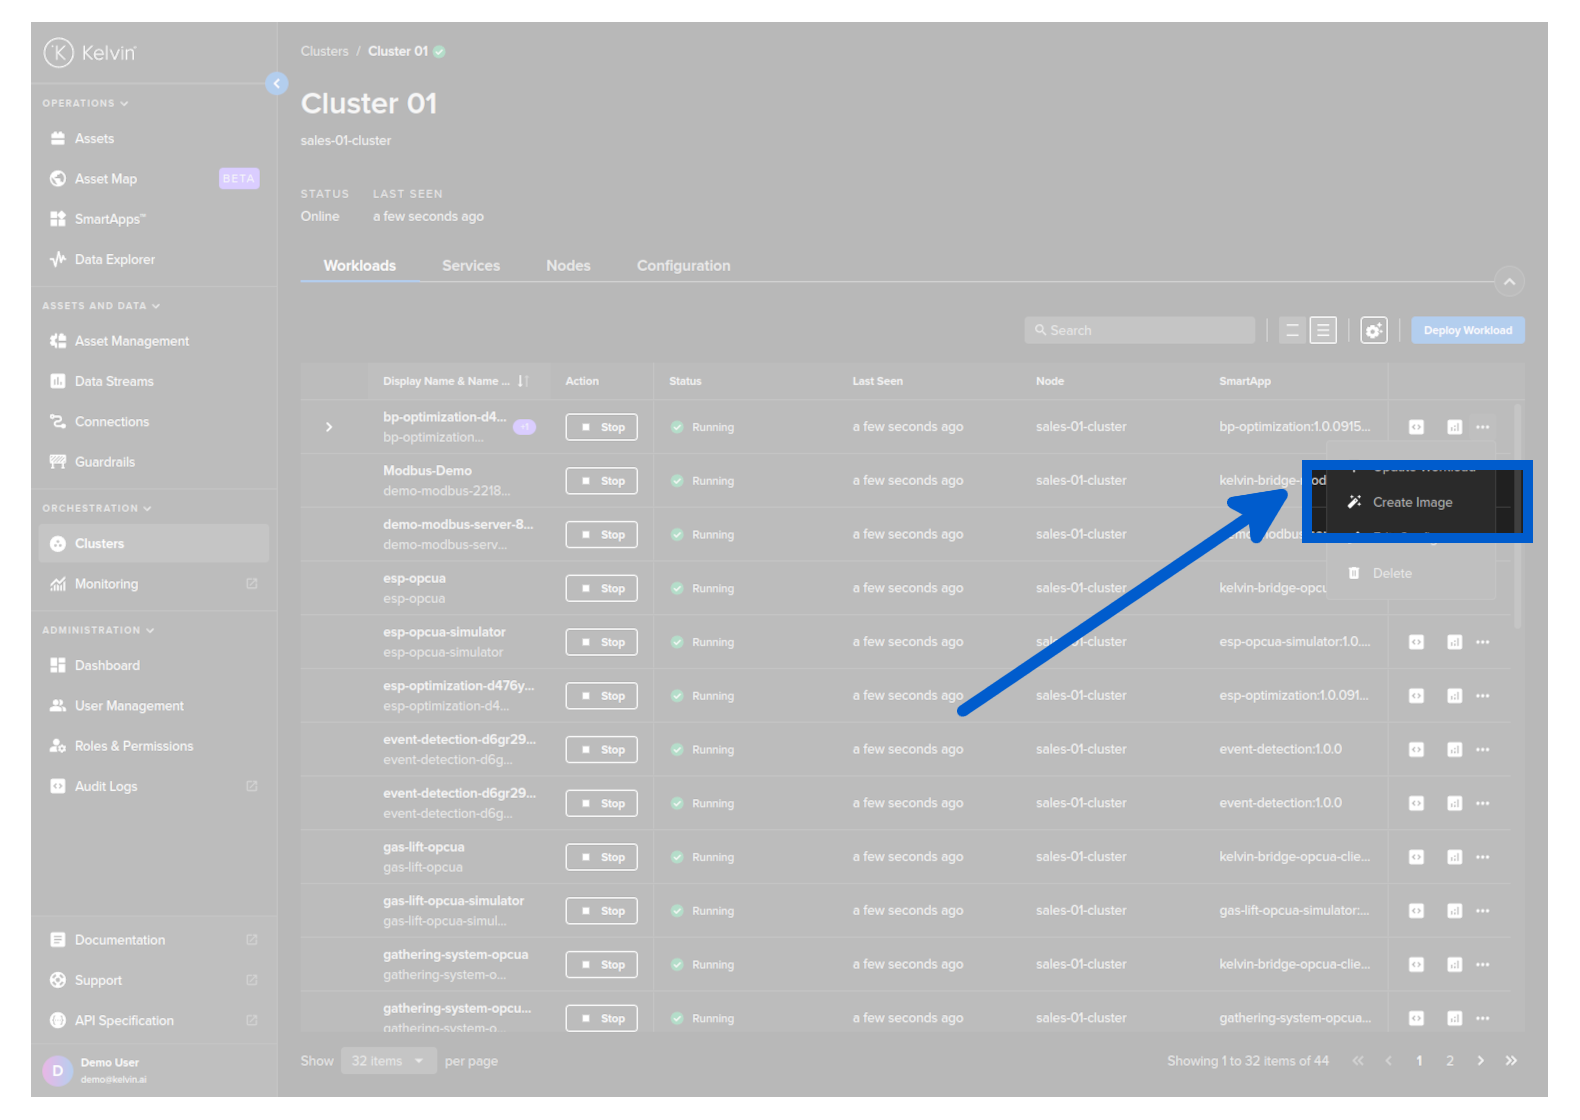
- Click on the hamburger menu. Click on the Create Image menu option.
You most likely will need to wait a few minutes for the image to be created and then you can download it from the same menu option.
- When the image has been created, then you can click again on the hamburger menu where the option has changed from Create Image to Download Image. Select where you want to locally save the file.
- Transfer the file to the edge system either through a USB stick or via a transfer program like SCP or Filezilla.
This image is ONLY valid for the Cluster you have deployed to. This image will not be able to be used to install the Workload on any other Clusters.
For Kelvin Professional edition the image will be automatically created.
The workload image is stored as a zip file.
Do not unpack the zip file !
Deploy Workload Image
Now go to the Edge computer or login remotely to the Edge VM.
To understand how to access and login to the Edge Services, you can read the full documentation on Edge Services here.
You have a few options to deploy the workload image using the Edge Services on the local Edge computer/VM.
Edge Services
Open the Edge UI in a browser.
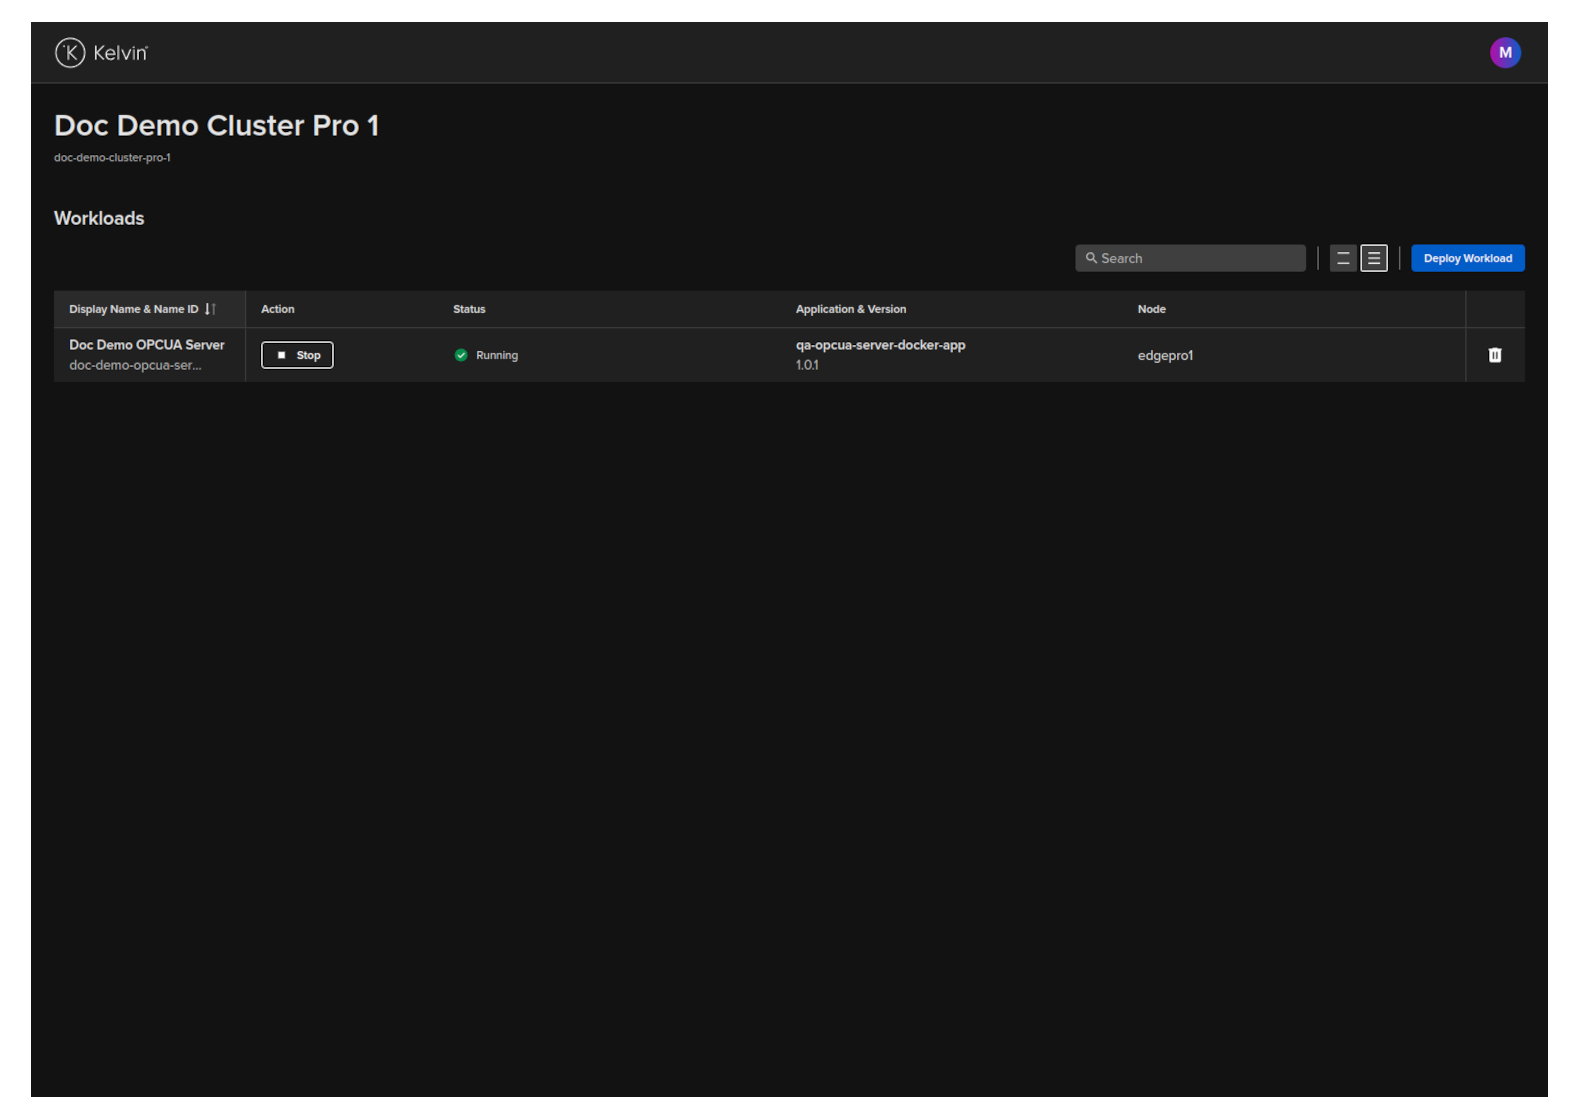
In the dashboard, click on the Deploy Workload button.

Either drag and drop the downloaded image file or click and select it then click on the Deploy button when it turns blue.
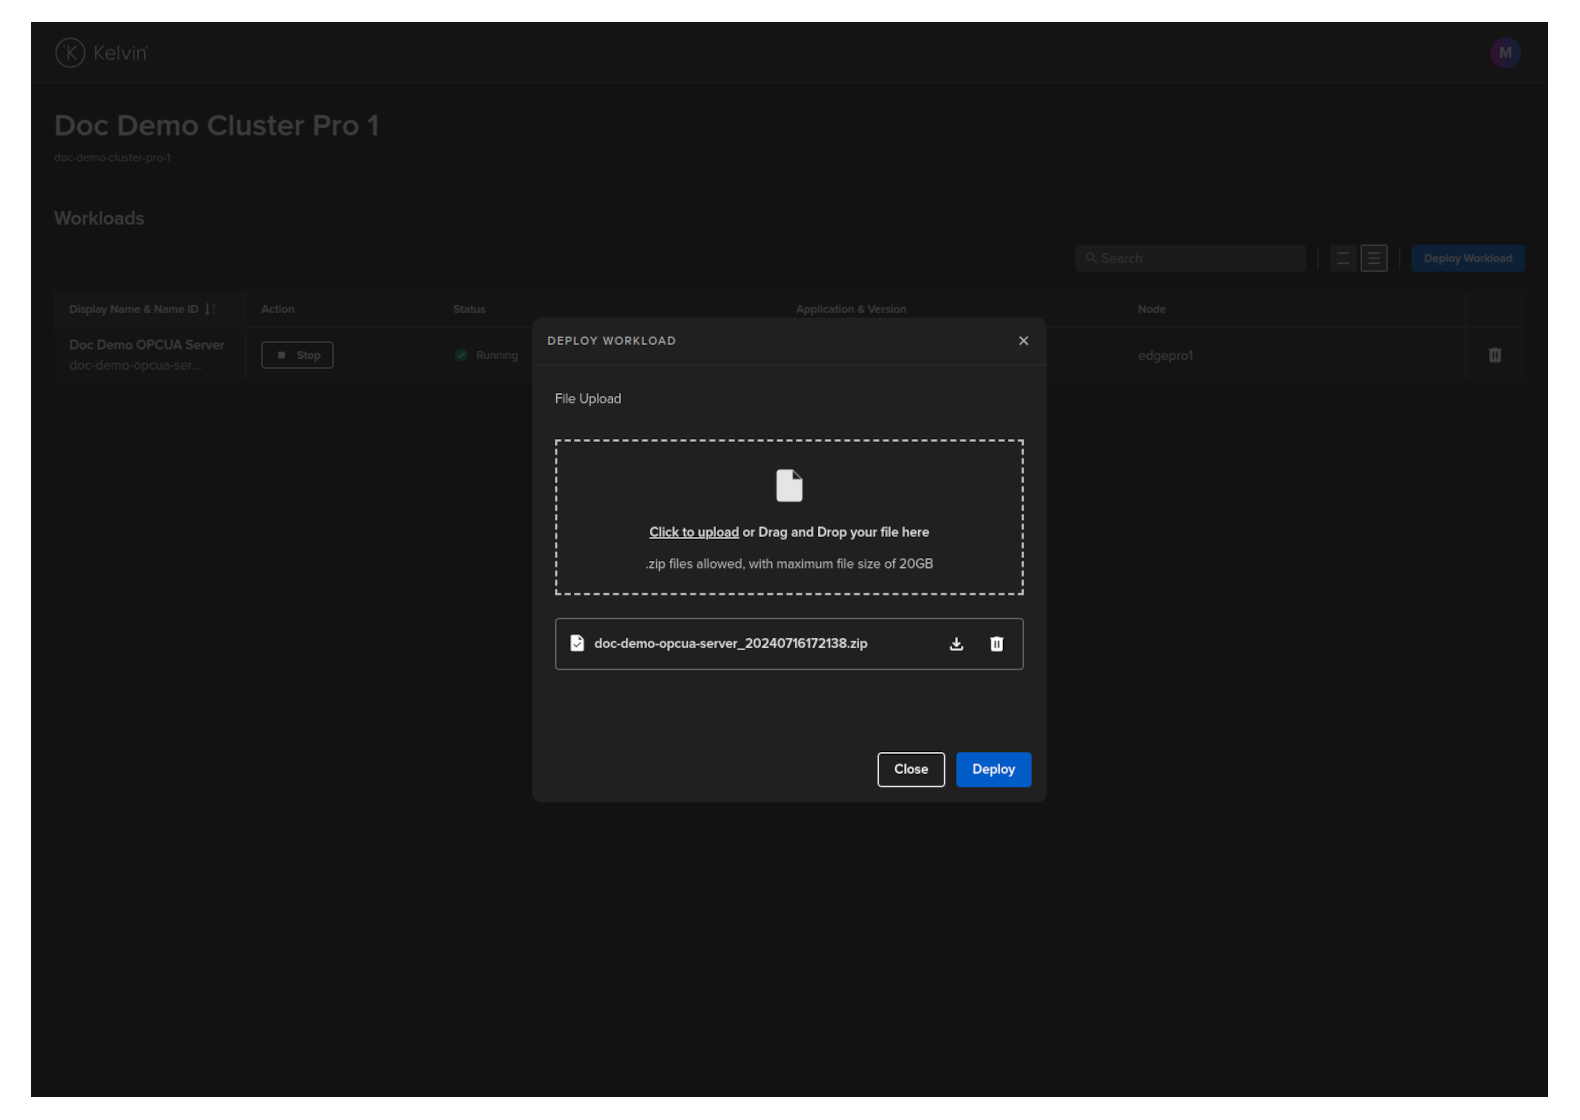
The Workload will be uploaded and deployed to a Node in the Cluster.
Once deployed successfully, the status of the Workload on the Kelvin Platform will be updated from Pending Deploy to Running the next time the edge computer is connected to the Internet.
Congratulations, you have deployed your new Workload.
This endpoint is only available in the Edge API. With the Kelvin API you can only do a full Workload deployment with the /workloads/deploy endpoint.
curl -X 'POST' \
'https://<edge-computer-ip>/api/v4/workloads/import' \
-H 'Authorization: Bearer <Your Current Token>' \
-H 'accept: application/json' \
-H 'Content-Type: multipart/form-data' \
-F 'file=@/home/ubuntu/Documents/doc-demo-opcua-server_20240716101813.zip;type=application/zip'
You will get a response similar to this;
{
"name":"doc-demo-opcua-server",
"title":"Doc Demo OPCUA Server",
"app_name":"qa-opcua-server-docker-app",
"app_version":"1.0.1",
"node_name":null,
"status":{
    "state":"received",
    "message":"Received",
    "warnings":null
},
"staged":null
}
This procedure will only work if you install the Cluster using the K3s method where Kelvin also installed and directly manages the Kubernetes cluster.
Ensure the Workload image is accessible from the command line and then type this command;
sudo kelvin-provision workloads import -f [fileLocation/filename]
Afterwards you can check the workload is running with the command.
sudo kelvin-provision workloads list