Docker Apps
Create a Docker App
A Docker App is a standard docker container and is created and developed like any normal container for docker and Kuberenetes.
You can build for both x86_64 and arm64 devices.
At a minimum to be compatible with Kelvin, you need two files.
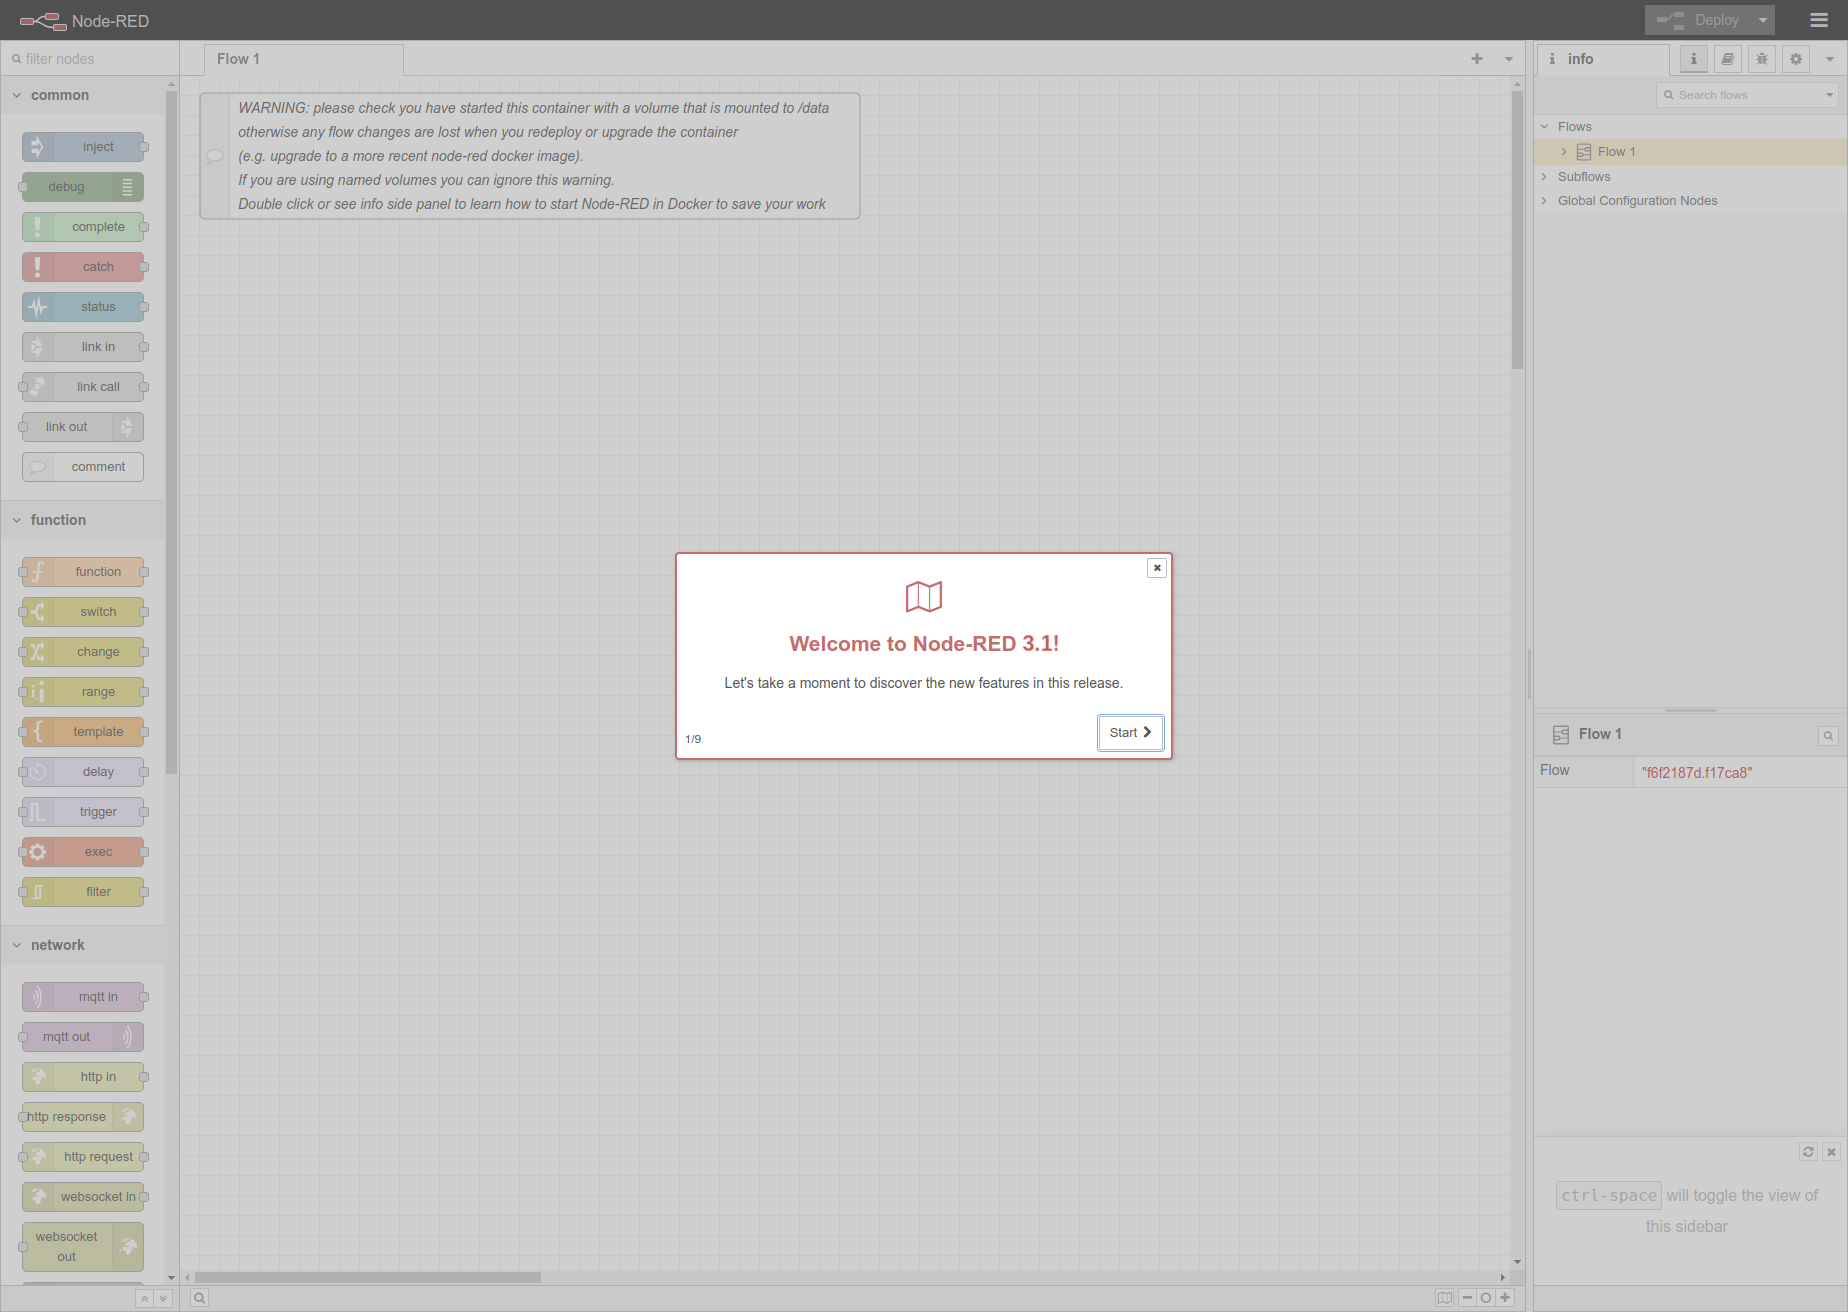
For this example we will get ready for deploying a stock Node Red Server to the edge which can then be accessed on the local LAN network at port 1880 in any modern broswer.
The app.yaml is the main configuration file that holds both Kelvin SmartApps™ definition as well as the deployment/runtime configuration.
For our example it would look like this;
app:
docker:
    args: []
    context: .
    dockerfile: Dockerfile
type: docker
info:
    description: Local Node Red Server Demo
    name: local-node-red-server-demo
    title: Local Node Red Server Demo
    version: 1.0.0
spec_version: 4.11.0
system:
ports:
    - name: http
    type: host
    host:
        port: 1880
privileged: false
volumes:
    - name: data
    target: /data
    type: persistent
It is composed by the following sections:
-
The
spec_versionsection is automatically injected and specifies Kelvin SmartApps™ JSON Schema (latest) version which both defines and validates theapp.yamlstructure.spec_version: 4.11.0 -
The
infosection holds Kelvin SmartApps™ basic information required to make itself uploadable to Kelvin's App Registry.info: description: Local Node Red Server Demo name: local-node-red-server-demo title: Local Node Red Server Demo version: 1.0.0The
nameis the Docker App's unique identifier. Thetitleanddescriptionwill appear in App Registry on the Kelvin UI once the Docker App is uploaded.Info
The
versionshould be bumped every time Kelvin SmartApps™ gets an update, and before it gets uploaded to the App Registry. -
The
app:dockercan be considered theapp.yaml"main" section. It defines the docker configurations and arguments for building the container.app: type: docker docker: args: [] context: . dockerfile: DockerfileInfo
This is the minimum information that you need to give.
-
The
systemsection is [optional] and can be used to set different system requirements/constraints within the Docker App's running environment. i.e. Resources, Environment Variables, Volumes, Ports, etc:system: ports: - name: http type: host host: port: 1880 privileged: false volumes: - name: data target: /data type: persistent -
In cases where you want to limit resources a container uses you can add
resourceswhich defines the reserved (requests) andlimitsthe resources allocated to the Docker App:system: resources: requests: # Reserved cpu: 100m memory: 256Mi limits: # Limits cpu: 200m memory: 512Mi -
environment_varsis used to define Environment Variables available within the Docker App container. i.e.:system: environment_vars: - name: KELVIN_GW_MODE value: SOCKETSInfo
KELVIN_GW_MODEis an Environment Variable that is [required] by Kelvin's platform. Others can optionally be added. -
Mounted
volumesare [optional] and their main purpose is to share and persist data generated by Kelvin SmartApps™ or used by it in a specific place. They act like a shared folder between the Docker App and the host. Kelvin supports directory volumes, such as folders or serial ports, persistent, and file/test volumes:system: volumes: # Folder Volume - name: serial-rs232 target: /dev/rs232 # Container path type: host host: source: /dev/ttyS0 # Host path # Persistent Volume - name: extremedb target: /extremedb/data type: persistent # File/Text Volume - name: model-parameters target: /opt/kelvin/data/parameters.bin type: text # Renders data into a file text: base64: true encoding: utf-8 data: |- SGVsbG8gUHJvZHVjdCBHdWlsZCwgZnJvbSB0aGUgRW5naW5lZXJpbmcgR3VpbGQhCg== -
portsis [optional] and used to define network port mappings. i.e.:system: ports: - name: http type: host host: port: 1880 - name: opcua type: service # Exposed as a service for other containers service: port: 48010 exposed_port: 30120 -
privilegedis [optional] and used to grant extended privileges to Kelvin SmartApps™, allowing it to access any devices on the host, such as a Serial device:system: privileged: true
The Dockerfile is a script used to define the instructions and configuration for building a Docker image. It specifies the base image, installation of software, file copying, and other setup tasks needed to create a reproducible and isolated environment for running Kelvin SmartApps™ in Docker containers.
For example if you wanted to create a basic Node Red Server for deployment to the edge, your Dockerfile can look something like this;
FROM nodered/node-red
Consume
In order to consume streaming data from Kelvin, you can connect to the Kelvin API to retrieve the data with the Timeseries endpoints.
In many cases you don't want to use bandwidth to download large volumes of data, with Kelvin API you can also collect aggregated data that is compiled on the server before being downloaded to your program.
You can go to Developer Tools → How To → Export section to see a myriad of ways you can consume data.
Produce
You can also publish three types of messages to the platform;
- Data Messages (Number, Boolean and String)
- Control Changes
- Recommendations
We'll go through those examples in the following sections.
Data Messages
In order to send data messages from Kelvin, you can connect to the Kelvin API to send the Asset / Data Stream pair data with the Timeseries endpoints.
curl -X 'POST' \
  'https://<url.kelvin.ai>/api/v4/timeseries/create' \
    -H 'Authorization: Bearer <Your Current Token>' \
  -H 'accept: application/json' \
  -H 'Content-Type: application/json' \
  -d '{
  "data": [
    {
      "payload": 18000,
      "resource": "krn:ad:bp_01/annulus_pressure",
      "source": "krn:user:demo@kelvin.ai",
      "timestamp": "2022-01-13T12:00:00.000000Z",
      "type": "number"
    }
  ]
}'
Control Change Messages
In order to send Control Changes from Kelvin, you can connect to the Kelvin API to send the Control Change instructions with the Create Control Change endpoint.
curl -X 'POST' \
  'https://<url.kelvin.ai>/api/v4/control-changes/create' \
    -H 'Authorization: Bearer <Your Current Token>' \
  -H 'accept: application/json' \
  -H 'Content-Type: application/json' \
  -d '{
  "resource": "krn:ad:98-ac-1/humidity_setpoint",
  "payload": 2001,
  "timeout": 300,
  "retries": 0,
  "expiration_date": "2024-03-14T00:00:00Z"
}'
Recommendation Messages
In order to send Recommendations from Kelvin, you can connect to the Kelvin API to send the Recommendation instructions with Control Change information using the Create Recommendation endpoint.
curl -X 'POST' \
  'https://<url.kelvin.ai>/api/v4/recommendations/create' \
    -H 'Authorization: Bearer <Your Current Token>' \
  -H 'accept: application/json' \
  -H 'Content-Type: application/json' \
  -d '{
  "source": "krn:wlappv:cluster-02/perf-berp-rec-gen/1.0.8",
  "resource": "krn:asset:perf-berp-perf-asset",
  "actions": {
    "control_changes": [
      {
        "resource": "krn:ad:perf-berp-perf-asset/perf-berp-perf-number",
        "expiration_date": "2024-03-15T13:11:14.864627Z",
        "payload": 14.5
      }
    ]
  },
  "expiration_date": "2024-03-15T13:11:14.864661Z",
  "metadata": {},
  "resource_parameters": {
    "closed_loop": false
  },
  "type": "perf-recommendation_type"
}'
There is also the option to add Dynacard data that can be viewed in the Recommendation.
In the Kelvin UI, the Dynacard is named Production in the Recommendation.
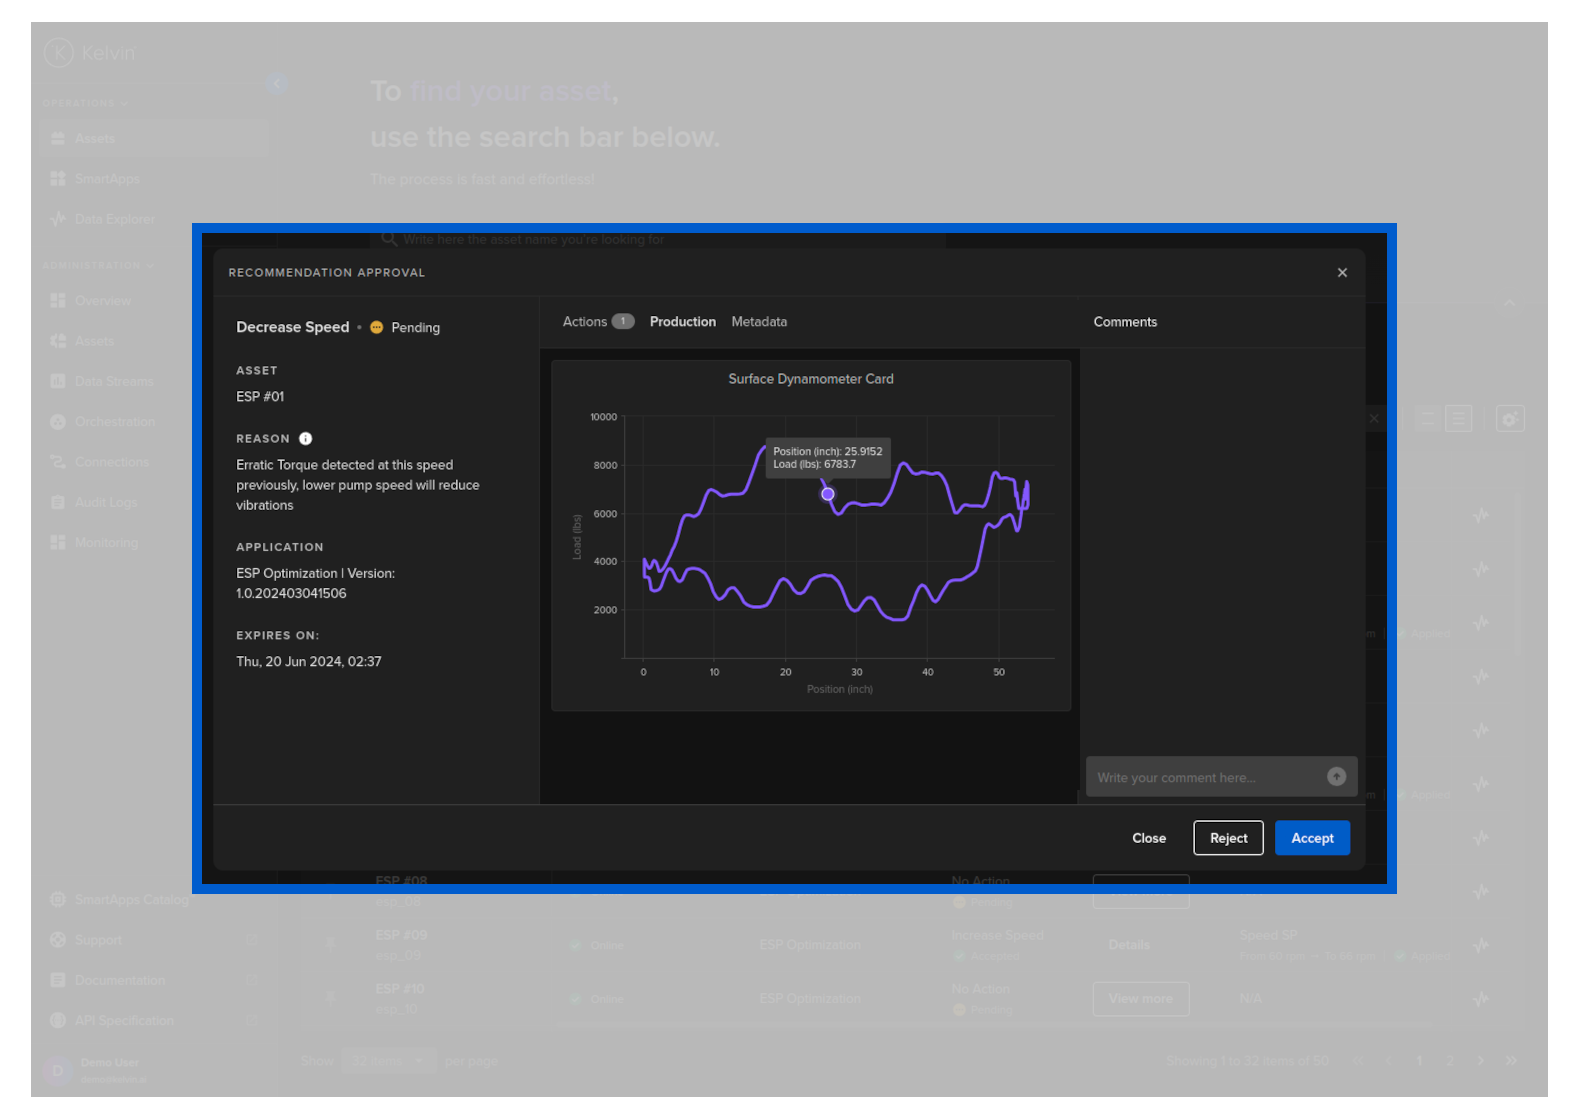
To add Dynacard data, add an evidence key inside metadata with the following structure;
| Key | Description |
|---|---|
| type | dynacard to make the Kelvin UI treat this as Production data |
| title | Title to be used by Kelvin UI |
| payload / data | The actual data to be plotted in Prodcution graph |
| payload / axisLabel | The labels for the x and y axis |
curl -X 'POST' \
  'https://<url.kelvin.ai>/api/v4/recommendations/create' \
    -H 'Authorization: Bearer <Your Current Token>' \
  -H 'accept: application/json' \
  -H 'Content-Type: application/json' \
  -d '{
   "actions":{
      "control_changes":[
         {
            "resource":"krn:ad:98-ac-1/cp_temperature",
            "expiration_date":"2024-07-18T13:11:14.864627Z",
            "payload":77
         }
      ]
   },
   "confidence":7,
   "description":"Temperature adjustment required for optimization of equipment.",
   "expiration_date":"2024-07-19T13:11:14.864661Z",
   "metadata":{
      "evidence":[
         {
            "type":"dynacard",
            "title":"Shutdown Dynacard",
            "payload":{
               "data":[
                        [0, 0],
                        [1, 1],
                        [2, 2],
                        [3, 3],
                        [4, 4],
                        [5, 5],
                        [6, 6],
                        [7, 7],
                        [8, 8],
                        [9, 9]
               ],
               "axisLabel":{
                  "x":"Position",
                  "y":"Load"
               }
            }
         }
      ]
   },
   "resource_parameters":{
    "closed_loop": false
   },
   "source":"krn:app:cp-temperature-producer",
   "resource":"krn:asset:98-ac-1",
   "type":"control-change"
}'
Test Docker App
You can test your Docker App in the same way you test any normal docker container using the traditional docker commands.
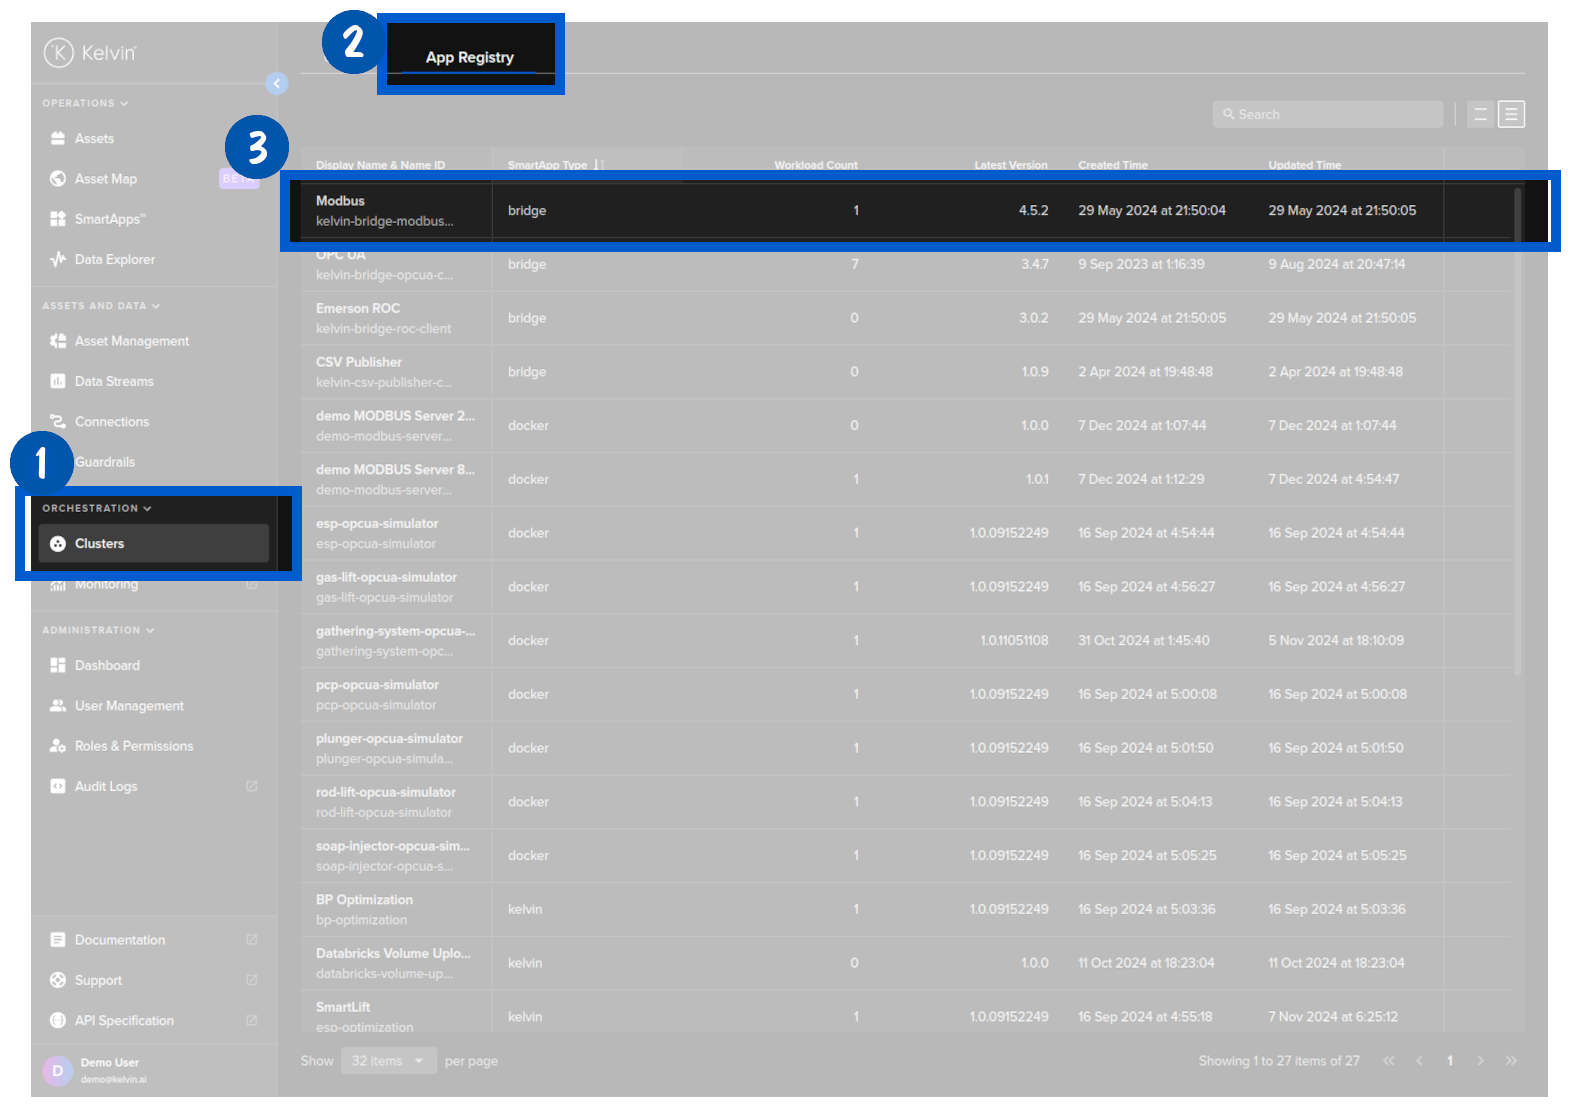
Upload to App Registry
When you are satisfied with your docker container, then you can upload it to the Kelvin SmartApp™ Registry. From the App Registry the Docker App will be available for deployment to any edge location through the Orchestration menu under Administration.
kelvin app upload
you will see a response similar to this;
[kelvin.sdk][2024-03-13 16:12:17][I] Uploading application from path: "/home/ubuntu/Node Red Server App"
[kelvin.sdk][2024-03-13 16:12:19][I] Assessing basic application info..
[kelvin.sdk][2024-03-13 16:12:22][I] Building "Docker type" application "local-node-red-server-demo"
[+] Building 1.3s (5/5) FINISHED                                 docker:default
 => [internal] load build definition from Dockerfile                       0.1s
 => => transferring dockerfile: 59B                                        0.0s
 => [internal] load .dockerignore                                          0.0s
 => => transferring context: 2B                                            0.0s
 => [internal] load metadata for docker.io/nodered/node-red:latest         1.1s
 => CACHED [1/1] FROM docker.io/nodered/node-red@sha256:b3bee638741091bf6  0.0s
 => exporting to image                                                     0.0s
 => => exporting layers                                                    0.0s
 => => writing image sha256:5d0b2df2bffb761fd91ba589d4d448ac6302555b3a6a7  0.0s
 => => naming to docker.io/library/local-node-red-server-demo:1.0.0        0.0s
[kelvin.sdk][2024-03-13 16:12:24][R] Image successfully built: "local-node-red-server-demo:1.0.0"
[kelvin.sdk][2024-03-13 16:12:24][I] Pushing application content
 [elapsed: 01:10] - [Layer: 2db4066a49ba] - [Pushed]
 [elapsed: 01:10] - [Layer: b2a388169cec] - [Pushed]
 [elapsed: 01:10] - [Layer: d35168474557] - [Pushed]
 [elapsed: 01:10] - [Layer: 4b8d6e3ee148] - [Pushed]
 [elapsed: 01:10] - [Layer: 554af45a34db] - [Pushed]
 [elapsed: 01:10] - [Layer: 120419f9badd] - [Pushed]
 [elapsed: 01:10] - [Layer: ce8ba45d69ca] - [Pushed]
 [elapsed: 01:10] - [Layer: 175e52ed816b] - [Pushed]
 [elapsed: 01:10] - [Layer: 0507161c0c07] - [Pushed]
 [elapsed: 01:10] - [Layer: 5f70bf18a086] - [Pushed]
 [elapsed: 01:10] - [Layer: 3b57d1265a50] - [Pushed]
 [elapsed: 01:10] - [Layer: 0b24e9c62827] - [Pushed]
 [elapsed: 01:10] - [Layer: 397e15d50d72] - [Pushed]
 [elapsed: 01:10] - [Layer: 365ccd918307] - [Pushed]
 [elapsed: 01:10] - [Layer: 1bba629c69e9] - [Pushed]
 [elapsed: 01:10] - [Layer: 139c1270acf1] - [Pushed]
 [elapsed: 01:10] - [Layer: 4693057ce236] - [Pushed]
[kelvin.sdk][2024-03-13 16:13:37][R] Application "local-node-red-server-demo:1.0.0" successfully pushed to registry
[kelvin.sdk][2024-03-13 16:13:37][R]

            Application successfully uploaded:
                Name: local-node-red-server-demo
                Version: 1.0.0
You will now find the App in the App Registry.