Create an Event Detection Application
Here we show you how to build an Application for x86_64 architecture. You do have the option to build for both x86_64 and arm64 devices.
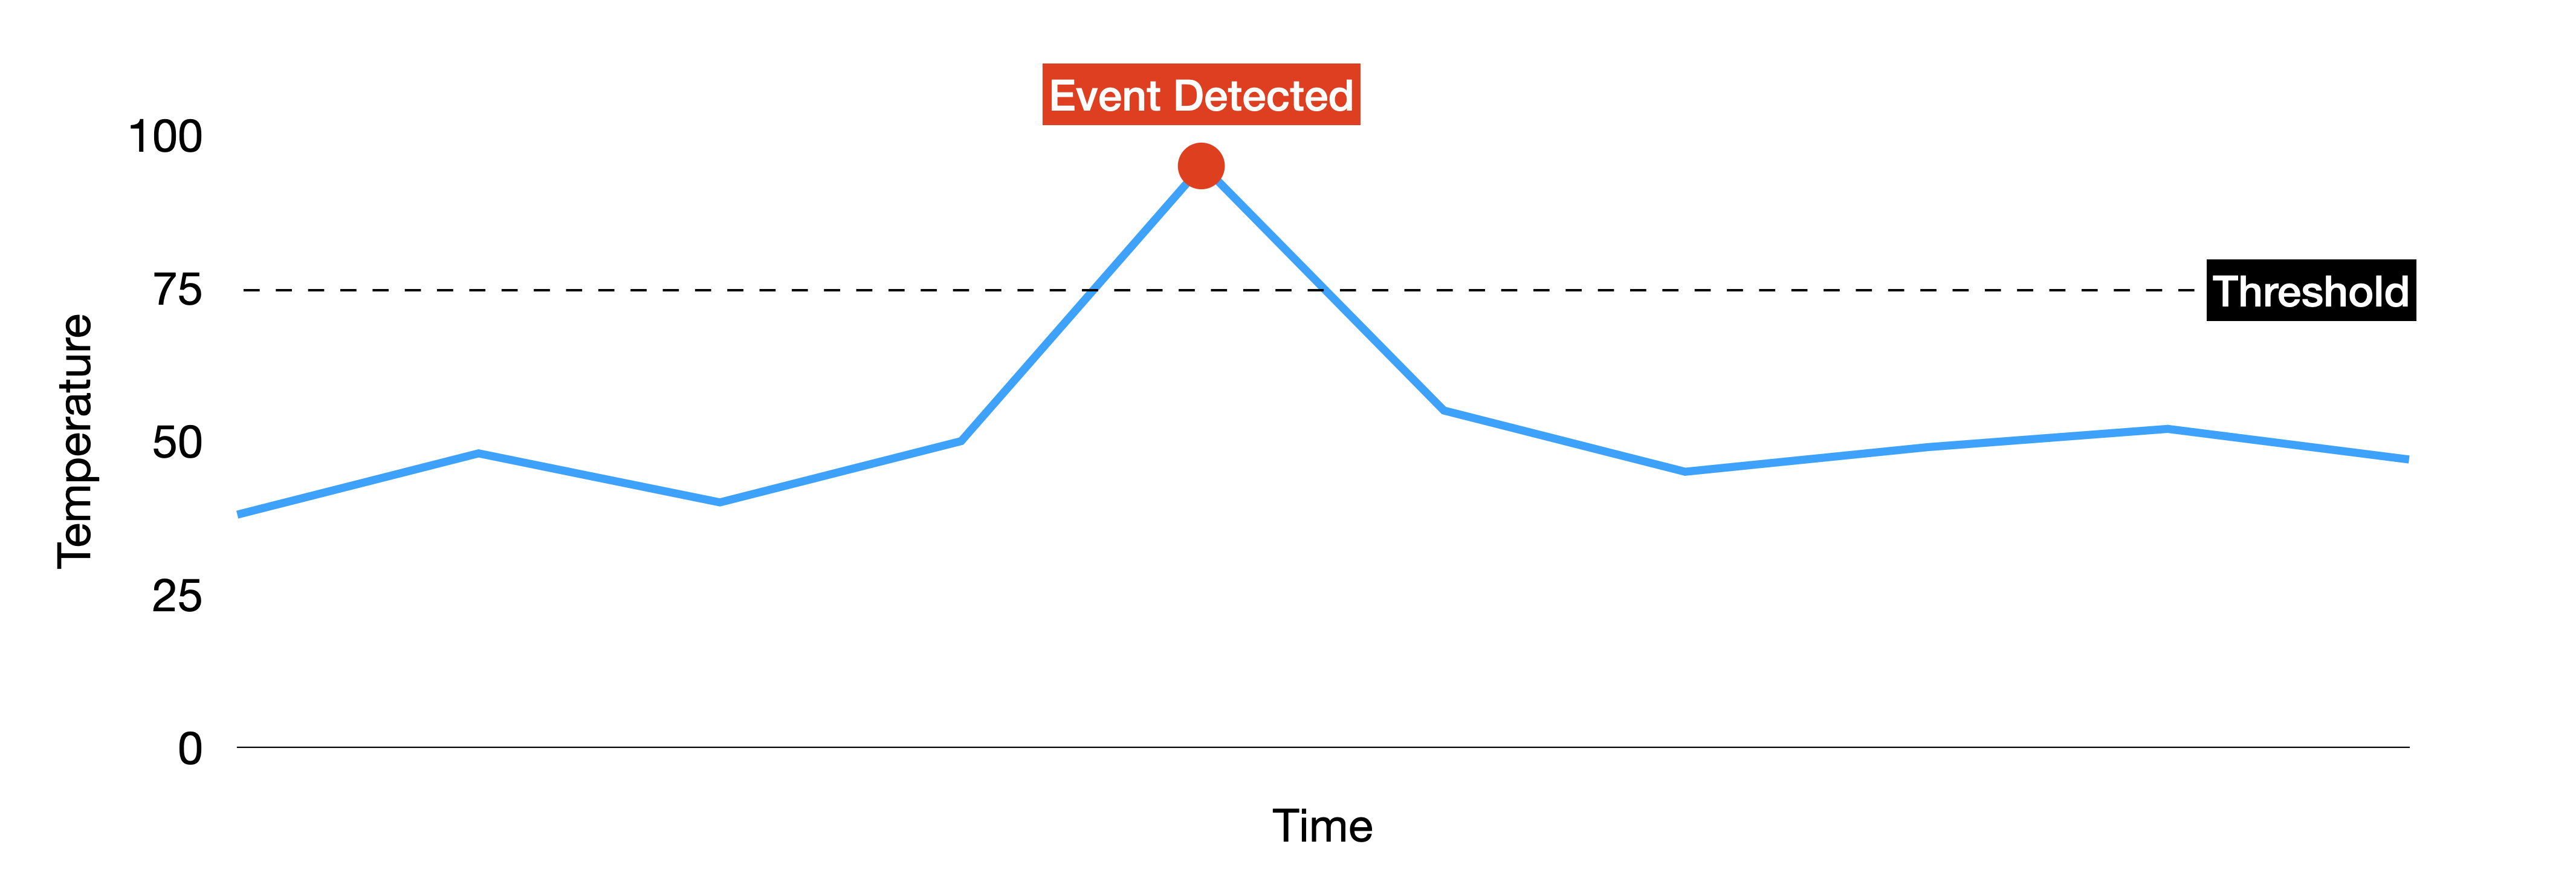
Motor overheating in Beam Pumps presents a technical challenge, potentially caused by factors such as overloading, inadequate maintenance, insufficient cooling, electrical issues, and mechanical misalignment.
To address motor overheating in beam pumps, we propose an integrated event detection and control application.
The application will monitor the temperature of a motor and detect when the motor is overheating. When this condition is met the application sends a Control Change to reduce the motor speed that will result in a reduction of the temperature.
This guide will show how to turn simple logic into a Kelvin App. Let's build this application step by step.
Create
Type the following command to create a Kelvin App:
kelvin app create event-detection
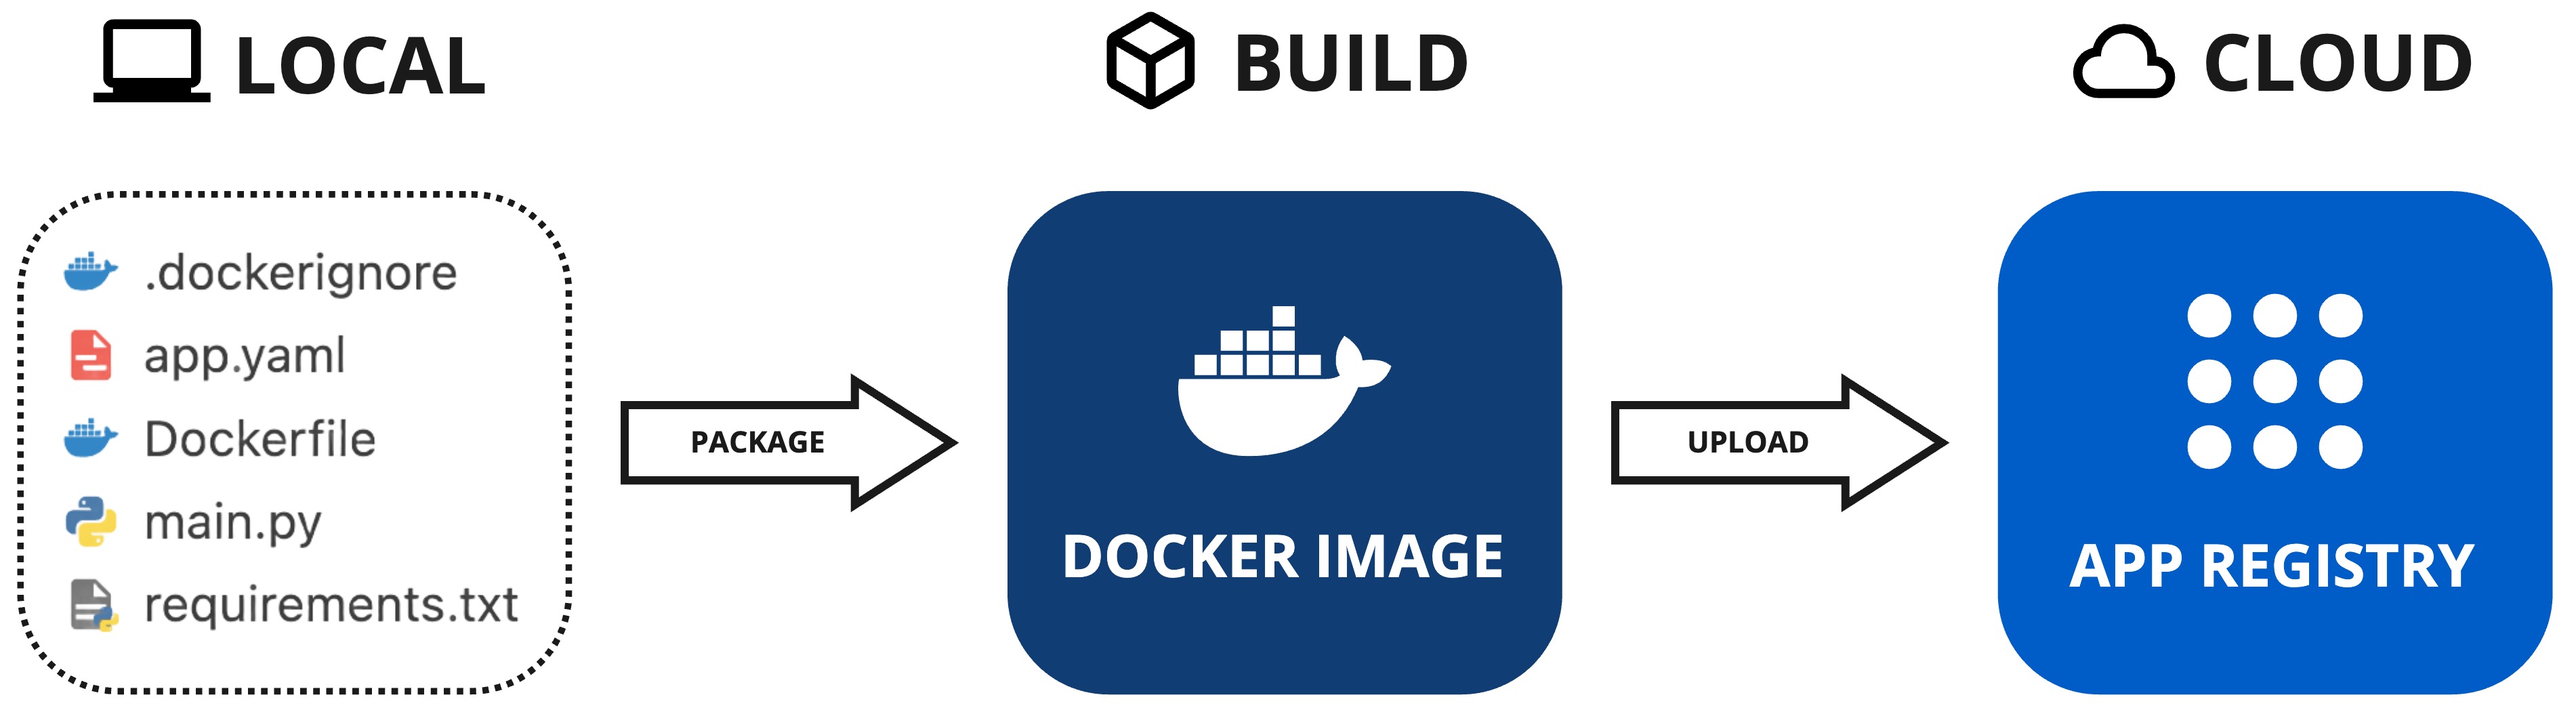
Kelvin SDK will create a new folder named after the project name and automatically create the required files and add a sample Python program for reference.
Folder Structure
You can now open the folder in your favorite IDE or editor and start to modify the files to create your Kelvin App.
$ cd event-detection
$ ls -l
-rw-rw-r-- 1 ubuntu ubuntu  133 Oct  2 21:57 Dockerfile
-rw-rw-r-- 1 ubuntu ubuntu  436 Oct  2 21:57 app.yaml
-rw-rw-r-- 1 ubuntu ubuntu  610 Oct  2 21:57 main.py
-rw-rw-r-- 1 ubuntu ubuntu   17 Oct  2 21:57 requirements.txt
Below is a brief description of each file.
The app.yaml file serves as the configuration file for the application, detailing specific parameters and settings of the application. We will modify this file as part of this tutorial in the next couple of steps.
You can read more about the app.yaml and the available configurations in this page.
The main.py is used as the entry point of an application. When it runs, main.py is typically the first script that gets executed, and it usually contains the main logic or orchestrates the flow of the application. We will modify this file as part of this tutorial in the next couple of steps.
You can read more about the main.py in this page.
This is a list of python libraries that need to be installed when compiling the Kelvin App. This is treated like any normal Python requirements.txt files.
The sample requirments.txt has the only mandatory library required if you want to use the specific Kelvin SDK library.
kelvin-python-sdk
You can read more about the requirements.txt in this page.
This is a standard Dockerfile that is used to compile the Kelvin App into a Docker image.
The sample Dockerfile comes with the minimum steps required for Kelvin App. This is adequate for this example and does not require any changes.
You can read more about the Dockerfile in this page.
Inputs and Outputs
The Kelvin App stands out for its seamless integration with streaming data. As a developer, you're given a simplified interface. Simply define:
- Inputs: The data your app will consume.
- Outputs: The data your app will produce.
Kelvin App takes care of the rest, ensuring reliable communication, fault-tolerance, data serialization, and data integrity.
Define Inputs
Inputs are specified within the app.yaml file. Each input requires:
- A unique name to identify the input. This will be used in the Python code to reference the input. It must contain only lowercase alphanumeric characters. The characters
.,_and-are allowed to separate words instead of a space BUT can not be at the beginning or end of the name. - An expected data type, which can be:
number,boolean,string.
For this guide, the Event Detection application is monitoring a motor's temperature. Edit the app.yaml and add the following application input:
app:
  kelvin:
    inputs:
      - data_type: number
        name: motor_temperature
Define Outputs
Outputs, similar to inputs, are defined in the app.yaml file. Each output needs:
- A unique name to identify the output. This will be used in the Python code to reference the output. It must contain only lowercase alphanumeric characters. The characters
.,_and-are allowed to separate words instead of a space BUT can not be at the beginning or end of the name. - An expected data type, which can be:
number,boolean,string.
Additionally, some outputs might initiate control changes. For instance, the Event Detection application determines a need to modify a motor speed. Edit the app.yaml and add the following output:
app:
  kelvin:
    outputs:
      - data_type: number
        name: motor_speed_set_point
        control_change: True
The control_change: True indicates that the output will trigger the appropriate logic to adjust the Motor Speed based on the provided set point. We recommend keeping this value to True for this guide to see what a Control Change looks like.
Your final app.yaml file with Inputs and Outputs should look like:
app:
  type: kelvin
  kelvin:
    inputs:
      - data_type: number
        name: motor_temperature
    outputs:
      - data_type: number
        name: motor_speed_set_point
        control_change: true
    language:
      type: python
      python:
        entry_point: kelvin_python_sdk
info:
  name: event-detection
  title: Event Detection
  description: Monitors if a motor is overheating. If so, it will send a Control Change to reduce the Motor Speed.
  version: 1.0.0
spec_version: 4.12.0
system:
  environment_vars:
    - name: KELVIN_GW_MODE
      value: SOCKETS
Code
The main.py file defines the code that will be executed by the Kelvin App. In the case of the Event Detection application we want the code to be like this:
import asyncio
from asyncio import Queue
from datetime import timedelta

from kelvin.application import KelvinApp, filters
from kelvin.message import Number, ControlChange
from kelvin.krn import KRNAssetDataStream


async def process_motor_temperature_change(app: KelvinApp, motor_temperature_msg: Number):
    if motor_temperature_msg.payload > 75:
        motor_speed_value = 1000

        print("Publishing Control Change for Motor Speed Set Point: ", motor_speed_value)

        # Build & Publish Control Change
        await app.publish(
                ControlChange(
                    expiration_date=timedelta(minutes=5),
                    payload=motor_speed_value,
                    resource=KRNAssetDataStream(motor_temperature_msg.resource.asset, "motor_speed_set_point")
                )
            )

async def main() -> None:
    app = KelvinApp()
    await app.connect()

    # Create a Filtered Queue with Temperature (Number) Input Messages
    motor_temperature_msg_queue: Queue[Number] = app.filter(filters.input_equals("motor_temperature"))

    while True:
        # Wait & Read new Temperature Inputs
        motor_temperature_msg = await motor_temperature_msg_queue.get()

        print("Received Motor Temperature: ", motor_temperature_msg)

        # Process the Temperature change
        await process_motor_temperature_change(app, motor_temperature_msg)

        await asyncio.sleep(1)


if __name__ == "__main__":
    asyncio.run(main())
Click here to read a detailed code explanation
Imports
import asyncio
from asyncio import Queue
from datetime import timedelta

from kelvin.application import KelvinApp, filters
from kelvin.message import Number, ControlChange
from kelvin.krn import KRNAssetDataStream
- The script imports necessary modules for asynchronous operations using
asyncio. KelvinApp,ControlChange,filters, and various message related classes from the Kelvin library are also imported.
Processing Motor Temperature Change
async def process_motor_temperature_change(app: KelvinApp, motor_temperature_msg: Number):
    if motor_temperature_msg.payload > 75:
        motor_speed_value = 1000

        print("Publishing Control Change for Motor Speed Set Point: ", motor_speed_value)

        await app.publish(
                ControlChange(
                    expiration_date=timedelta(minutes=5),
                    payload=motor_speed_value,
                    resource=KRNAssetDataStream(motor_temperature_msg.resource.asset, "motor_speed_set_point")
                )
            )
- Defines an asynchronous function
process_motor_temperature_changethat processes temperature changes. - If the temperature (from
motor_temperature_msg.payload) exceeds 75, it sets the motor speed value to 1000 RPM. - The script then sends a
ControlChangemessage to the system with the updated speed value. This control message has an expiration date of 5 minutes.
Main Asynchronous Function
async def main() -> None:
    app = KelvinApp()
    await app.connect()

    # Create a Filtered Queue with Temperature (Number) Input Messages
    motor_temperature_msg_queue: Queue[Number] = app.filter(filters.input_equals("motor_temperature"))

    while True:
        # Wait & Read new Temperature Inputs
        motor_temperature_msg = await motor_temperature_msg_queue.get()

        print("Received Motor Temperature: ", motor_temperature_msg)

        # Process the Temperature change
        await process_motor_temperature_change(app, motor_temperature_msg)

        await asyncio.sleep(1)
- Initializes a
KelvinAppinstance and connects to it asynchronously. - Filters incoming messages for those that equal "motor_temperature" and places them in a queue named
motor_temperature_msg_queue. - The script enters an infinite loop where it continuously checks for new motor temperature messages.
- Upon receiving a motor temperature message, it logs it and processes the temperature change using the aforementioned function.
- After processing the message, the script waits (sleeps) for 1 second before checking for a new message.
This code connects to Kelvin and sets up a filter to listen for messages related to motor_temperature.
If a motor temperature message is received and the temperature value (payload) is greater than 75 degrees, the script sends a control change to the Kelvin system to set the motor speed to 1000 rpm, which expires in 5 minutes.
The main loop of the program continuously checks for new messages, processes them, and then waits for a second before checking again.
And that is it. You can now run and test your Python program in the same manner as you do for other Python applications.
Test
In the Kelvin SDK there is a test tool to help you ingest data to the inputs and debug the outputs to test the performance of your application. Some of the features include:
- Ingest Simulated Data: Inject random values at a specified interval to the app inputs using the command
kelvin app test simulator - Ingest CSV file: Read a CSV file and send the data to the app inputs using the command
kelvin app test csv - Verify outputs: Verify the outputs of the app like control changes and recommendations
For this guide, Open a new terminal in the folder where your application is located and type:
You can also use your own custom simulation data from a csv file. You can read more about this feature in the detailed testing documentation here.
kelvin app test simulator
This will start the test tool by simulating random values. This needs to be running in its own terminal as it will continue running until you do a manual break. The output should look like this:
$ kelvin app test simulator

Publisher started.
Now open a new terminal and run the python application:
$ python3 main.py

Received Motor Temperature:  id=UUID('e5fd1793-32aa-426c-938a-c8cf00701d6d') type=KMessageTypeData('data', 'pt=number') trace_id=None source=None timestamp=datetime.datetime(2023, 11, 24, 14, 58, 5, 560989, tzinfo=datetime.timezone(datetime.timedelta(0), 'WET')) resource=KRNAssetDataStream(asset='test-asset-1', data_stream='motor_temperature') payload=14.3
Received Motor Temperature:  id=UUID('3df4e3d4-5971-497e-92fc-ef0ab45f525d') type=KMessageTypeData('data', 'pt=number') trace_id=None source=None timestamp=datetime.datetime(2023, 11, 24, 14, 58, 10, 562370, tzinfo=datetime.timezone(datetime.timedelta(0), 'WET')) resource=KRNAssetDataStream(asset='test-asset-1', data_stream='motor_temperature') payload=84.45
Publishing Control Change for Motor Speed Set Point:  1000
Now go back to the terminal session where you ran kelvin app test simulator to see the information generated by the application:
$ kelvin app test simulator
Publisher started.
Connected

Received Control Change Message:
 ControlChangeMsg(id=UUID('35088132-f07e-4c9a-82e2-b4233d770dde'), type=KMessageTypeControl('control', ''), trace_id=None, source=None, timestamp=datetime.datetime(2023, 11, 24, 14, 58, 10, 563476, tzinfo=datetime.timezone(datetime.timedelta(0), 'WET')), resource=KRNAssetDataStream(asset='test-asset-1', data_stream='motor_speed_set_point'), payload=ControlChangePayload(timeout=None, retries=None, expiration_date=datetime.datetime(2023, 11, 24, 15, 3, 10, 563419, tzinfo=datetime.timezone(datetime.timedelta(0), 'WET')), payload=1000))
What is happening? The simulator reads the application's inputs from the app.yaml file and generates random values for it at a fixed interval. The application receives the inputs and processes them. All outputs generated by the application are captured by the simulator and displayed in the terminal.
Success
Congratulations! You have successfully tested your application.
Upload
In this step you will upload your Kelvin App to the App Registry.
The info section in the app.yaml file defines the unique name, display name, description and version of the application. Here's your app.yaml file:
info:
  name: event-detection
  title: Event Detection
  description: Monitors if a motor is overheating. If so, it will send a Control Change to reduce the Motor Speed.
  version: 1.0.0
Every time you upload your application to the App Registry, you need to increment the version number. The version number is in the format of major.minor.patch.
You will get an error if you try to upload your application to the App Registry if it already exists in the App Registry with the same version number.
Uploading the Kelvin App is very easy and only needs a one instruction line. To do this, open a new terminal in the folder where your program and all the associated files are located and type;
kelvin app upload
For this step Docker must be installed and running as it is used to package and upload the application to the App Registry.
As the command runs, you will observe the application being packaged and subsequently uploaded to the App Registry. Here's a sample output:
[kelvin.sdk][2023-10-03 20:53:51][R] Image successfully built: "event-detection:1.0.0"
[kelvin.sdk][2023-10-03 20:53:51][I] Pushing application content to "https://<url.kelvin.ai>"
       [elapsed: 00:19] - [Layer: 2e1bc7550524] - [Pushed]
       [elapsed: 00:19] - [Layer: f15701d79da8] - [Layer already exists]
[kelvin.sdk][2023-10-03 20:54:10][R] Application "event-detection:1.0.0" successfully pushed to registry "https://<url.kelvin.ai>"
[kelvin.sdk][2023-10-03 20:54:10][R]

            Application successfully uploaded:
                Name: event-detection
                Version: 1.0.0
Congratulations! You've successfully uploaded your Kelvin App and are now ready to deploy it to assets.
Next Step
Now that you have your first Kelvin App created and uploaded, you can deploy it to some sample assets that we have created for you in your Kelvin Instance. Click on the link below to learn how to deploy your application: