InfluxDB
Overview
InfluxDB is a time-series database designed to handle high write and query loads.
InfluxDB empowers developers to build IoT, analytics, and monitoring software.
It is purpose-built to handle the massive volumes and countless sources of time-stamped data produced by sensors, applications, and infrastructure. It is a time-series database written in Go and optimized for fast, high-availability storage and retrieval of time-series data in fields such as operations monitoring, application metrics, Internet of Things sensor data, and real-time analytics.
In this tutorial, we will be covering a simple example of how to create a generic application that will run InfluxDB and read/write time-series data to a persistent volume.
In this tutorial we will learn the following features
- How to use an exposed service network port.
- How to mount a persistent volume where
InfluxDBdata will be saved.
Prerequisite:
- Complete the Getting Started Guide.
Source Code
The source code for this application is available at GitHub.
Create a docker type application
kelvin app create --app-type docker kelvin-influxdb-tutorial
cd kelvin-influxdb-tutorial
Start Kelvin Studio
kelvin studio start --input-file app.yaml
Configure the new generic docker application
In this example, we will use InfluxDB version 1.8.3.
Start by defining the Dockerfile and its contents:
FROM influxdb:1.8.3
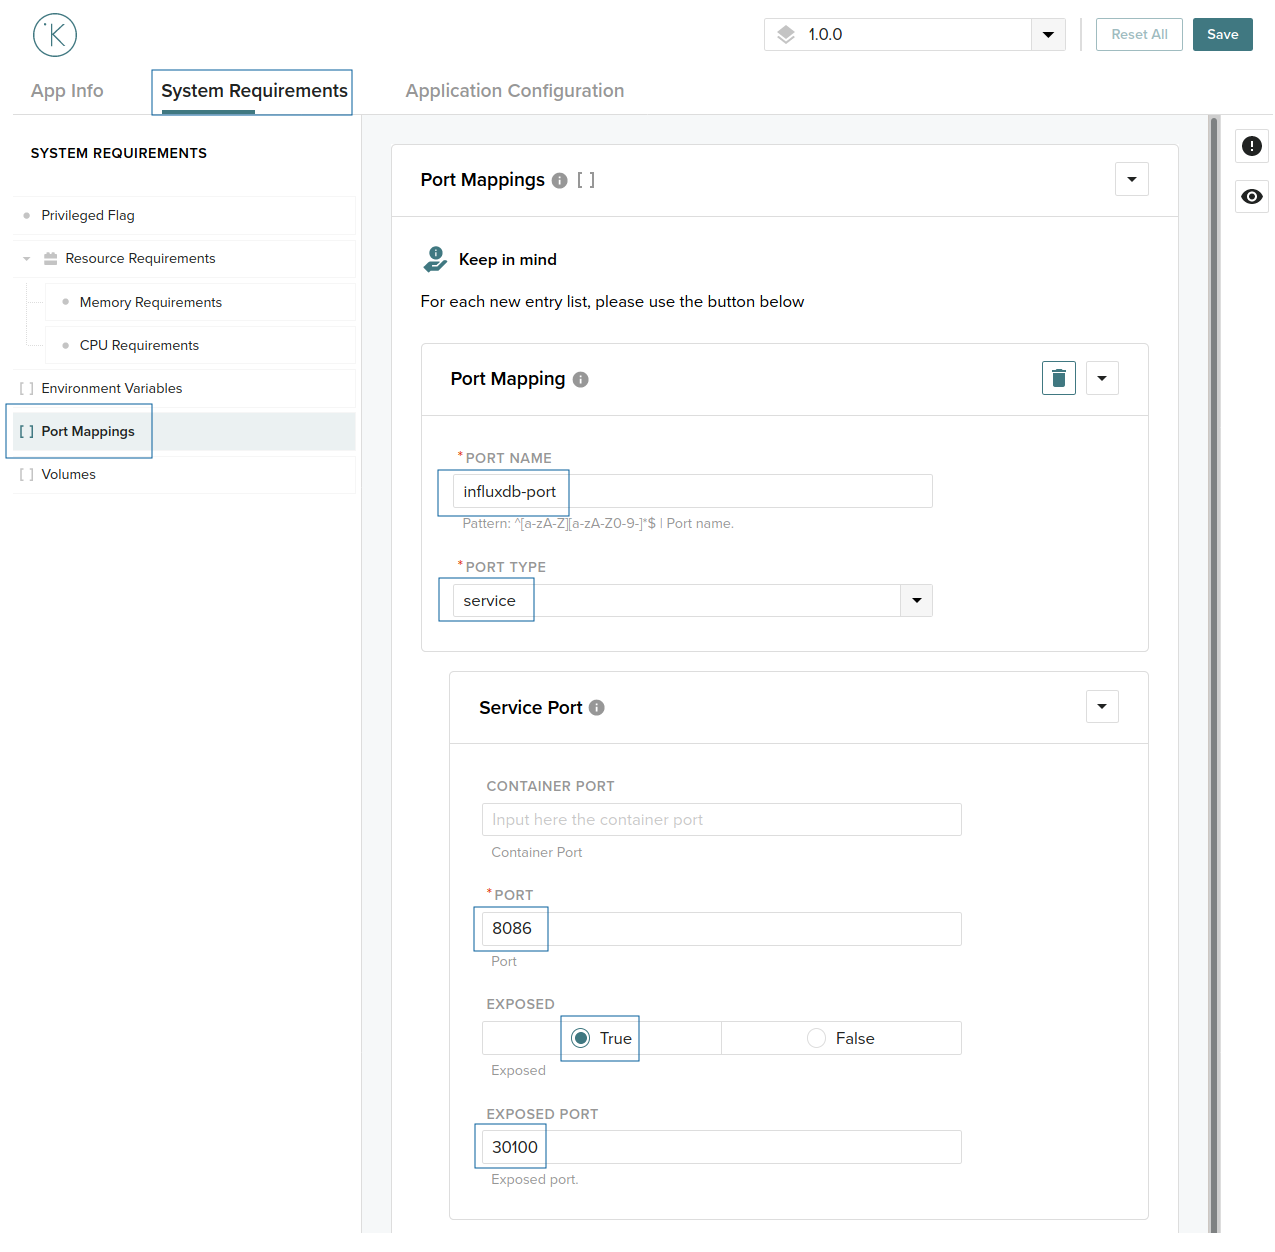
To further configure the application, go to the System requirements tab and, on the left menu, click in Port Mappings and add a new port.
We will use the standard InfluxDB ports. Fill with the following values:
Port name = influxdb-portPort type = servicePort = 8086Exposed = trueExposed Port= 30100
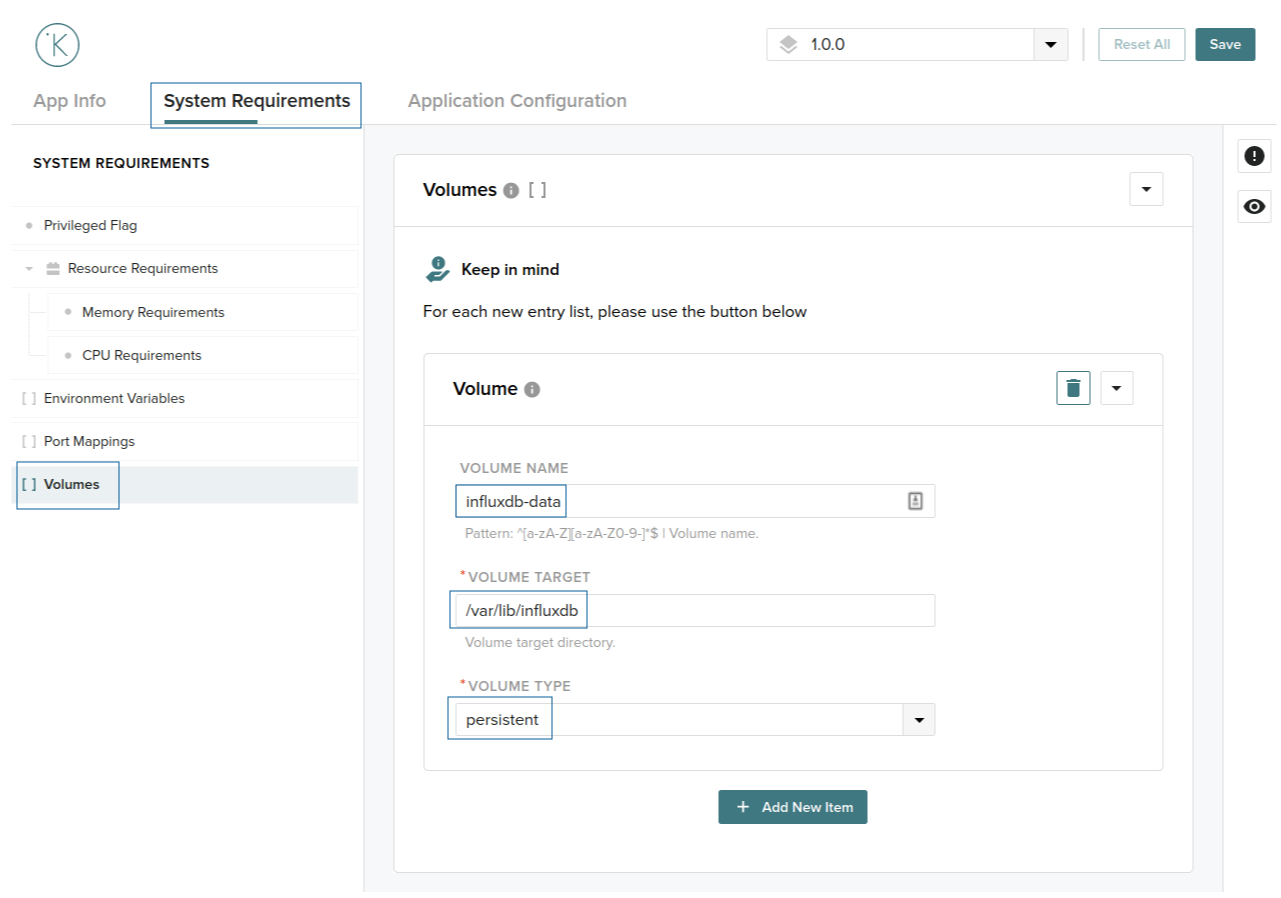
We now need to create a volume which will serve a simple static HTML page. Click in volumes in the left menu and add a new item. Fill with the following information:
Volume name = influxdb-dataVolume target = /var/lib/influxdbVolume type = persistent
The final step is to save this configuration. Click on the save button in the top right. To confirm the settings open the app.yaml file, and confirm it matches the following:
app:
  docker:
    args: []
    context: .
    dockerfile: Dockerfile
  type: docker
info:
  description: kelvin-influxdb-tutorial
  name: kelvin-influxdb-tutorial
  title: kelvin-influxdb-tutorial
  version: 1.0.0
spec_version: 2.0.0
system:
  ports:
    - name: http
      type: host
      host:
        port: 8086
  privileged: false
  volumes:
    - name: data
      target: /var/lib/influxdb
      type: persistent
Build and upload the new generic docker image
kelvin app build
kelvin appregistry upload
Deploy to a Node
kelvin workload deploy --app-name kelvin-influxdb-tutorial --app-version 1.0.0 --app-config app.yaml --workload-name kelvin-influxdb-tutorial --node-name <node-name>
Check and validate the workload
Open the Control Center and go to the newly created workload profile page. You will see that the workload is running and, in the network tab, you will have information about the Node IP address.

Documentation on how to access the Node IP address is out of this tutorial scope. If you are running the Node in a VM inside your computer you shouldn't have any problem.
Interacting with InfluxDB
Create a InfluxDB database:
curl -G 'http://<ip-address>:8086/query' --data-urlencode "q=CREATE DATABASE kelvin"
List databases:
curl -G 'http://<ip-address>:8086/query' --data-urlencode "q=SHOW DATABASES"
Result:
{
  "results": [
    {
      "statement_id": 0,
      "series": [
        {
          "name": "databases",
          "columns": [
            "name"
          ],
          "values": [
            [
              "_internal"
            ],
            [
              "kelvin"
            ]
          ]
        }
      ]
    }
  ]
}
Write some data:
curl -i -XPOST 'http://<ip-address>:8086/write?db=kelvin' --data-binary 'raw.int32 value=32'
List measurements:
curl -G "http://<ip-address>:8086/query?db=kelvin" --data-urlencode 'q=show measurements'
Result:
{
  "results": [
    {
      "statement_id": 0,
      "series": [
        {
          "name": "measurements",
          "columns": [
            "name"
          ],
          "values": [
            [
              "raw.int32"
            ]
          ]
        }
      ]
    }
  ]
}
Read data:
curl -G "http://<ip-address>:8086/query?db=kelvin" --data-urlencode 'q=select * from "raw.int32"'
Result:
{
  "results": [
    {
      "statement_id": 0,
      "series": [
        {
          "name": "raw.int32",
          "columns": [
            "time",
            "value"
          ],
          "values": [
            [
              "2021-01-15T15:15:02.523426963Z",
              32
            ]
          ]
        }
      ]
    }
  ]
}
To make sure that the persistent volume is working, re-start the workload and query again the InfluxDB. You will get the same data as before.
kelvin workload stop kelvin-influxdb-tutorial
kelvin workload start kelvin-influxdb-tutorial