Creating an Emerson Controller ROC Bridge
On this page you will learn how to use the Kelvin Control Manager UI to create, edit, delete and control a Kelvin ROC Bridge. There is a troubleshooting section at the end if you have any trouble.
What is an Emerson Remote Operations Controller (ROC) ?
Emerson Remote Operations Controller combines the ruggedness and low power consumption of a RTU, the scalability, speed and control of a PLC, and the audit trails and historical data of a flow computer enabling you to measure, control and optimize your oil and gas operations using a single device. (Emerson website, 2021)
You can communication to the Emerson Remote Operations Controller (ROC), FloBoss, and RegFlo using the Emerson ROC or ROC plus protocol. It can be used to access and retrieve information from the database configuration, real-time clock, events, alarm logs, live data and historically archived data.
Communications over TCP / IP and serial (direct, radio, or dialup) links are supported.
What is a Kelvin ROC Bridge ?
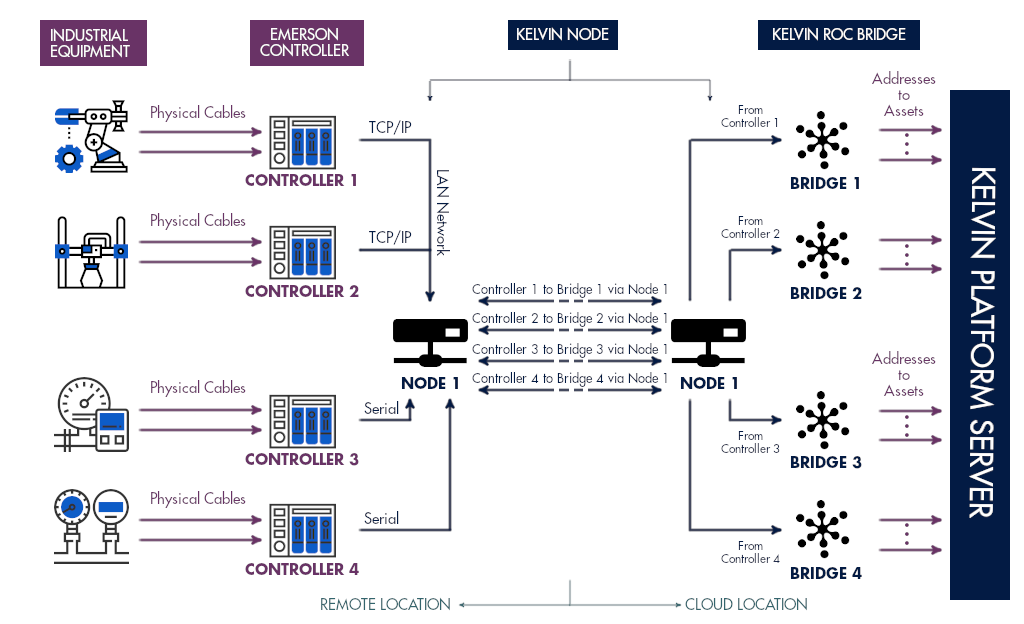
A Kelvin ROC bridge uses the Emerson ROC protocol to read information from an Emerson field devices supporting the ROC or ROC Plus communications protocol. The ROC bridge can communicate to all Emerson ROC and FloBoss devices that support the ROC or ROC Plus protocols.
At the remote location you can connect to an ROC controller either through the TCP / IP Ethernet LAN or through a serial (RS 232 or RS 485) connection.
The ROC Bridge is able to read and write live data. At the moment there is no access to the database configuration, real-time clock, events, alarm logs and historically archived data.
Deploy New ROC Bridge 
Requirements
Connections from the Controllers to the Node
The Node needs to be connected to the ROC controllers by TCP / IP or by Serial connection. Check and make sure this is working before deploying a new ROC bridge. See the below about Nodes.
Create a Node 
A Node must be setup with direct access to the Emerson ROC Controllers. This requires two steps;
- Installing a Node at your premises. The node must be on the same local network as your ROC Controllers for TCP/IP connections or connected directly with a Serial cable.
- Creating a node in the Kelvin Control Manager UI which connects to your node setup in step 1 above.
Info
You do not need to program the node to connect to the ROC Controllers. You will configure the ROC connections, port and security credentials when first deploying the ROC Bridge.
Create a Metric 
A Metric must be created or exist before you can create a ROC Bridge.
If you don't have a Metric yet, then go to Metrics and create one before proceeding.
Create Assets 
Every piece of data is connected to an Asset in the Kelvin Control Manager UI. Normally each Asset will represent one sensor or data point. But it can also be a data point representing a calculated formulae of many data points.
An address in ROC protocol represents one data point. And one data point is one Asset in the Kelvin Control Manager UI.
So you need to setup all your Assets in the Kelvin Control Manager UI before starting to deploy the ROC Bridge.
Firewalls
Ensure that there is a direct connection between the Node and all the ROC controllers, FloBoss and RegFlo devices you want to connect to.
If you use TCP / IP and have no communications then you will need to configure any firewalls or IP routing tables to guarantee uninhibited communications between the Node and all ROC controllers.
Deploying 
Warning
If you have not read the requirements above, then please go back and read them carefully. If you do not setup a Node, a Metric and all your Assets before coming here, then you will lose time following these steps as they are mandatory.
Step 0: Starting the process 
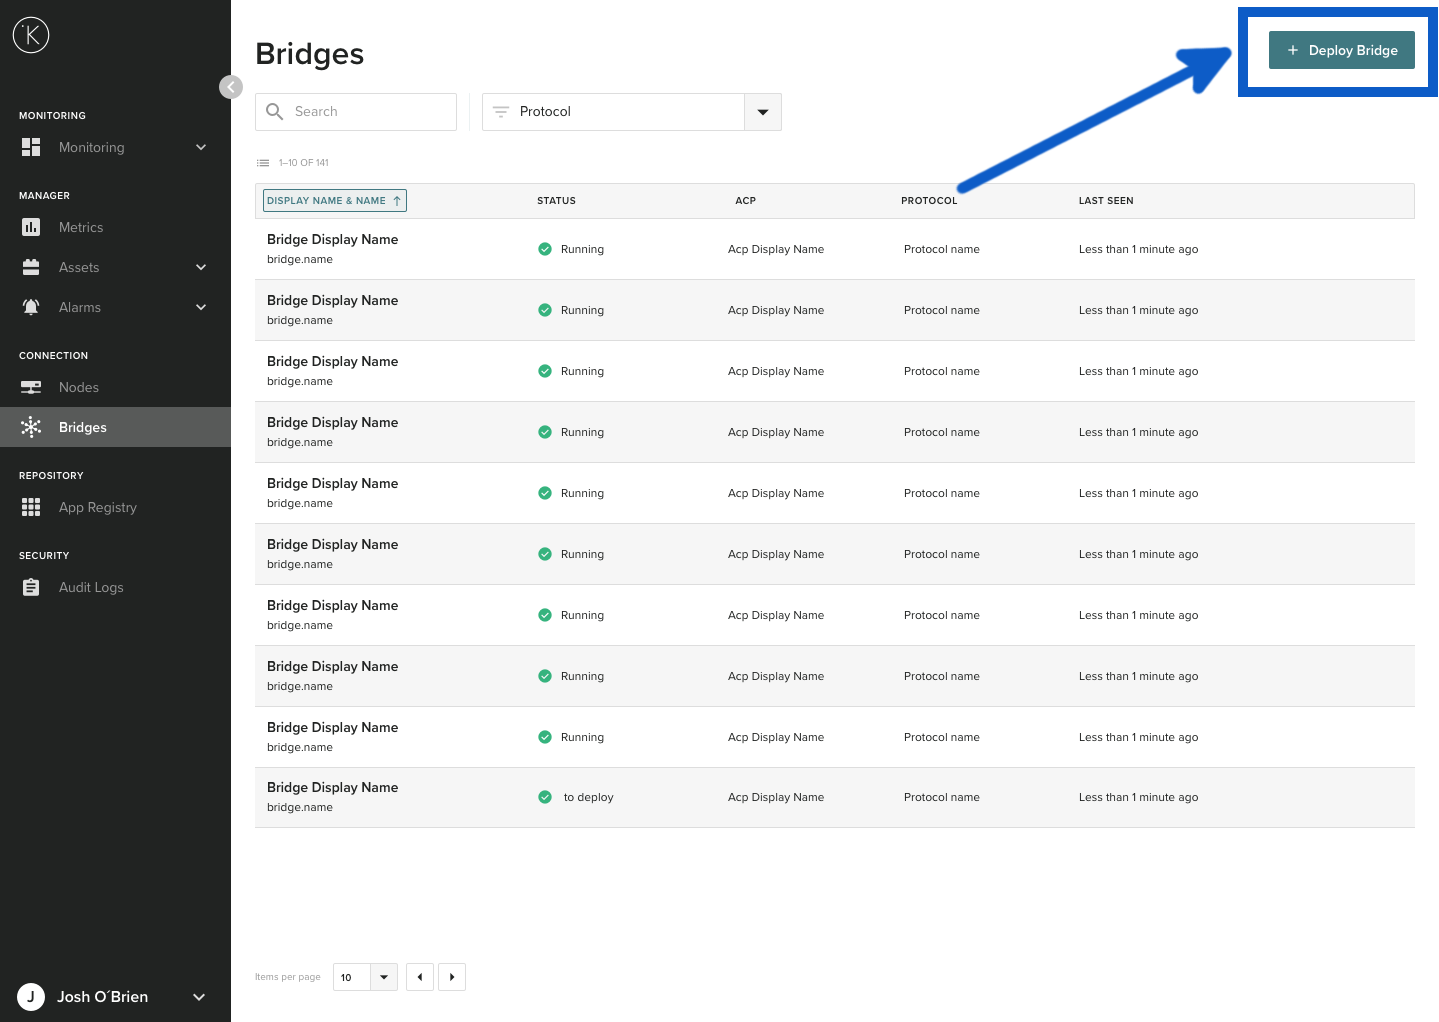
Go to the overview page on the Kelvin Control Manager UI. On the left hand side menu, select Bridges.

Then select Deploy Bridge.
Then select ROC Protocol and click Next

Now you are ready to setup a new ROC bridge. Deploying a new bridge requires 5 steps;
- Info - Selecting which Node to connect to
- Connection - Setting the ROC connection information (TCP/IP or Serial)
- Metric Mapping - Connecting the Topics to the Assets defined on the Kelvin Control Manager UI
- Asset Credentials - Each Asset can be connected to an ROC with different login/password credentials
- Deploy - The Kelvin Control Manager UI will connect with the Node and send the ROC Bridge parameters to it. The ROC Bridge will automatically start.
We will now go through each step below and explain in detail every option you have.
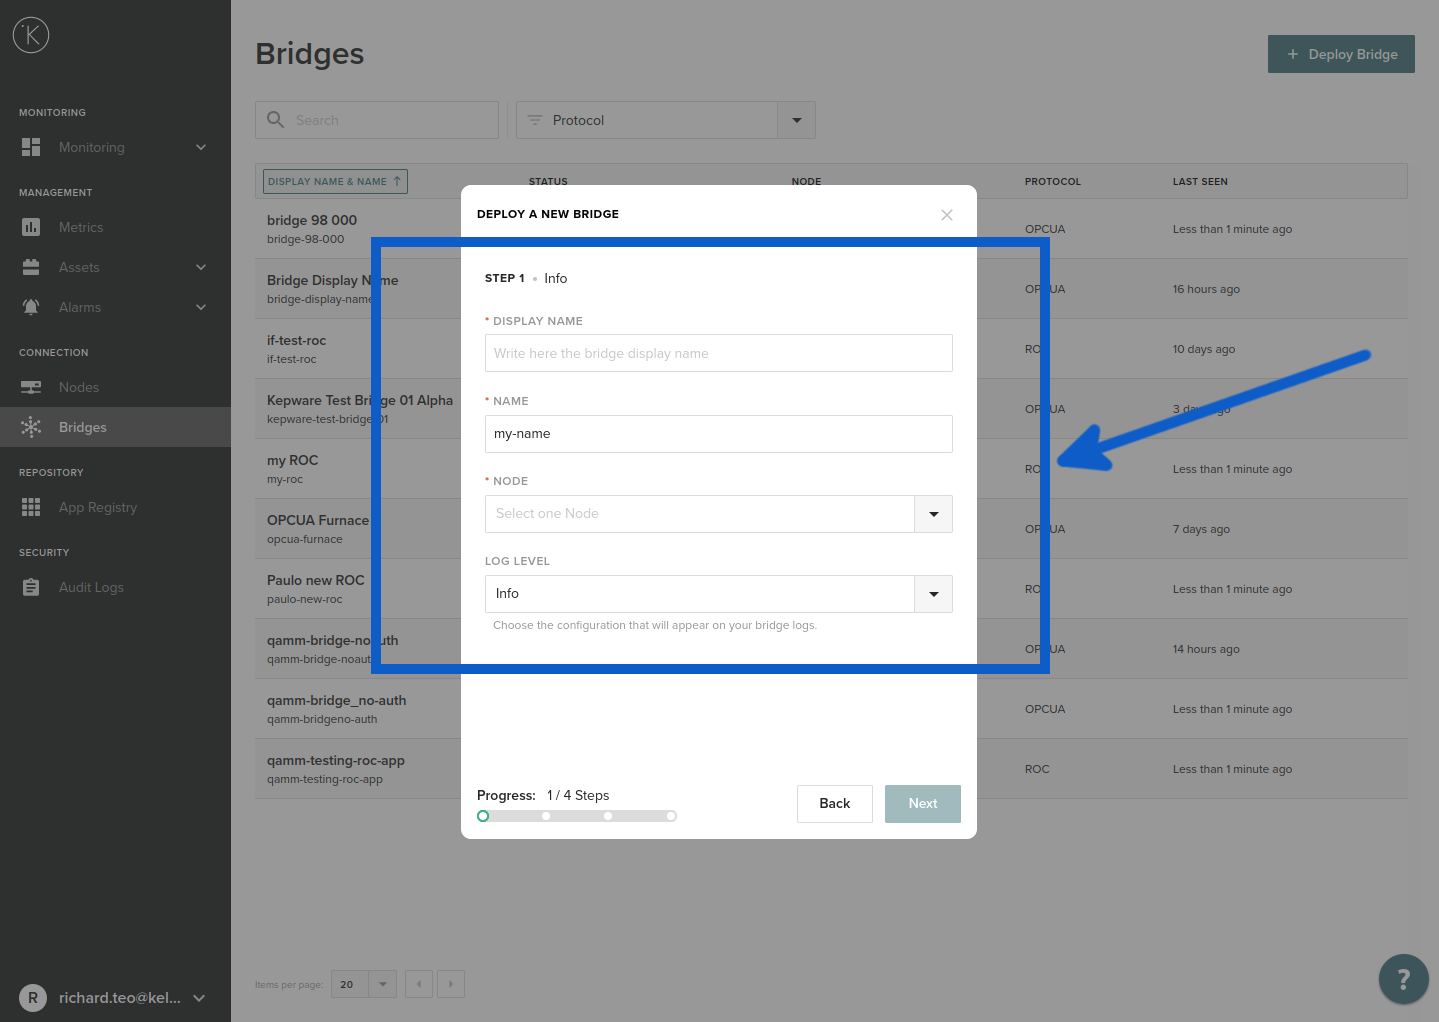
Step 1: Info 
Fill in the information (descriptions below) and click Next
| Field | Explanation | Mandatory |
|---|---|---|
| Display Name | You can use any name that helps you identify the bridge. You can use any alphanumeric character. | Yes |
| Name | This will be automatically filled after you have added a Display Name. Normally you don't need to change this. This name is used internally for the API and SDK to reference. It must be lowercase alphanumeric without any spaces. Only the "-" character is allowed to separate words. e.g. my-name | Yes |
| Node | You can select a Node that you have created previously. The Node must be connected and online otherwise you will not be able to select it. See troubleshooting section for more details. | Yes |
| Log Level | This is the type of information about the bridge operations that will be recorded to the Kelvin Platform Server logs. | Yes |
Info
In the Node you can do a fast filter by typing any part of the Node name. You do not have to start with the first character of the Node name. The drop down list will automatically filter and show you relevant results to choose.
Step 2A : Connection - If you choose TCP
Fill in the information (descriptions below) and click Next
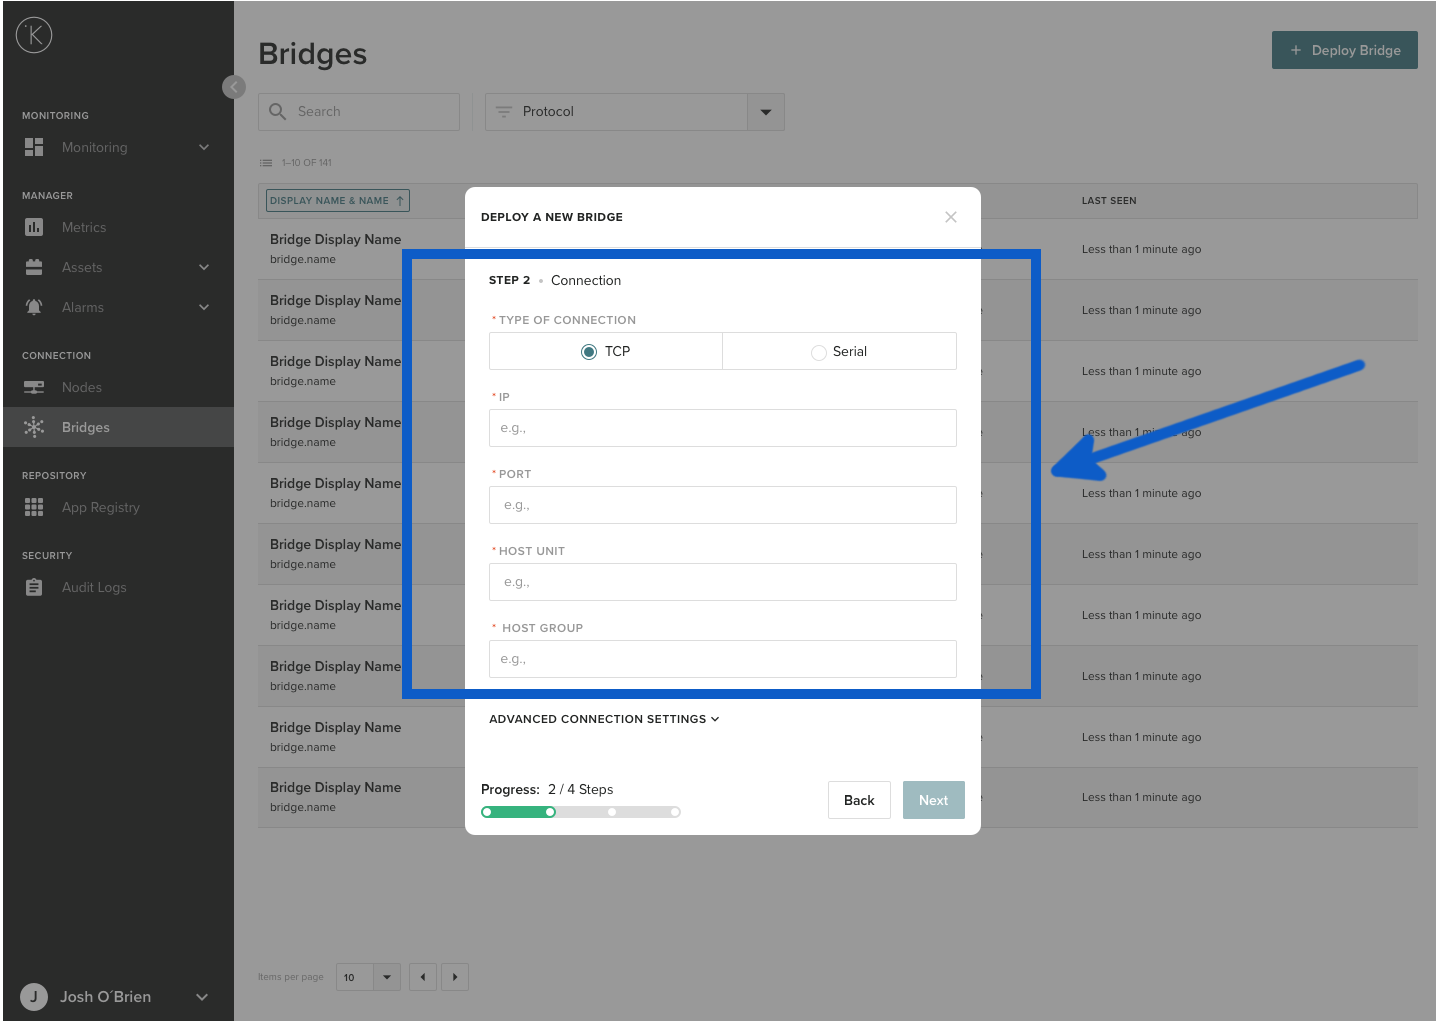
If you choose to setup TCP/IP communications from the Node to the ROC controller, then you will need to enter these values.
| Field | Explanation | Mandatory |
|---|---|---|
| TCP | Select this radio button to setup a TCP/IP connection | Yes |
| IP | This is the physical IP address of the ROC Controller. The IP address should be a valid address from the point of view of the Node location. This means that local LAN IP addresses will be valid entries. (e.g. 192.168.0.100) | Yes |
| Port | The port number that the ROC Controller is listening on. | Yes |
| Host Unit | This is the Host Unit number that you assign to this new ROC Bridge. It's very important you do not mistake this for the PLC or Sensor Host Unit number. | Yes |
| Host Group | This is the Host Group number that you assign to this new ROC Bridge. It's very important you do not mistake this for the PLC or Sensor Host Group number. | Yes |
Warning
The Host Unit and Host Group number is for this ROC Bridge. This is not the numbers for the Controller or the sensor that you want to communicate to.
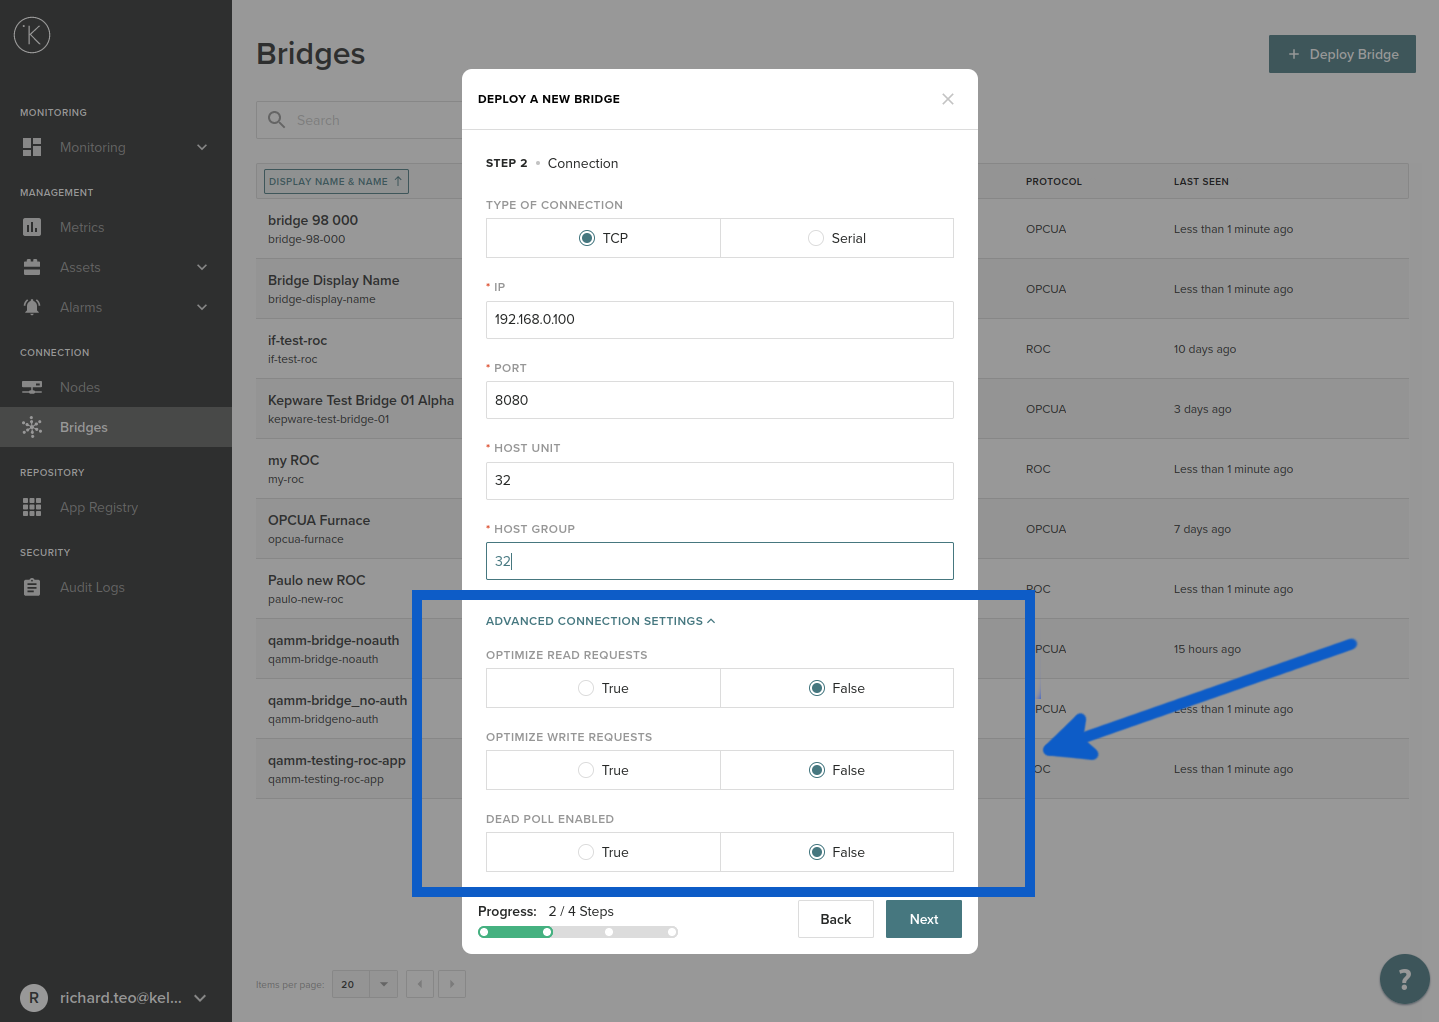
There are also some advanced connection settings you can configure.
| Field | Explanation | Mandatory |
|---|---|---|
| OPTIMIZE READ REQUESTS | If you will be reading many values with consecutive addresses, you can read the whole block with just one request. This reduces the number of requests to the controller per minute. | No |
| OPTIMIZE WRITE REQUESTS | If you will be writing many values with consecutive addresses, you can write the whole block with just one request. This reduces the number of requests to the controller per minute. | No |
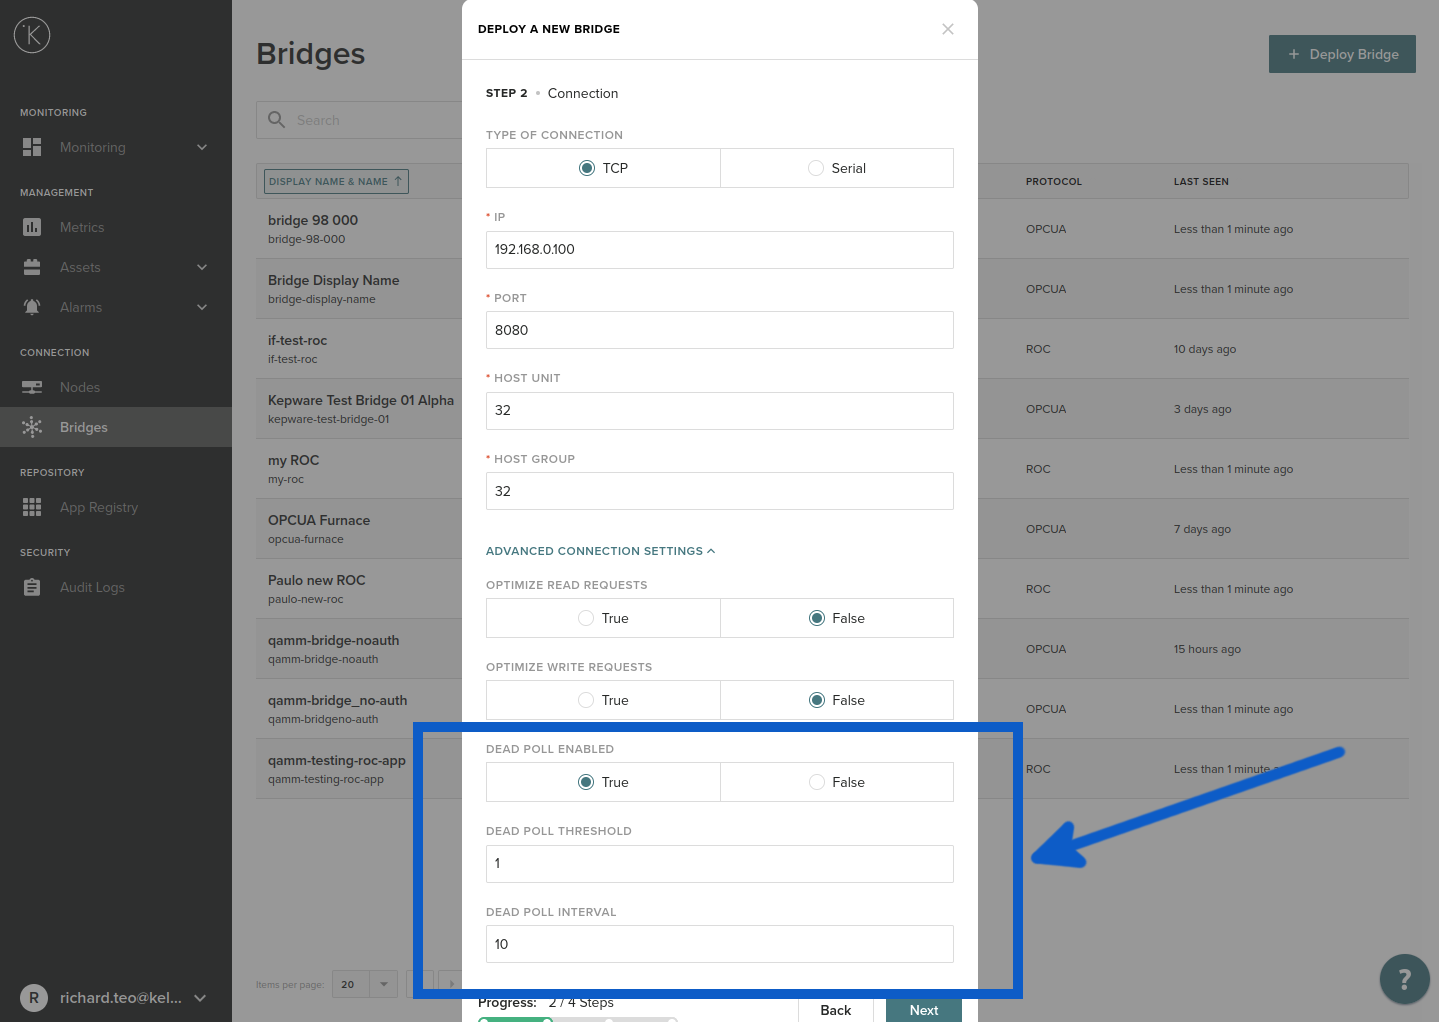
| DEAD POLL ENABLED |
If the controller or sensor becomes unresponsive to requests, then this will stop all requests and wait for a period of time. This is to allow the controller or sensor time to recover. When you select True for this value, two more options will appear. |
No |
| Field | Explanation | Mandatory |
|---|---|---|
| DEAD POLL THRESHOLD |
Number of seconds after sending a request to wait for a response from the controller or sensor. If there is no response by the end of this time limit, then the Dead Poll will be activated. When Dead Poll is activated, it will delete all pending requests to the controller or sensor and wait the Dead Poll Interval before accepting new requests from the Kelvin Platform Server and sending them to the controller or sensor. |
No |
| DEAD POLL INTERVAL | Number of seconds the ROC Bridge will wait after the Dead Poll is activated before accepting and sending any new requests. | No |
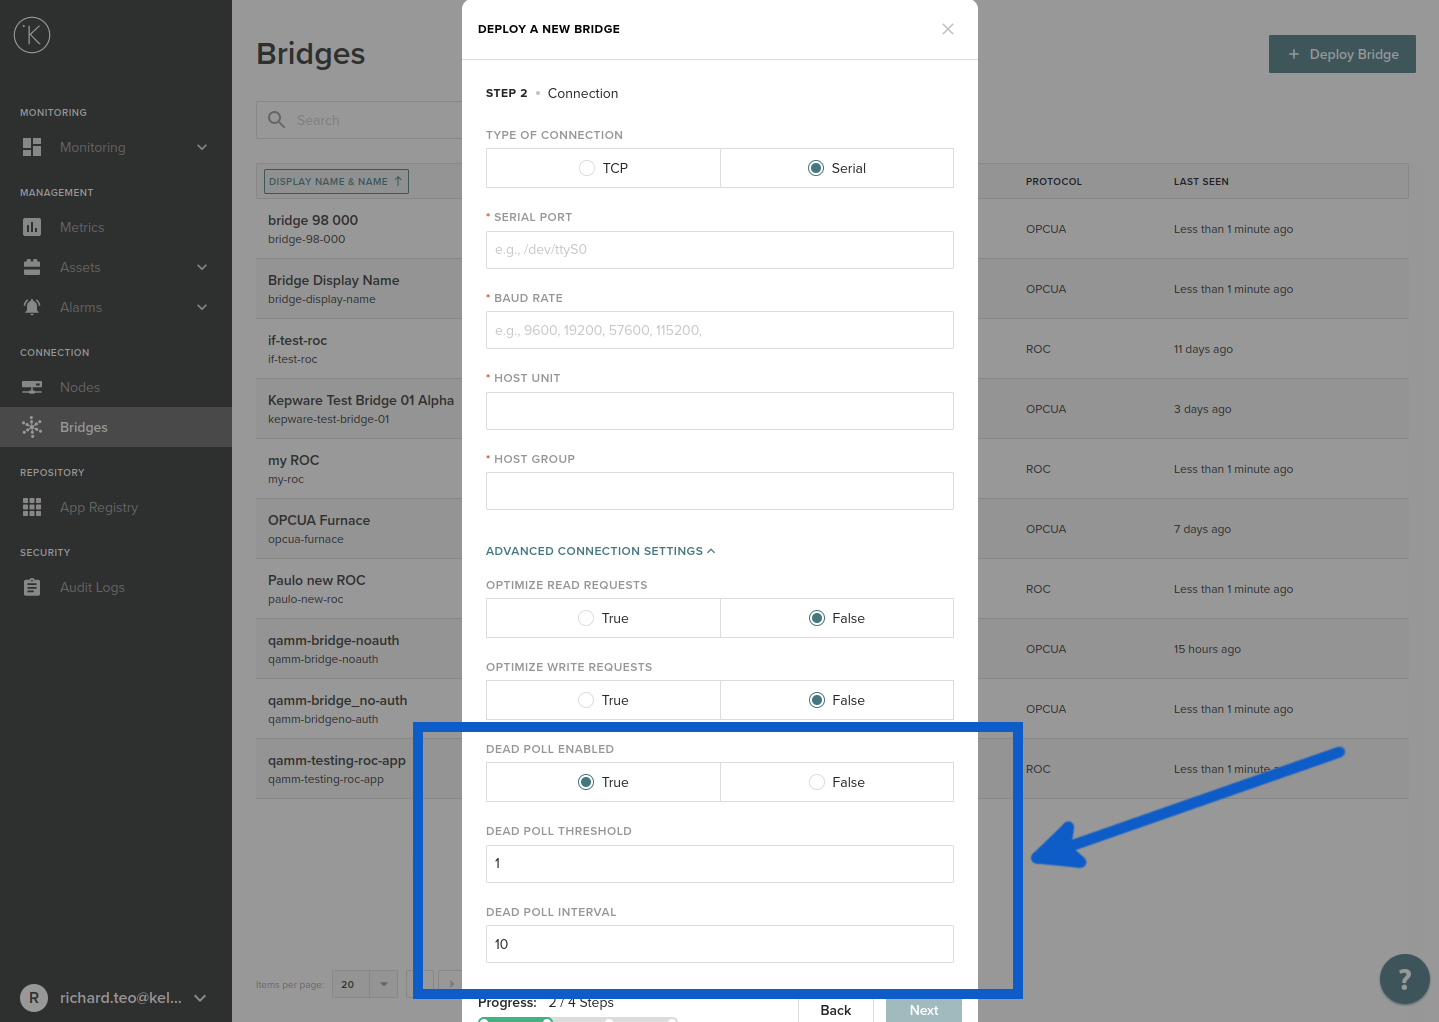
Step 2B : Connection - If you choose Serial Communications
Fill in the information (descriptions below) and click Next
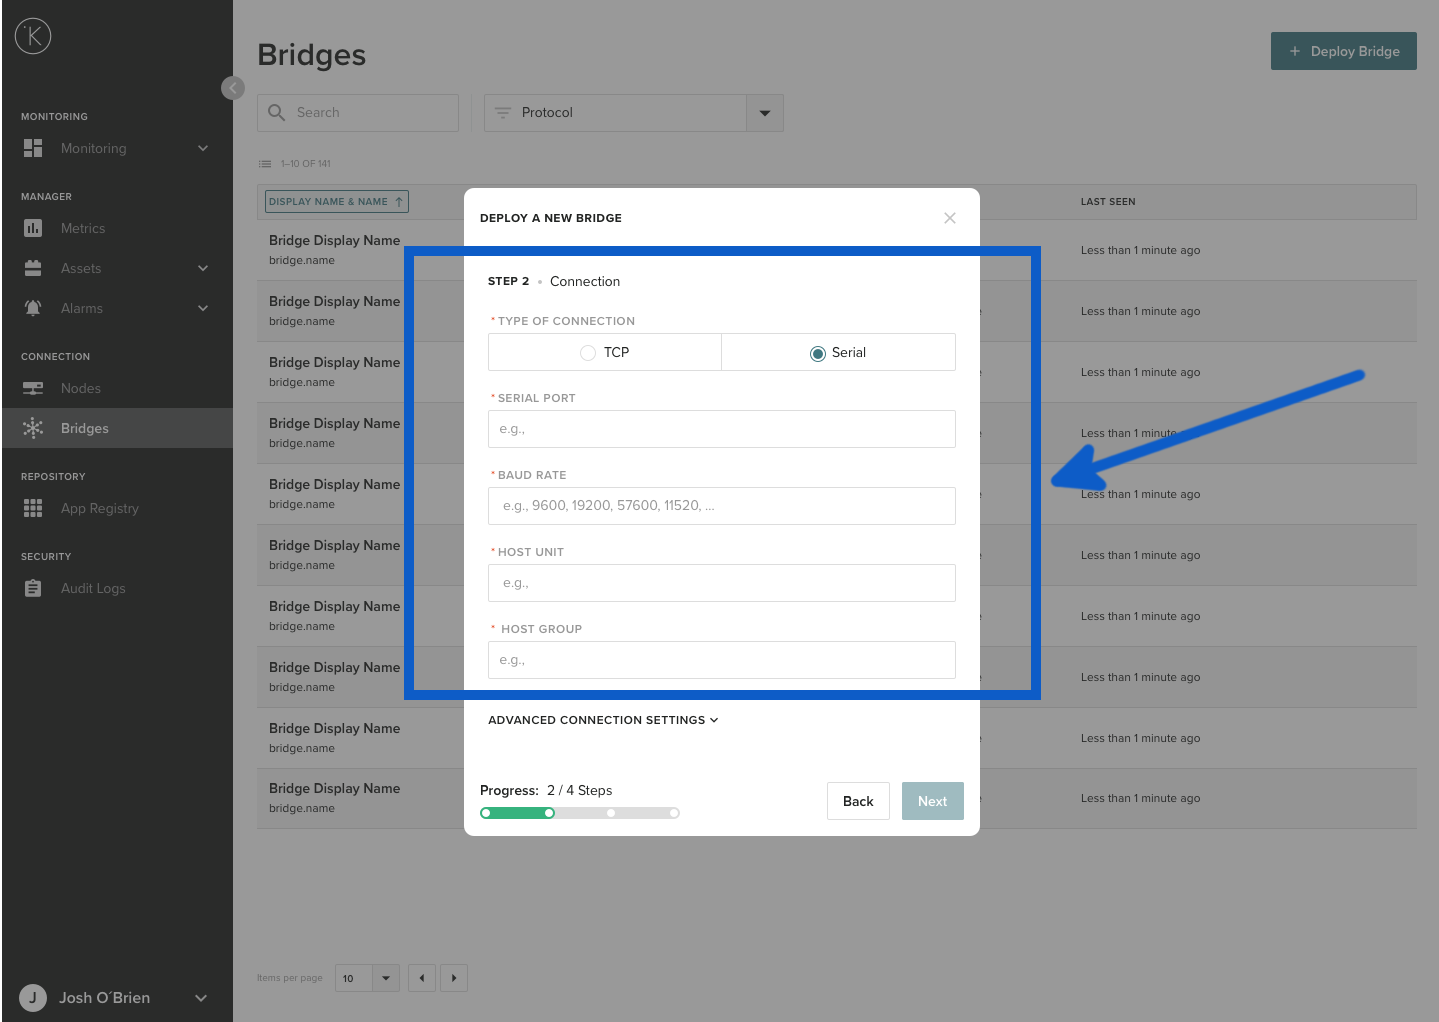
If you choose to setup a Serial communications from the Node to the ROC controller, then you will need to enter these values.
| Field | Explanation | Mandatory |
|---|---|---|
| Serial | Select this radio button to setup a serial connection | Yes |
| Serial Port | The serial port location for example /dev/ttyS0. You can find this location address from your local gateway or server where you are running the local Node. | Yes |
| Baud Rate | The baud rate of the serial communications in bits per second. Some common baud rates are 9600, 19200, 57600 and 115200. | Yes |
| Host Unit | This is the Host Unit number that you assign to this new ROC Bridge. It's very important you do not mistake this for the PLC or Sensor Host Unit number. | Yes |
| Host Group | This is the Host Group number that you assign to this new ROC Bridge. It's very important you do not mistake this for the PLC or Sensor Host Group number. | Yes |
Warning
The Host Unit and Host Group number is for this ROC Bridge. This is not the numbers for the Controller or the sensor that you want to communicate to.
There are also some advanced connection settings you can configure.

| Field | Explanation | Mandatory |
|---|---|---|
| OPTIMIZE READ REQUESTS | If you will be reading many values with consecutive addresses, you can read the whole block with just one request. This reduces the number of requests to the controller per minute. | No |
| OPTIMIZE WRITE REQUESTS | If you will be writing many values with consecutive addresses, you can write the whole block with just one request. This reduces the number of requests to the controller per minute. | No |
| DEAD POLL ENABLED |
If the controller or sensor becomes unresponsive to requests, then this will stop all requests and wait for a period of time. This is to allow the controller or sensor time to recover. When you select True for this value, two more options will appear. |
No |
| Field | Explanation | Mandatory |
|---|---|---|
| DEAD POLL THRESHOLD |
Number of seconds after sending a request to wait for a response from the controller or sensor. If there is no response by the end of this time limit, then the Dead Poll will be activated. When Dead Poll is activated, it will delete all pending requests to the controller or sensor and wait the Dead Poll Interval before accepting new requests from the Kelvin Platform Server and sending them to the controller or sensor. |
No |
| DEAD POLL INTERVAL | Number of seconds the ROC Bridge will wait after the Dead Poll is activated before accepting and sending any new requests. | No |
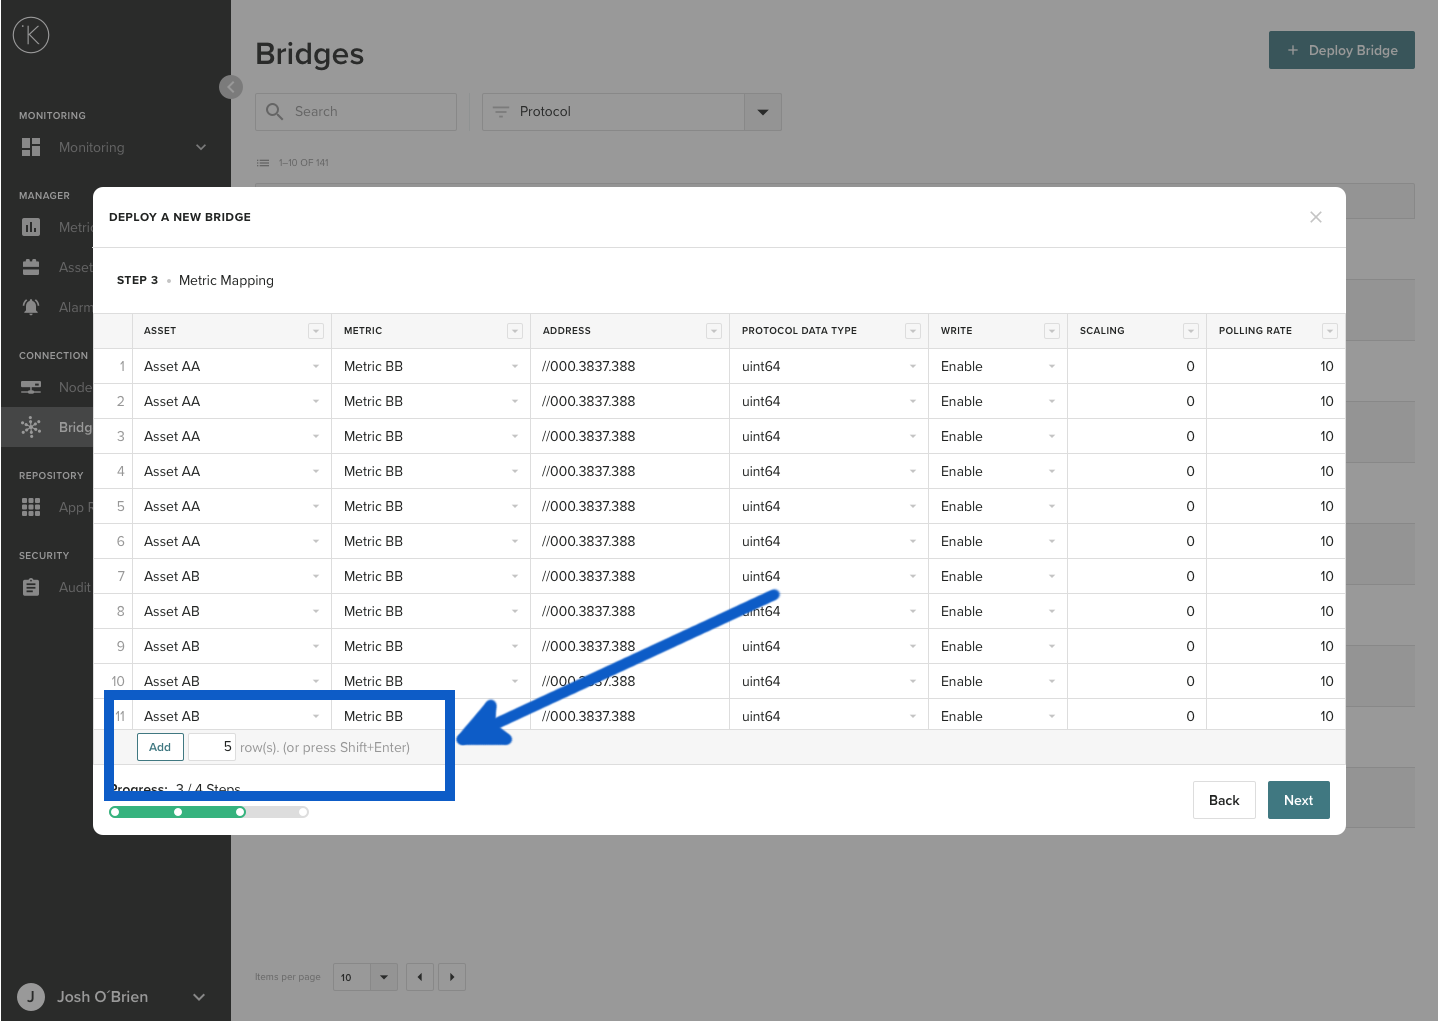
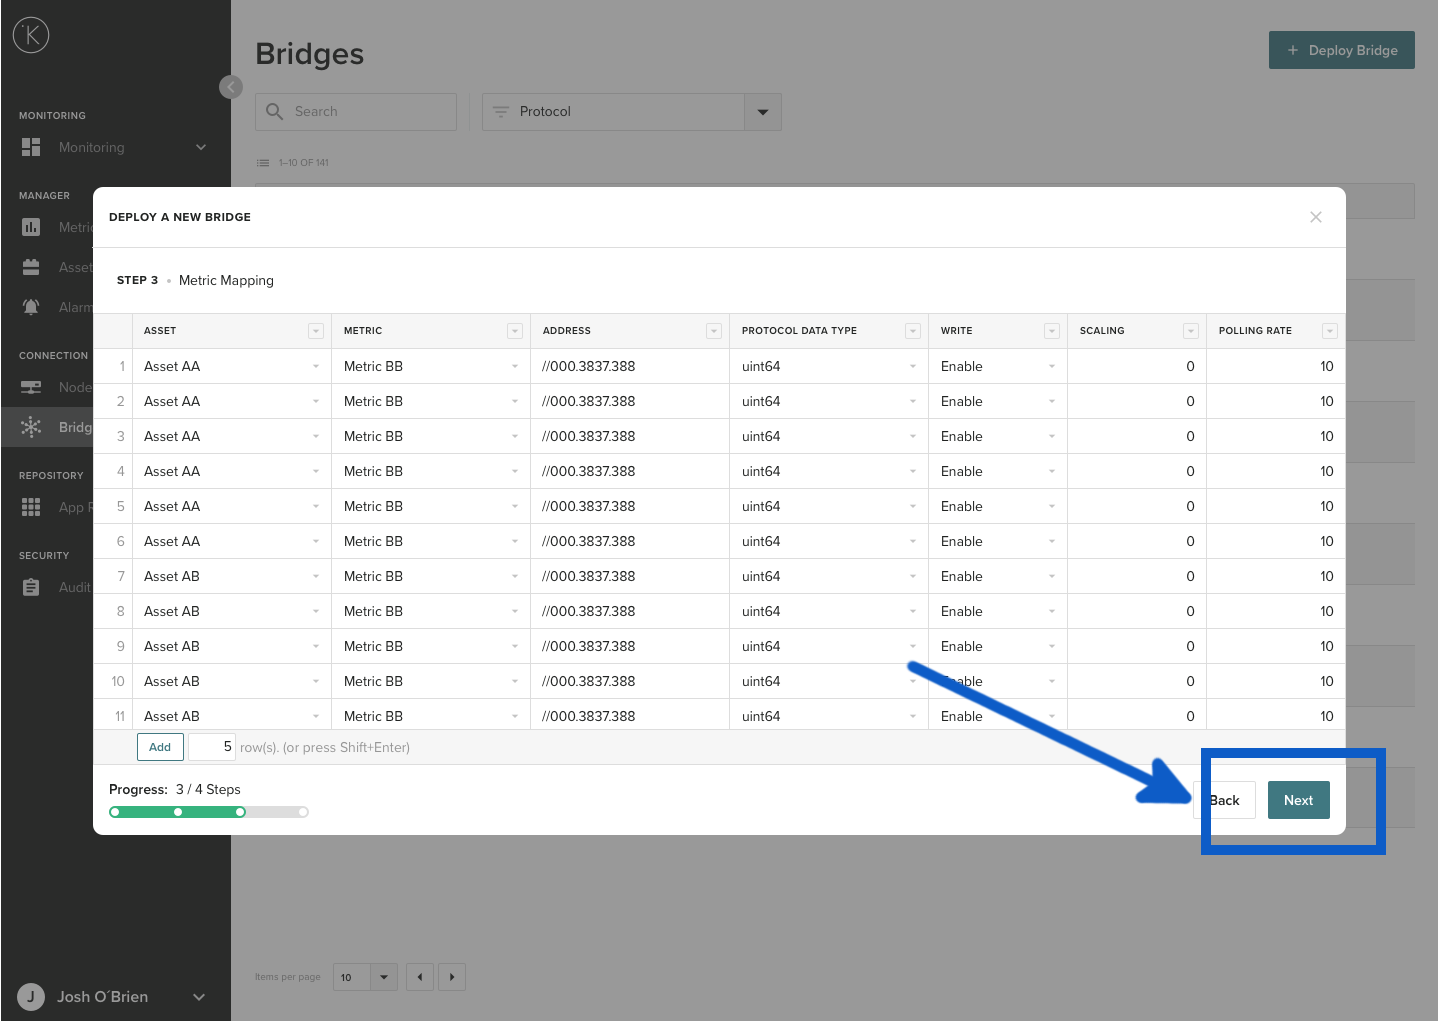
Step 3 : Metric Mapping 
You need to connect each Address from the ROC Controller with an Asset and Metric in the Kelvin Control Manager UI. One row represents one Address, One Metric and one Asset.
When you are finished, click Next

| Field | Explanation | Mandatory |
|---|---|---|
| Asset | This is the Asset you have previously created in the Kelvin Control Manager UI. Select from the drop down list. (Note : If you need to create a new Asset, you will need to go back to Assets first and create it, you can not create it here) | Yes |
| Metric | Select a Metric from the drop down list. (Note : If you need to create a new Metric, you will need to go back to Metrics first and create it, you can not create it here) | Yes |
| Address | Enter the Address for the data point in the ROC Controller. | Yes |
| Protocol Data Type | Select what type of data this is. | Yes |
| Write | You can choose if this is read-only (Disabled) or read/write (Enabled). | Yes |
| Scaling | Not used. Can leave blank. | No |
| Polling Rate | How often you want to read the value. In seconds. | No |
Step 3.1 : Adding extra Rows 
If you run out of rows and need to add more Addresses to Assets, you can add extra rows by clicking to the Add button at the bottom left corner.
Info
Do not worry if you have any blank rows when finished. You do not need to delete them. These will be ignored when you click Deploy.
Step 4 : Assets Credentials
When you click Next on Step 3 above, the system will automatically analyze the metric mapping and calculate how many controllers there are based on the Assets.
You will be asked to assign each group of Assets to an ROC Controller. You will enter the actual ROC Controller or sensor Unit number and Group number.
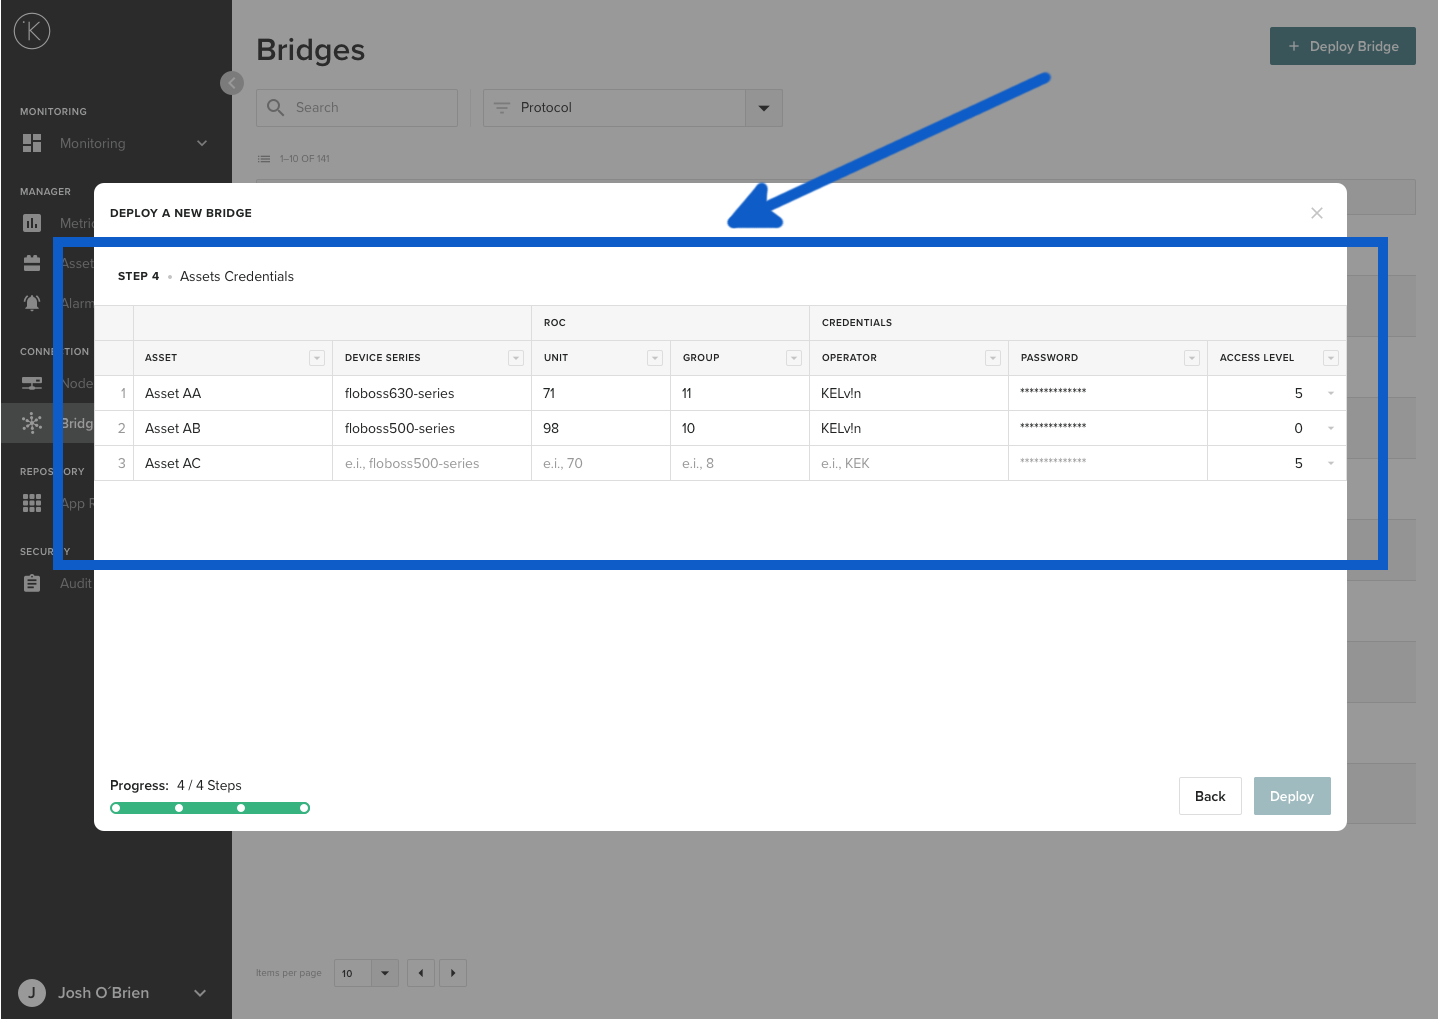
| Field | Explanation | Mandatory |
|---|---|---|
| Asset | This is the Asset you have previously created in the Kelvin Control Manager UI. This list will be a grouped list from the Step 3 Metric Mapping. | Yes (Automatic) |
| Device Series |
This is optional. Each ROC Controller has a slightly different reporting error format. By declaring the type of Controller or sensor you are using, Kelvin can better interpret the error codes for the logging. Available options are |
No |
| Unit | This is the ROC Controller Unit Number | Yes |
| Group | This is the ROC Controller Group Number | Yes |
| Operator | This is the operator name that the ROC Bridge will use to login to the ROC Controller. | No |
| Password | This is the password for the operator name entered above. | No |
| Access Level | This is the access level you request to the controller. | No |
Step 5 : Deploy 
When you are ready, then click Deploy.
Danger
If you click on the close button (x) here at Step 4, you will lose all your work for the new ROC Bridge. You will not receive a warning.
Step 6 : Confirm Deploy 

Info
If you select cancel here you will not lose your work. You will remain at Step 4. You can try and deploy again or cancel the whole process and lose your work.
Understanding Deploy Status 
When you click deploy, the ROC Bridge will proceed to connect to the Node you selected in Step 1 and deploy the parameters of the ROC Bridge there. The ROC Bridge will then automatically connect to the ROC Controller, FloBoss or RegFlo device and start collecting data.
You can start, stop or restart the ROC Bridge at anytime. Detailed instructions can be found later on this page.
Edit and Redeploy ROC Bridge 
At any time you can reedit and change any parameter of the ROC Bridge.
You can change any of the settings while first deploying the ROC Bridge. For example, you may want to do this if you change the Node, add new ROC Controller or add extra Addresses.
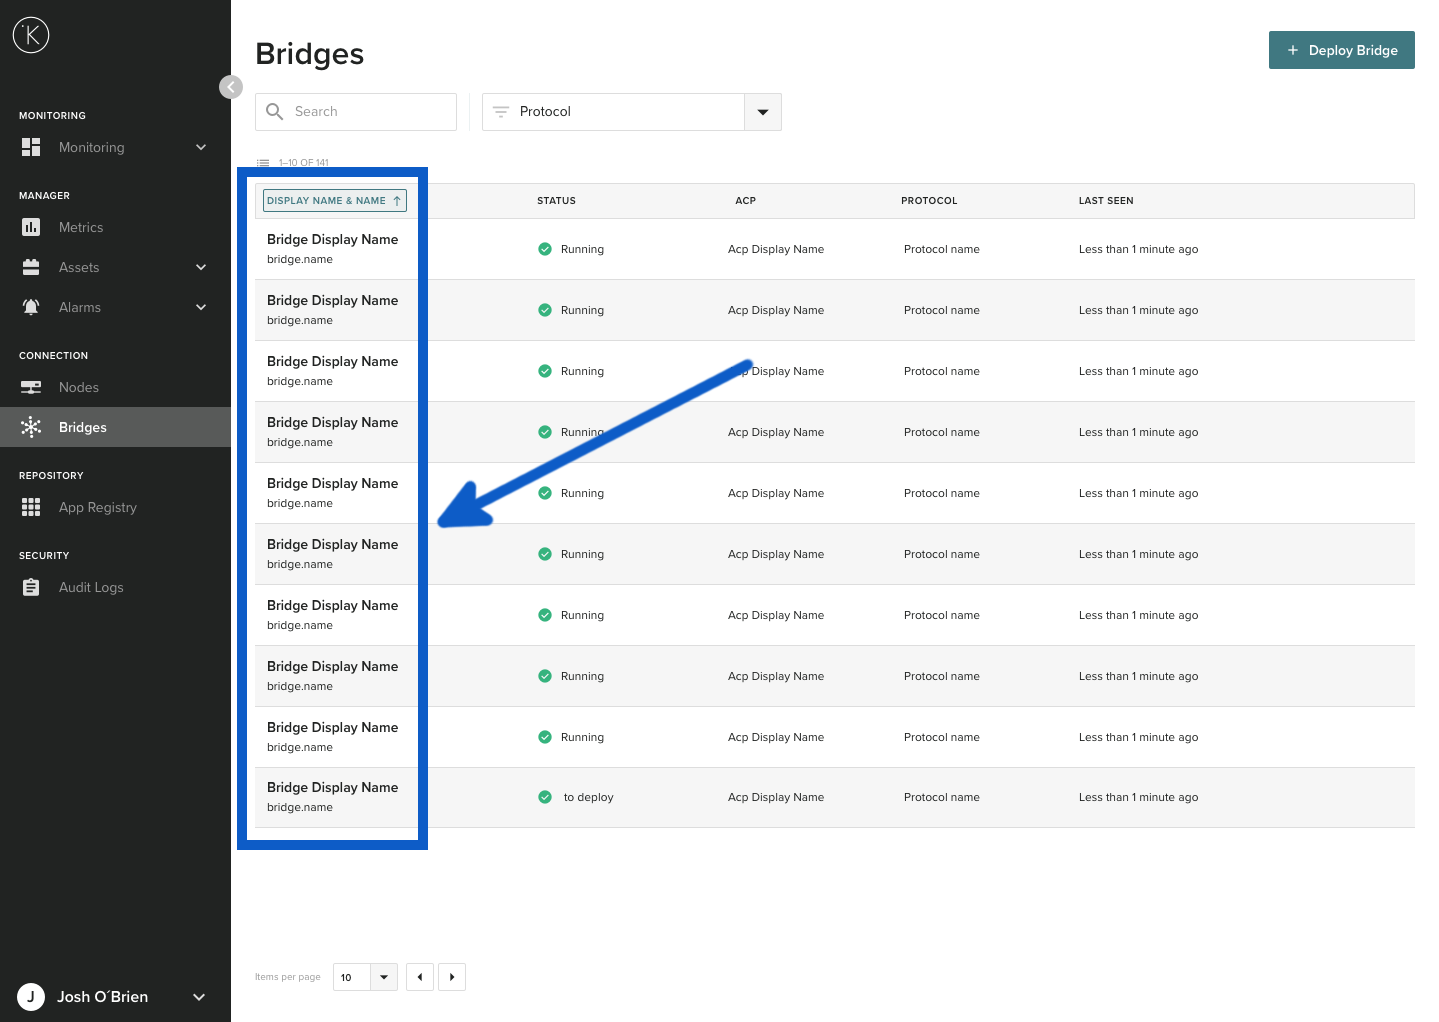
To edit an existing ROC Bridge, go to the overview page on the Kelvin Control Manager UI. On the left hand side menu, select Bridges.
Click on a ROC Bridge name.
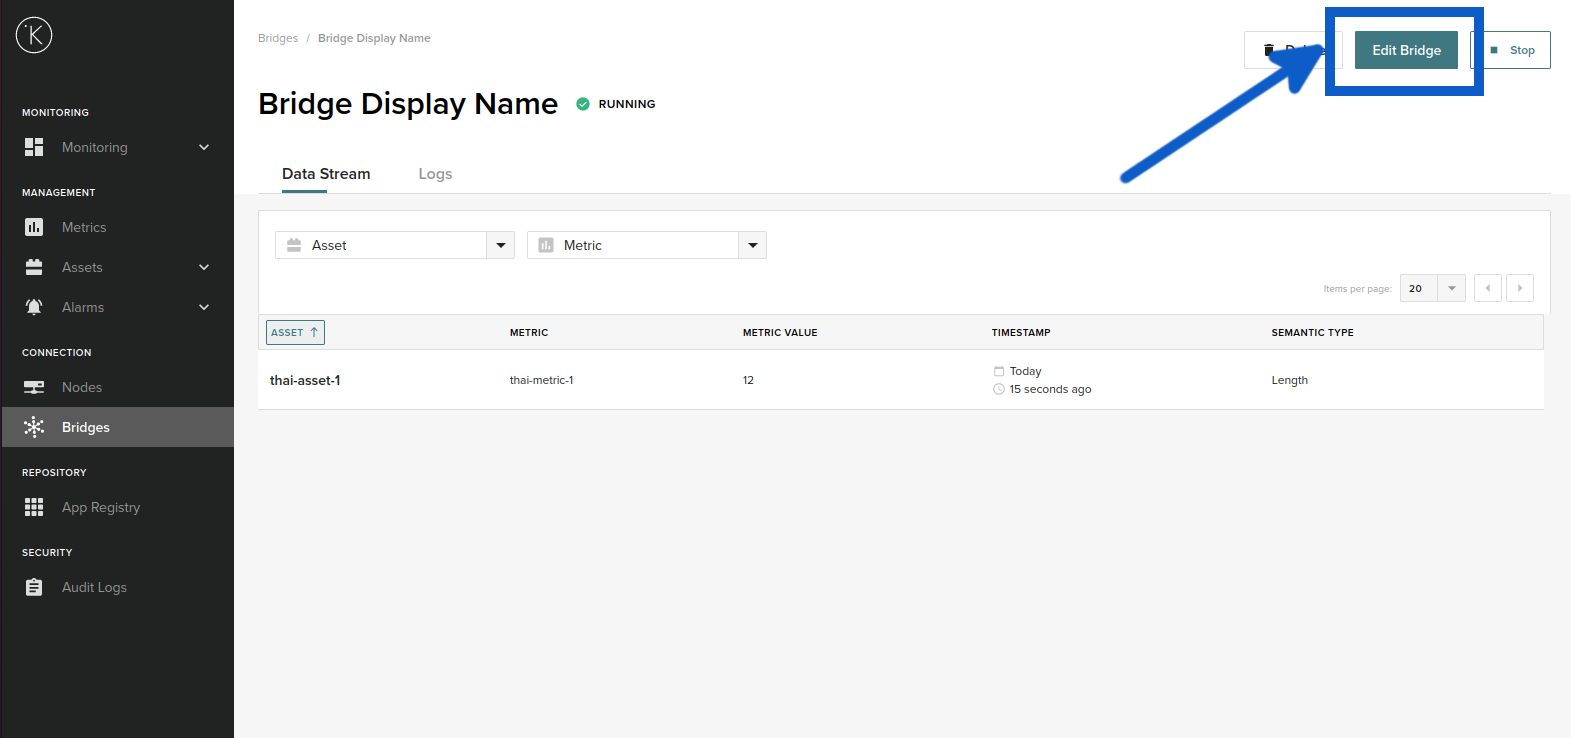
You will see the bridge details and all Assets being collected through this ROC Bridge. Click on Edit Bridge.
Then you will go through the same step when you first deployed the ROC Bridge. The only difference is the current settings will already be entered. See Deploying a New ROC Bridge for detailed instructions of each step. After you reach Step 5, come back here to continue.
When you are finished and click deploy. You will be asked to confirm Redeploy.

Info
If you select cancel here you will not lose your work. You will remain at Step 4. You can try and deploy again or cancel the whole process and lose your work.
Delete ROC Bridge 
You can delete ROC bridges that you no longer need.
Danger
This action is permanent. Once ROC bridge is deleted, you can not undo. You must make a new bridge.
To delete an existing ROC Bridge, go to the overview page on the Kelvin Control Manager UI. On the left hand side menu, select Bridges.
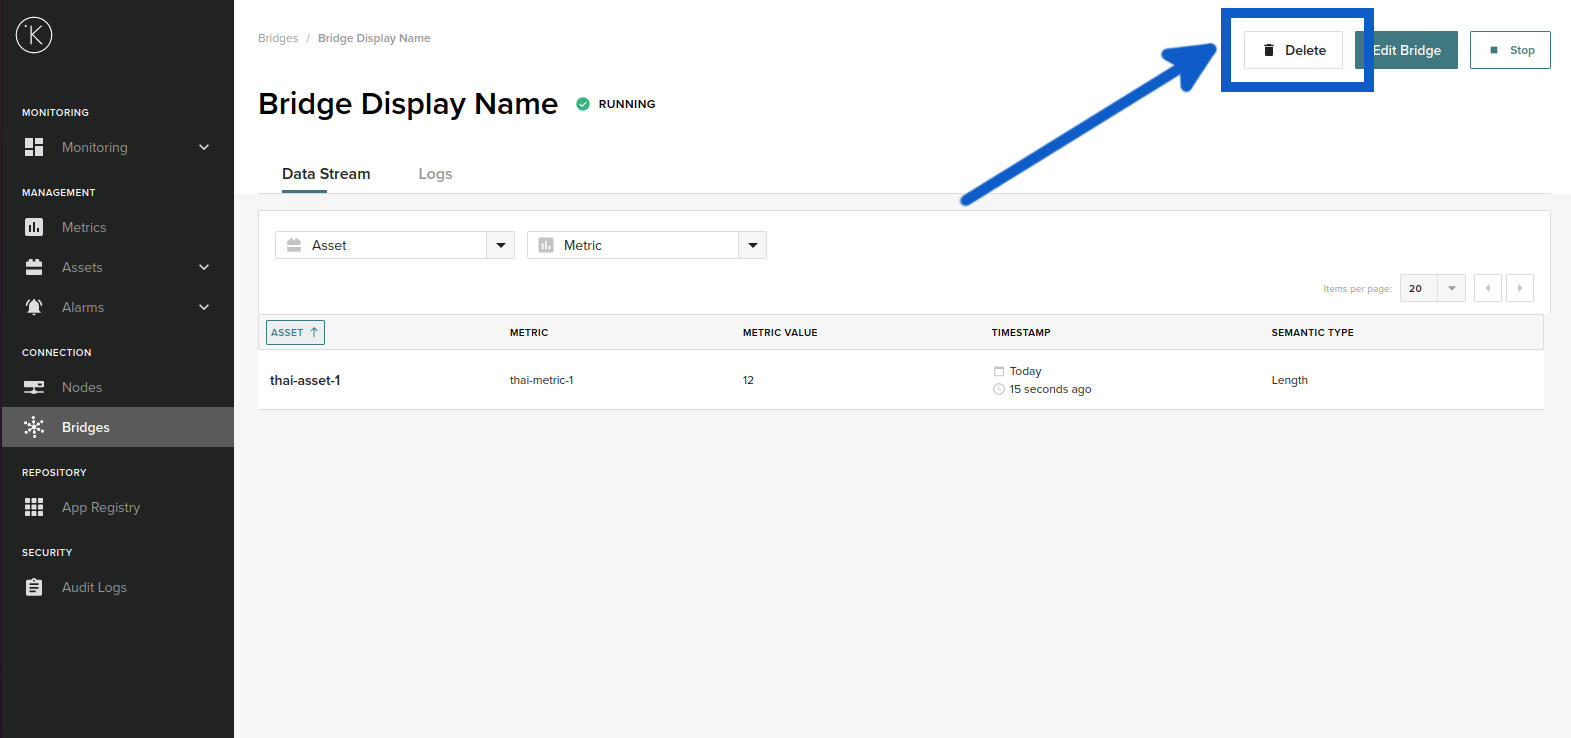
Click on a ROC Bridge name.
You will see the bridge details and all Assets being collected through this ROC bridge. Click on Delete.
Start, Stop and Restart ROC Bridge 
You can control each ROC bridge from the dashboard. You may want to do that in cases where you want to stop listening to the ROC Controller(s) but don't want to delete the ROC bridge.
In some cases when the Node temporarily loses connection to the cloud, you may need to restart the ROC bridge once the connection is restored.
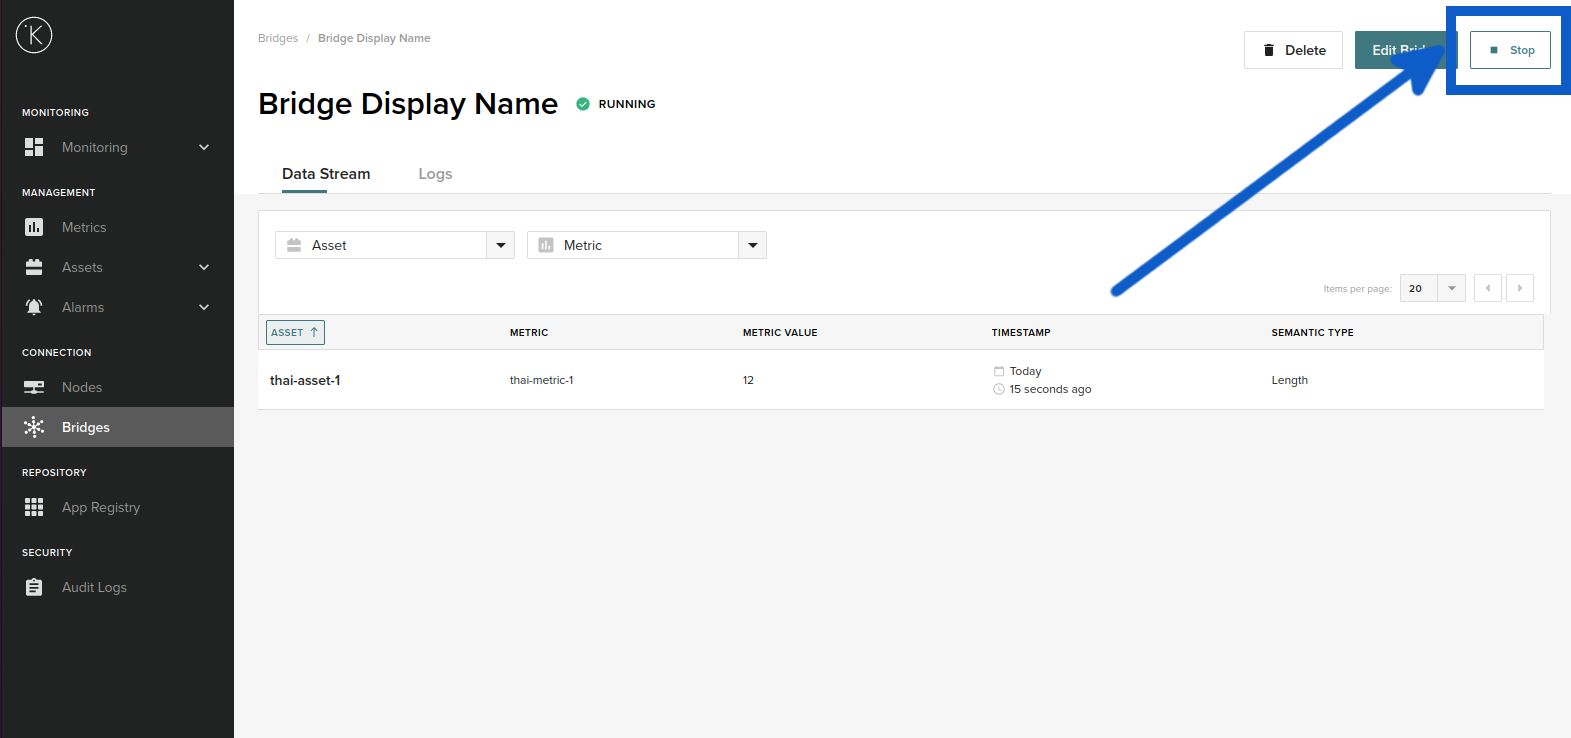
To start,stop or restart an existing ROC Bridge, go to the overview page on the Kelvin Control Manager UI. On the left hand side menu, select Bridges.
Click on a ROC Bridge name.
You will see the bridge details and all Assets being collected through this ROC bridge. On the top right hand corner you will see a button with one of three possible words; Stop, Start or Restart. This will depend on the current status of the ROC Bridge.
Click the button to perform the action.
Troubleshooting
Deploying ROC Bridge
| Problem | Solutions |
|---|---|
| In Step 1, there are no Nodes in the drop down list |
You need to create Nodes first before creating an ROC Bridge. Go to Nodes and create a Node first. |
| In Step 1, In the Name option, it does not accept the name I have entered and gives "invalid format" error. | The name must contain only lowercase alphanumeric characters and "-". No spaces or other special characters are allowed. |
| In Step 1, You can see the Node in the list but can not select it. |
You can only select Nodes that are currently online. If the Node is disconnected, then you can not proceed. Check and make sure the Node is online first. |
| In Step 3, there are no Assets in the drop down list | You need to create Assets first before creating an ROC Bridge. Go to Assets and create all your Assets first. |
| In Step 3, there are no Metrics in the drop down list | You need to create Metrics first before creating an ROC Bridge. Go to Metrics and create all your Metrics first. |
| Error Message : This Bridge can’t be deleted | You must be connected with the Node before you can delete a bridge.
Check and make sure the ROC bridge is running (green tick next to ROC bridge name) before trying to delete. |
| I can not see the ROC protocol as an option. | You need to be using minimum version 3.7+. On older versions you can only setup a bridge with OPC UA. |
Emerson ROC Controller
| Problem | Solutions |
|---|---|
| I can not connect to the ROC Controller |
Make sure the parameters for the communication link are correct. Also
make sure that you are using a valid credentials. Make sure you have specified
the correct Device Address and Device Group of the ROC.
If you are connecting by serial, make sure you are using the correct baud rate and other parameters. Check the security settings of ROCLINK 800. |
| The serial communications can not connect to the controller |
Make sure you have entered the correct location, for example /dev/ttyS0. You can get a list of serial connections setup on your Node with the Linux CLI command "dmesg | grep tty" If you have used a serial USB, then you will need to look for the USB Serial device by running the Linux CLI command "sudo dmesg | more" Alternatively, you can use the setserial program. This can be installed with "sudo apt install setserial". Documentation can be found on their website at https://linux.die.net/man/8/setserial. |
| I've lost connection with the ROC Controller. | Sometimes the communications to the ROC Controller will stop for no apparent reason. To check if your communications is ok, run telnet on the Node and connect manually to check. If successful, then restart the ROC Bridge and the connections should be restored. |
Glossary of Terms
| Term | Definition |
|---|---|
| ROC Protocol | This is a communications protocol used by Emerson products such as Remote Operation Controllers (ROC), FloBoss and RegFlo equipment. It can be used to access and retrieve information from the database configuration, real-time clock, events, alarm logs, live data and historically archived data. |
| Remote Operation Controllers | This is an Emerson product called ROC Controller which is comparable to a rugged PLC. It has more features than a standard PLC, like audit trails and historical data of a flow computer. It also is designed to have flexible communication options, to allow use in remote areas. |
| ROC Bridge | A Bridge is located on the Kelvin Control Manager UI. It can be configured to use many types of protocols (UPC UA, MQTT, Emerson ROC, etc.) to collect information from the edge. |
| Node | A node is a Kelvin gateway. It is used by the Kelvin Control Manager UI to deploy programs to the edge and to collect data from the edge. |
| Metrics | Metrics are a group of Assets in the Kelvin Control Manager UI. |
| Assets | An Asset is one piece of data in the Kelvin Control Manager UI. This could be a temperature, vibration, position or any useful value. |
| TCP/IP | Also known as Ethernet communications, it's full name is Transmission Control Protocol/Internet Protocol and is a suite of communication protocols used to interconnect network devices. |
| Serial | It is the process of sending data one bit at a time, sequentially, over a communication channel or computer bus. There are two common standards RS232 and RS485. |
* Some Icons made by Eucalyp from www.flaticon.com