Getting Started Guide
Introduction
The goal of this quick start guide is to demonstrate the basic usage of the main features in KICS.
You will learn to:
- Provision a Node computer into KICS
- Create an Asset Class and Asset Type
- Create an Asset
- Connect to an OPC-UA Server and bind data to the asset
- Create and develop an application
- Update the application to have a simple control logic
- Upload the application to the Platform Application Registry
- Deploy the application to the provisioned Node
Prerequisites
- Access to a running Kelvin Platform Server (e.g.:
https://<sub-domain>.kelvininc.com) - Software Pre-requisites Windows / Unix .
- Virtual machine or X86 machine to serve as a Node running Ubuntu 18.04 or 20.04
- An OPC-UA Server/Simulator
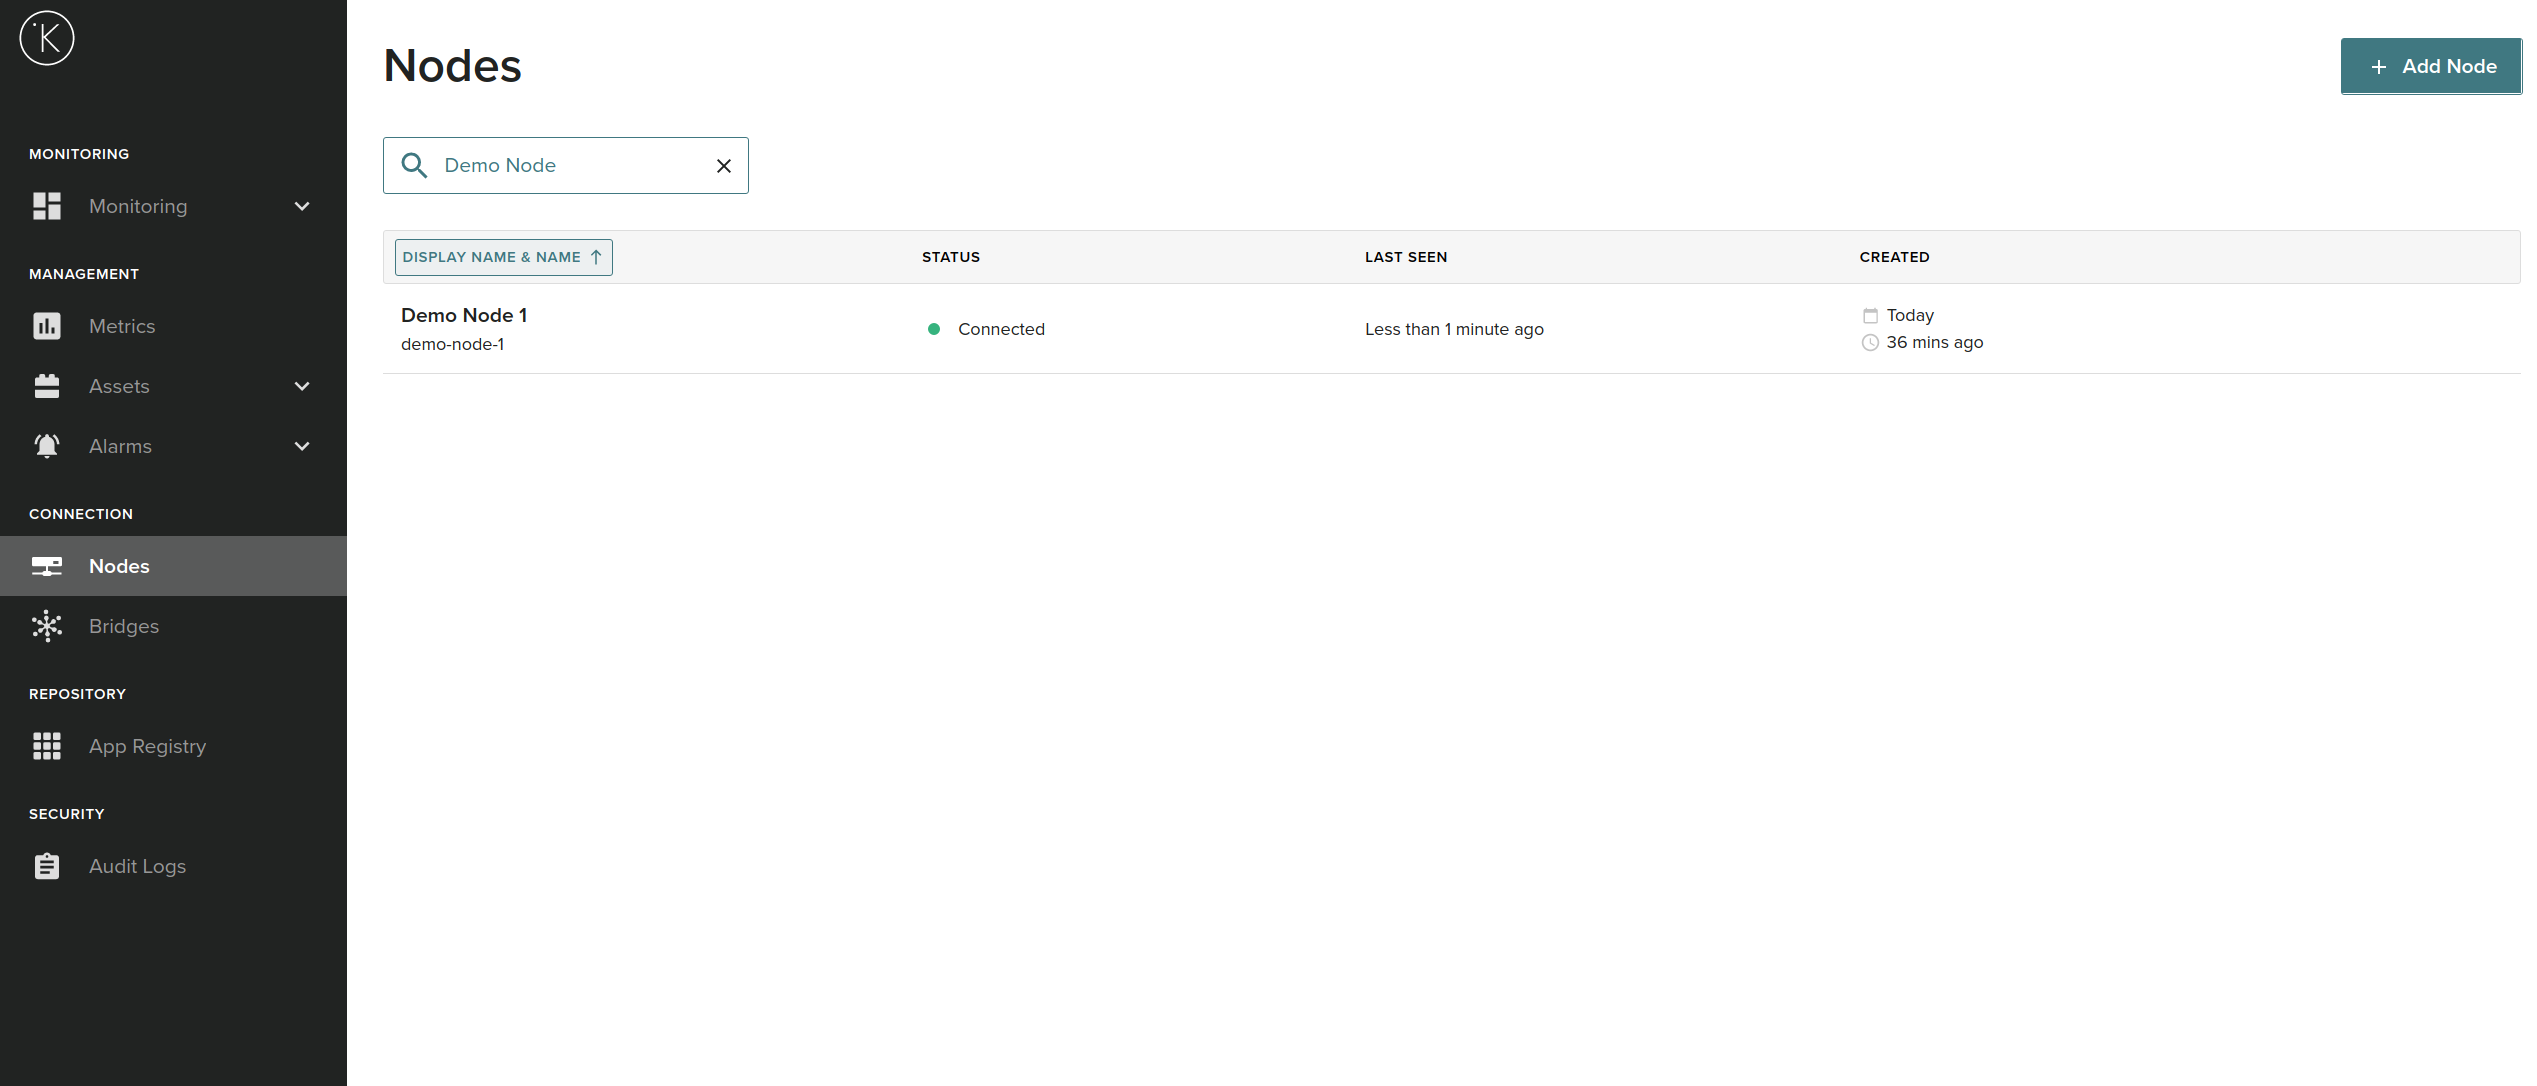
Step 1 - Provision a Node
Onboarding a gateway into Kelvin is straight forward, just run an on-line command.
-
Login to the Kelvin Control Center by opening your browser and typing the platform domain (e.g.:
https://<sub-domain>.kelvininc.com) -
Click on the Nodes Menu and then click in the
+ Add Nodebutton: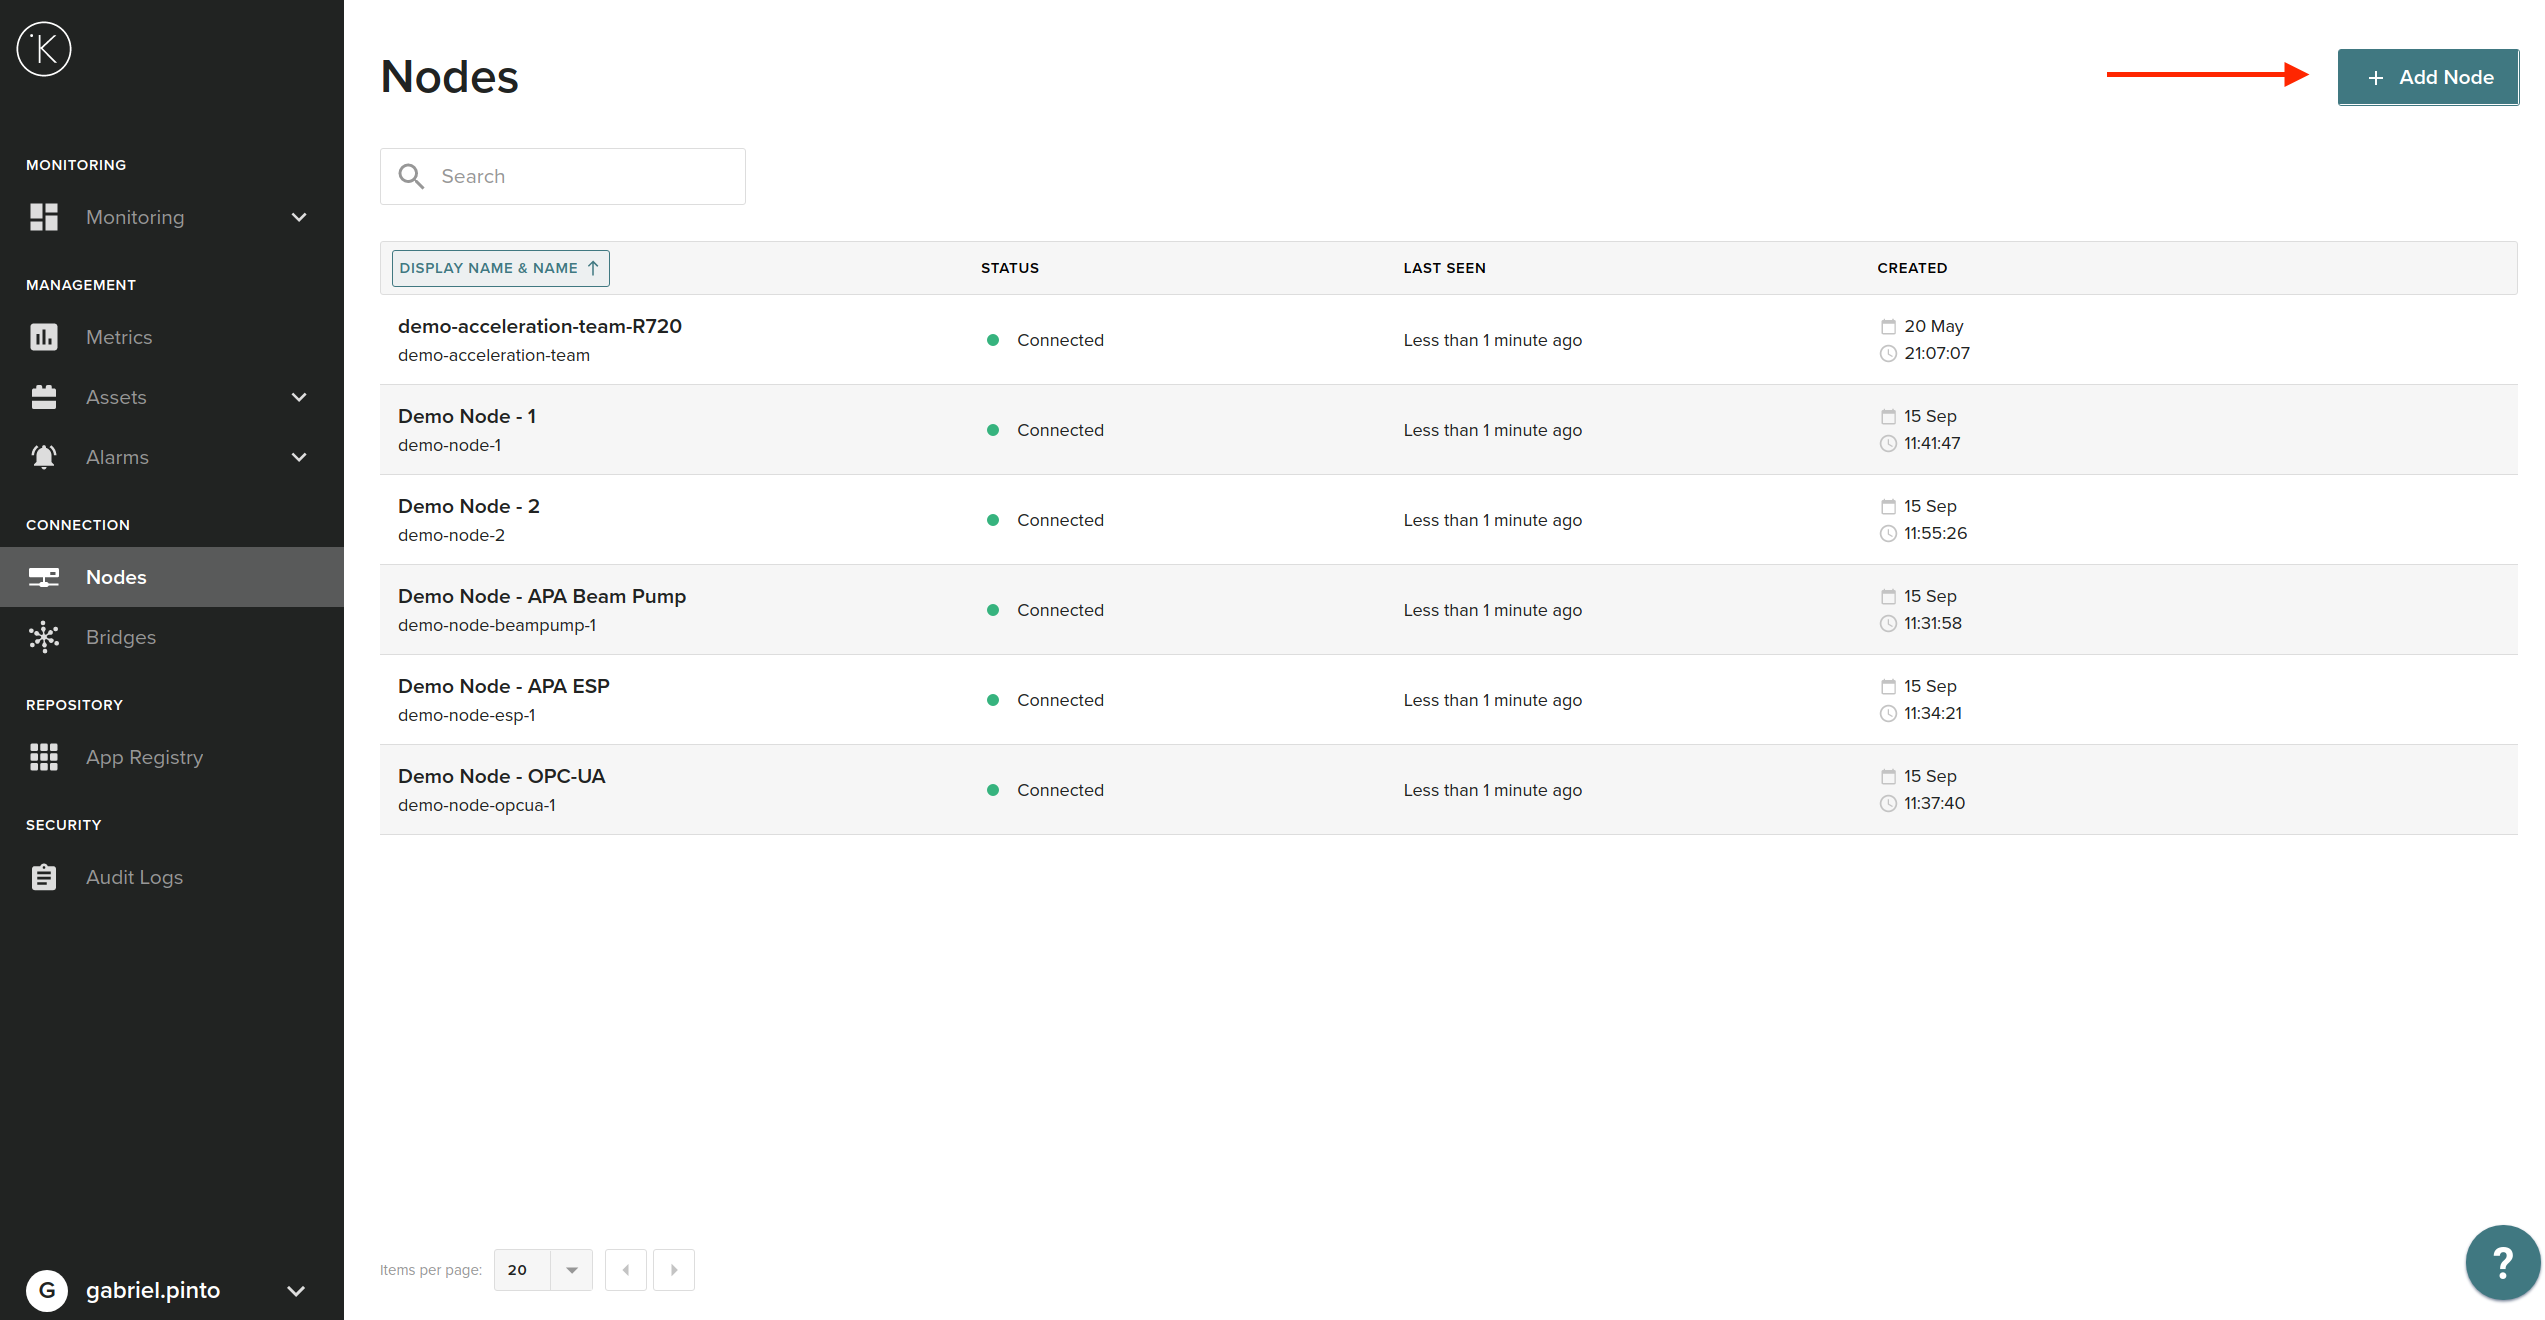
-
You should see the popup below:

Confirm that your Node is upgraded with the latest patches.
sudo apt updatesudo apt upgrade -yrebootyour Node
- Use the copy button or select the command from the screen and paste it to your system:
You need be root or have sudo access
johndoe@host:~$ KELVIN_TOKEN="PaVgyuXU93nRrwwHeEwUZZg55bdZDfSbhzDAMuD5BQWrufqh4gvESTfNW8eSFe2c8HAM9BS=" bash <(curl -sf https://demo.kelvininc.com/provision)
For error message command 'curl' not found, follow these steps.
-
You will be requested to input the name and title for the Node in KICS:
By default, the name and title are filled with the hostname... Checking Secureboot state...[OK] Testing cluster access...[OK] Write the Node name: demo-node-1 Write the Node title: demo-node-1 Creating Node in the server...[OK] Request create wireguard peer...[OK] ... -
The process can take a couple of minutes depending on the machine. Upon successful software installation, you should see the following output:
... Request Get cloud-cluster peer...[OK] Setting up Wireguard...[OK] Request update edge-cluster peer...[OK] Requesting create peer tunnel...[OK] Testing Wireguard communications. Please wait... Requesting K3S manifest files...[OK] Waiting for K3S to be up and running. Please wait... Request update cluster...[OK] Creating kelvin-provision service...[OK] All done! johndoe@host:~$ ... - You can now go back to the Control Center and confirm your system is provisioned by finding it in the list. Its status should be similar to below:

Step 2 - Create an Asset Class and Asset Type
The Asset Class can be viewed as a way to categorize the asset types in Kelvin. Each asset type always has an asset class associated to it. The best way to demonstrate this is with some examples. You can think of an asset class as "Pump", "Compressor", "Motor", etc. An Asset type needs to have one Asset Class associated with. This makes easier to filter assets that have different types but belong to the same class. Examples of asset types are "Beam pump", "Motor AC" and "Motor DC".
To create an asset class you need to:
- Login to the Kelvin Platform Server (e.g.:
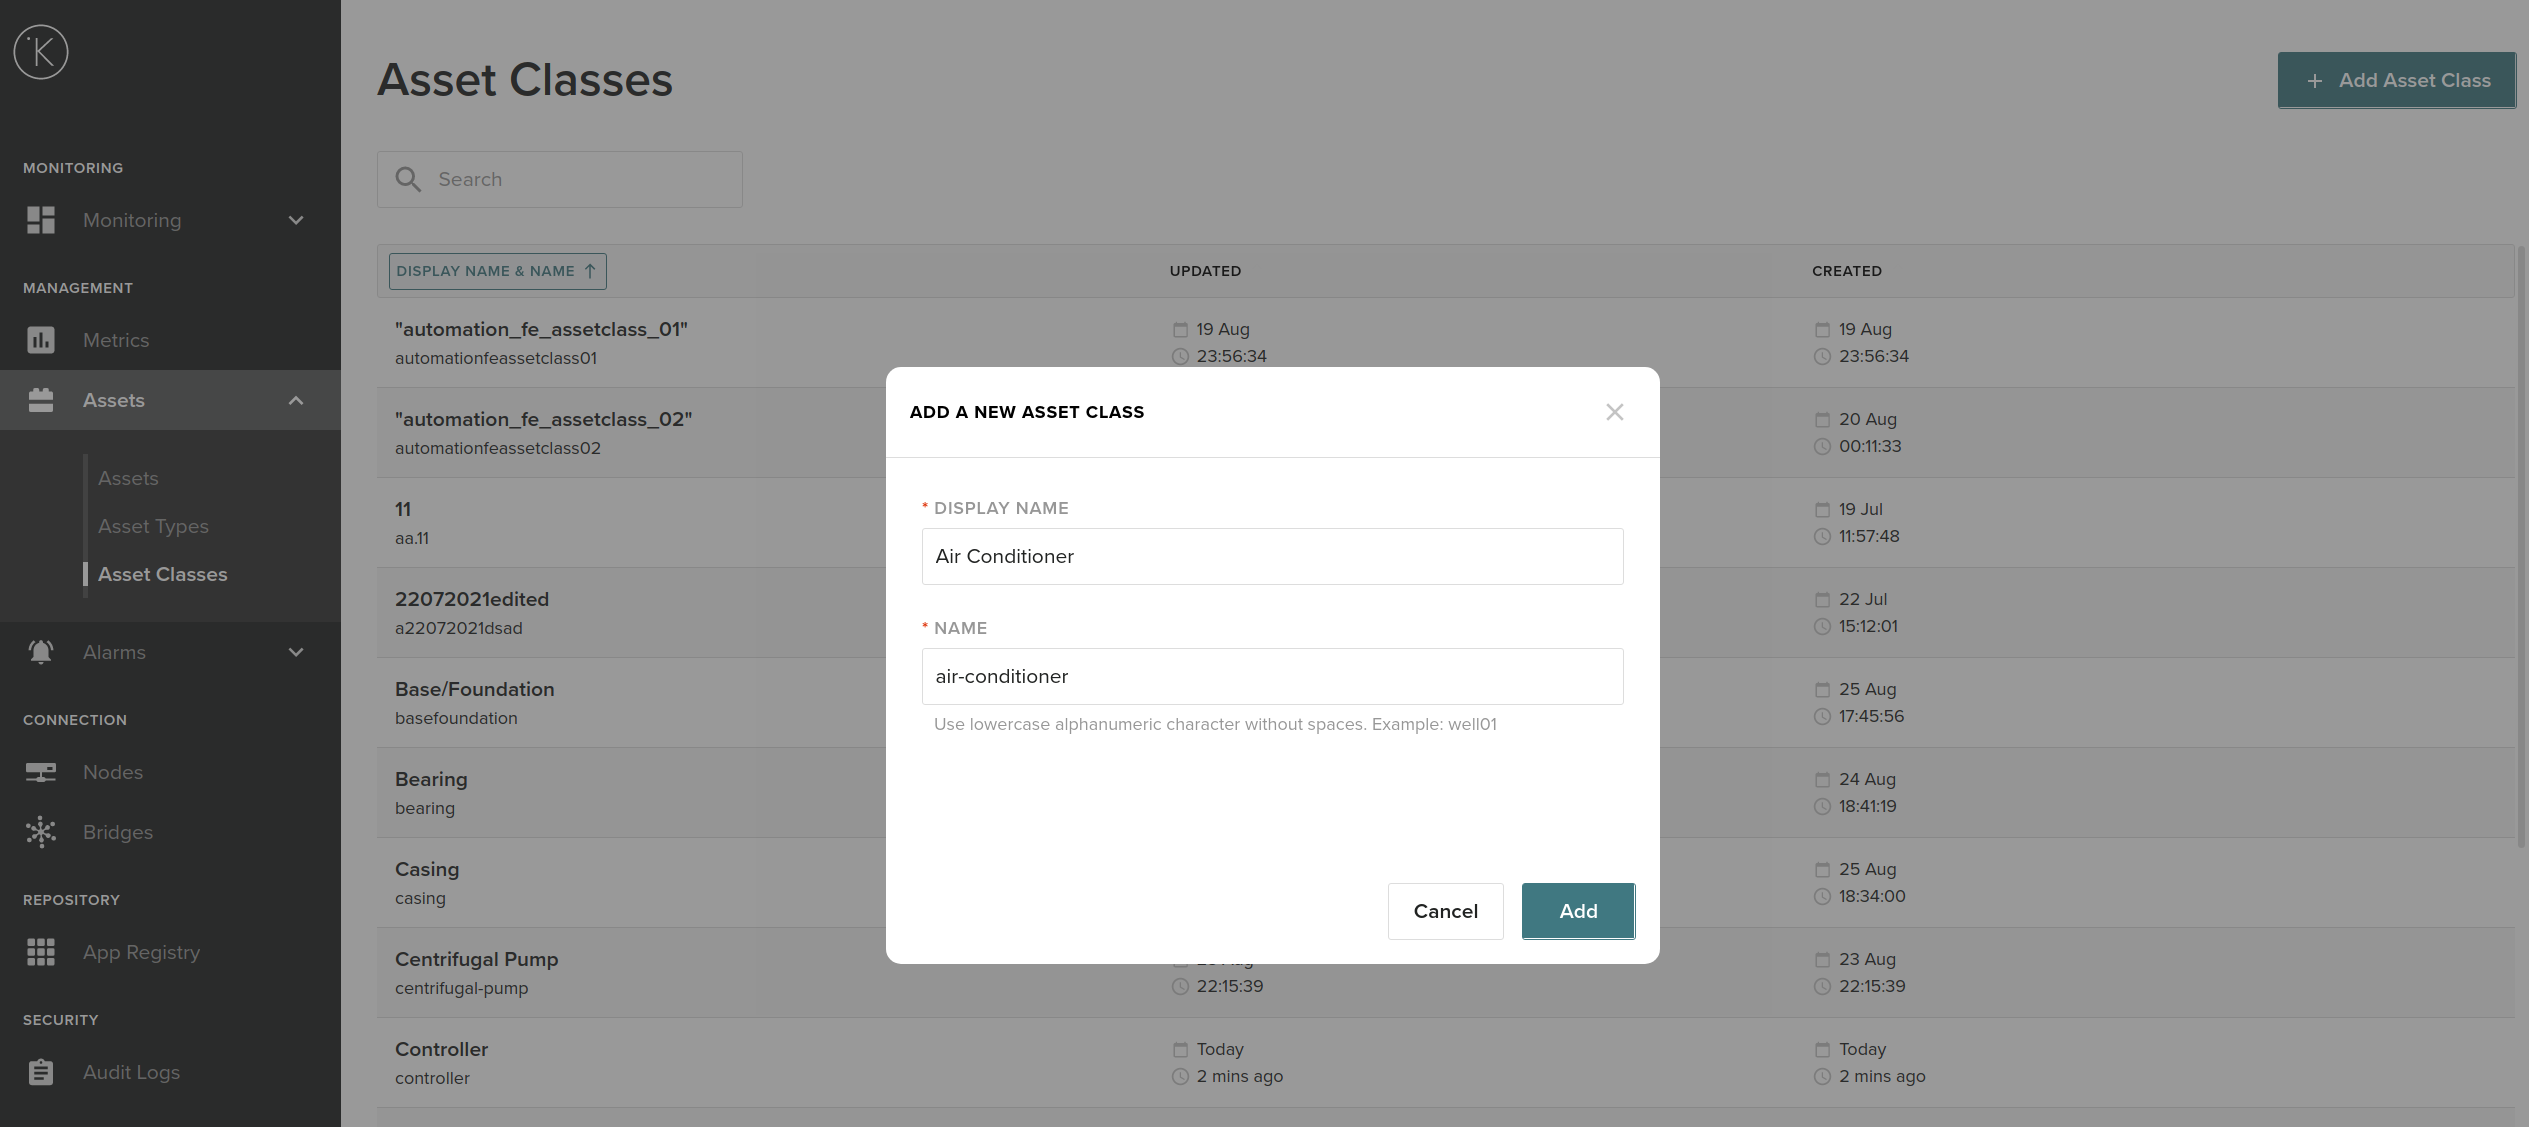
https://foo.kelvininc.com) - Click in the left hand menu on
Assetsand thenAsset Classes - Click on the top right corner
+ Add Asset Class - Fill the
Nameand theTitle(Title is the Display Name) - For this example we will be creating the asset classe Controller
To create an asset type you need to:
- Login to the Kelvin Platform Server (e.g.:
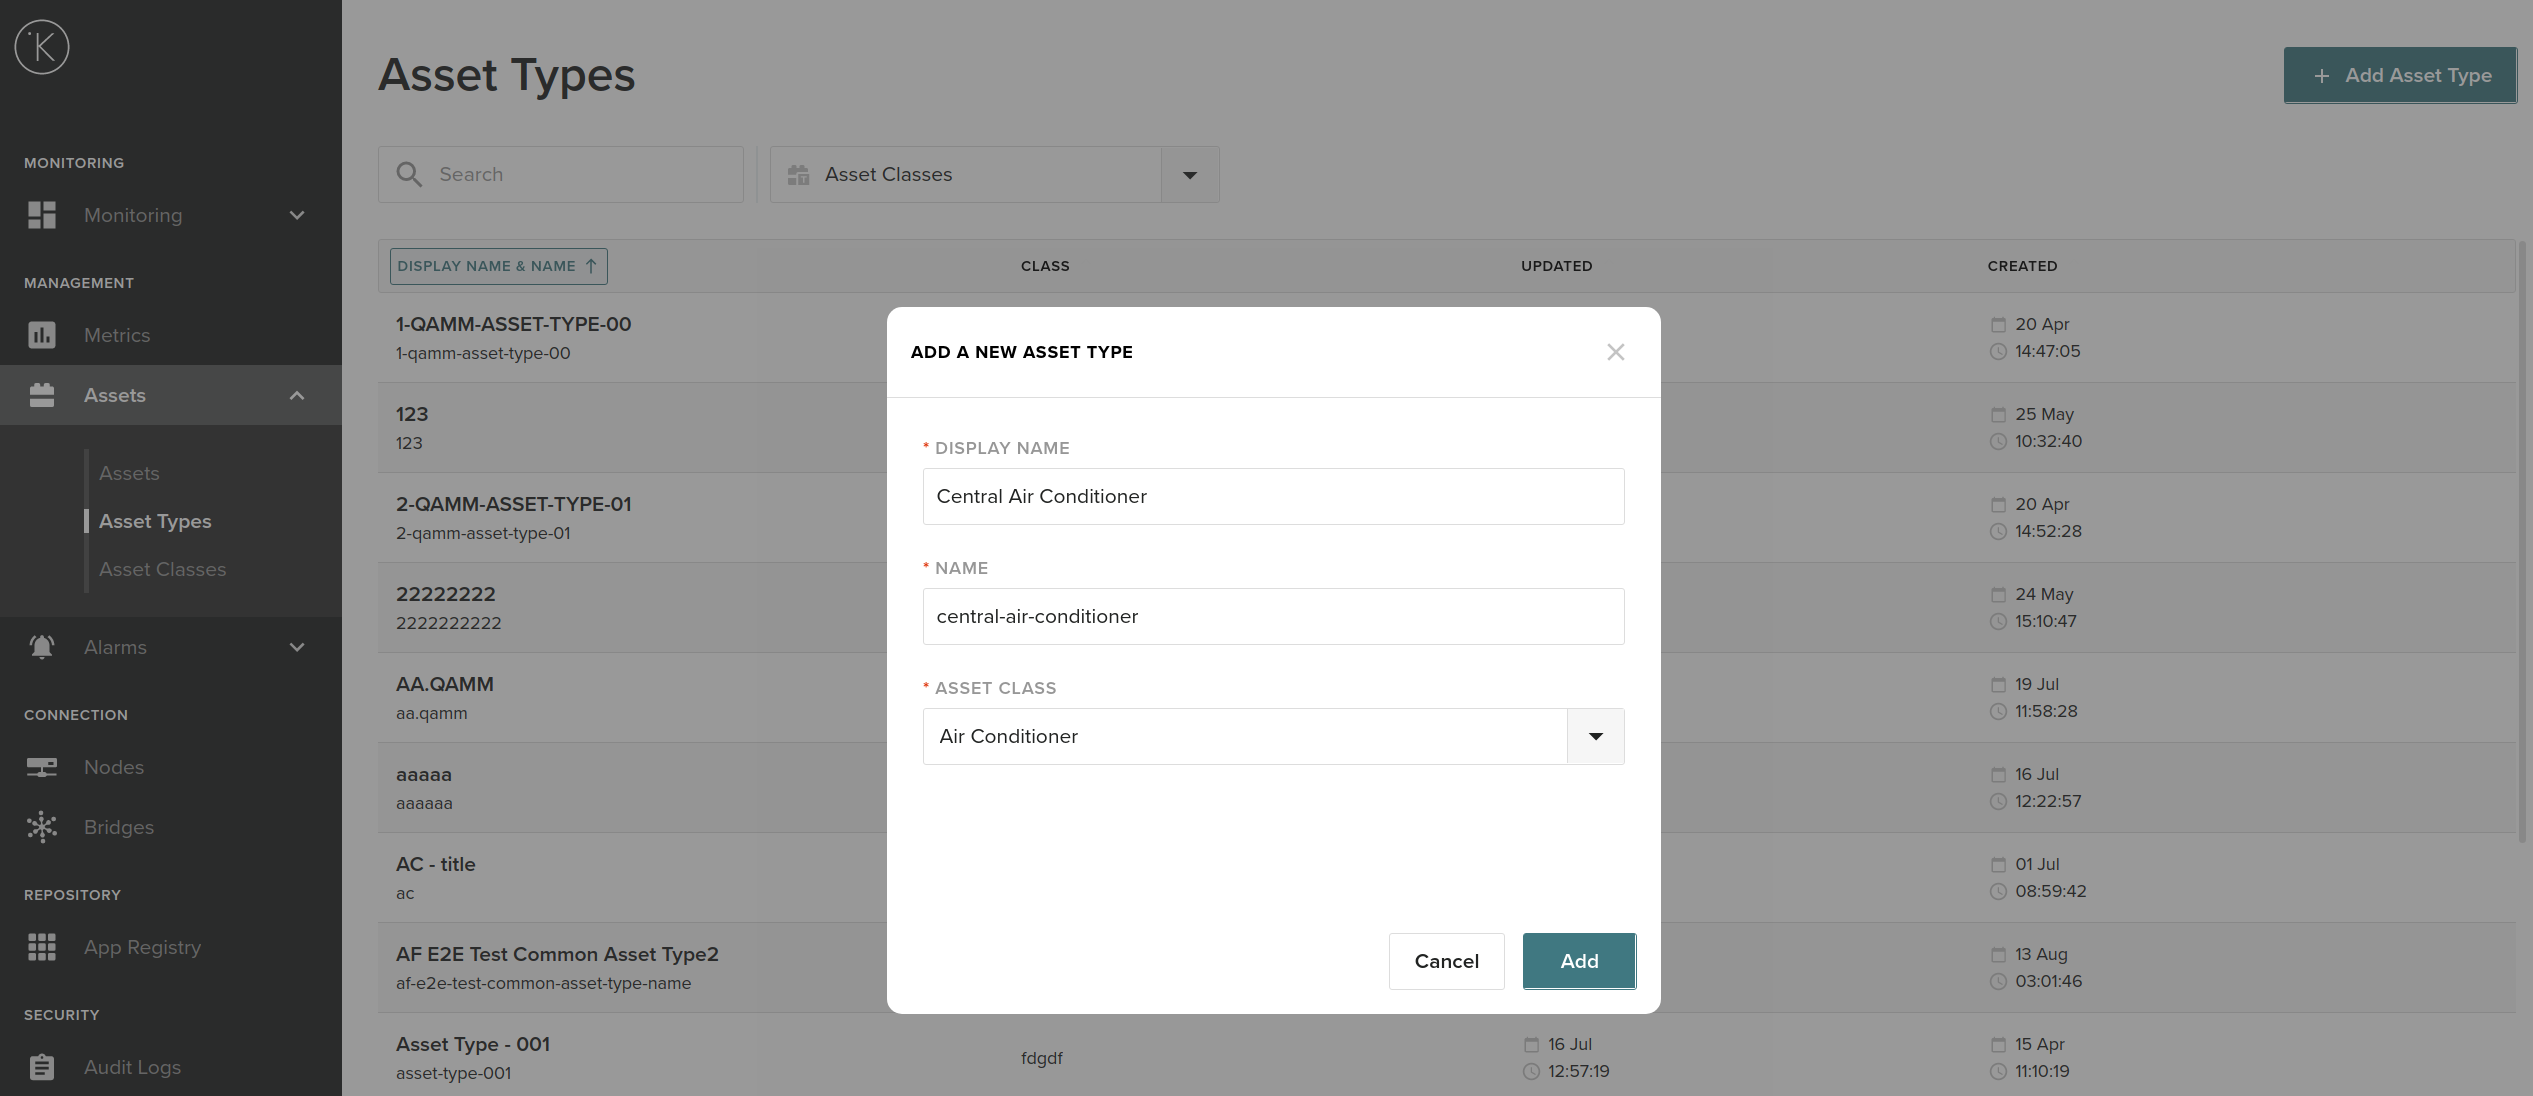
https://foo.kelvininc.com) - Click in the left hand menu on
Assetsand thenAsset Types - Click on the top right corner
+ Add Asset Type - Fill the
Name, theTitle(Title is the Display Name) and theAsset Class - For this example we will be creating the asset type PLC
Step 3 - Create an Asset
- Login to the Kelvin Platform Server (e.g.:
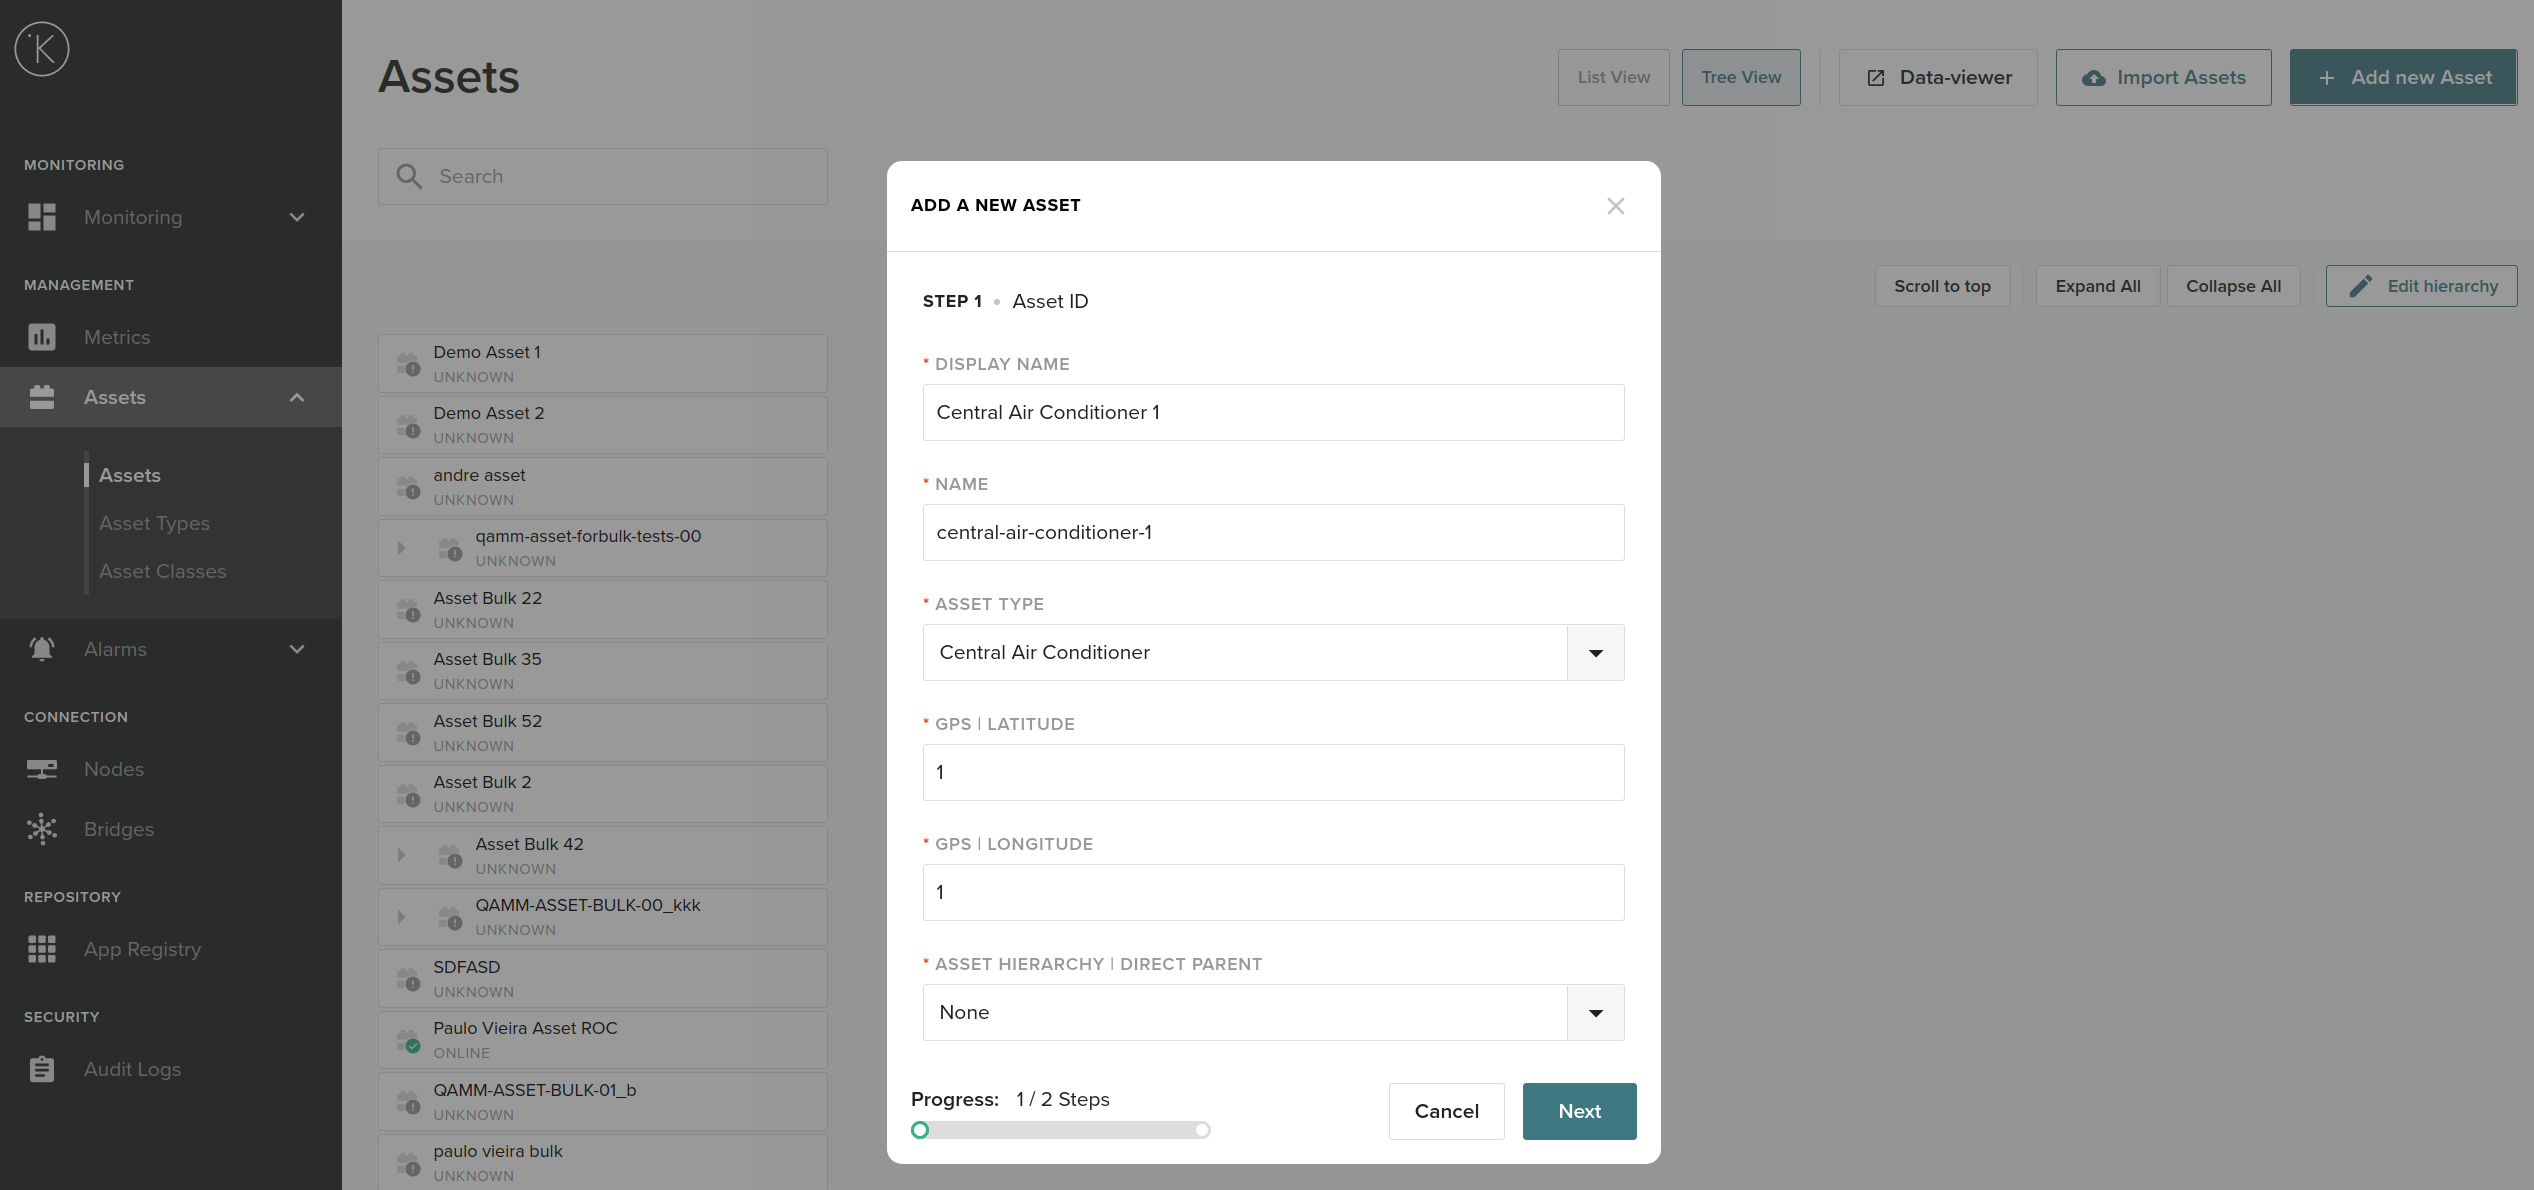
https://foo.kelvininc.com) - Click in the left hand menu on
Assets - Click on the top right corner
+ Add Asset - Fill the
Name,Title, theAsset Type(in this case we will use the one created aboveBeam Pump), theGPScoordinates andAsset Hierarchy - For this example we will be creating the asset called PLC 1
Step 4 - Connect data to the Asset
- Login to the Kelvin Platform Server (e.g.:
https://foo.kelvininc.com) - Click in the left hand menu on
Bridges - Click on the top right corner
+ Deploy Bridge - Select the protocol
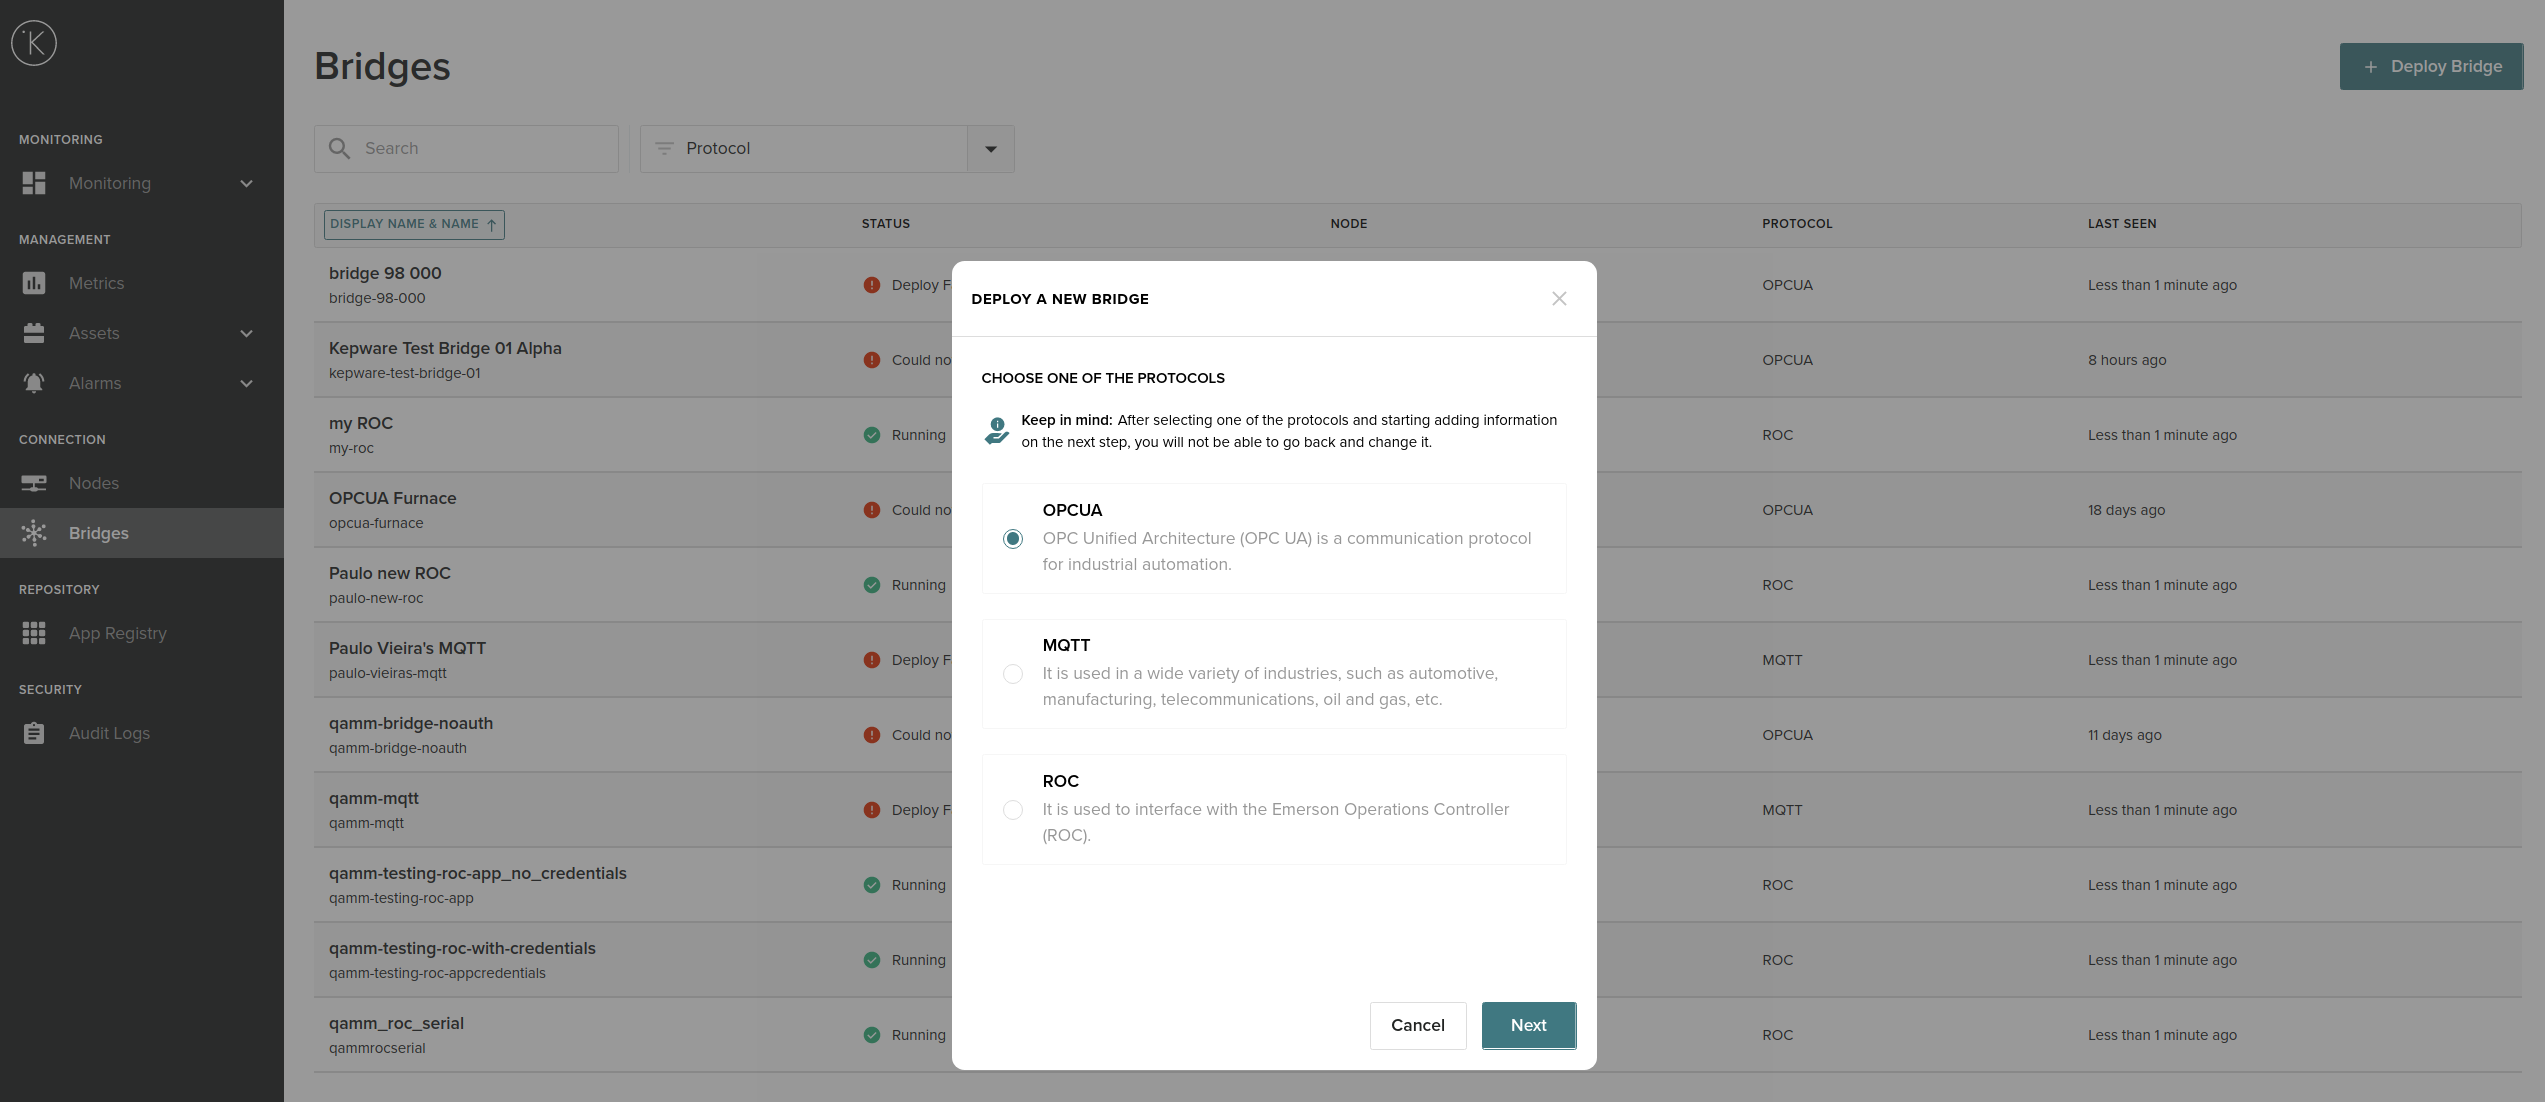
- Fill the
Display Name,Namefor the Bridge (Connection) - Select which
Nodethe connection is going to be established with (In this case we will use the Node we provisioned in Step 1demo-node-1)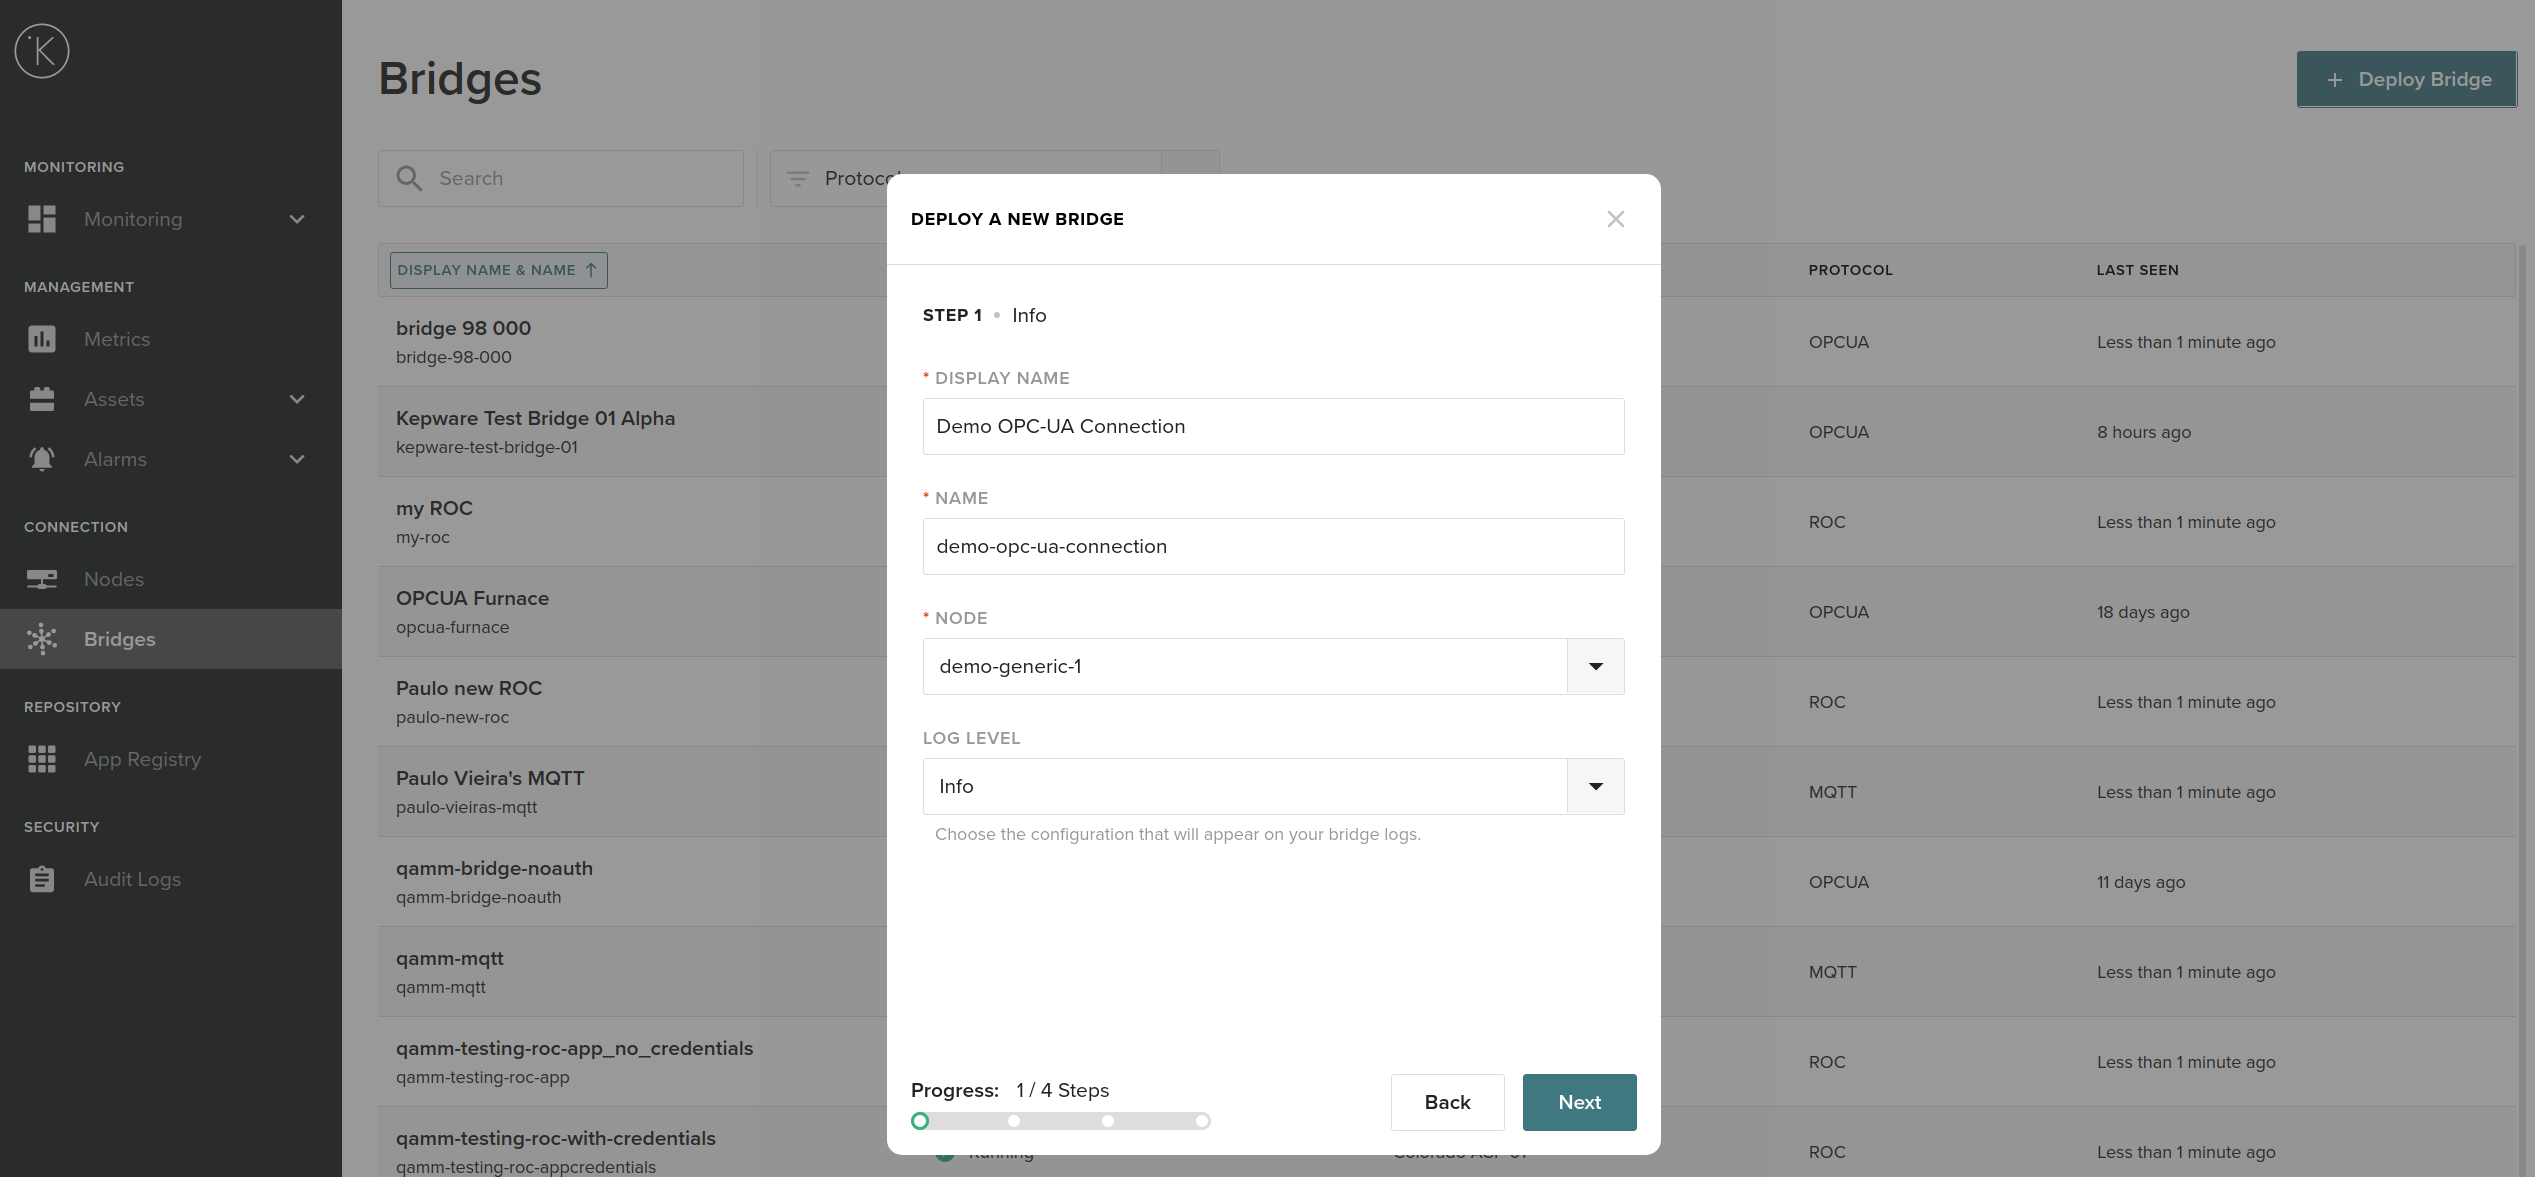
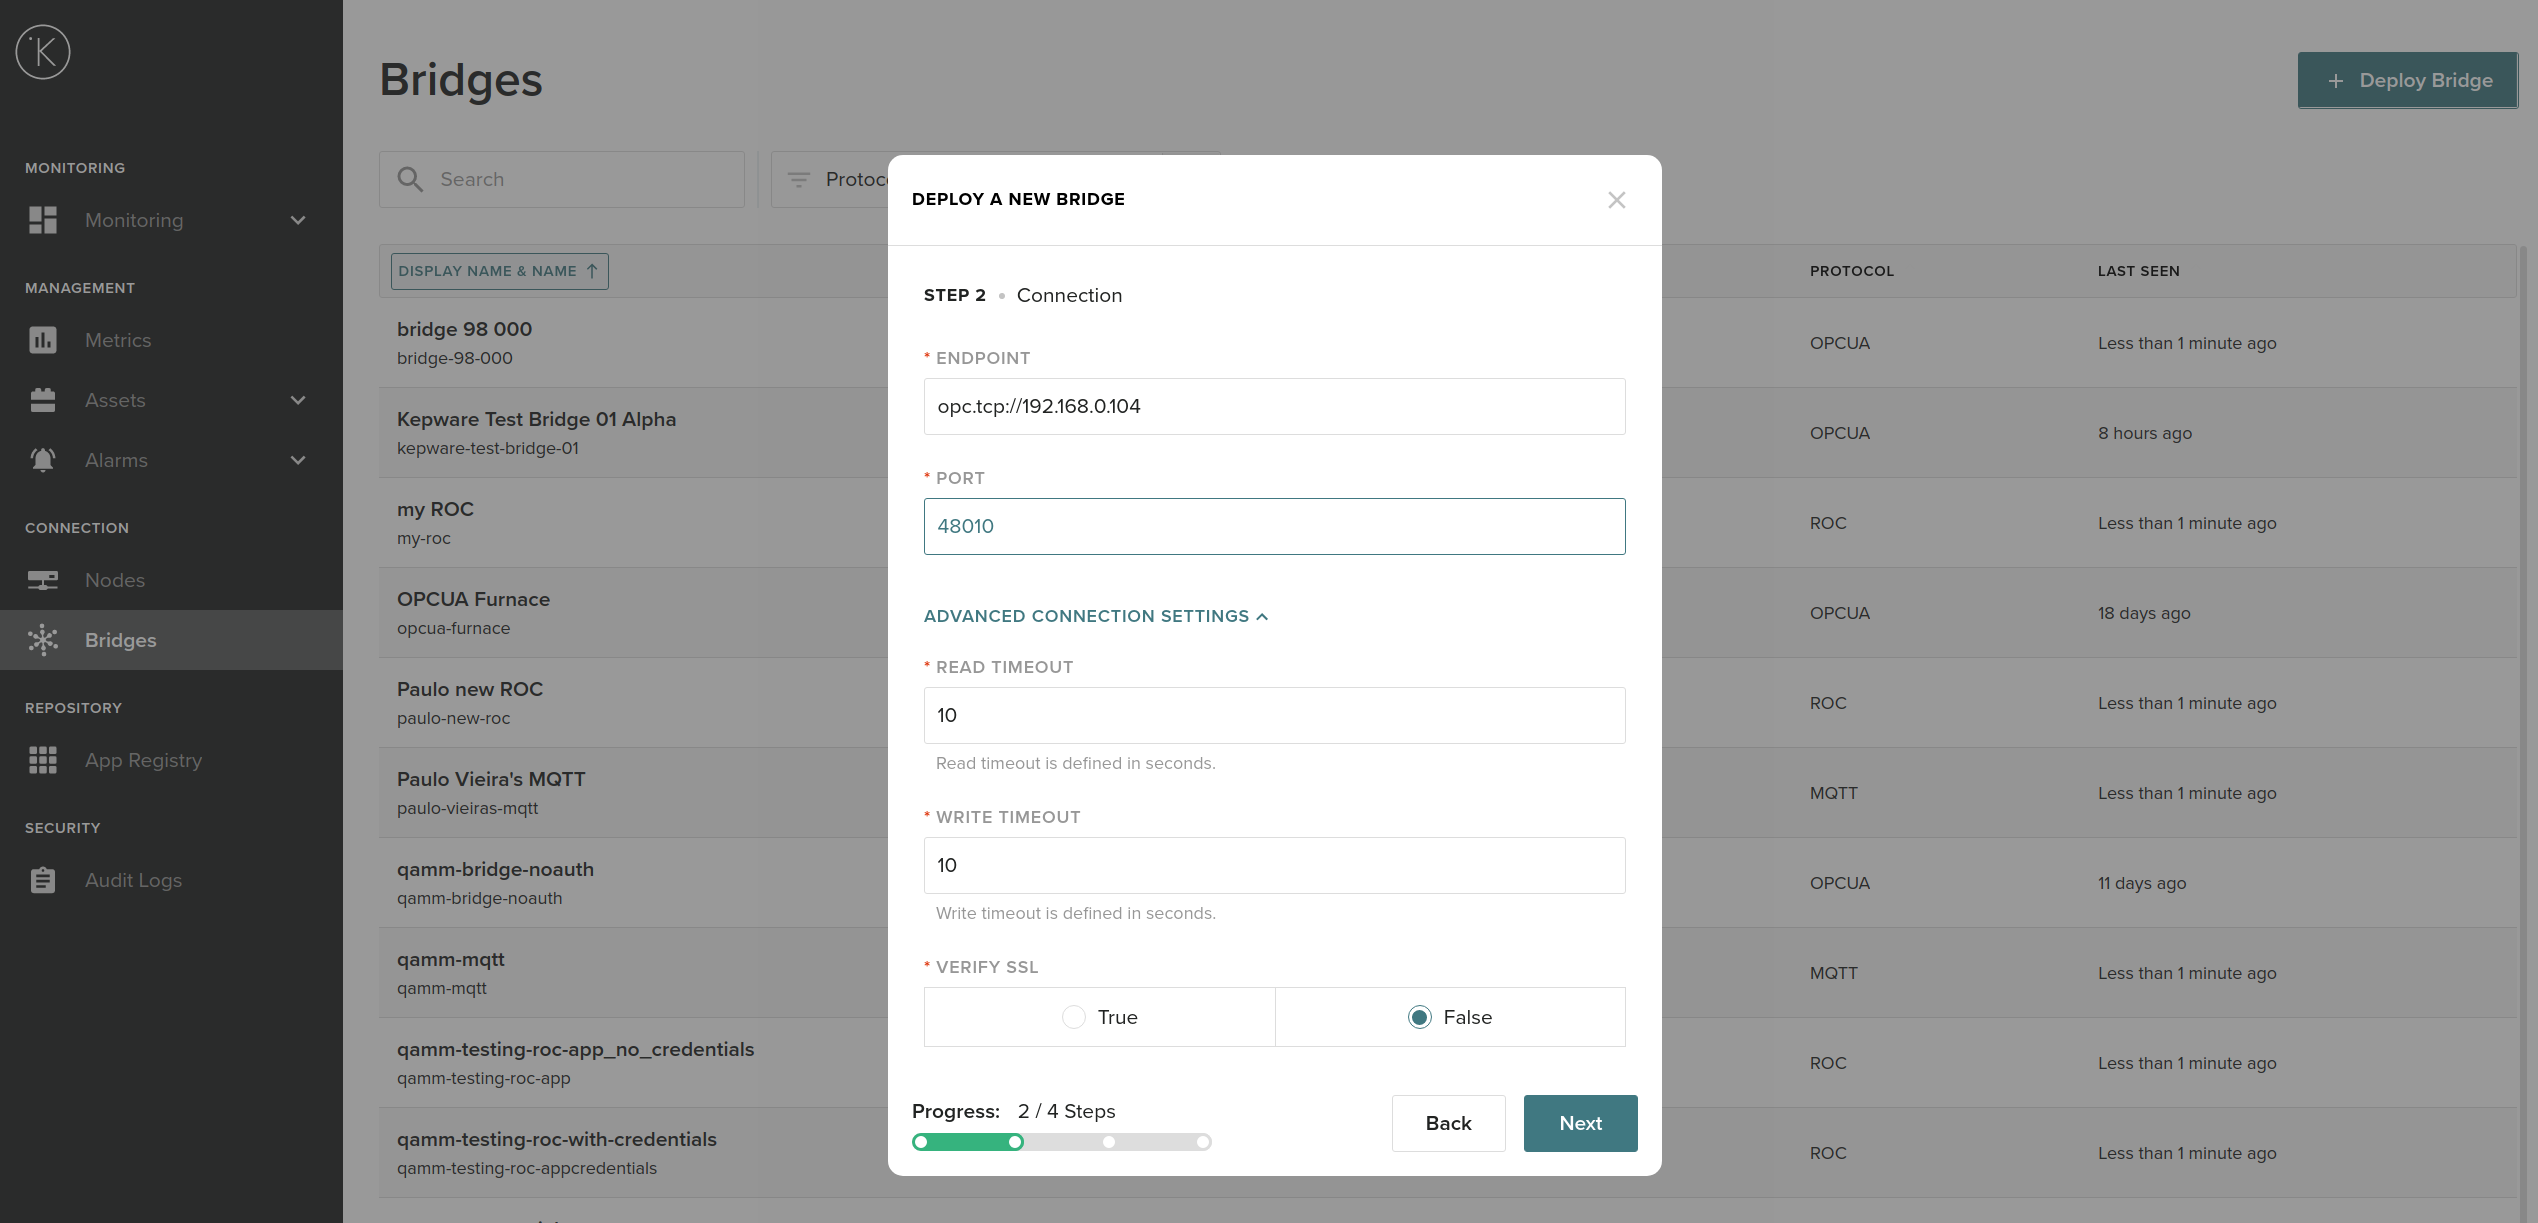
- Fill the connection details of the OPC-UA Server. In this example we have an OPC-UA server running on IP 192.168.0.104 with PORT 48010
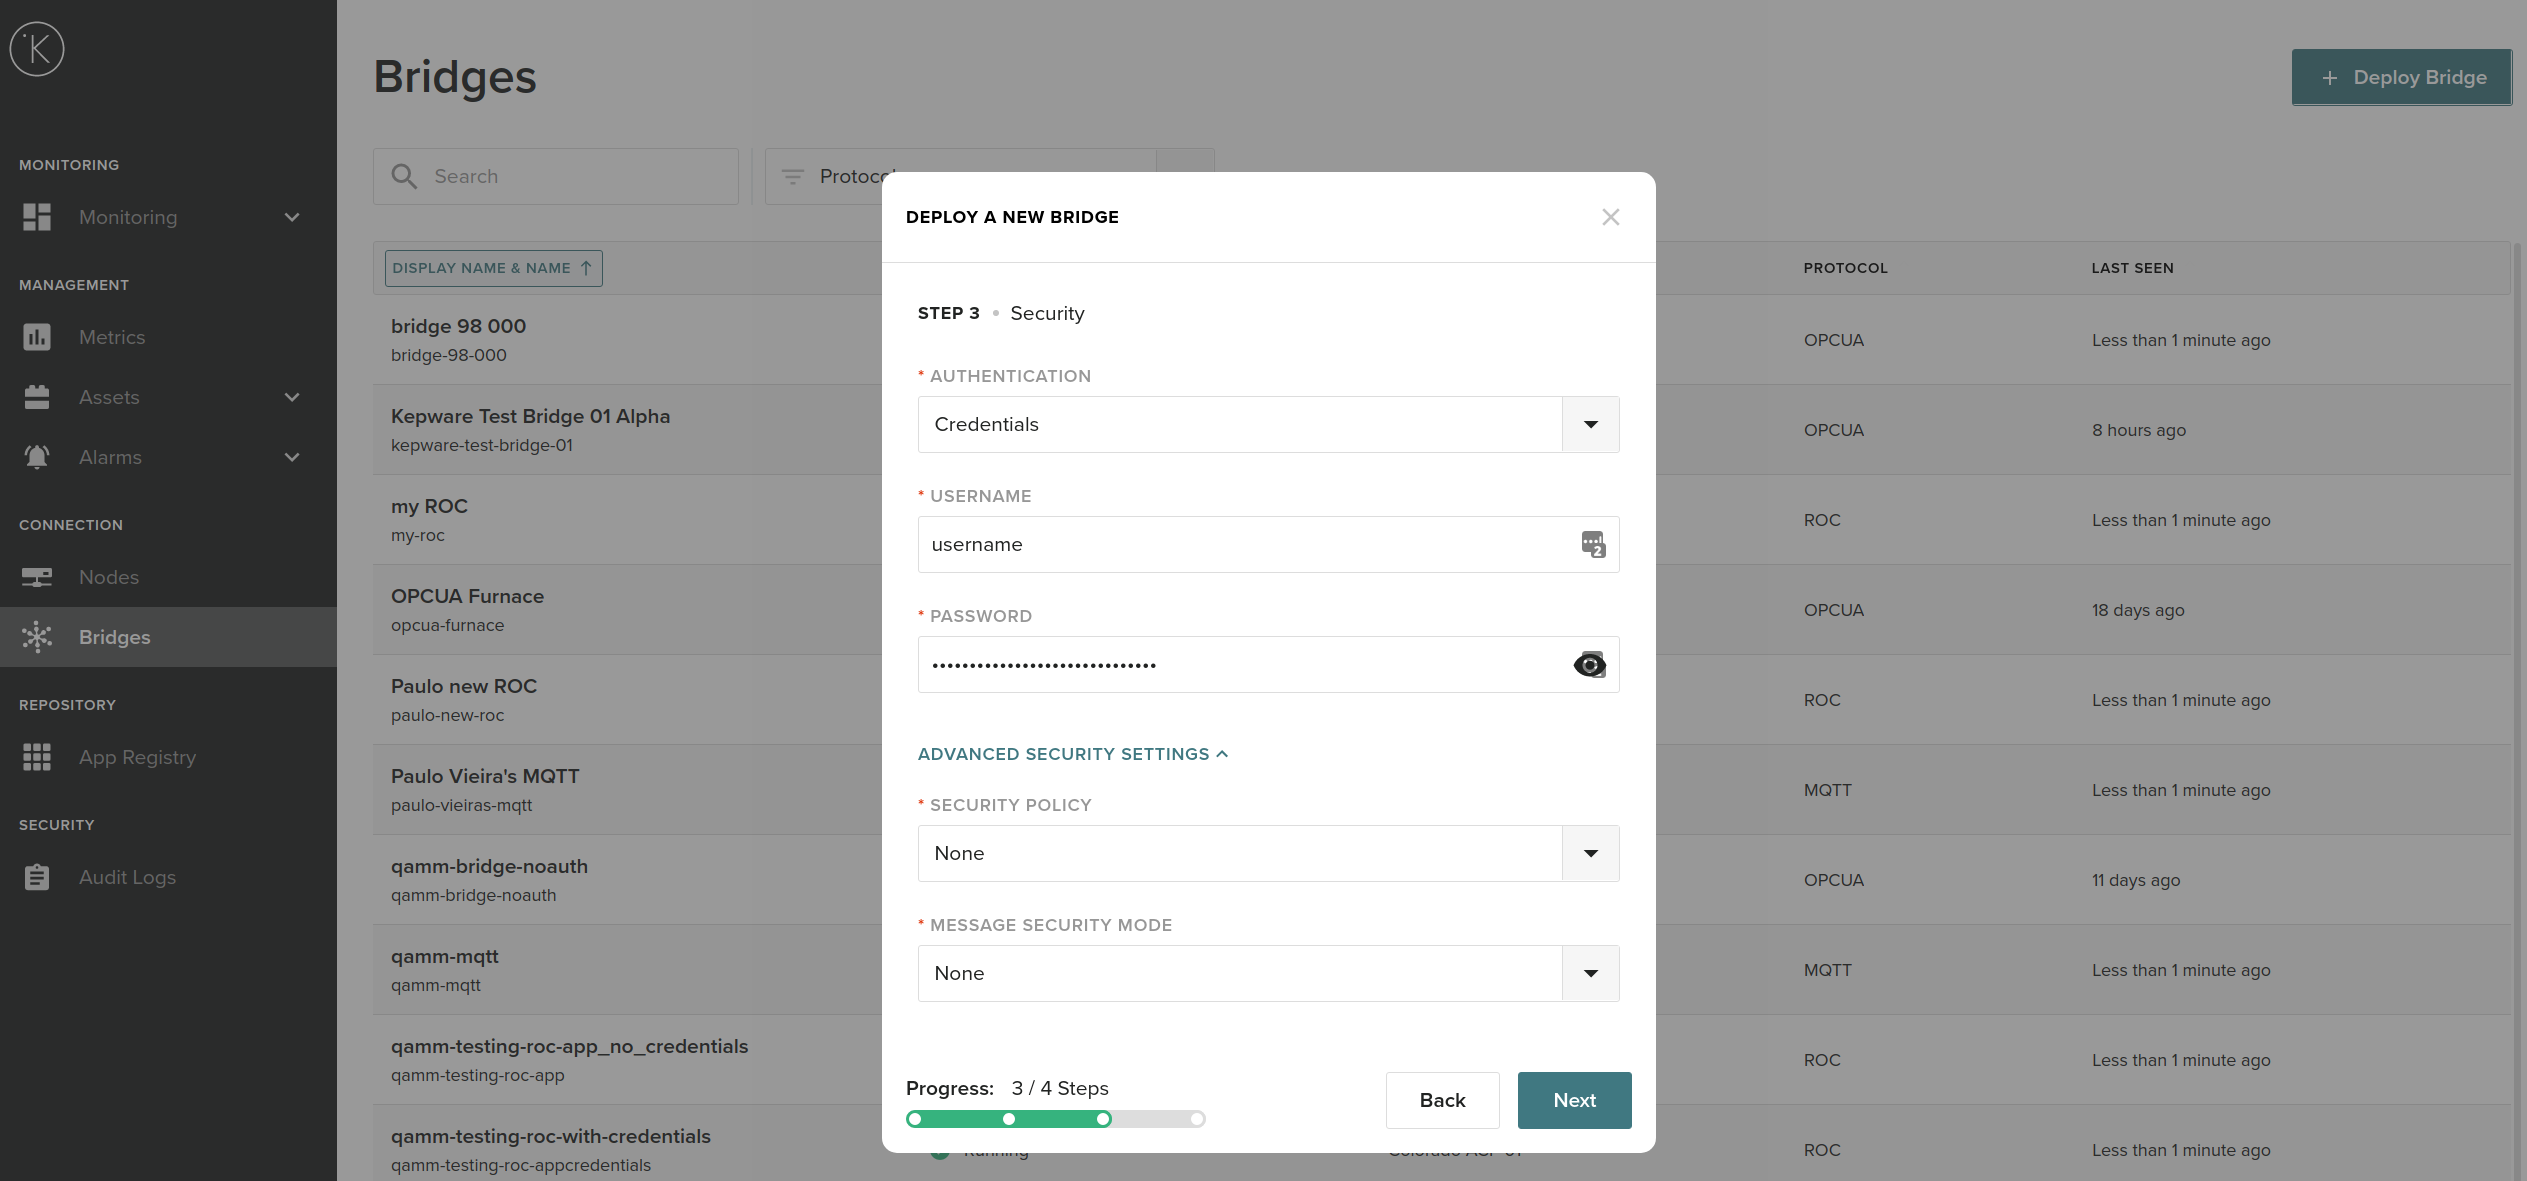
- Fill the connection credentials if there is any.
- Fill the register map. You can copy and paste from a spreadsheet directly to the browser
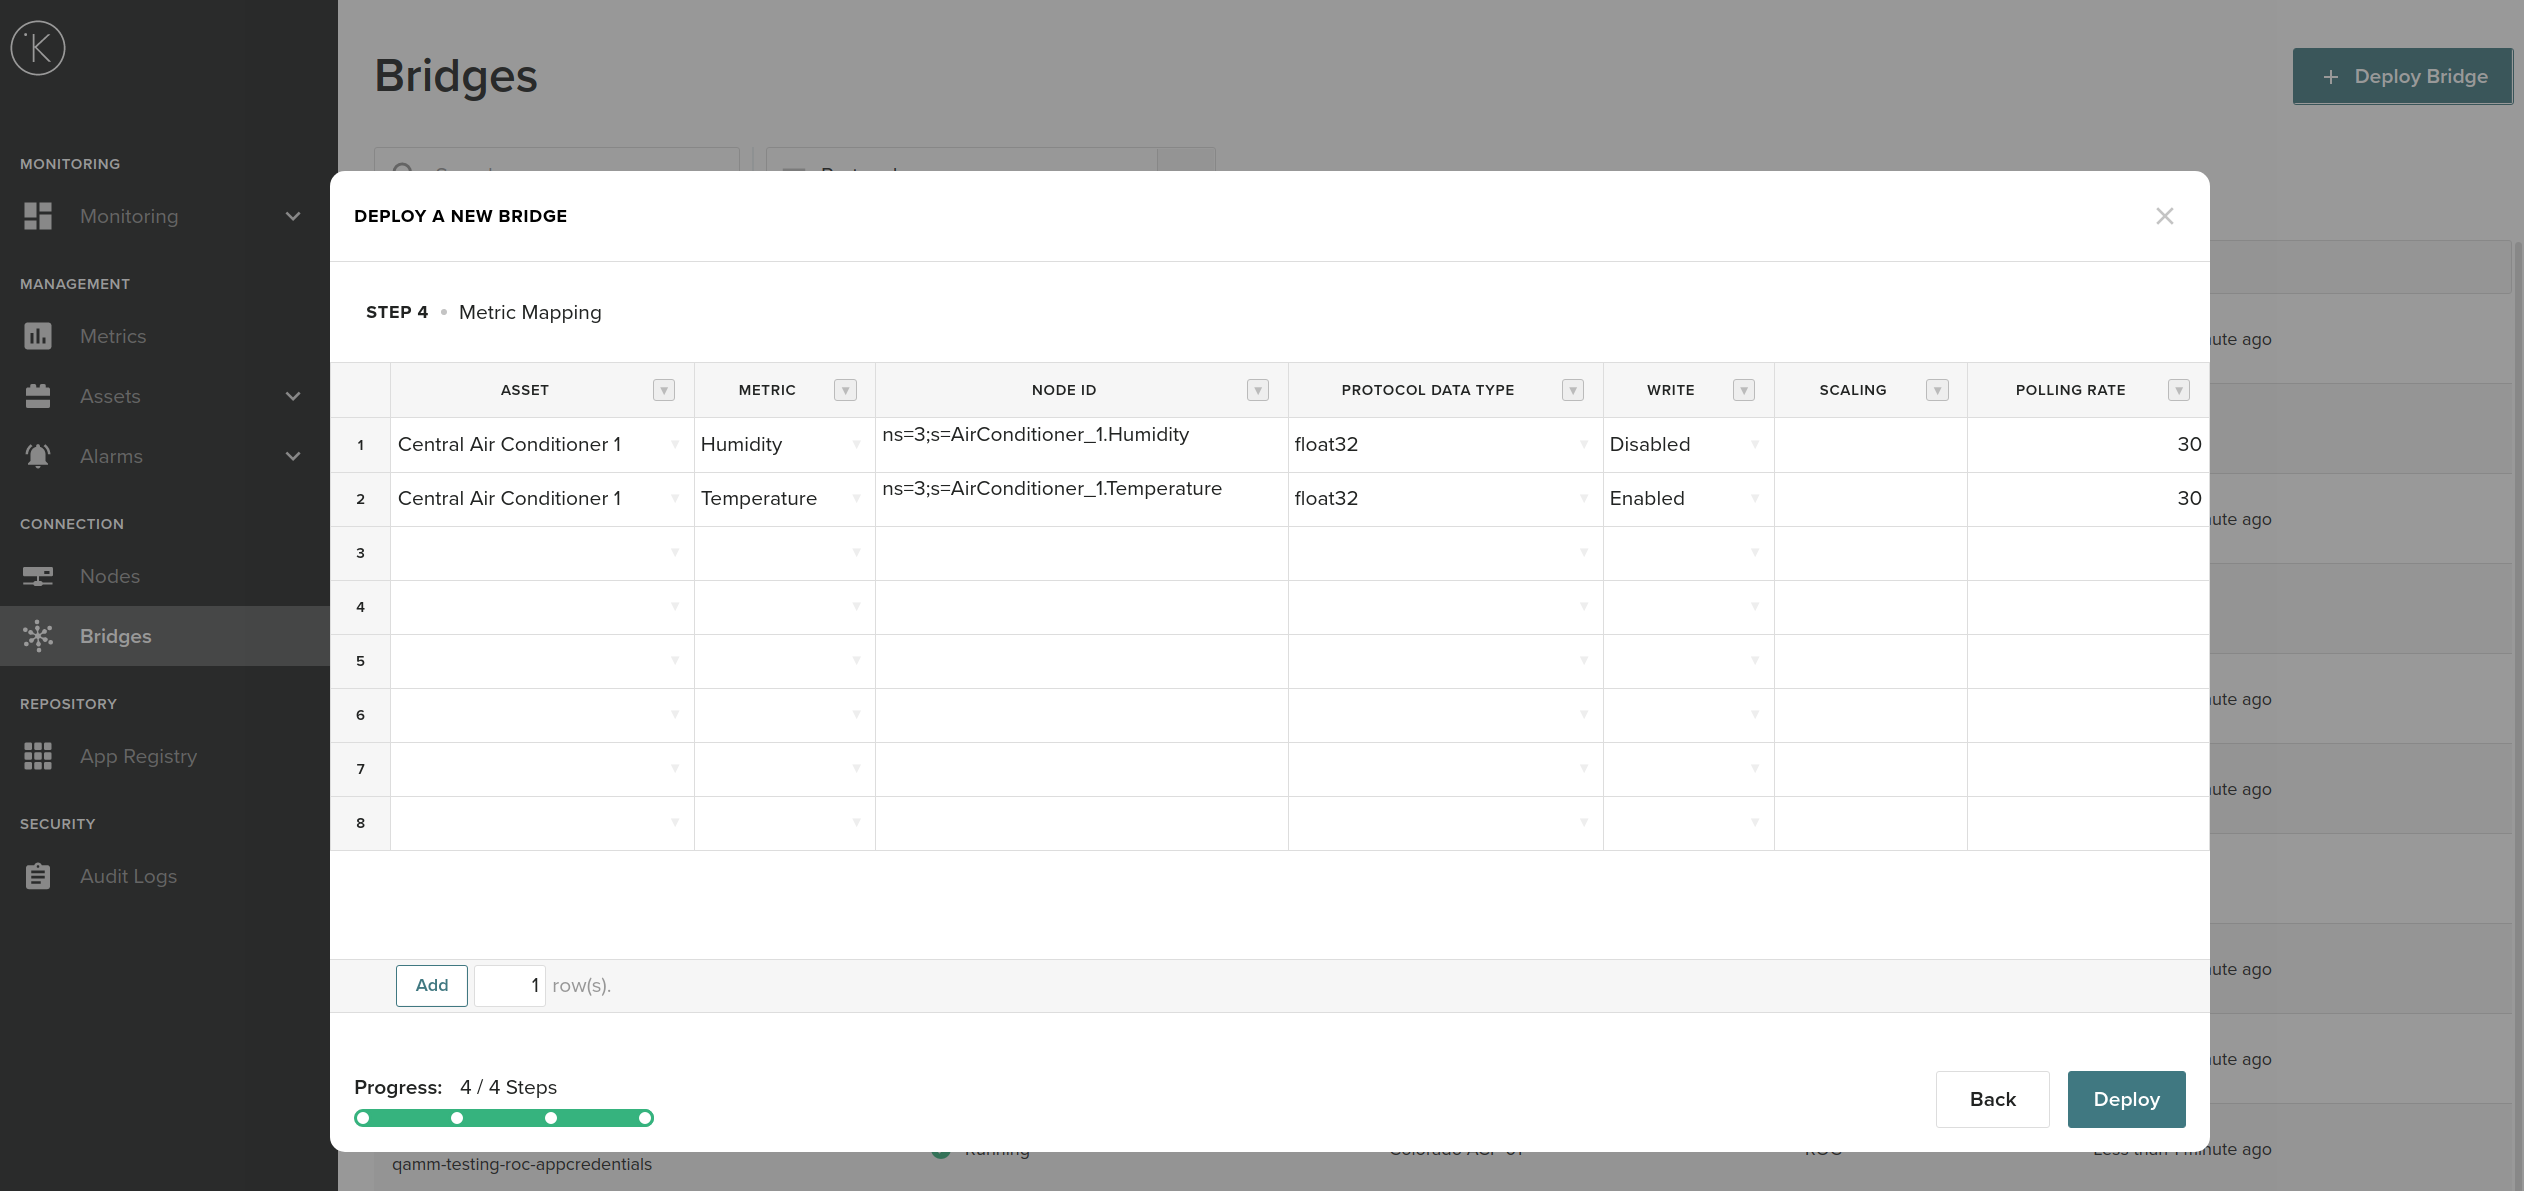
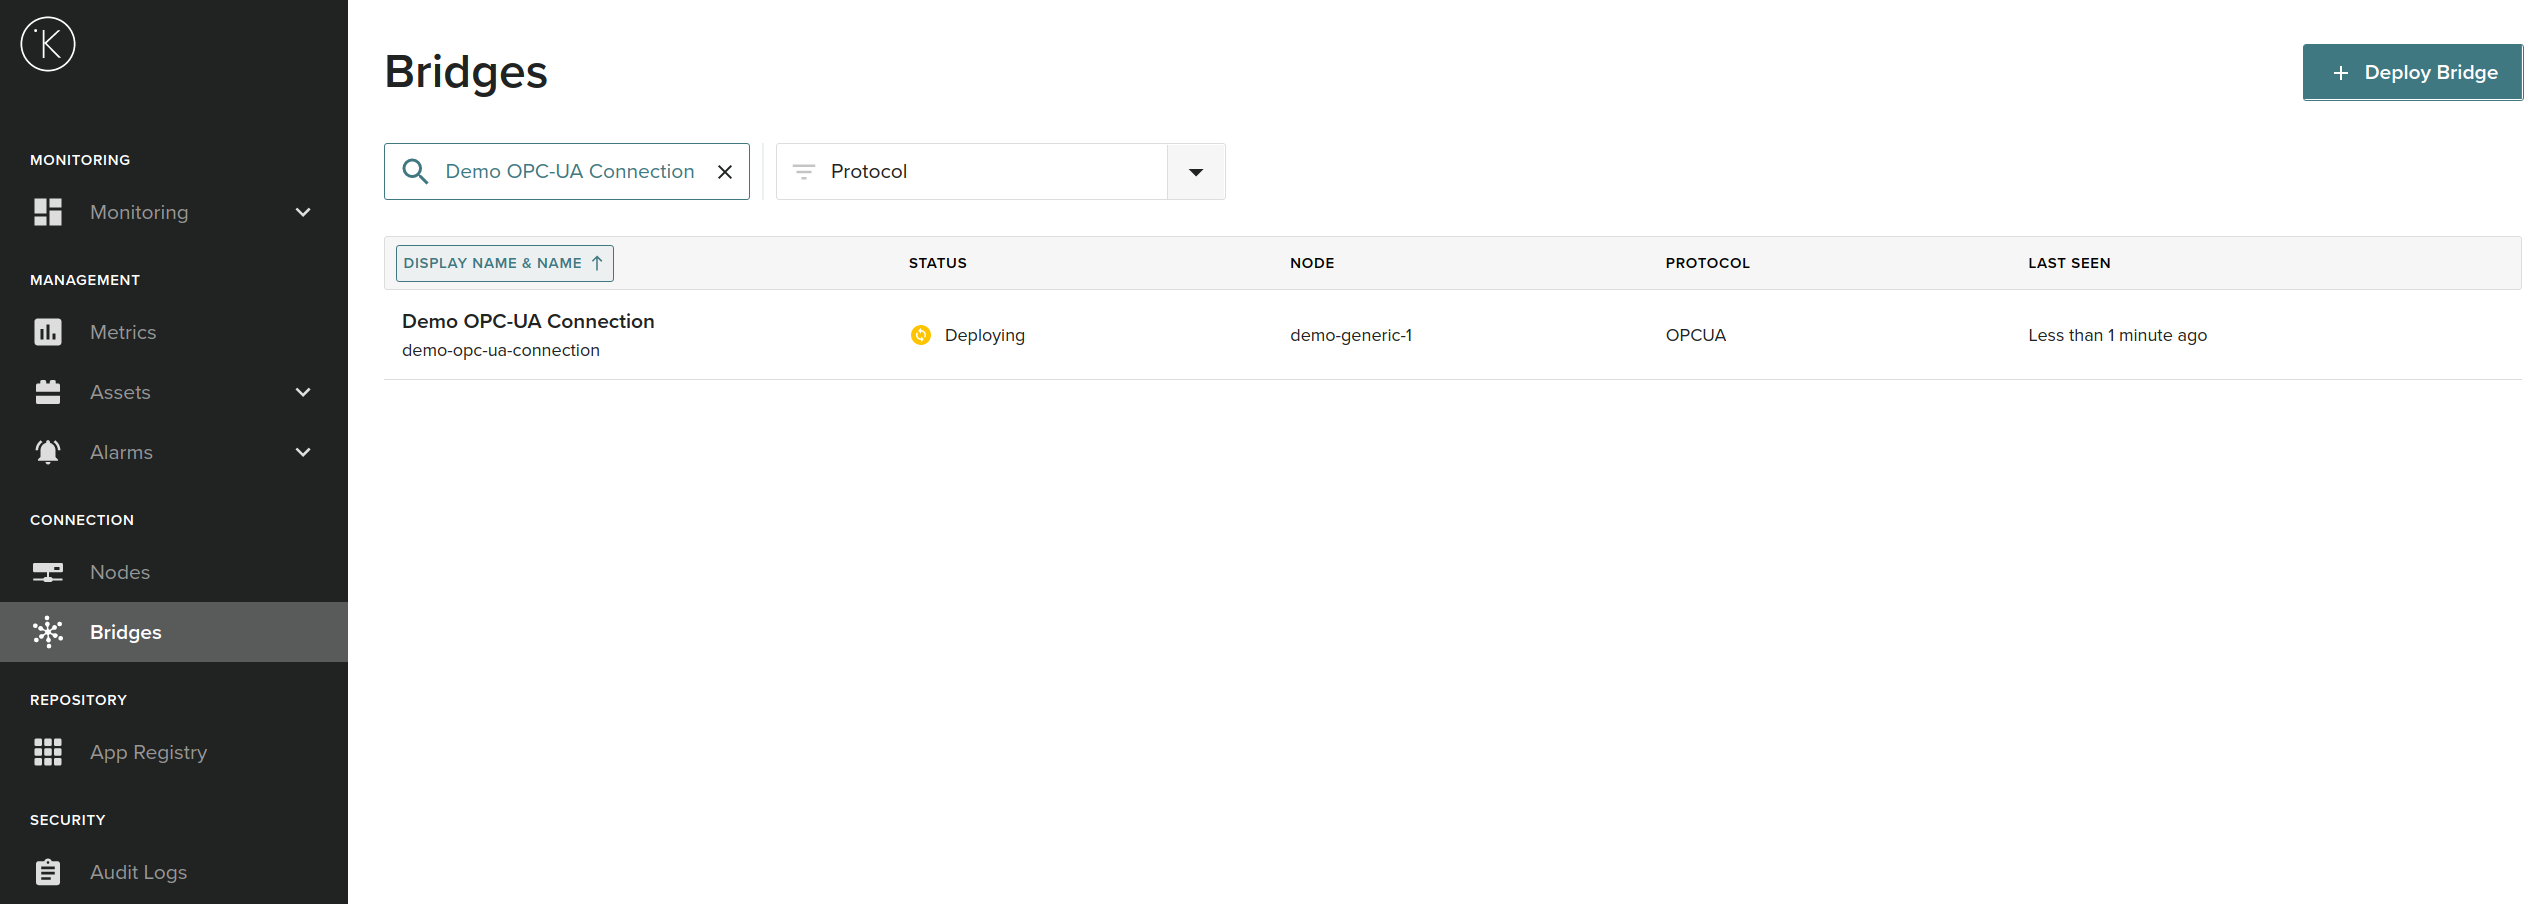
- Deploy the bridge, and the connection will show up in the bridge list right away
Step 5 - Create the application
- Install KICS on your machine (see additional details with Windows installation, Linux & Mac installation):
pip3 install kics==3.8.* -
Check the version of the SDK:
kelvin --version Kelvin SDK 6.2.0 -
Login to the KICS Platform Instance:
kelvin auth login demo.kelvininc.comSuccess
[kelvin.sdk][2021-01-31 20:52:00][I] Resetting KSDK configurations.. [kelvin.sdk][2021-01-31 20:52:00][I] KSDK configurations successfully reset Enter your username: john.doe Enter your password: <type your password> Enter 2 Factor Authentication (2FA) one-time password (blank if not required): [kelvin.sdk][2021-01-31 20:52:30][I] Attempting to log on "demo.kelvininc.com" [kelvin.sdk][2021-01-31 20:52:31][R] Successfully logged on "demo.kelvininc.com" -
Create a new application (pick a unique name):
kelvin app create application-testSuccess
[kelvin.sdk][2020-12-16 17:43:24][I] Creating new application "application-test". [kelvin.sdk][2020-12-16 17:43:24][I] Retrieving the latest schema version. [kelvin.sdk][2020-12-16 17:43:32][R] Successfully created new application: "application-test". Continue its configuration using "studio". Refer to "kelvin studio --help" for more information. -
Go to the application folder:
cd application-test -
You should have the following structure:
└── application-test
    ├── app.yaml
    ├── application_test/
    │   ├── __init__.py
    │   └── application_test.py
    ├── build/
    ├── data/
    ├── datatype
    ├── docs/
    ├── requirements.txt
    ├── setup.py
    └── tests/
        ├── __init__.py
        └── test_application.py
Step 6 - Define the inputs and outputs
- Launch the studio configuration tool to assist with application configuration with the following command:
kelvin studio start --input=app.yaml
Kelvin Studio will be launched
This will launch Kelvin Studio on your default web browser on either of the following addresses:
-
Click on the tab
Application Configuration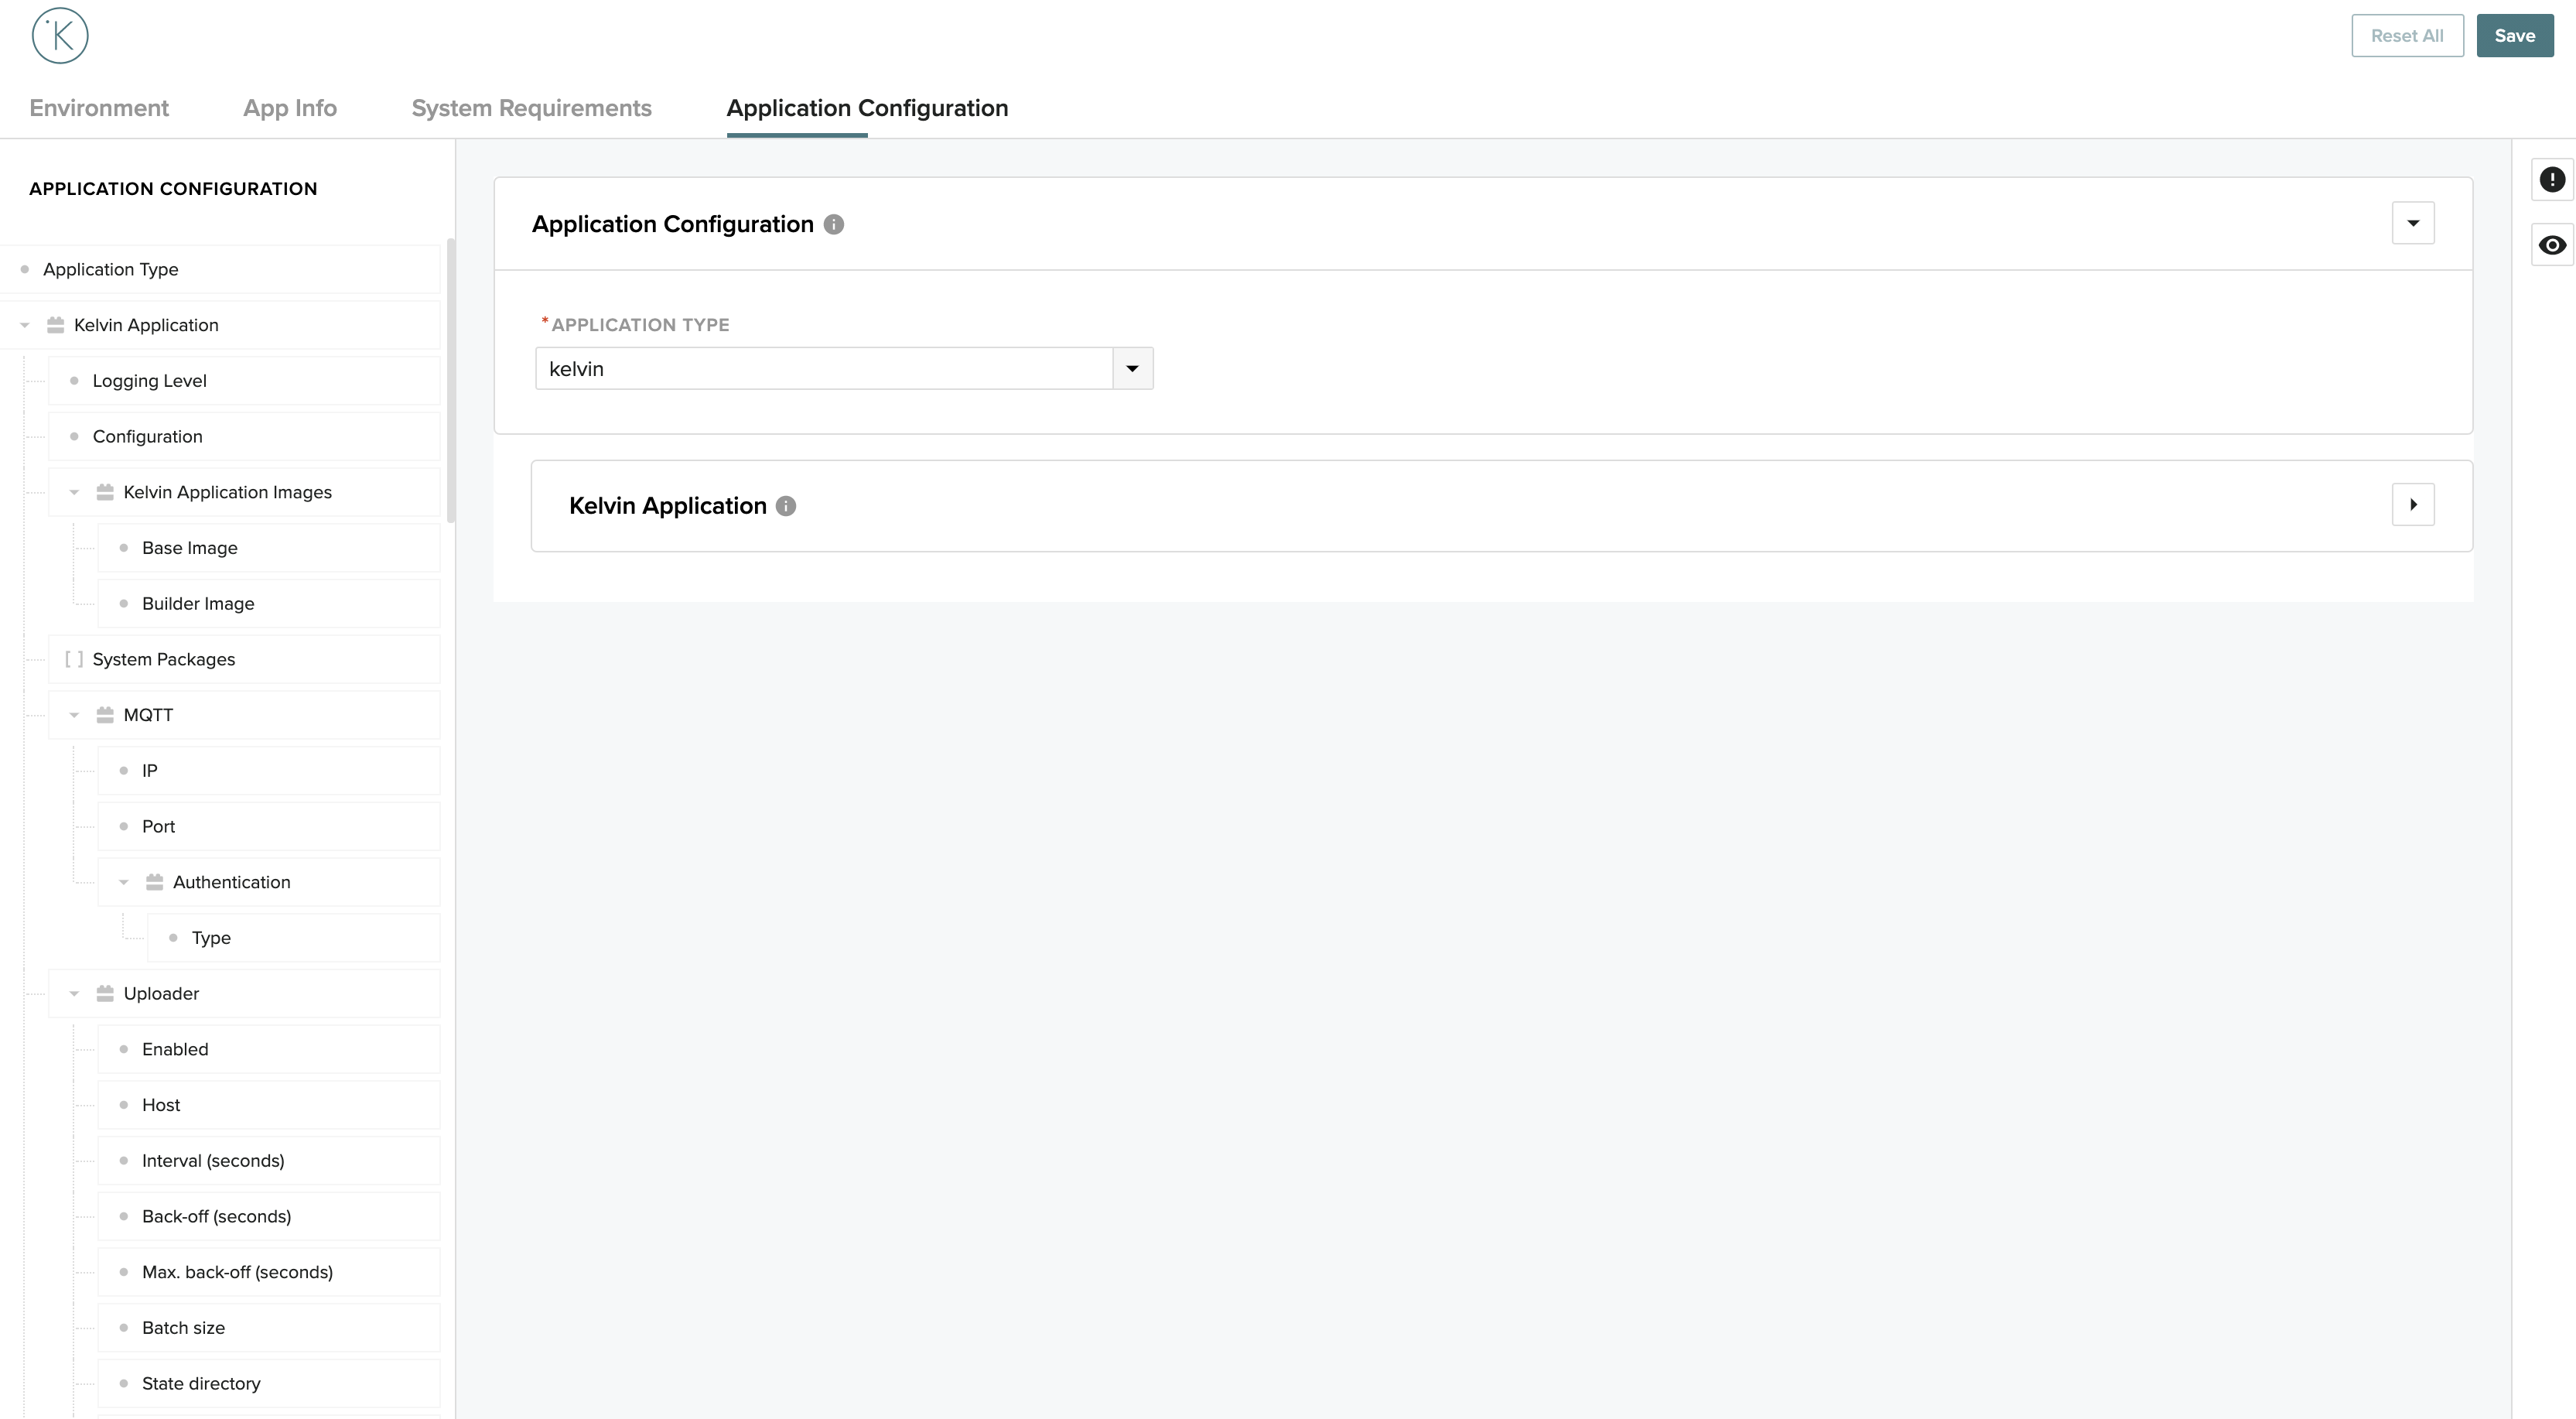
-
Drill down to
Kelvin Application>Inputs.
Add a new Input and call ittemperature. For the datatype let's use the pre-loaded Kelvin data typeraw.float32.
You can learn more about data types here
Tip
To check the available data types, run the command kelvin datatype list.
- Let's now create an Output and call it
temperature_setpoint.
Drill down toKelvin Application>Outputsand use the sameraw.float32data type.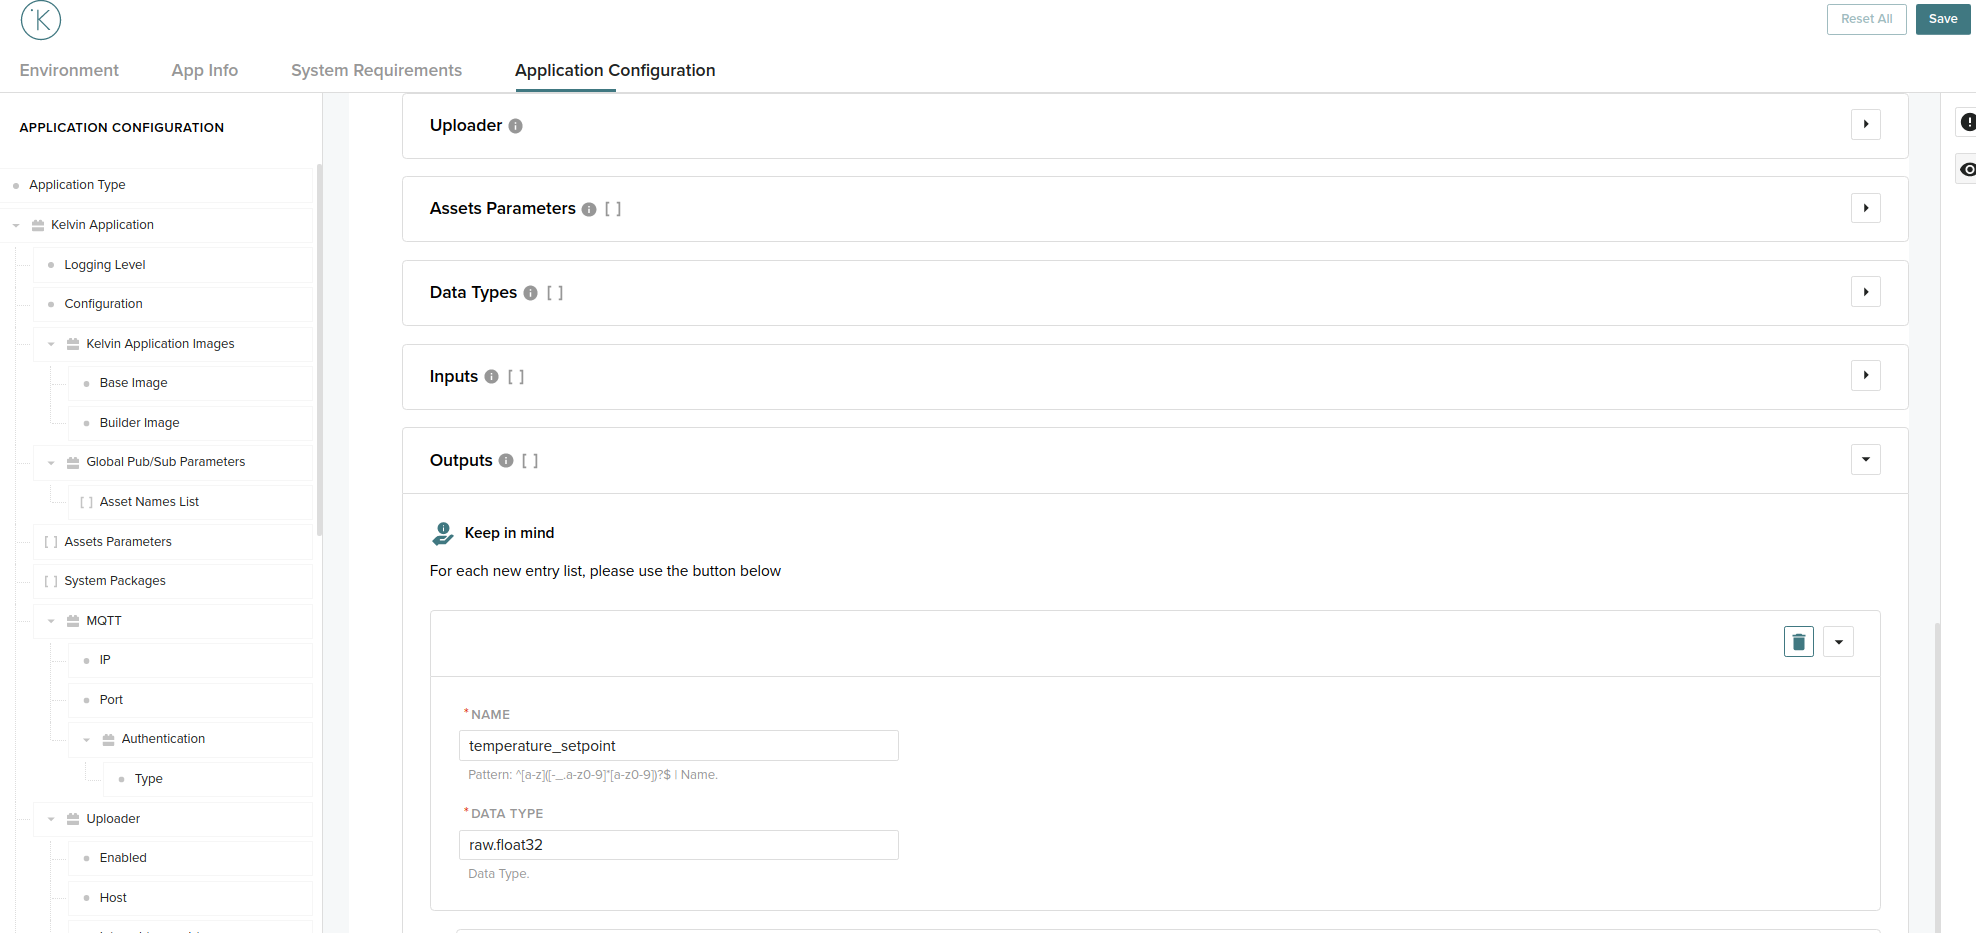
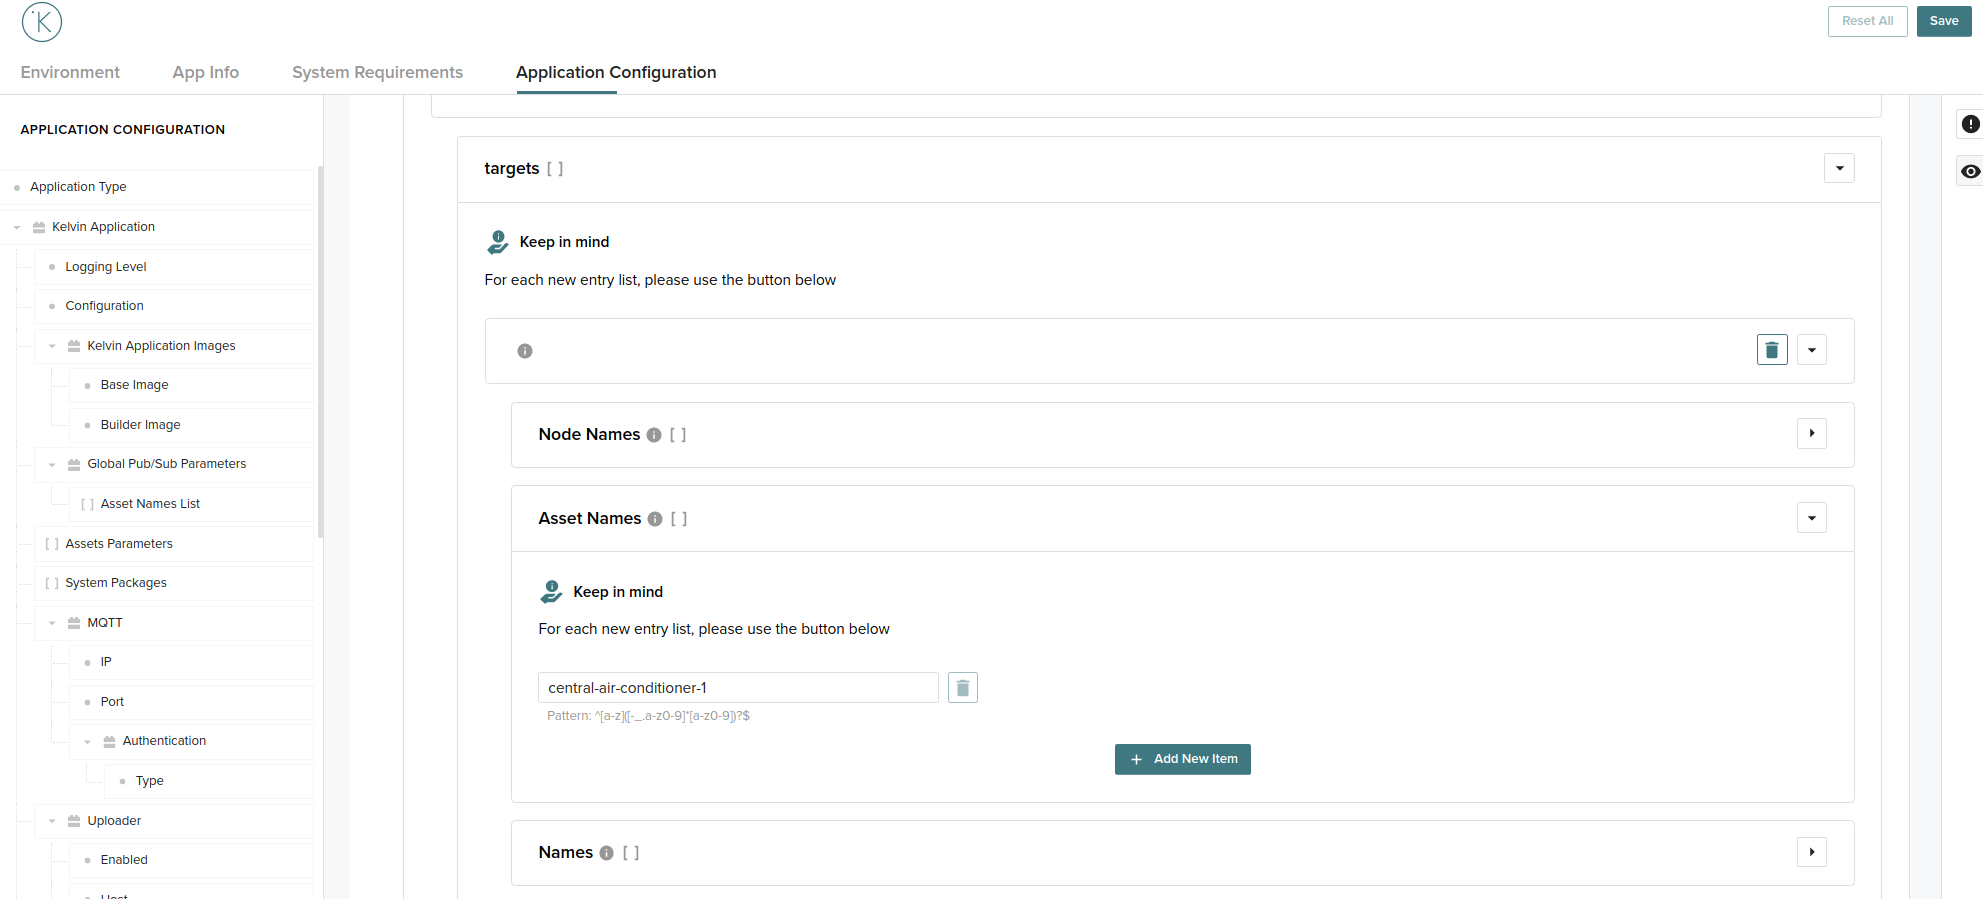
Step 7 - Bind the inputs sources and output targets
Once we have our inputs and outputs defined we need to define which asset, workload and node will they be associated to.
For this exercise, data will be read from the asset central-air-conditioner-1 and the workload demo-opc-ua-connection.
- Starting with
Inputs, add a new item and fill in all the details:
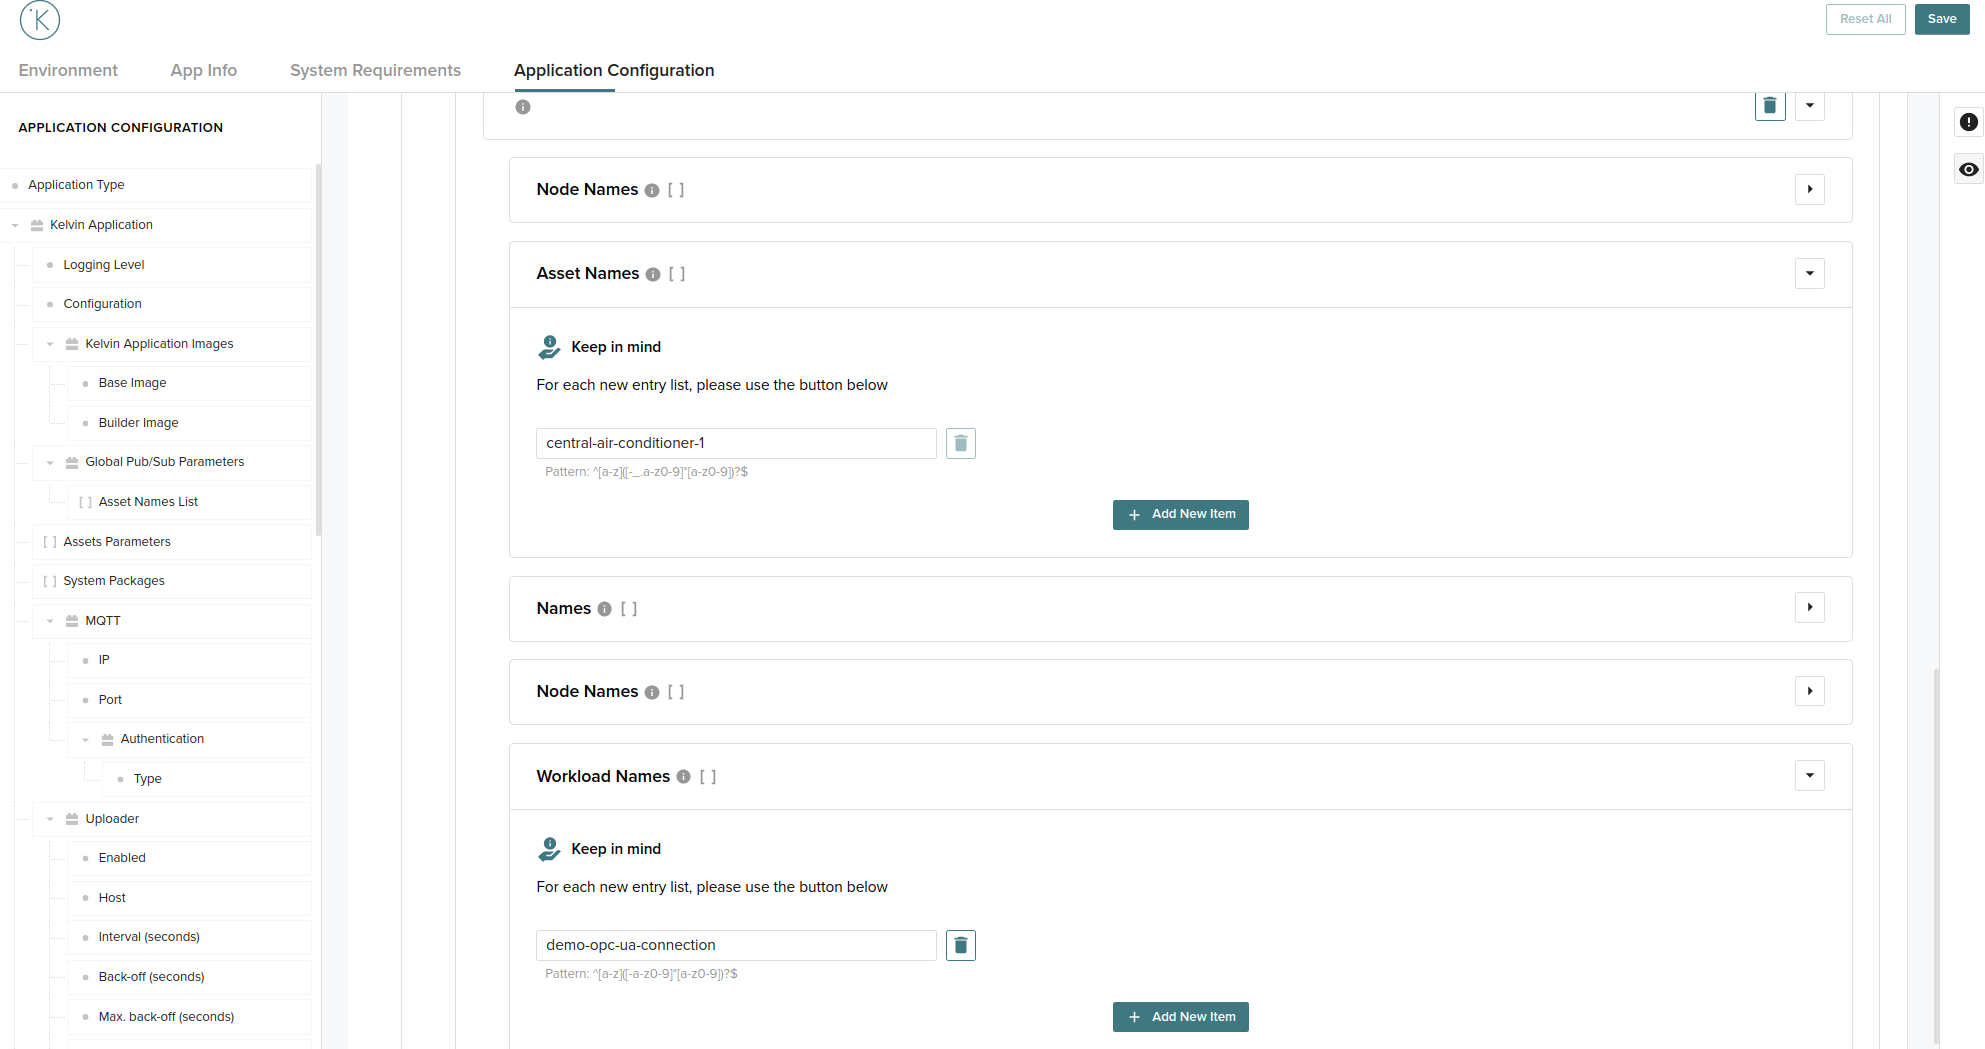
Asset Names central-air-conditioner-1 - The asset(s) to read data from.
Workload Names demo-opc-ua-connection - The source workload, usually the source application name to read data from.
- Similarly, with
Outputs, add a new item and fill in all the details:
Asset Names central-air-conditioner-1 - The asset(s) to write data into.
Step 8 - Save App Configuration file
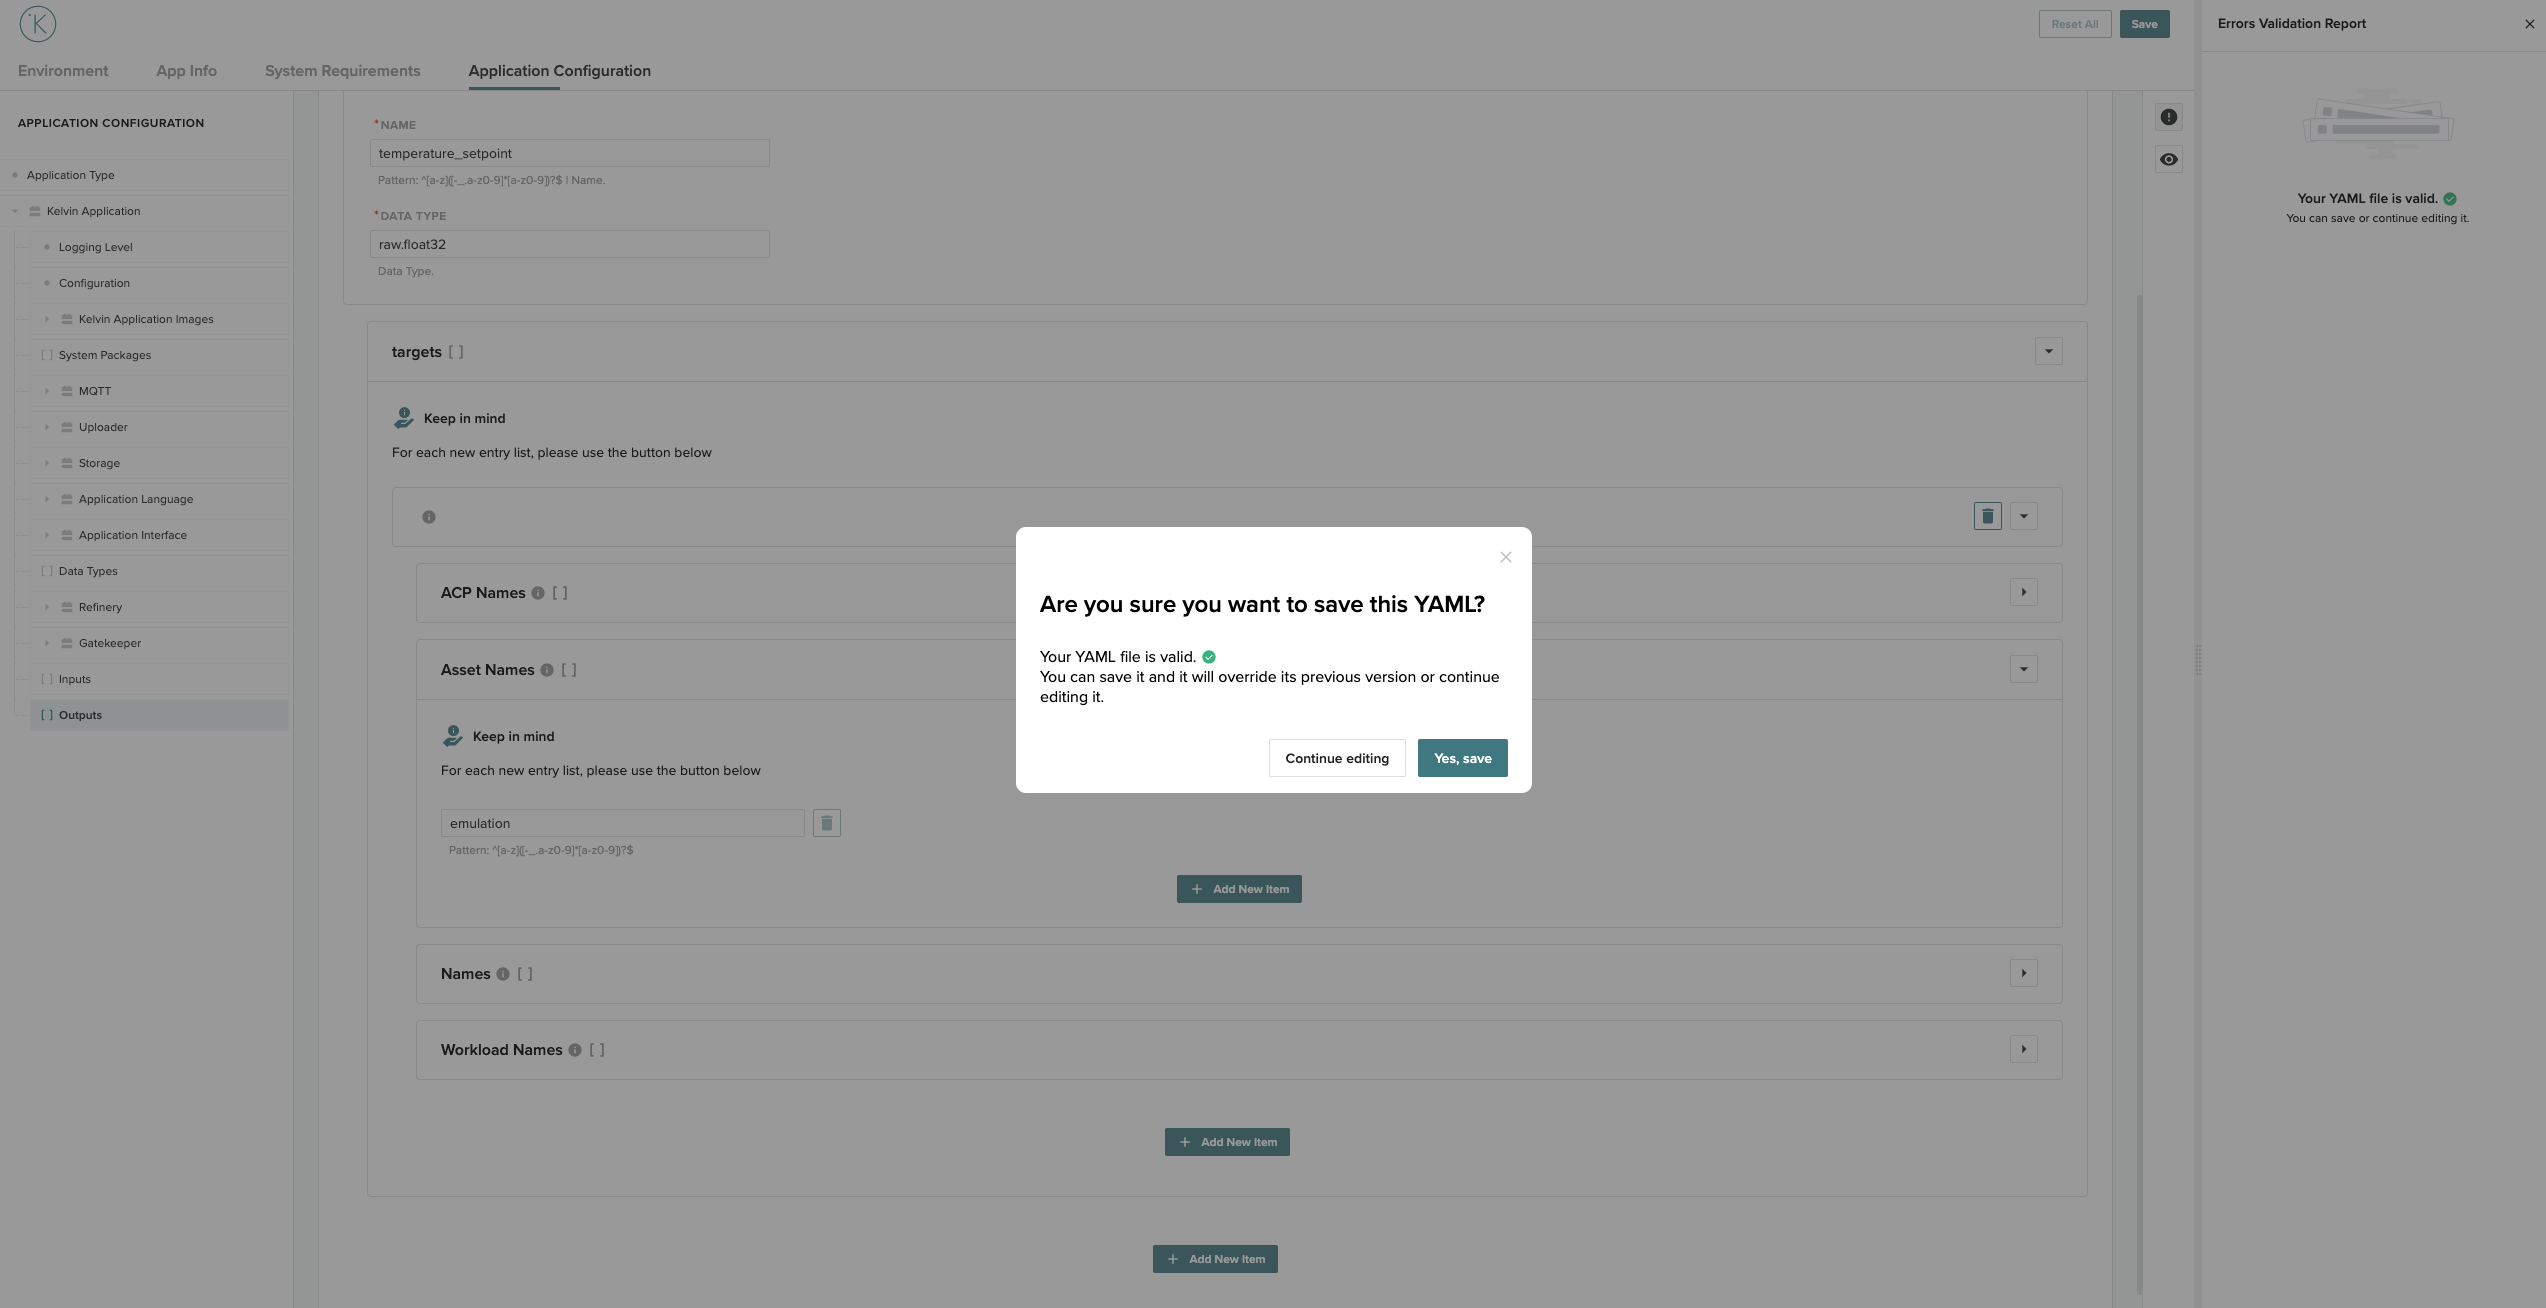
-
Save app.yaml - Hit the save button on the top right corner and you should get a success message.
-
Close the web browser and stop Kelvin Studio using
kelvin studio stop.
Step 9 - Test the application
To test that the data is flowing into the application, add a print statement as seen below:
Open the main application file:
application-test
    ├── application_test
        └── application_test.py
Add the print declaration:
"""
Data Application.
"""

from kelvin.app import DataApplication


class App(DataApplication):
    """Application."""

    def init(self) -> None:
        """
        Initialisation method
        """
        # Custom initialisation logic

    def process(self) -> None:
        print('Input Data: ' + str(self.data))
Build the application from the app top directory:
kelvin app build
Emulate the application with the logs enabled:
kelvin emulation start --show-logs
After the application starts, you should be able to see the temperature being printed:
[kelvin.sdk][2021-01-09 15:53:29][I] Initializing the emulation system.
[kelvin.sdk][2021-01-09 15:53:29][I] Emulation system is running.
[kelvin.sdk][2021-01-09 15:53:29][I] Loading configuration and starting the application
....
Input Data: <data>(temperature=<Float32>(value=72.0904))
Input Data: <data>(temperature=<Float32>(value=72.0452))
Input Data: <data>(temperature=<Float32>(value=72.0))
...
kelvin emulation stop inside the folder.
Step 10 - Add control logic to the application
In this step we are going to add simple control logic to the application.
To keep it simple, we are going to check the temperature data and respond to high temperatures. If the temperature goes above 150 we will move the temperature setpoint to 100.
The application runs on the stream of data, so we will use the method process to look into every data chunk flowing into the app.
- Let's get to it and update our application to reflect that logic:
"""
Data Application.
"""

from kelvin.app import DataApplication
from kelvin.message.raw import Float32


class App(DataApplication):
    """Application."""

    def init(self) -> None:
        """
        Initialisation method
        """
        # Custom initialisation logic

    def process(self) -> None:
        # 1 - get the data message for temperature data
        temperature = self.data.get('temperature')
        # 2 - make sure that the data message exists
        if temperature is not None:
            # 2.1 - If the temperature goes above 150
            if temperature > 150:
                # 2.2 - Create a Float32 message object for the temperature_setpoint that was defined as raw.float32
                # set the value to 100
                message = self.make_message(
                    "raw.float32",
                    name="temperature_setpoint",
                    value=100,
                    emit=False
                )
                # 2.3 - Emit the message
                self.emit(message)
                print("Control change pushed")
-
Now try to emulate the application with the logs enabled. Using an OPC-UA client, move the temperature setpoint to a value above 150.
You can use any OPC-UA client to execute the change in your server, for this example we are using the following: https://github.com/FreeOpcUa/opcua-client-guikelvin emulation start --show-logs -
Check the logs of your application once the temperature goes above 150. You should see the following log entries:
[kelvin.sdk][2021-01-10 11:48:43][I] Initializing the emulation system.
[kelvin.sdk][2021-01-10 11:48:43][I] Emulation system is running.
[kelvin.sdk][2021-01-10 11:48:43][I] Loading configuration and starting the application
[kelvin.sdk][2021-01-10 11:48:43][I] Starting application "application-test:1.0.0"
...
Temperature is above 150
Control change pushed
...
Step 11 - Upload the application to the App Registry
-
To upload the application to the App Registry, run the following command from the application folder:
kelvin appregistry upload -
The outputs of successful app upload should look similar to the following:
Uploading an app for the first time can take a couple of minutes to complete. Application updates will not take as much time since only changes are uploaded.[kelvin.sdk][2021-07-15 16:36:36][I] Uploading application from path: "/path/to/application-test" [kelvin.sdk][2021-07-15 16:36:40][I] Assessing basic application info.. [kelvin.sdk][2021-07-15 16:36:40][I] Valid schema available locally. Using cached version (/root/path/.config/kelvin/schemas/2.0.0.json) [kelvin.sdk][2021-07-15 16:36:43][I] Building "Kelvin type" application "application-test" [kelvin.sdk][2021-07-15 16:36:43][I] Processing application data types.. [kelvin.sdk][2021-07-15 16:36:43][I] Loading all data type files from directory "/root/path/.config/kelvin/datatypes" [kelvin.sdk][2021-07-15 16:36:43][R] 13 data types loaded from directory "/root/path/.config/kelvin/datatypes" [kelvin.sdk][2021-07-15 16:36:43][I] Retrieving data types for "application-test" [kelvin.sdk][2021-07-15 16:36:44][I] Downloading data type "raw.float32:2.0.0" [kelvin.sdk][2021-07-15 16:36:44][R] Data type "raw.float32:2.0.0" successfully downloaded to "/path/to/application-test/build/datatype/raw_float32__2-0-0.yml" [kelvin.sdk][2021-07-15 16:36:46][R] Successfully logged on registry "demo.kelvininc.com:5000" [kelvin.sdk][2021-07-15 16:36:46][I] Pulling "demo.kelvininc.com:5000/kelvin-core-python:7.0.0" from "demo.kelvininc.com" [elapsed: 00:35] - [Layer: 11968f9526cb] - [Pushed] [elapsed: 00:35] - [Layer: f95baba9cd33] - [Pushed] [elapsed: 00:35] - [Layer: c3c833c280e4] - [Pushed] [elapsed: 00:35] - [Layer: 9648aded042d] - [Pushed] [elapsed: 00:35] - [Layer: e162b3c2d6ad] - [Pushed] [elapsed: 00:35] - [Layer: 15c7daf2fa04] - [Pushed] [elapsed: 00:35] - [Layer: bcf0a5ddf9f1] - [Pushed] [elapsed: 00:35] - [Layer: aab8a11eb4c8] - [Pushed] [elapsed: 00:35] - [Layer: 69fa8cc7a52f] - [Pushed] [elapsed: 00:35] - [Layer: fe6d8881187d] - [Pushed] [elapsed: 00:35] - [Layer: 23135df75b44] - [Pushed] [elapsed: 00:35] - [Layer: b43408d5f11b] - [Pushed] [kelvin.sdk][2021-07-15 16:37:14][R] Successfully pulled "demo.kelvininc.com:5000/kelvin-core-python:7.0.0" from "demo.kelvininc.com" [kelvin.sdk][2021-07-15 16:37:14][I] Pulling "demo.kelvininc.com:5000/data-model-builder:6.0.1-081bf89" from "demo.kelvininc.com" [elapsed: 00:00] - [Layer: 6.0.1-081bf89] [Pending..] [kelvin.sdk][2021-07-15 16:37:15][R] Successfully pulled "demo.kelvininc.com:5000/data-model-builder:6.0.0" from "demo.kelvininc.com" [kelvin.sdk][2021-07-15 16:37:15][I] Building new image for "application-test:1.0.0". Please wait.. [kelvin.sdk][2021-07-15 16:39:10][R] Image successfully built: "application-test:1.0.0" [kelvin.sdk][2021-07-15 16:39:11][I] Pushing application content to "demo.kelvininc.com:5000" [kelvin.sdk][2021-01-10 12:08:04][R] Application successfully uploaded: Name: application-test Version: 1.0.0 To deploy this application version, run the following command: kelvin workload deploy --app-name application-test --app-version 1.0.0 -
Confirm the application is shown in Control Center in the
App Registrylist:
Step 12 - Deploy the application to the provisioned Node
-
Login to the Control Center and go to the Nodes section and find your Node
-
Click Deploy Application and search for your application
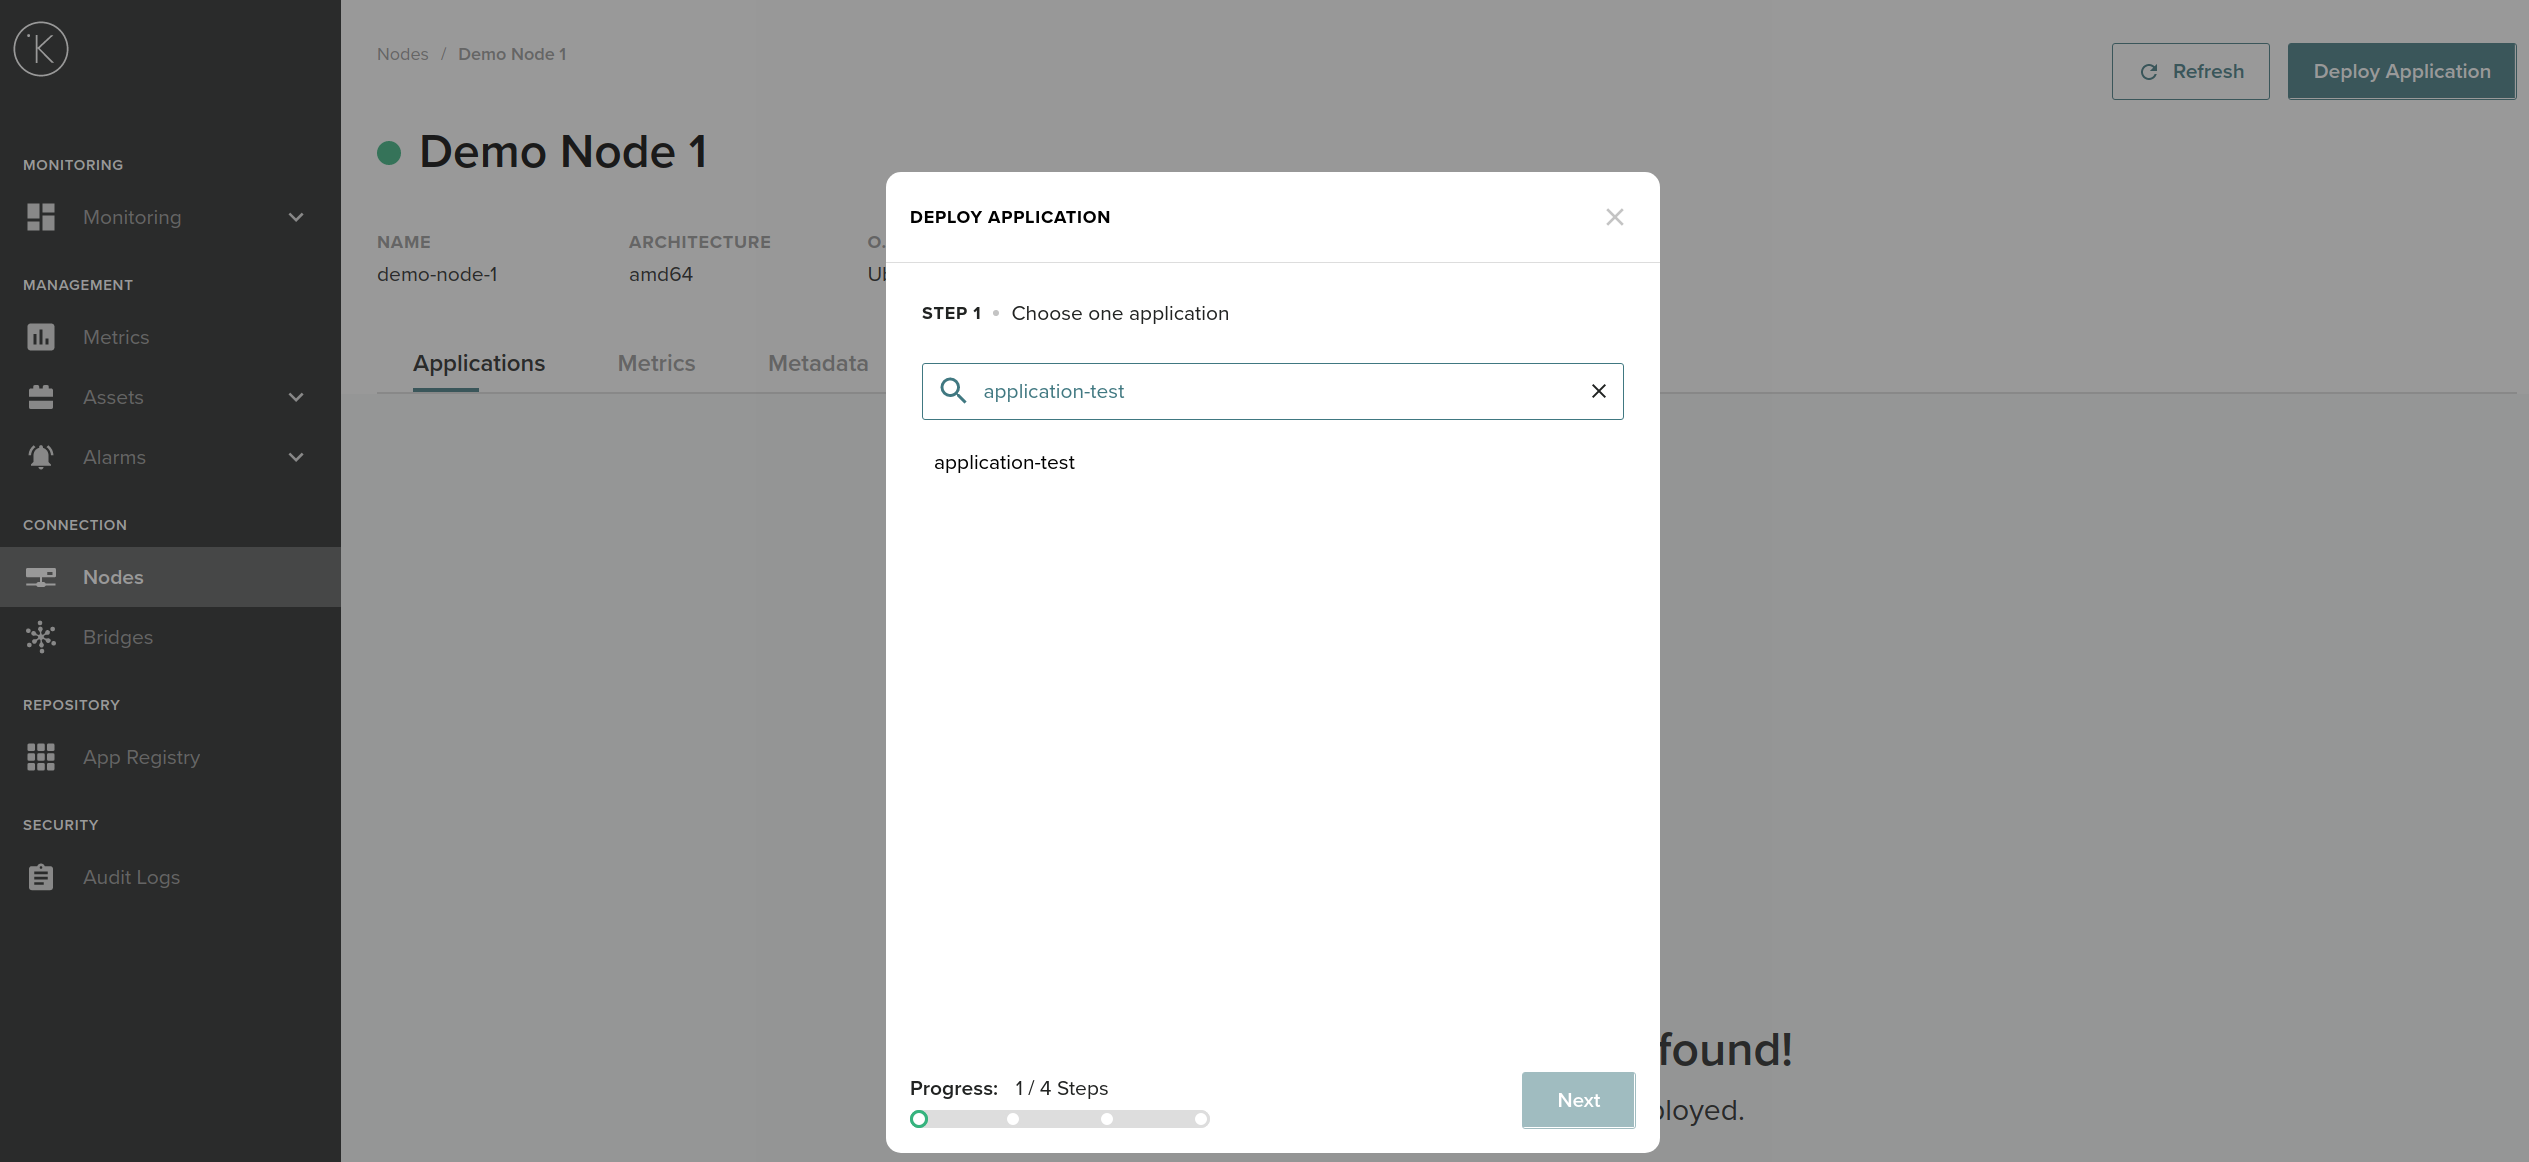
-
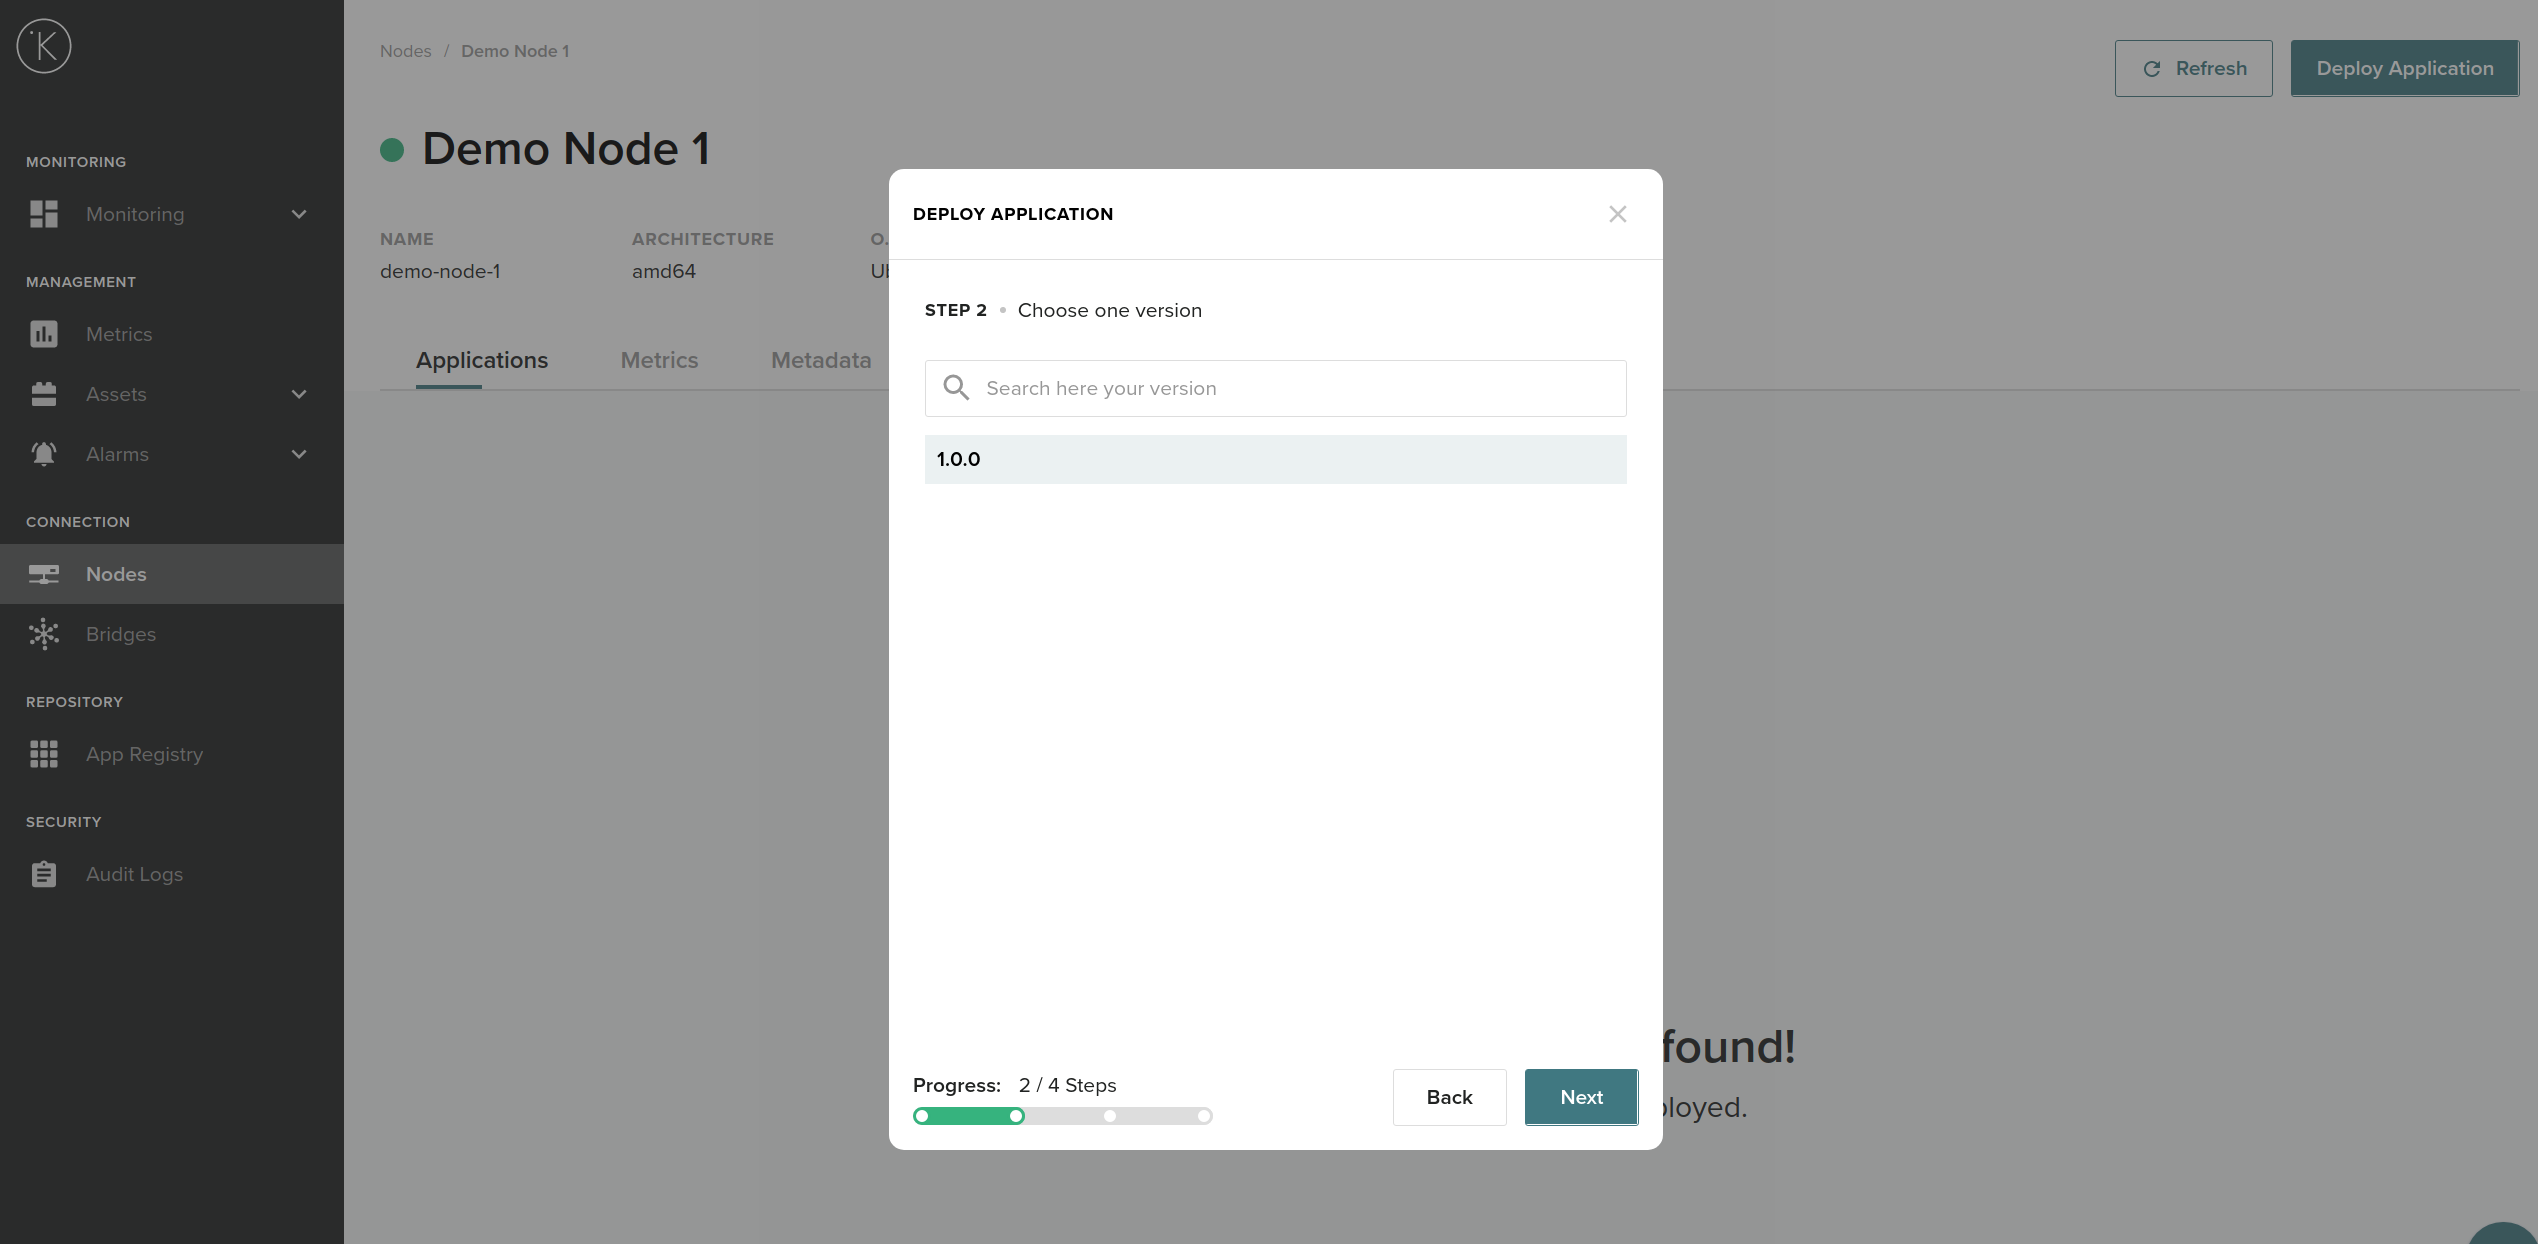
Choose the application version
-
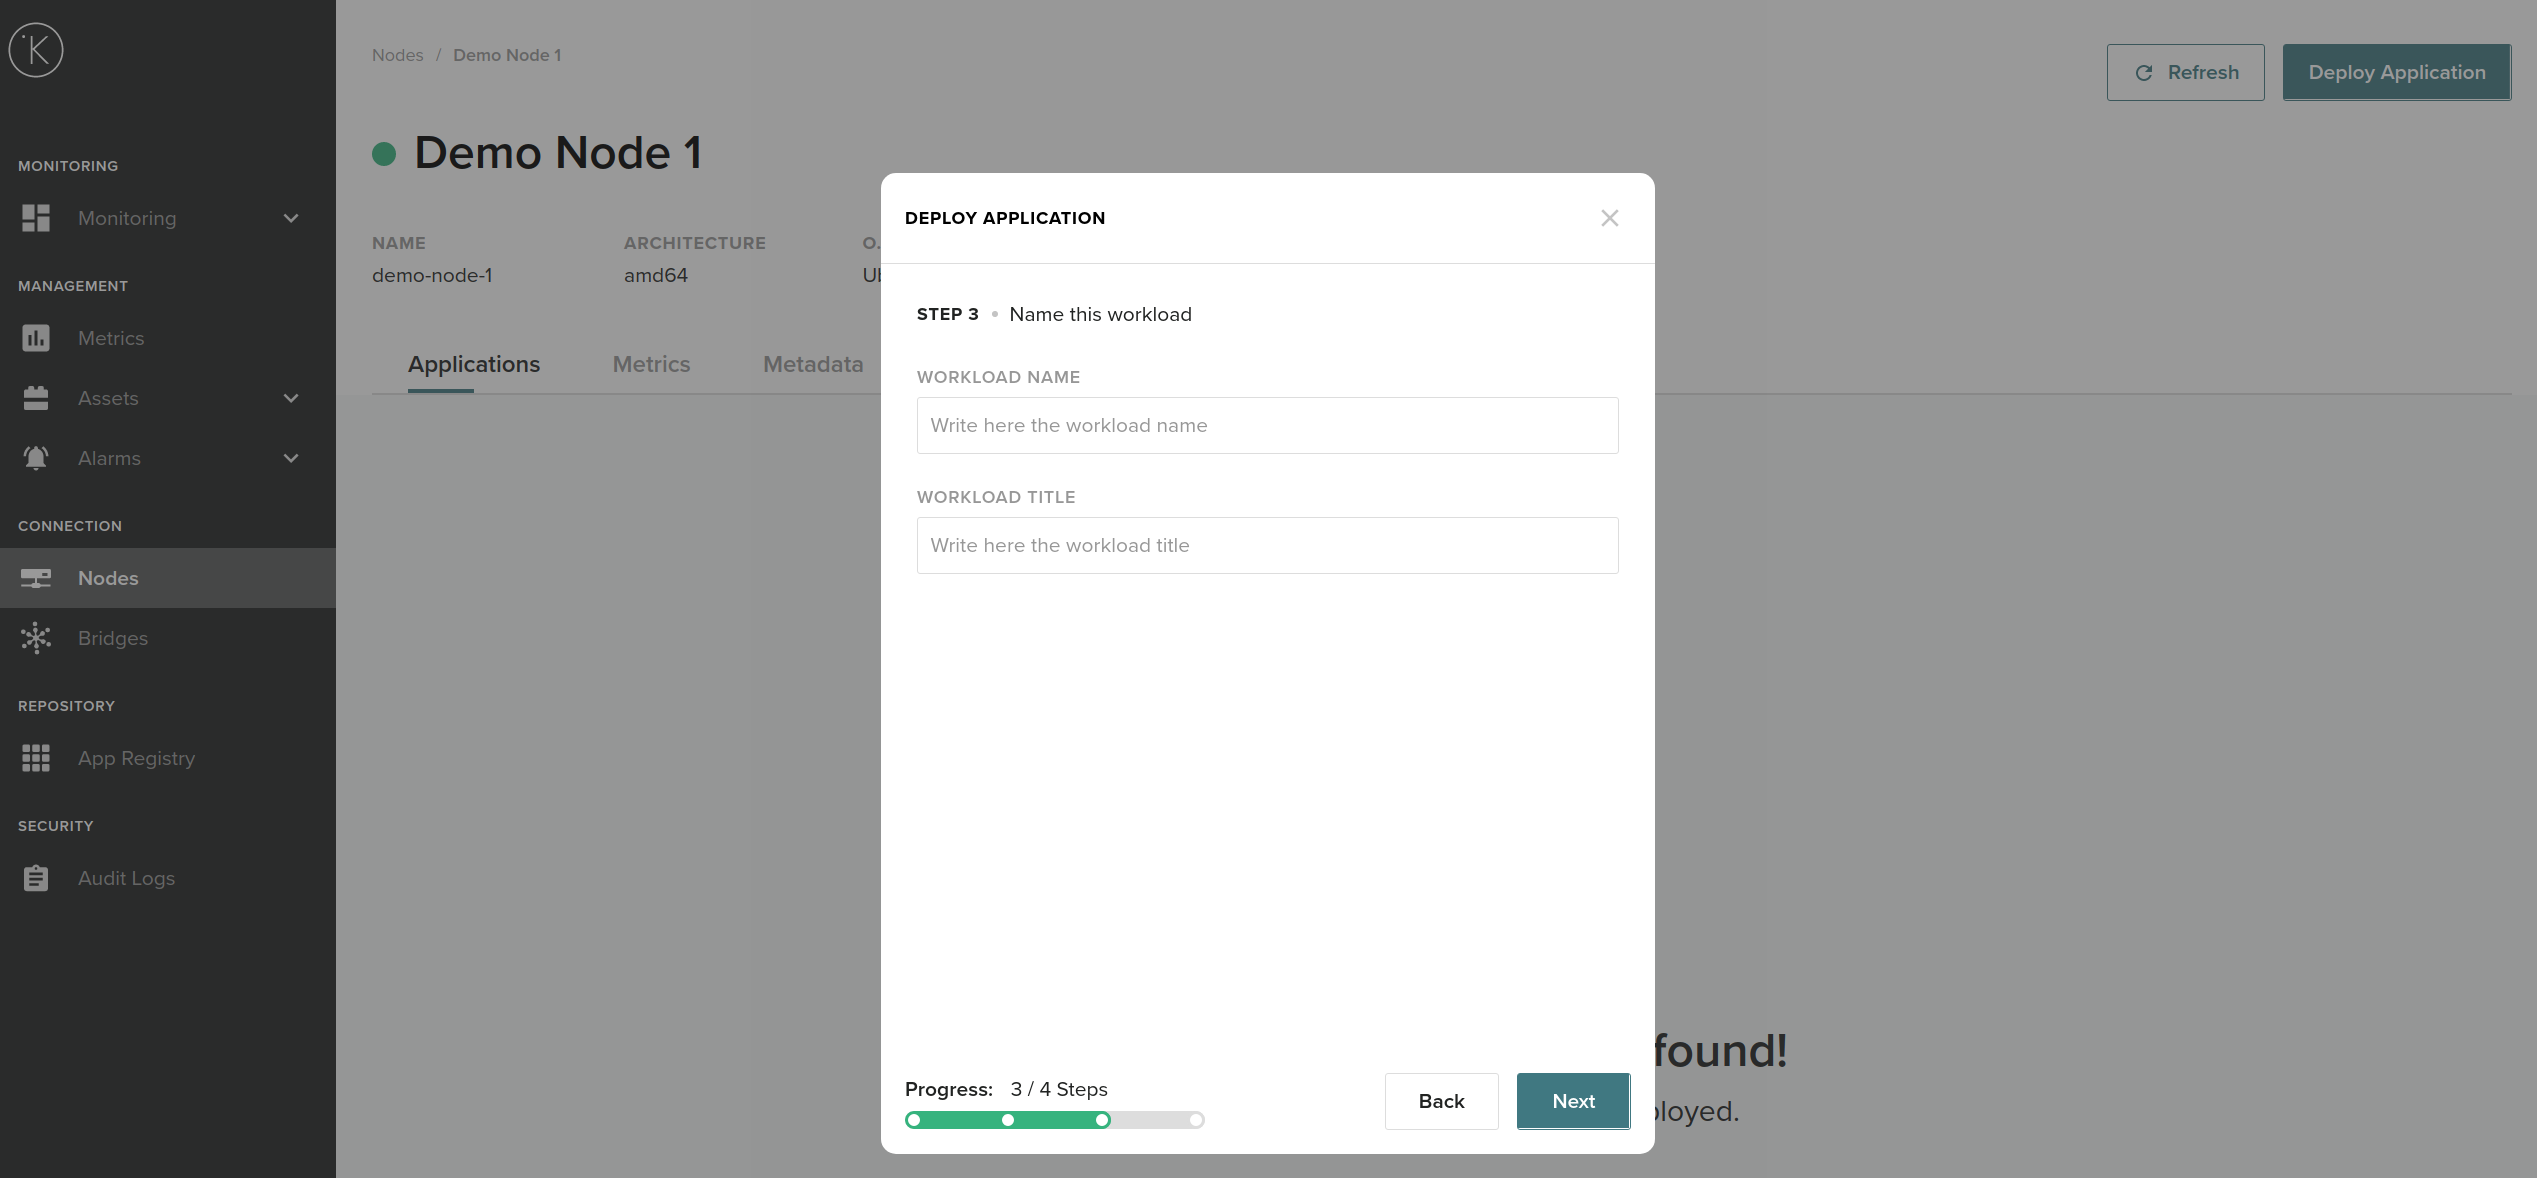
Choose the name and the title for the instance of the application (if you leave it blank the platform will auto-generate one)
-
Confirm the configuration (should be the same as the one you generated from kelvin studio)
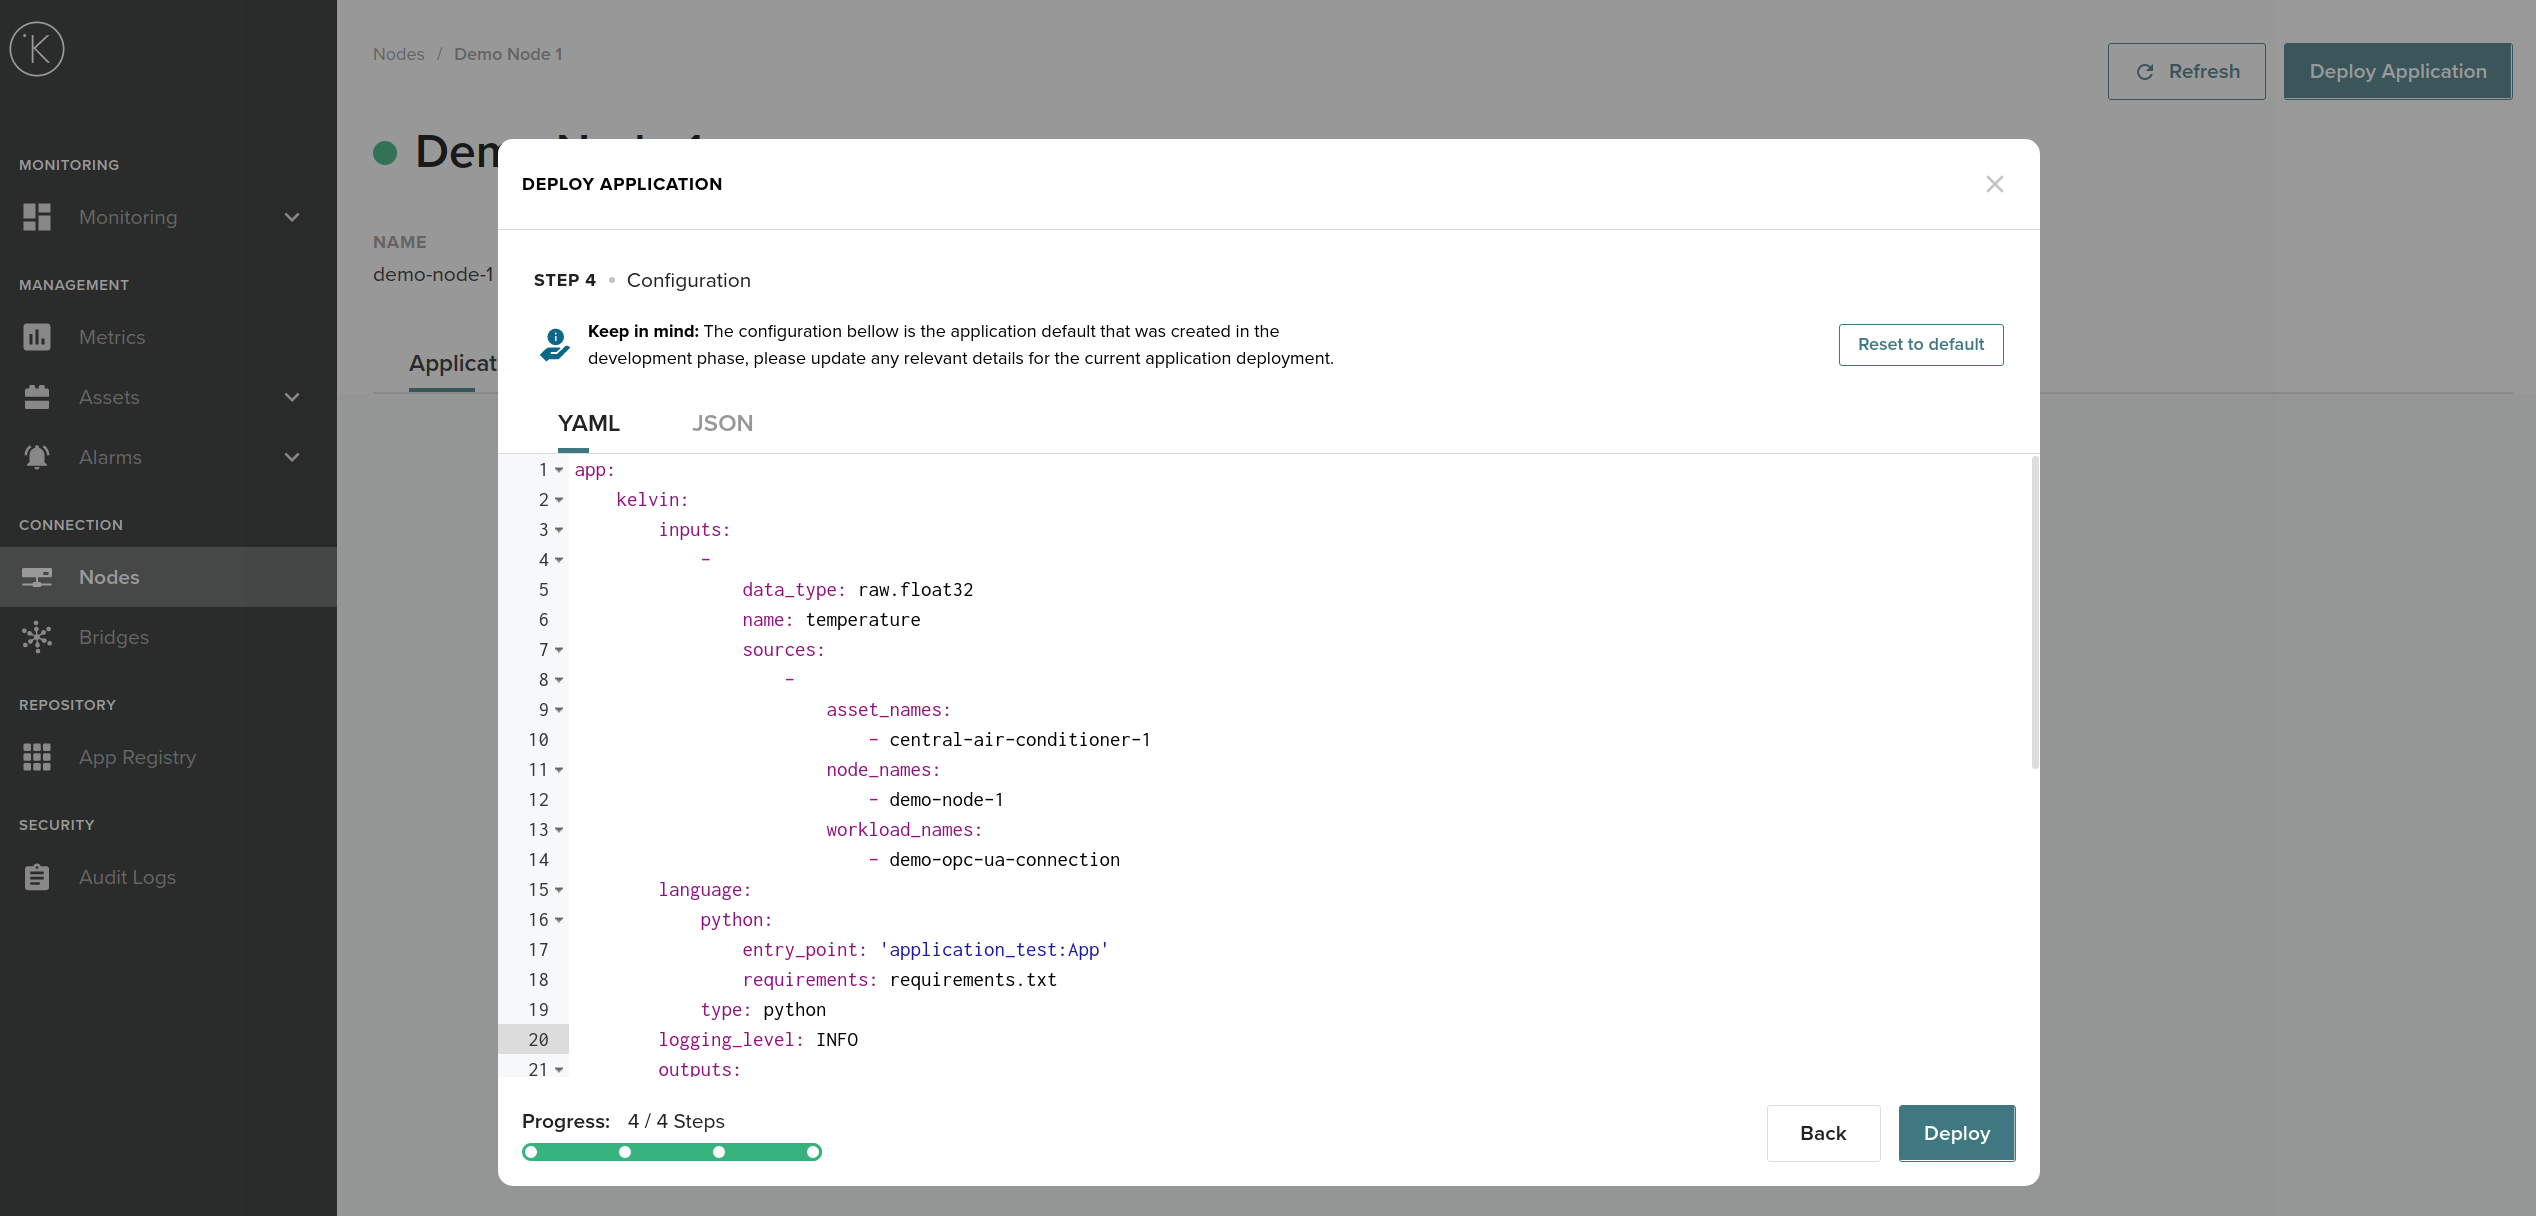 In this step is where you can change to another OPC-UA server endpoint and the tags' names depending which system your application is going to control
 -
Click Deploy and Confirm. The application instance on your Node should be in the list in the
DEPLOYINGstate, and then transition toRUNNINGafter a couple of seconds: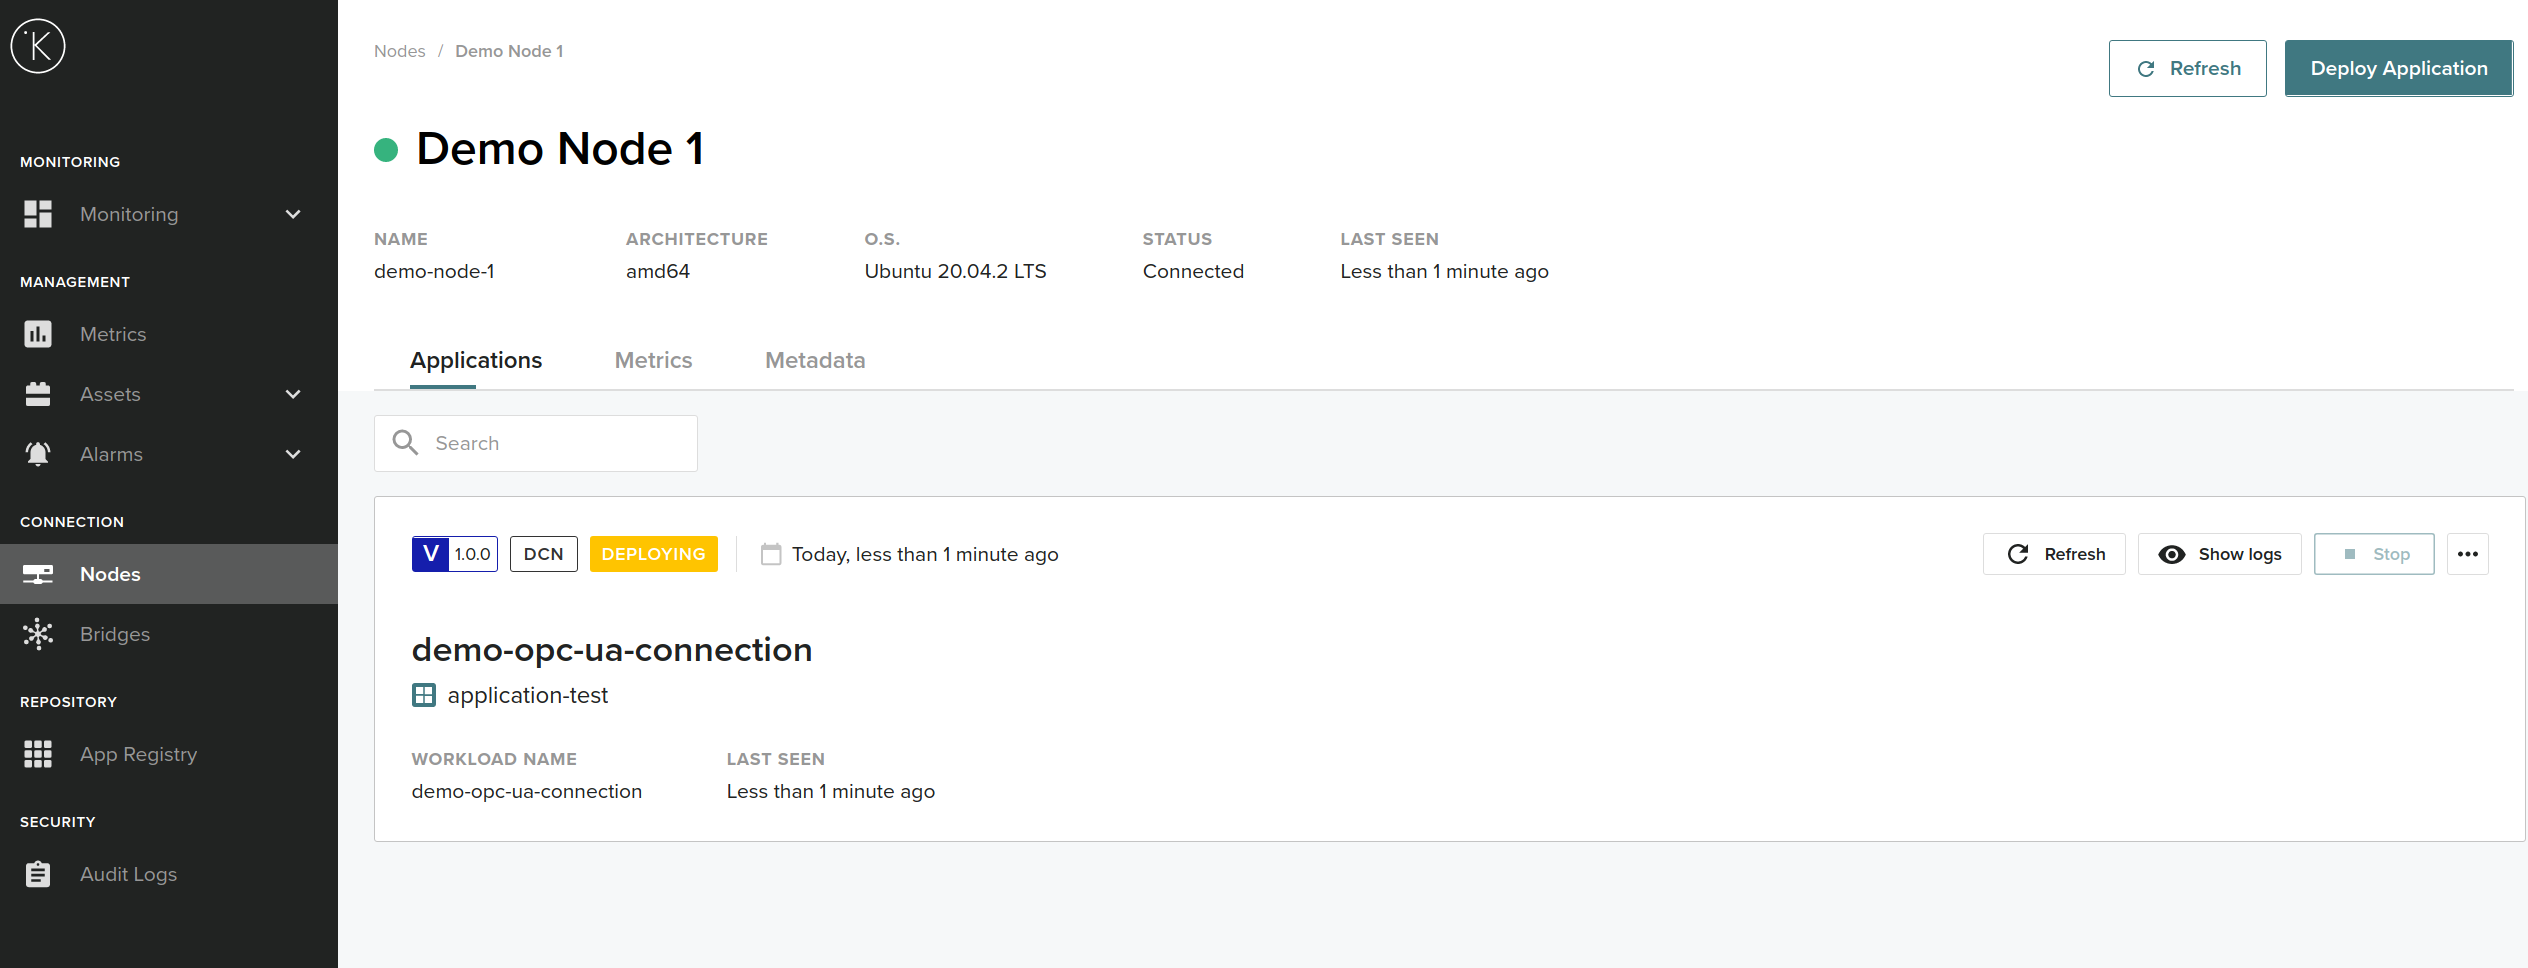
Deploying 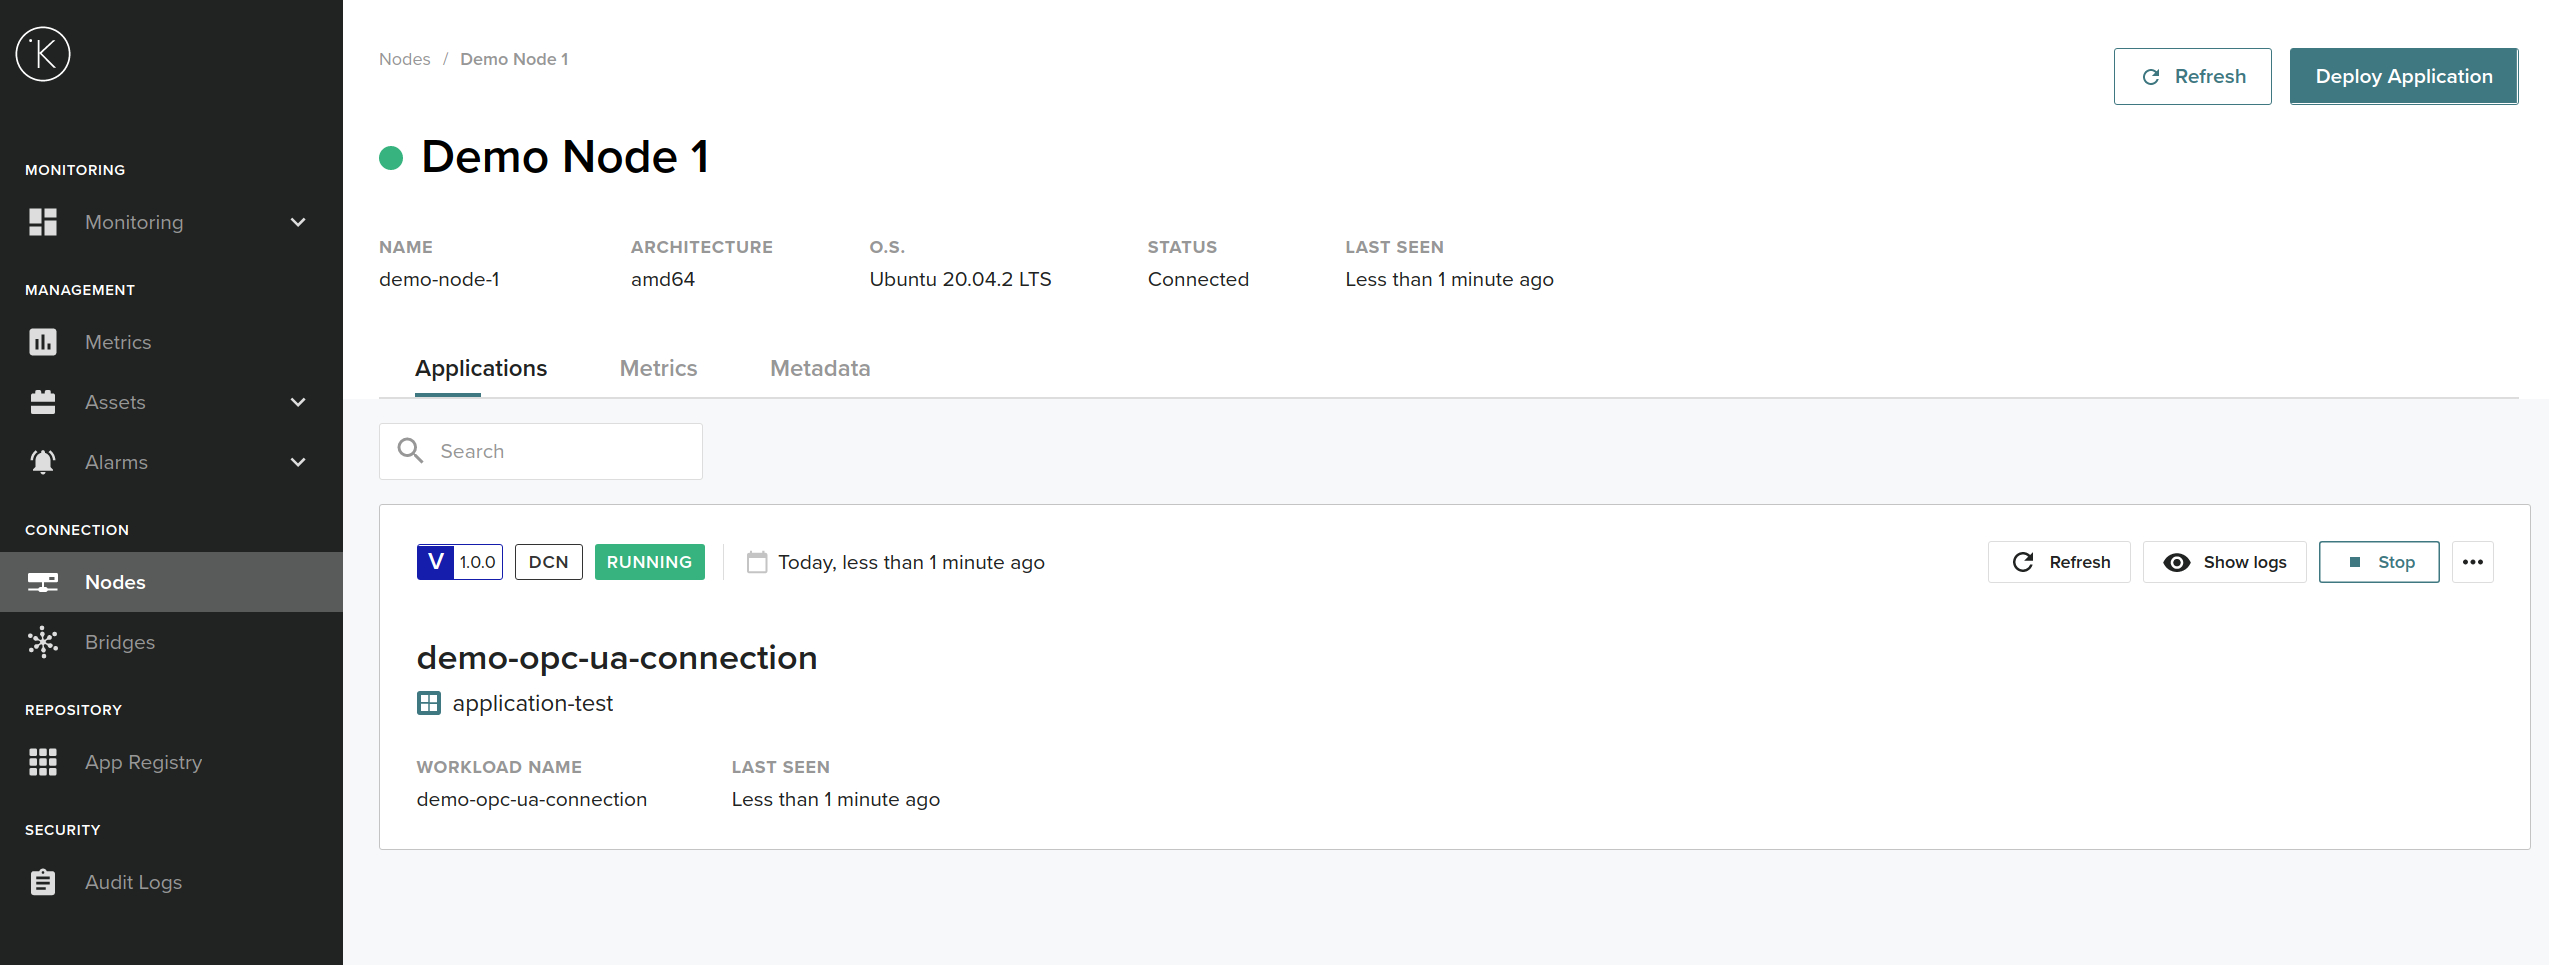
Running
Finish
Congratulations!!  You just finished the Getting Started Guide.
If you would like to find more information about KICS and application development process, please go to the Documentation section.
If you have any questions, please refer to our Support page