Cluster Management - How To
Installation
You can use you own kubernetes cluster or let Kelvin install a k3s cluster onto a bare metal VM or physical machine.
If you let kelvin do the k3s installation, then you will also have the kelvin-provision tools on the VM/machine to perform many operations locally from the command line.
You can install Kelvin on many different flavors of kubernetes. Here we walk you through k3s and three others.
- Let Kelvin install k3s on a bare metal VM/machine
- Install Kelvin on a standard kuberenetes cluster
- Install Kelvin on a AWS EKS cluster
- Install Kelvin on a Azure AKS cluster
Set the Default Cluster
For each Instance you can set one default cluster. The default cluster will be used for any Kelvin SmartApps™ deployments.
| Field | Description |
|---|---|
| cluster | The name of the default Cluster for Kelvin SmartApps™ deployment. The ., _ and - characters are also allowed to separate words instead of a space but not at the beginning or end). |
| max_resources | The maximum number of Assets that can be assigned to each Workload. When the max number is reached, a new workload will be automatically deployed for Kelvin SmartApps™ and the new Assets. |
This can not be set in the Kelvin UI.
curl -X 'POST' \
'https://<url.kelvin.ai>/api/v4/instance/settings/app-manager-planner-rules/update' \
-H 'Authorization: Bearer <Your Current Token>' \
-H 'accept: application/json' \
-H 'Content-Type: application/json' \
-d '{
"payload": {
  "cluster": "aws-cluster",
  "max_resources": 1
  }
}'
from kelvin.api.client import Client

# Login
client = Client(config={"url": "https://<url.kelvin.ai>", "username": "<your_username>"})
client.login(password="<your_password>")

# Set or Update the Default Cluster in an Instance
response = client.instance.update_instance_settings_app_manager_planner_rules(data={
  "payload": {
    "cluster": "aws-cluster",
    "max_resources": 16
  }
})

print(f'Updated planner rules with default cluster {response.payload.cluster} with a maximum resource limit of {response.payload.max_resources}')
You will receive an output like this;
Updated planner rules with default cluster aws-cluster with a maximum resource limit of 16
Upgrading Clusters
There are three areas of a Cluster than need to be upgraded when new versions are released.
- The Kubernetes cluster software
- The custom Kelvin pods
- Kelvin SmartApps™ and Connections deployed to a Cluster
1. Kubernetes Cluster Upgrades
If you choose the option that Kelvin installs the Kubernetes cluster, Kelvin installs a customized K3s installation. The K3s can manage its own upgrades using the system-upgrade-controller.
If you choose to use your own Kubernetes cluster, then you should refer to its documentation on how to manage the updates.
2. Custom Kelvin Pod Upgrades
All Nodes in a Cluster have Kelvin specific pods running behind the scenes managing all the Kelvin related services.
From time to time these will need to be upgraded with the latest versions for both new features and for security updates. You can apply these upgrades automatically or manually.
Automatic Upgrades
Automatic upgrades will check for new versions at regular intervals and upgrade when new versions are available.
You can turn on and manage the frequency of upgrades from Kelvin UI.
From Orchestration menu click on a single Cluster, then under the Configuration tab you can set or disable the auto update feature and the frequency to check for updates.
Remember to click save after changing any settings otherwise you will lose those changes.
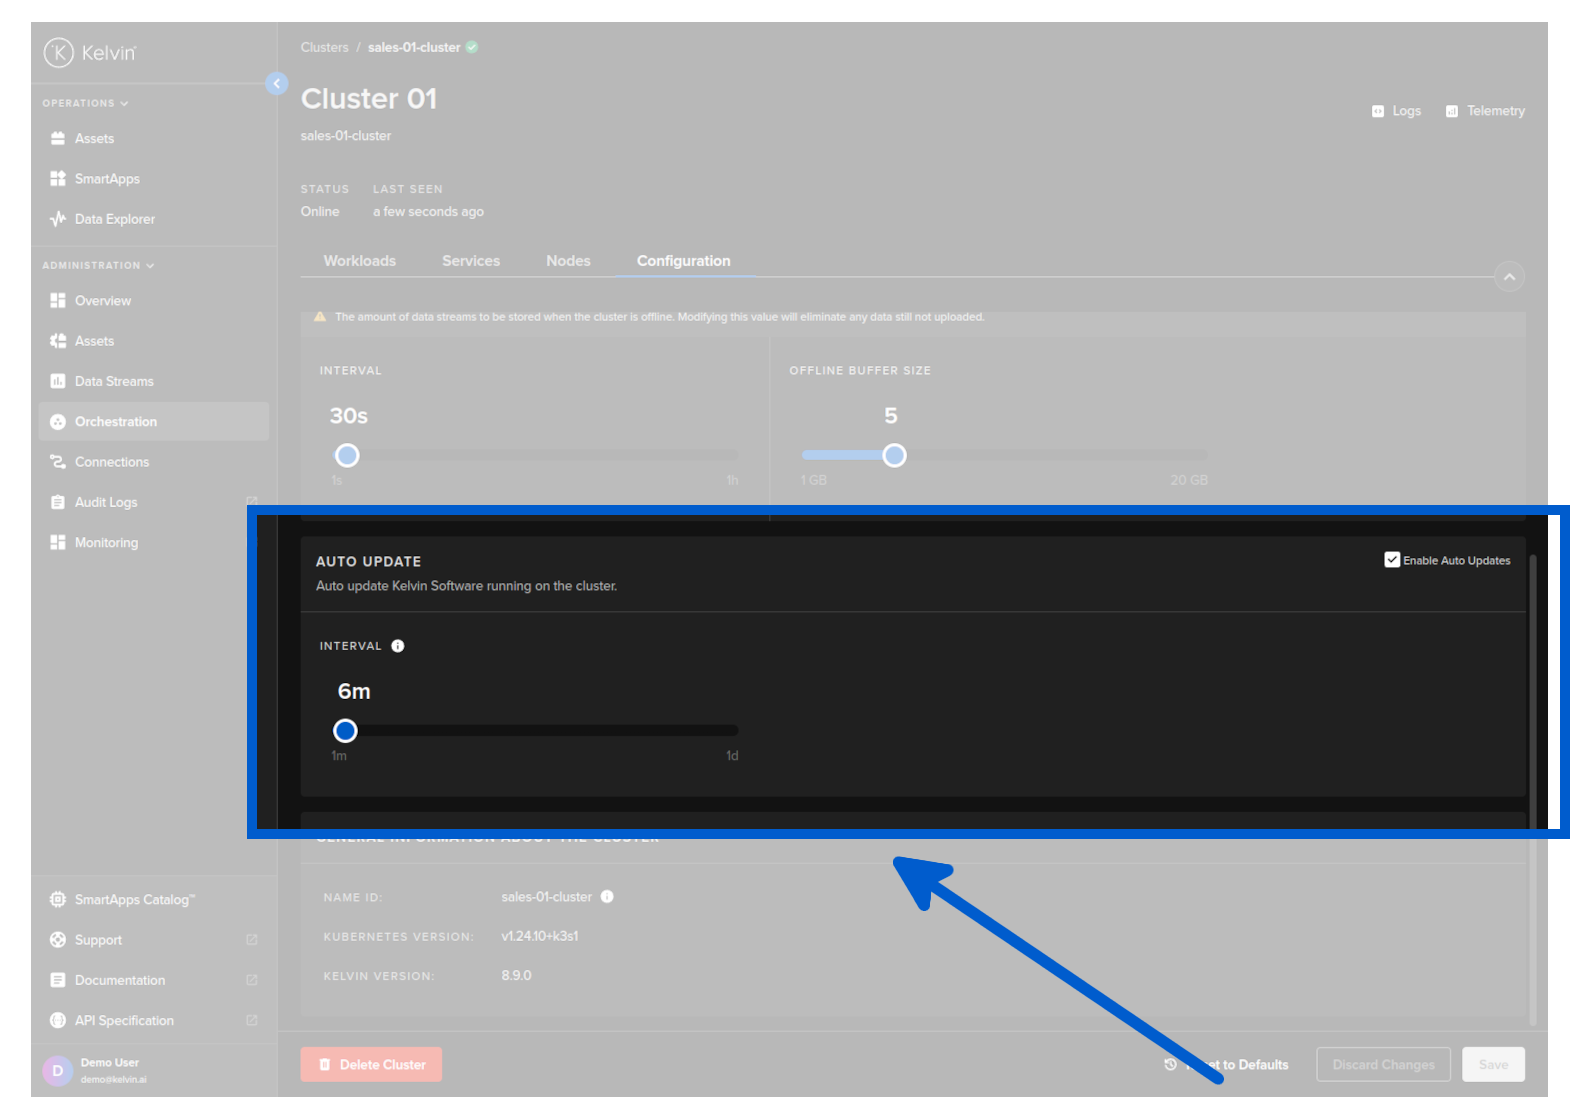
If you have Auto Update set, then Kelvin will automatically regularly check and upgrade all Kelvin pods when available. The timing of the check can be set in the Cluster configuration screen in Kelvin UI.
Manual Upgrades
In circumstances when you want to apply upgrades manually, for example during maintenance shifts or when your assets are not in operation, you can turn off automatic upgrades.
For manual upgrades you have two options;
- Download and upgrade simultaneously.
- Download the updates but do not immediately apply them. At a later date you can separately initiate the actual upgrade process.
If your Internet connection is unreliable or slow, we advise splitting the download and upgrade steps. This approach reduces disruption to edge operations, allowing updates to be downloaded and staged in advance and then the upgrade itself executed regardless of Internet status during scheduled maintenance periods or when the asset is not running.
Before applying the changes, it is important that you understand the Cluser key options available in Kelvin API.
| Key | Options | Description |
|---|---|---|
| manifests_scrape_enabled | true / false | Enable or disable automatic upgrade of the cluster |
| manifests_scrape_interval | integer in seconds | If in automatic upgrade mode, how often the system will check for upgrades. |
| upgrade / instantly_apply | true / false | If set to true, the upgrade process will begin immediately after the updates have been downloaded and staged. If set to false, after download the cluster will wait for a signal to apply the upgrade. |
| upgrade / pre_download | true / false | If set to true, it will pre-download all the necessary workloads/images and stage them ready for upgrade. If set to false then Kubernetes will handle the image download and upgrade immediately. |
First you need to turn off automatic upgrades. You can do this from Kelvin API or Kelvin UI.
To turn off automatic upgrades from Kelvin UI;
From Orchestration menu click on a single Cluster, then under the Configuration tab you uncheck the auto update feature Enable Auto Updates.
Remember to click save after changing any settings otherwise you will lose those changes.
To turn off automatic upgrades you can set the manifests_scrape_enabled to false.
curl -X 'POST' \
  'https://<url.kelvin.ai>/api/v4/orchestration/clusters/<Your Cluster Name>/update' \
  -H 'Authorization: Bearer <Your Current Token>' \
  -H 'accept: application/json' \
  -H 'Content-Type: application/json' \
  -d '{
  "manifests_scrape_enabled": false
}'
from kelvin.api.client import Client

# Login
client = Client(config={"url": "https://<url.kelvin.ai>", "username": "<your_username>"})
client.login(password="<your_password>")

# Set or Update the Default Cluster in an Instance
cluster_updates =  client.orchestration.update_orchestration_clusters(
    cluster_name="sales-01-cluster",
    data={
    "manifests_scrape_enabled": False
    })
Now with Kelvin API you can setup the configuration on the Cluster on whether to download and upgrade each workload simultaneously or separately.
Download and Upgrade Simultaneously
There are two ways to do a manual upgrade where the download and upgrade is done simultaneously.
You will need to set the correct values for the keys for the Cluster to assign the way you want the upgrades to be performed.
| Upgrade Process | instantly_apply key |
pre_download key |
Description |
|---|---|---|---|
| By Kubernetes | true | false | When an upgrade is manually initiated, Kubernetes will handle the download and upgrade of all the Kelvin specific images. Images will be download and upgraded one by one. It is not guaranteed which order this will happen. |
| By Kelvin | true | true | Kelvin will monitor and download all new images and stage them when they become available. When an upgrade is manually initiated, Kelvin will first ensure all new updates have been downloaded to the edge, then the upgrade is started. |
Select the manual upgrade option in the table above then use these commands to set your choice in Kelvin.
This is not possible to set in the Kelvin UI.
curl -X 'POST' \
  'https://<url.kelvin.ai>/api/v4/orchestration/clusters/docs-demo-cluster-k3s/update' \
  -H 'Authorization: Bearer <Your Current Token>' \
  -H 'accept: application/json' \
  -H 'Content-Type: application/json' \
  -d '{
  "upgrade": {
    "instantly_apply": <Boolean Value>,
    "pre_download": <Boolean Value>
  }
}'
from kelvin.api.client import Client

# Login
client = Client(config={"url": "https://<url.kelvin.ai>", "username": "<your_username>"})
client.login(password="<your_password>")

# Set or Update the Default Cluster in an Instance
cluster_updates =  client.orchestration.update_orchestration_clusters(
    cluster_name="sales-01-cluster",
    data={
        "instantly_apply": <Boolean Value>,
        "pre_download": <Boolean Value>
    })
Download and Upgrade Separately
You will first need to set the correct values for the keys for the Cluster to ensure the download and upgrades processes are done by two different commands.
| Upgrade Process | instantly_apply key |
pre_download key |
Description |
|---|---|---|---|
| By Kubernetes | NA | NA | Not possible. |
| By Kelvin | false | true | Kelvin will monitor and download all new images and stage them when they become available. When an upgrade is manually initiated, Kelvin will first ensure all new updates have been downloaded to the edge, then the upgrade is started. |
This is not possible to set in the Kelvin UI.
curl -X 'POST' \
  'https://<url.kelvin.ai>/api/v4/orchestration/clusters/docs-demo-cluster-k3s/update' \
  -H 'Authorization: Bearer <Your Current Token>' \
  -H 'accept: application/json' \
  -H 'Content-Type: application/json' \
  -d '{
  "upgrade": {
    "instantly_apply": false,
    "pre_download": true
  }
}'
from kelvin.api.client import Client

# Login
client = Client(config={"url": "https://<url.kelvin.ai>", "username": "<your_username>"})
client.login(password="<your_password>")

# Set or Update the Default Cluster in an Instance
cluster_updates =  client.orchestration.update_orchestration_clusters(
    cluster_name="sales-01-cluster",
    data={
        "instantly_apply": False,
        "pre_download": True
    })
Finally you can trigger an upgrade to start on a Cluster either from your computer or directly on the edge system using the kelvin-provision command.
Trigger Upgrade from your Computer
There are a few conditions that must be met to ensure your upgrade request succeeds.
- The cluster must be online.
- The cluster must be configured with the
pre_download == trueandinstantly_apply = false
This is not possible to initiate in the Kelvin UI.
Calling the following endpoint /orchestration/clusters/{cluster_name}/edge-apps/version/apply will cause the cluster to apply the upgrade according to the configuration you have created in the previous step.
curl -X 'GET' \
  'https://<url.kelvin.ai>/api/v4/orchestration/clusters/docs-demo-cluster-k3s/edge-apps/version/apply' \
  -H 'Authorization: Bearer <Your Current Token>' \
  -H 'accept: application/json' \
  -H 'accept: application/json'
Running this function will cause the cluster to apply the upgrade according to the configuration you have created in the previous step.
from kelvin.api.client import Client

# Login
client = Client(config={"url": "https://<url.kelvin.ai>", "username": "<your_username>"})
client.login(password="<your_password>")

# Set or Update the Default Cluster in an Instance
response =  client.orchestration.apply_orchestration_clusters_edge_apps_version(
    cluster_name="sales-01-cluster"
    )
Trigger Upgrade on Edge System
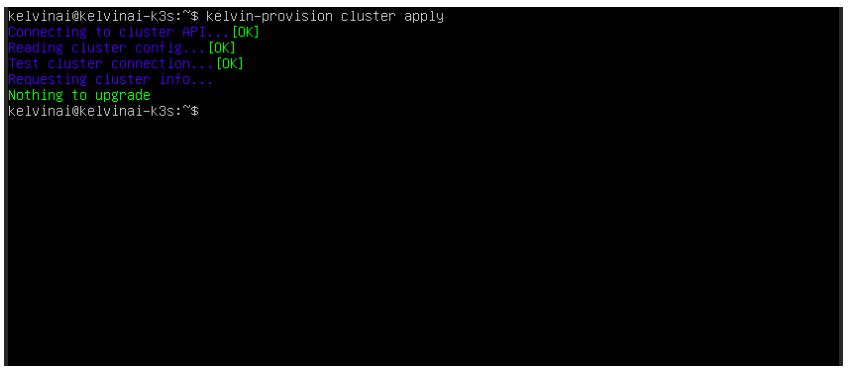
In the terminal of the Edge System you can also initiate the upgrade to start. This is very useful if the upgrade is done while the Cluster is offline and not connected to the Internet.
For an offline upgrade, the updates should be downloaded and staged beforehand. To download, an online connection is required.
This method allows you to download updates at your convenience, regardless of whether the asset is operational. The download process will not interfere with current operations.
kelvin-provision cluster apply
3. Kelvin SmartApps™, Docker Apps and Connections Upgrades
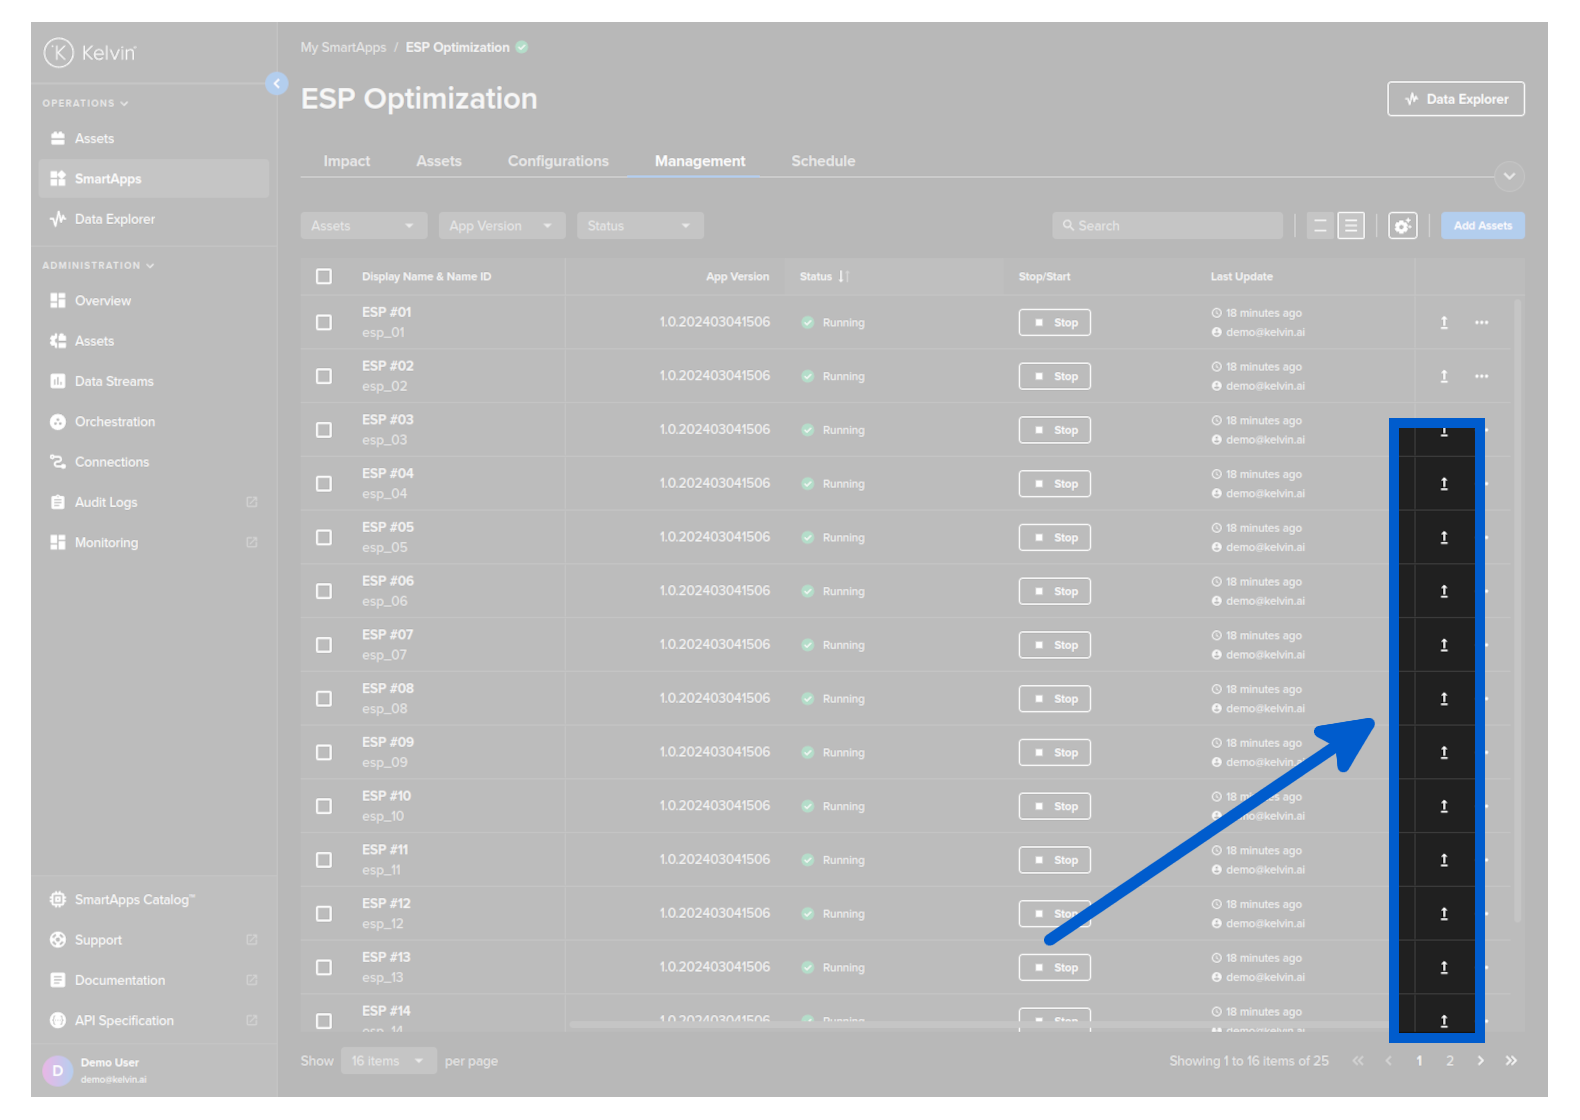
Workloads and Connections must be upgraded manually. You can send a new deploy for the new version and the old version currently running will be managed depending on the staged key.
Kelvin SmartApps™ can be upgraded from the Kelvin UI. You can read full documentation on this feature here.
Workloads Overview
When you first look at a Cluster in Kelvin UI you will see the workloads running on any Worker Node in the Cluster.
Workloads are Kelvin SmartApps™, Docker Apps and Connectors that you have deployed to the Cluster.
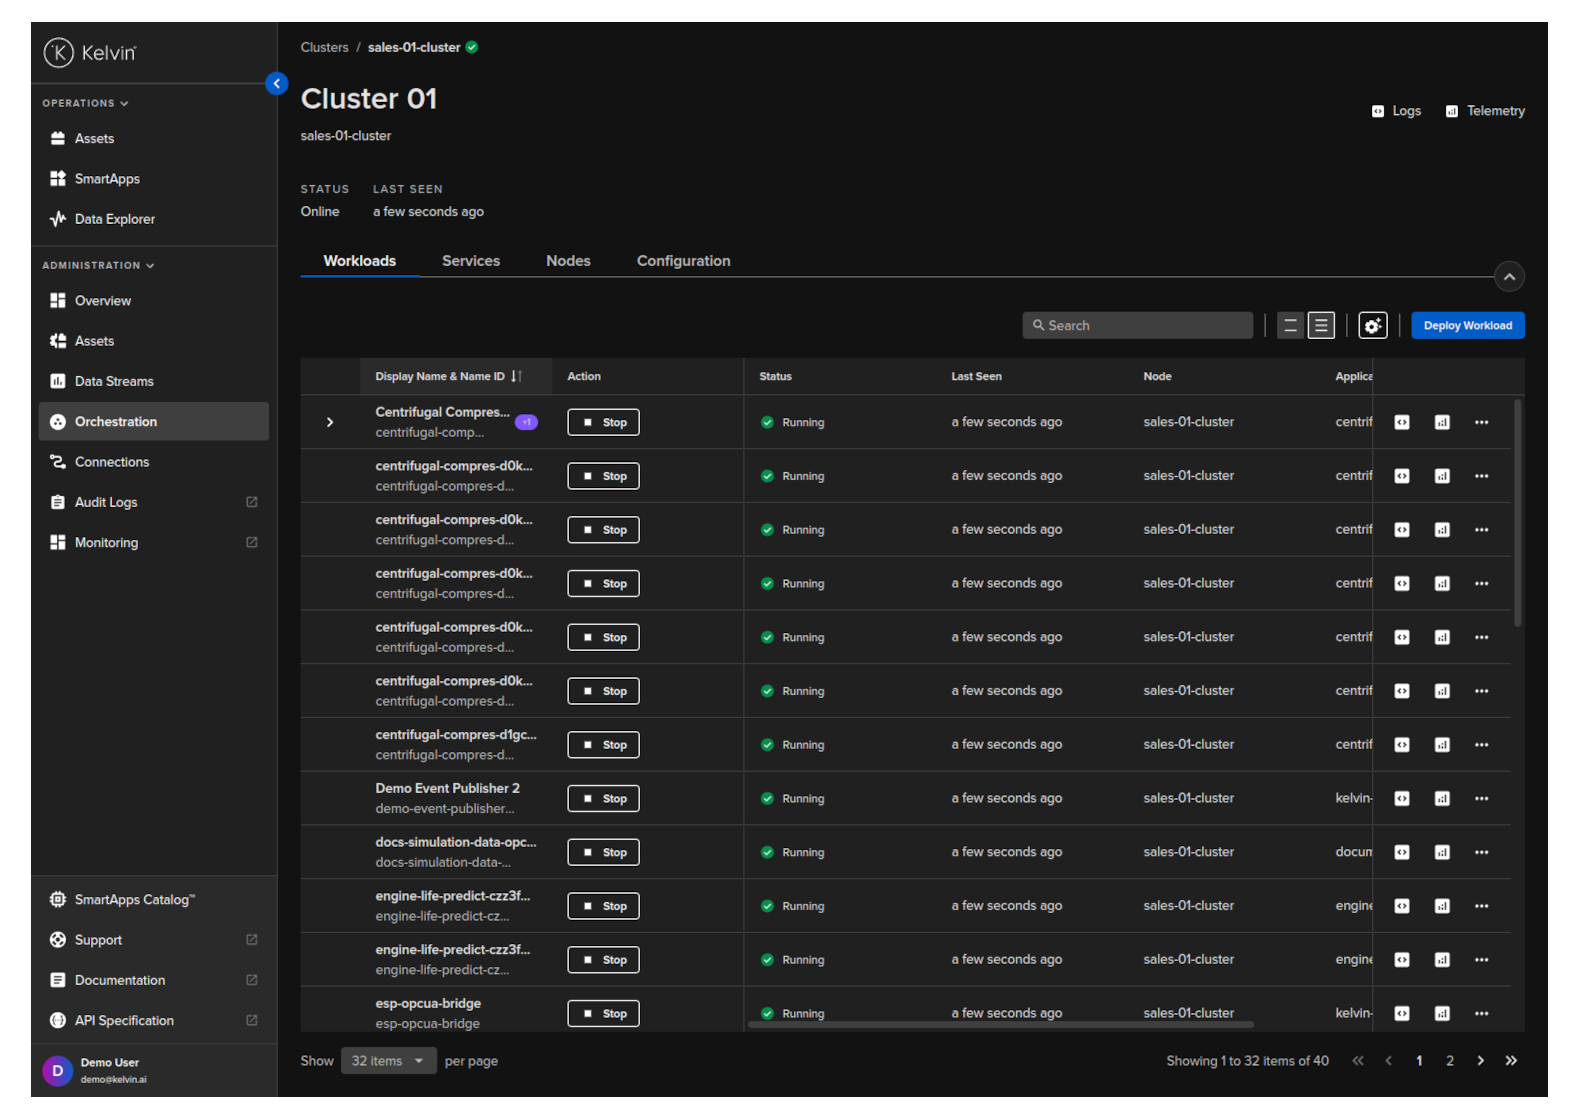
From this screen you can do the following actions;
- Start / Stop a workload
- Deploy a new workload
- Download an image for offline deployment
- Edit a workload's configuration file
- Delete a workload
Full details on deploying and managing Workloads can be found in Developer Tools section under How To → Deploy.
Nodes (Horizontal Scale Cluster)
At any time you can horizontally scale your Cluster by adding or deleting Nodes.
This can be done at any time while in the Cluster is running and will not affect any Workloads currently running on the Cluster.
Add Node to Cluster (Scale Up)
New Nodes can be added to an existing Cluster allowing easy scaling of Clusters as the requirements for the location or service grows.
You only need to do this if you have chosen the Main Node in the Cluster to be k3s installation by Kelvin. If you manage your own Kubernetes cluster, then follow your providers instructions and Kelvin will automatically find and configure the new Nodes.
First setup a new edge system which can be either a physical machine or a virtual machine and install Ubuntu server on it.
Then from Orchestration menu click on a single Cluster, then under the Nodes tab you click on the Add Node button.
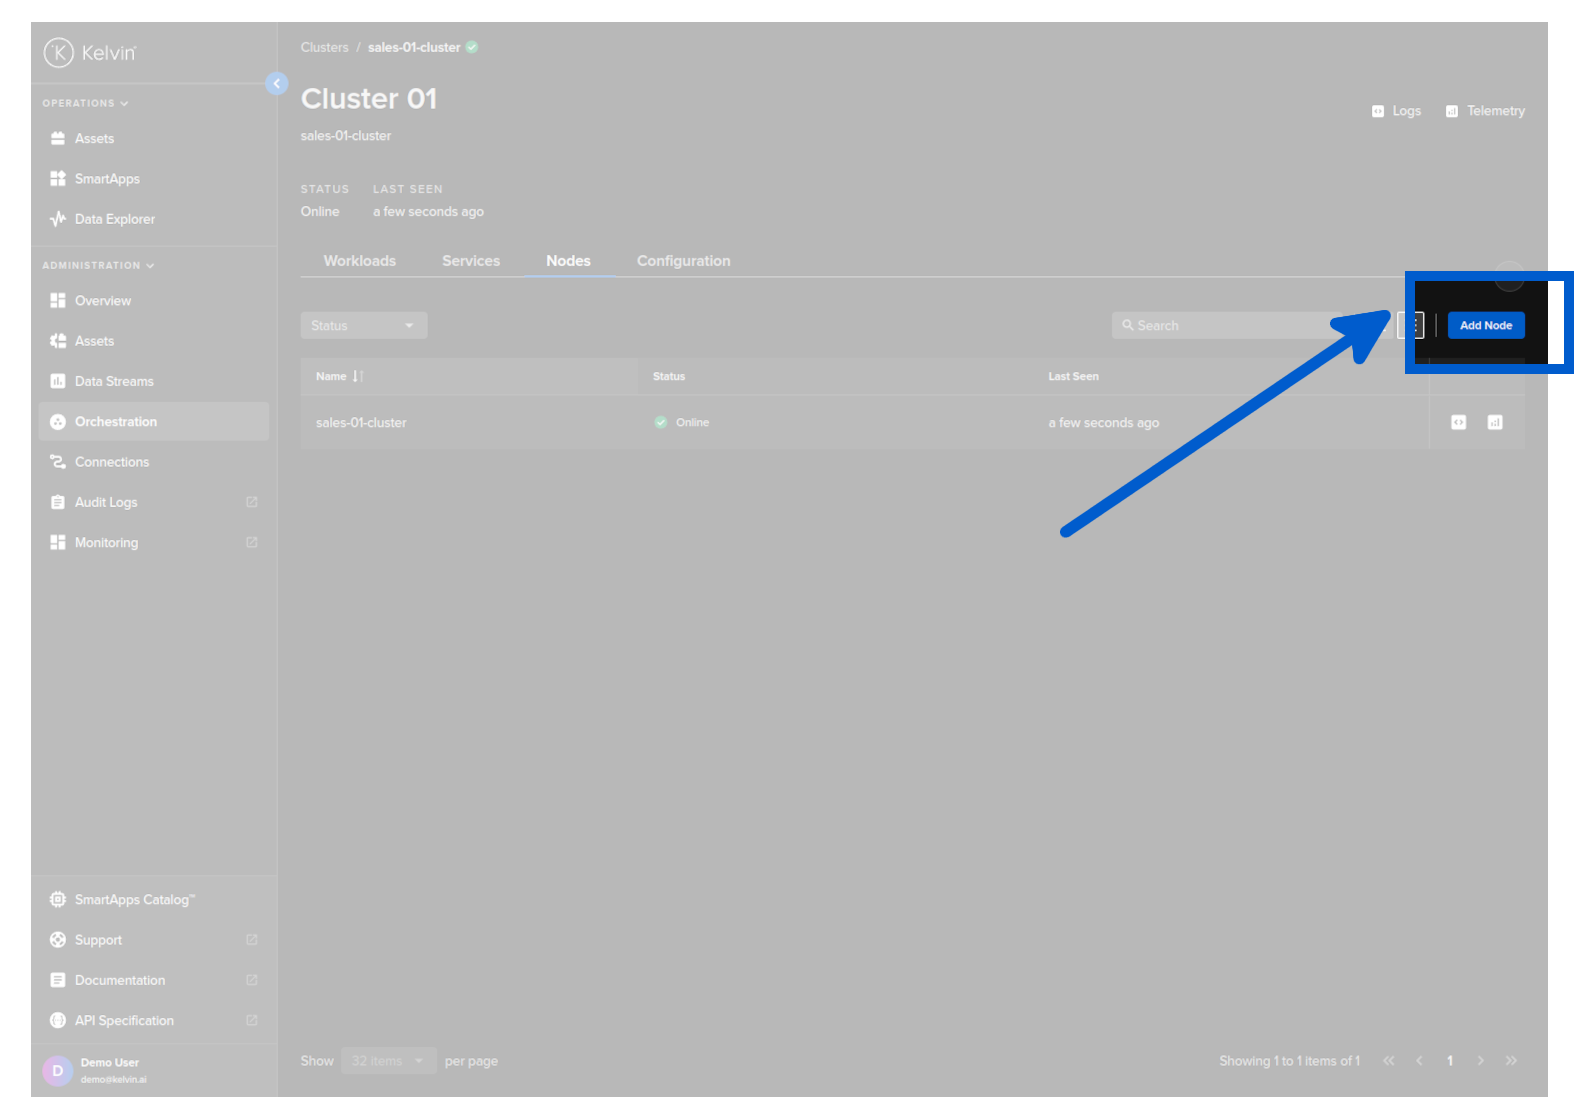
A popup will appear with instruction on what to type into the command line of the new edge system.
The new edge system needs to have both an Internet connection and is also able to communicate through the LAN/WAN to the IP address of the Main Node in the Cluster.
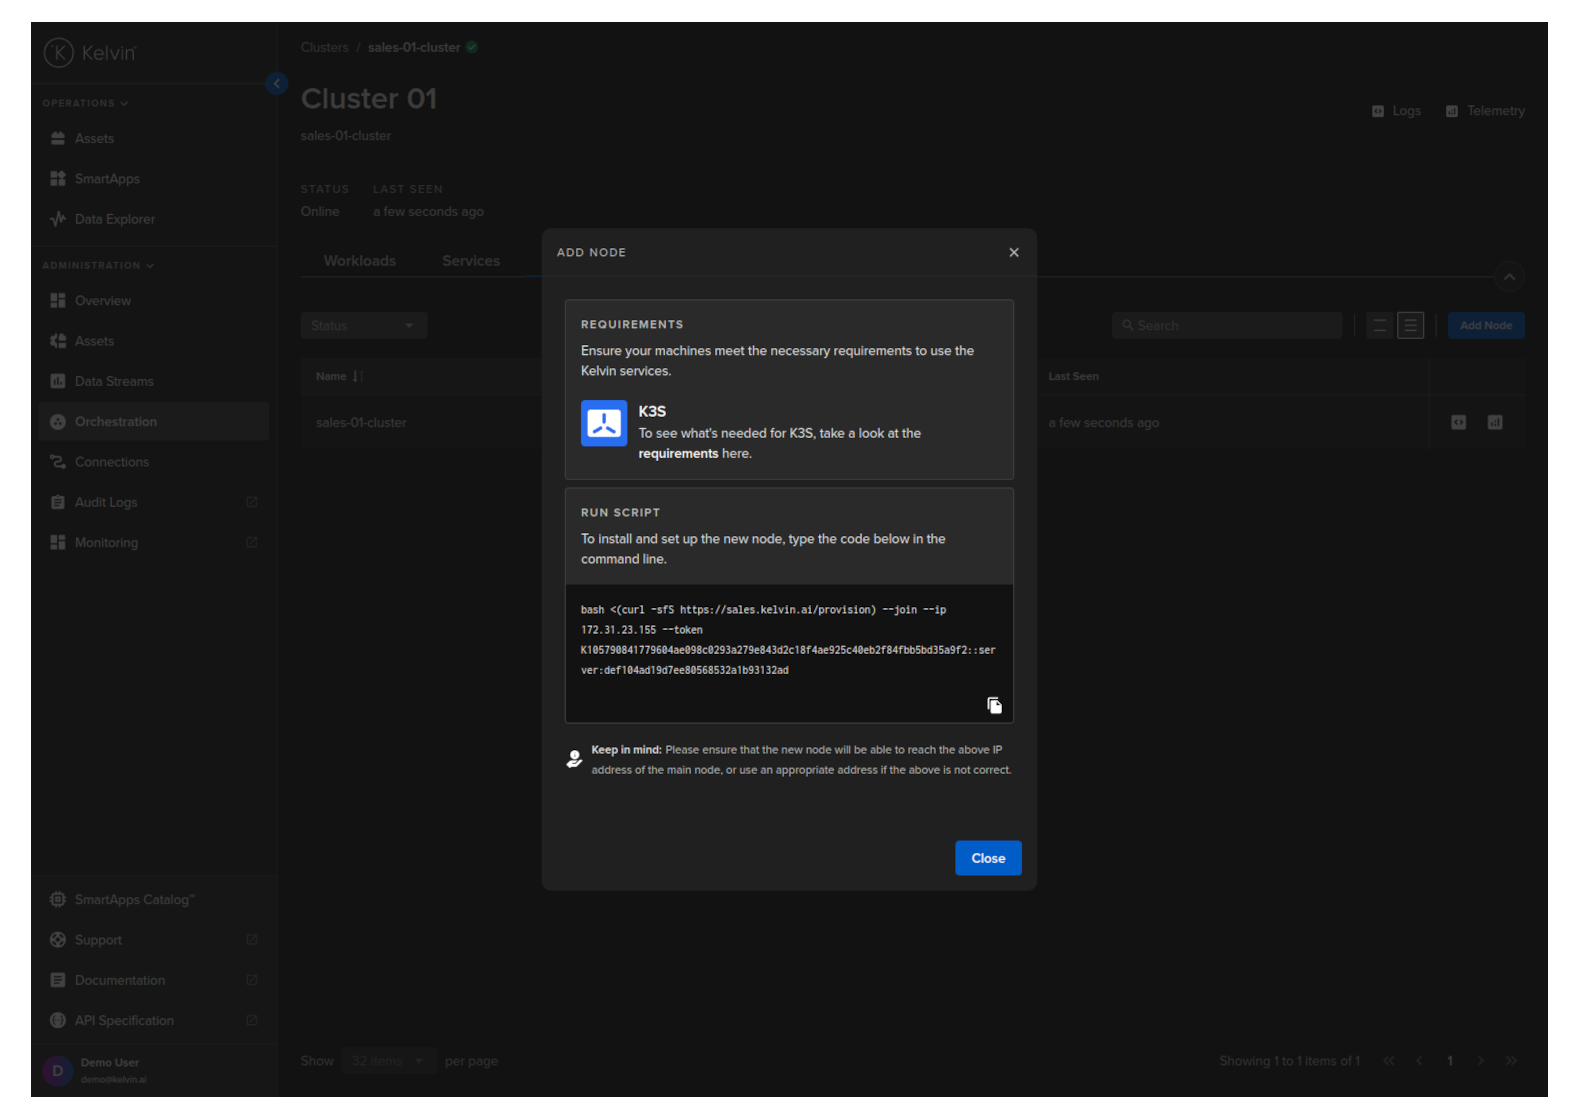
Copy the script and run it in the command line on the new edge system mentioned earlier. It will look something like this;
bash <(curl -sfS https://{Kelvin-Cloud-URL}/provision) --join --ip 172.31.40.200 --token K10ca29650933641be49c3b9f6ce4c68a2c78004025c4c08adb::server:21aa9c700e3e06cba4833b8dc
The installation and registration is fully automatic and follows this procedure;
- In the terminal the provision script will be first be downloaded and run
- The script will connect with the master node through the IP address and token from the command line
- The script will then install the necessary programs and configurations to setup the new node on a k3s cluster
- The script will then finish by starting the k3s-agent
- The new node will show in Kelvin UI with the status Not Ready.
- All the Kelvin core services will be installed and configured in the Cluster. This is all done in the background and you will not see any feedback on the command line.
- When all configurations are completed successfully, then the status for the Node in the Kelvin UI will change from Not Ready to Online.
Depending on the process the whole procedure should not take more than 5 minutes to complete.
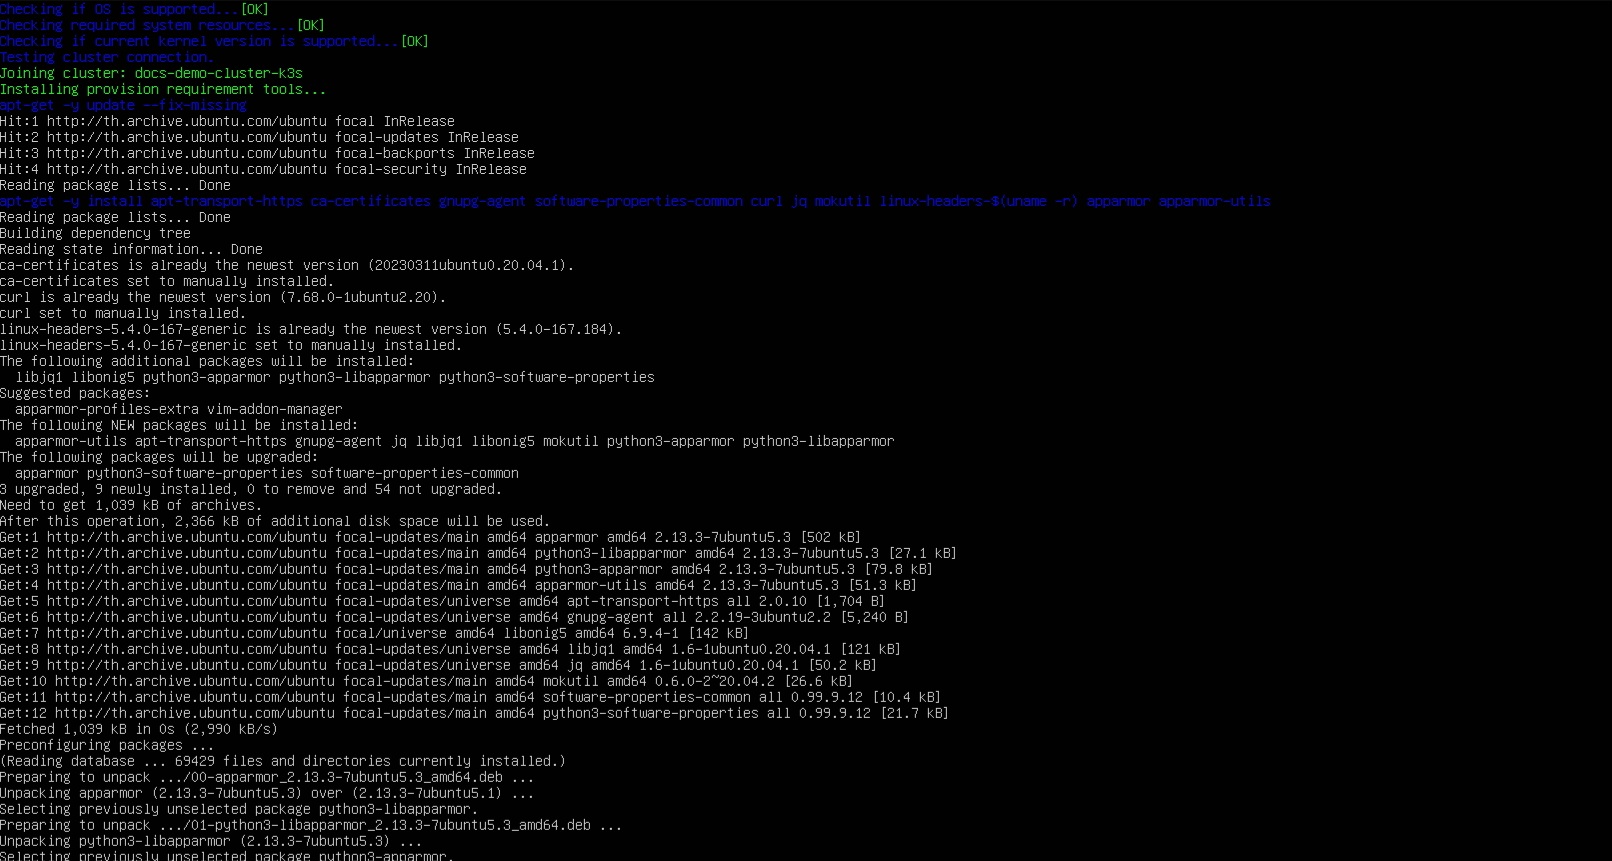
Congratulations, you have added a new Worker Node to the Cluster.
Delete Node from Cluster (Scale Down)
Worker Nodes from a k3s cluster can be deleted at any time. All workloads and running processes will be transfered to other nodes automatically.
You only need to do this if you have chosen the Main Node in the Cluster to be k3s installation by Kelvin. If you manage your own Kubernetes cluster, then follow your providers instructions and Kelvin will automatically adjust the system to remove the deleted node.
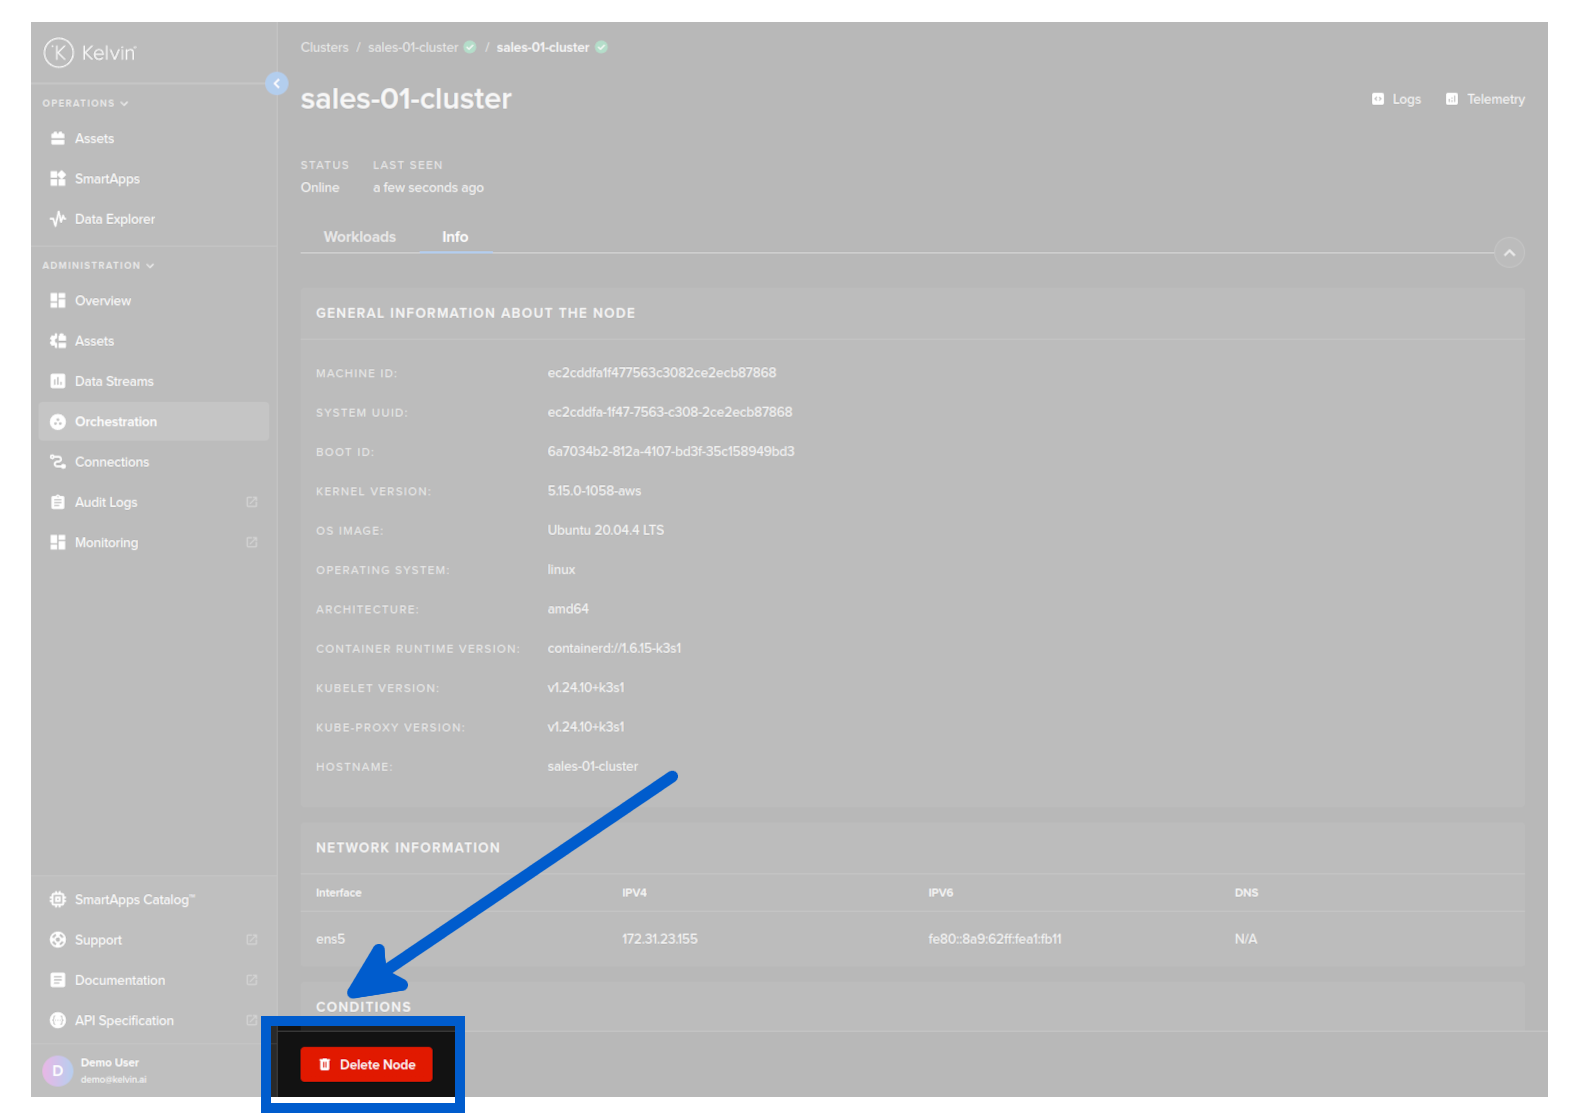
To perform this action you need to have access to the Main Node. You can find full instructions on how to delete your selected node by going to Orchestration, selecting your cluster and node, click on the Info tab and click Delete Node.
You will get the instructions what to type into the command line of your Main Node in the Cluster.
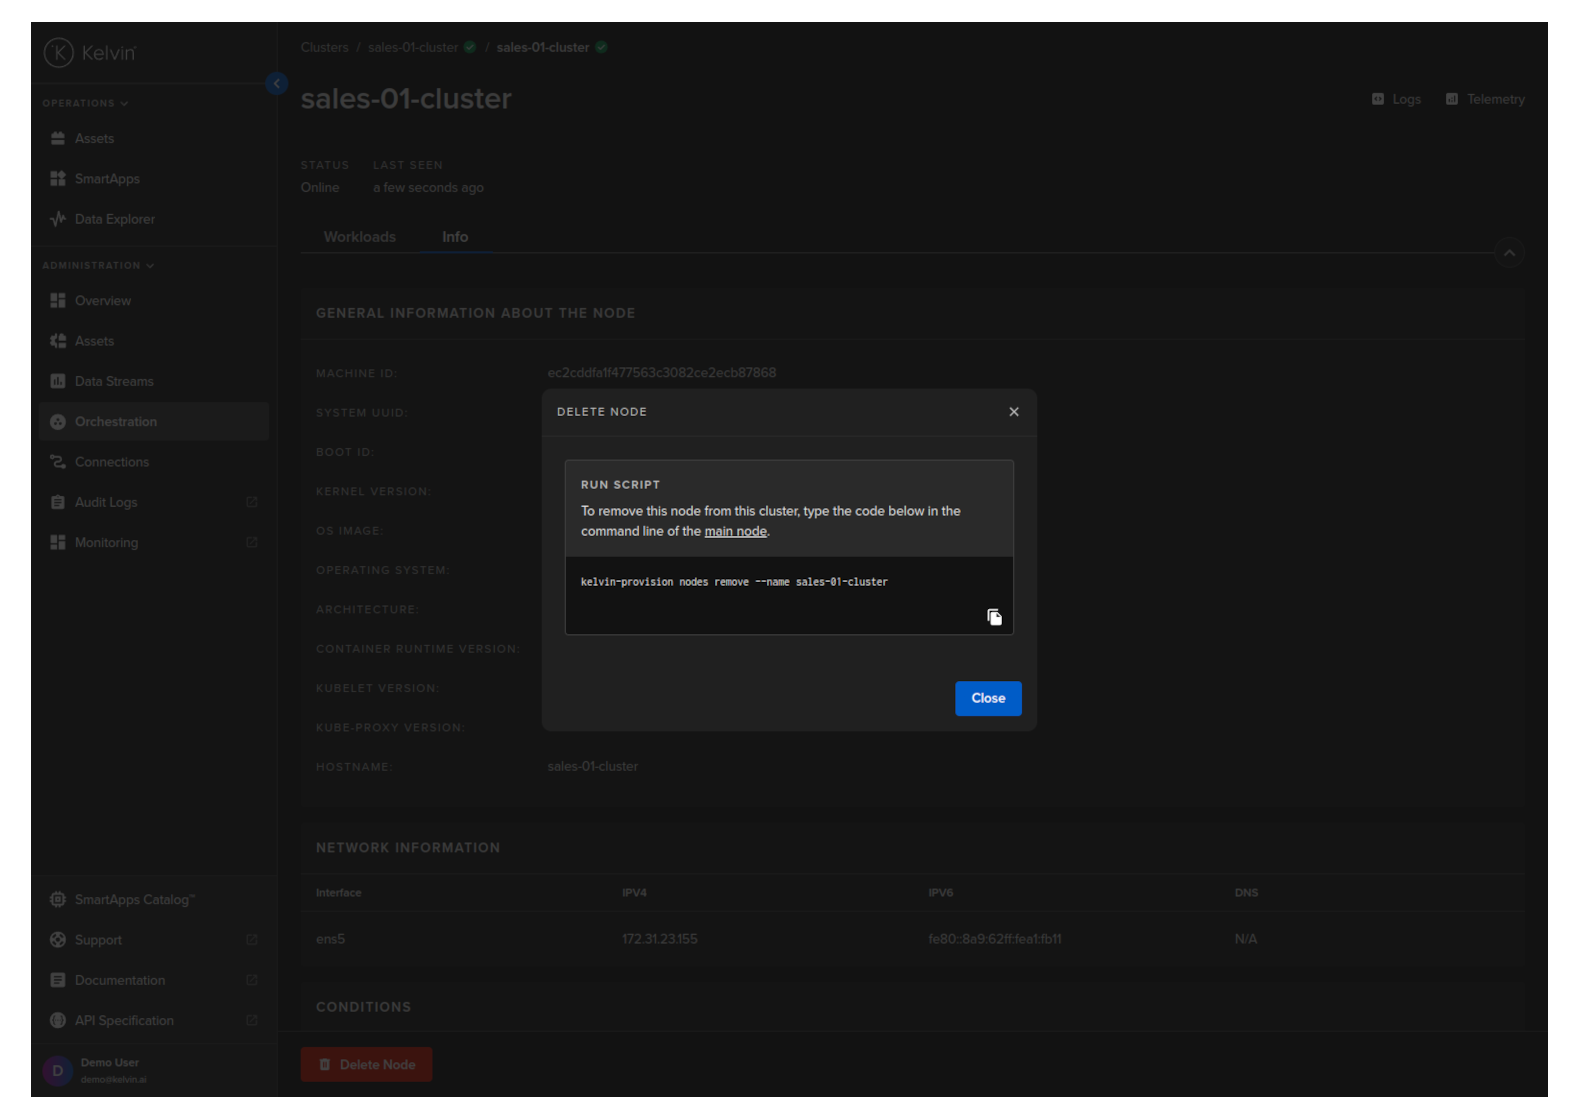
Go to your Main Node and type in the following;
kelvin-provision nodes remove --name {Worker Node Name}
You will then see the following response and a final question
Connecting to Cluster API...[OK]
Reading cluster config...[OK]
Test cluster connection..[OK]

WARNING: This action is irreversible.

Use the arrow keys to navigate: ↓ ↑ → ←
? Are you sure you want to continue?:
    Yes
  → No
Select Yes and press enter. You will then get confirmation on whether the Worker Node has been successfully deleted.
Nodes Status
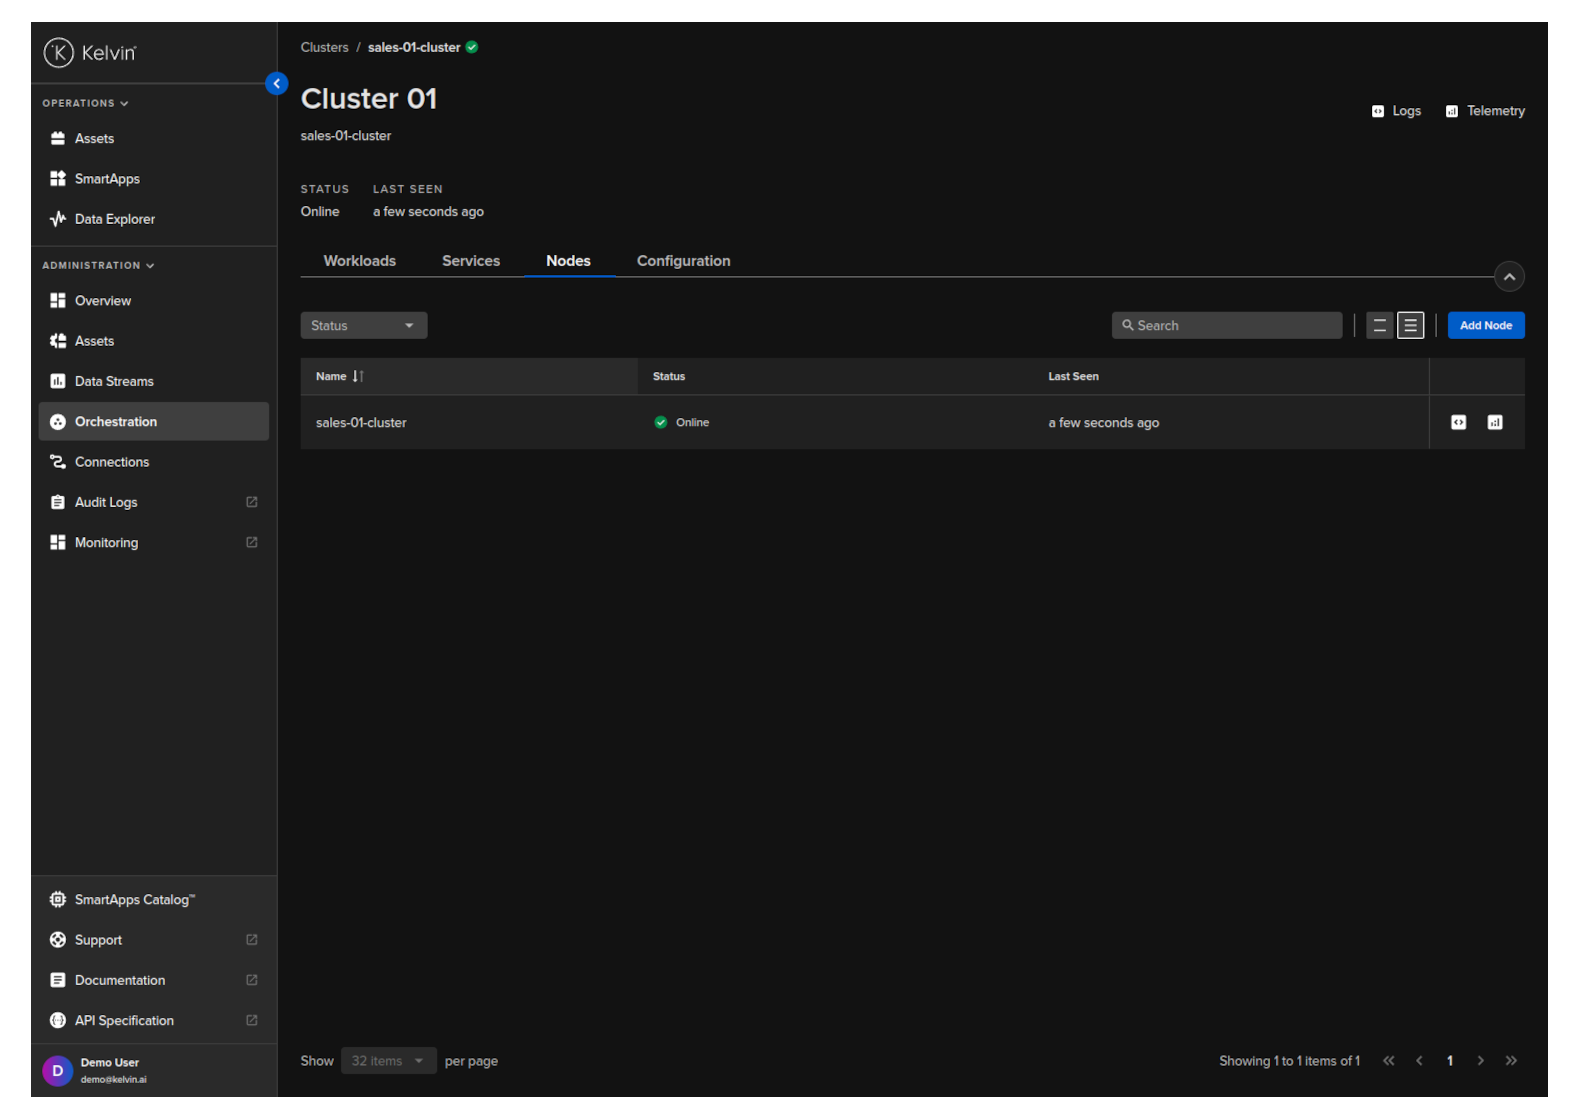
In a Cluster you can have many Nodes available. In this section you can see all the Nodes in the Cluster and the current status of each Node.
If communications to one or more nodes has been lost, then the status of the affected Nodes will be updated to read "Not Ready".
Node Details
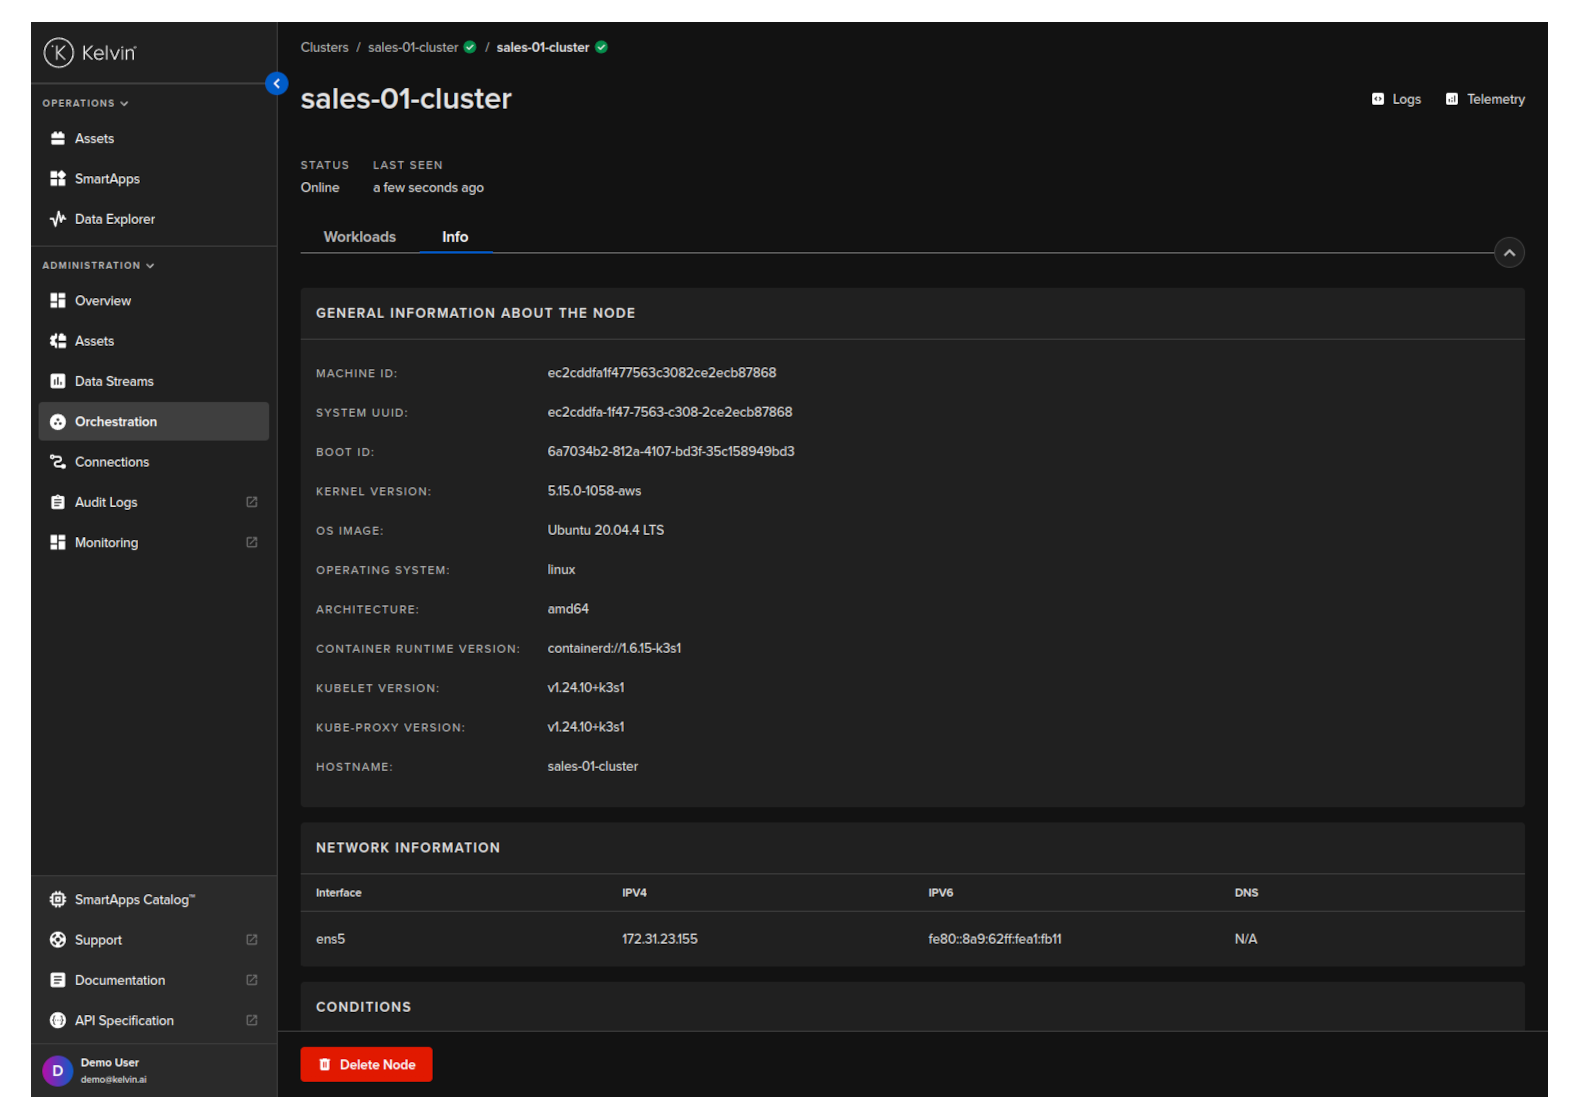
If you click on a Node, then you can see more details about the individual Node and the workloads running on the Node.
Details on the workloads screen is the same as the workloads screen for the Cluster.
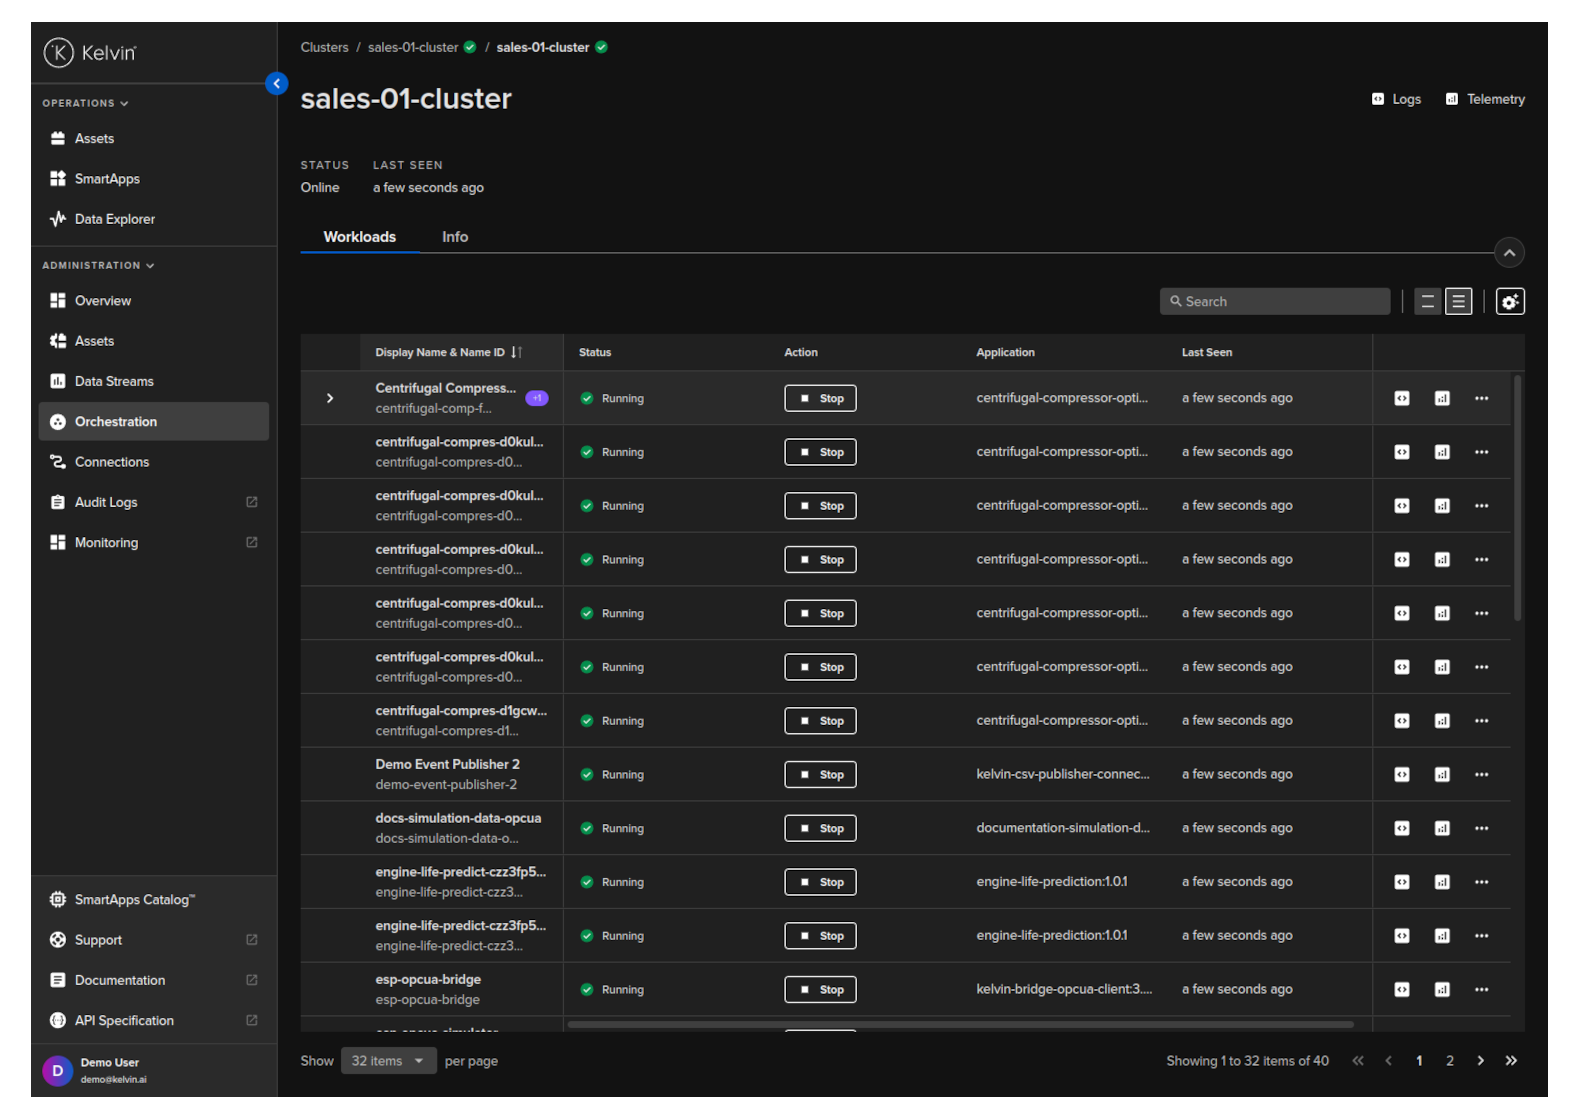
and the general information and health of the Node.
Configuration
Configuration has a few features;
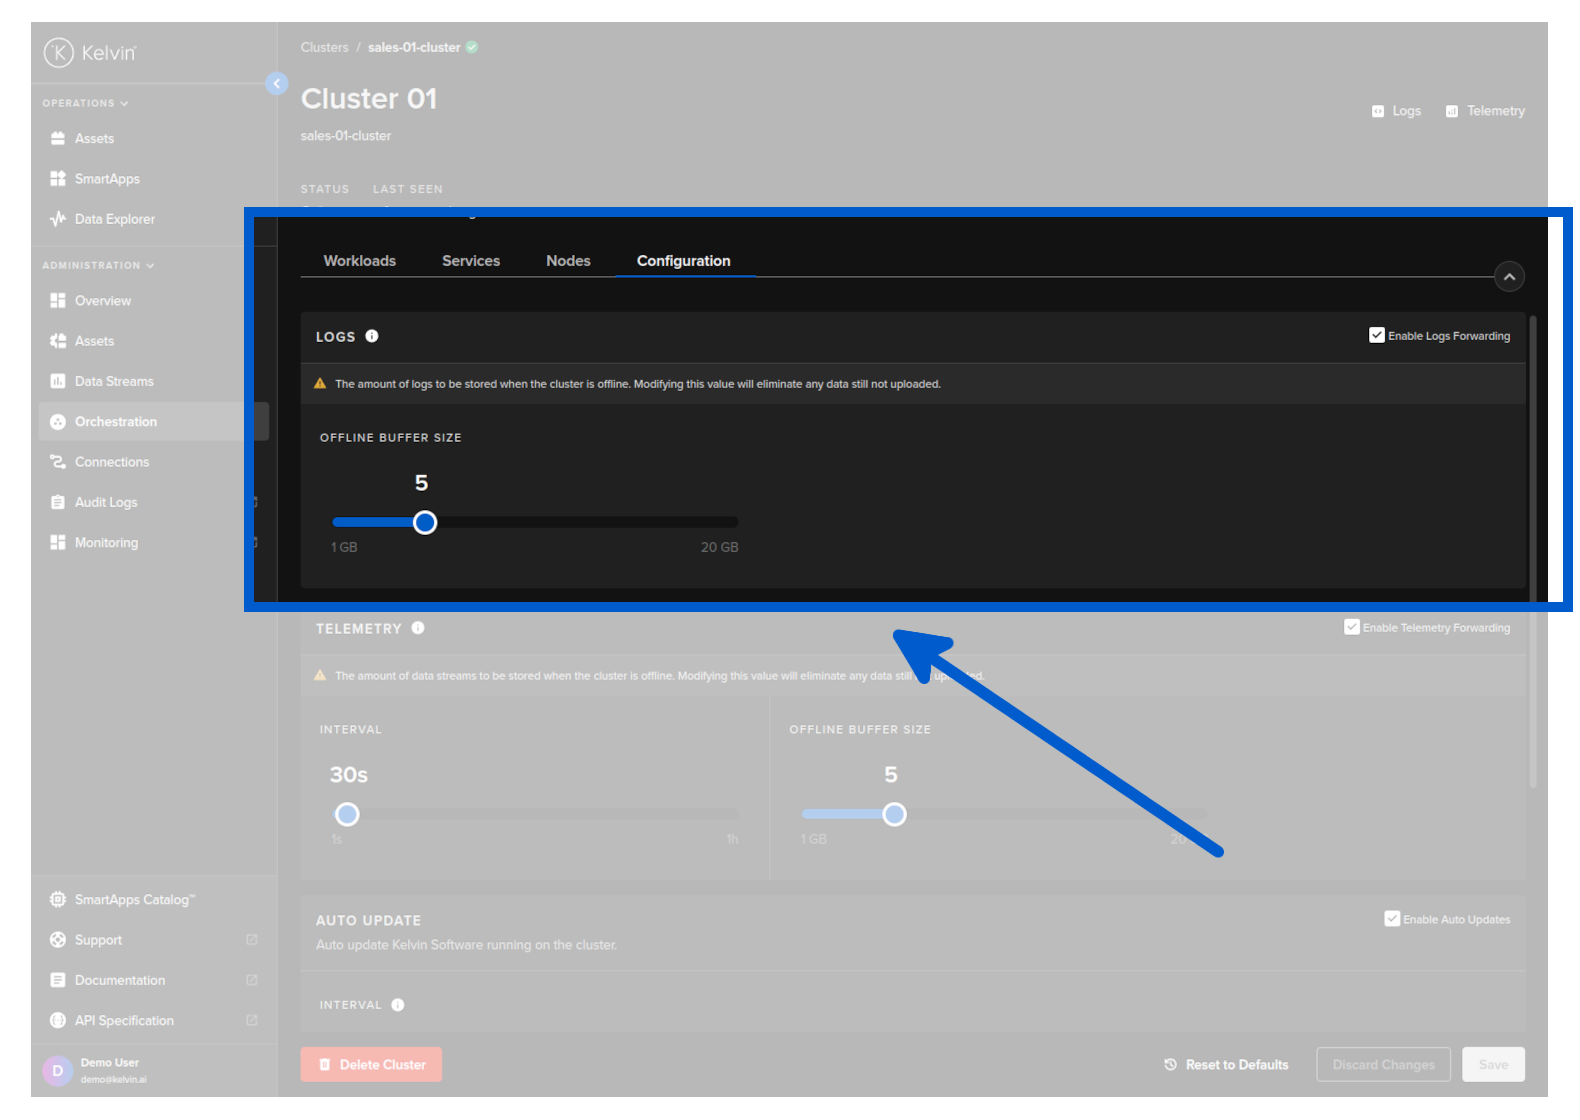
Logs
When the cluster is offline, the Clusters will continue to collect and buffer the log data and transmit it to the Kelvin when it reconnects.
From Orchestration menu click on a single Cluster, then under the Configuration tab you can set the size of buffer for recording logs while the cluster is offline or not connected to the Kelvin.
Be careful when changing this setting as this will delete all current logs that are currently in the buffer waiting to be loaded to the Kelvin.
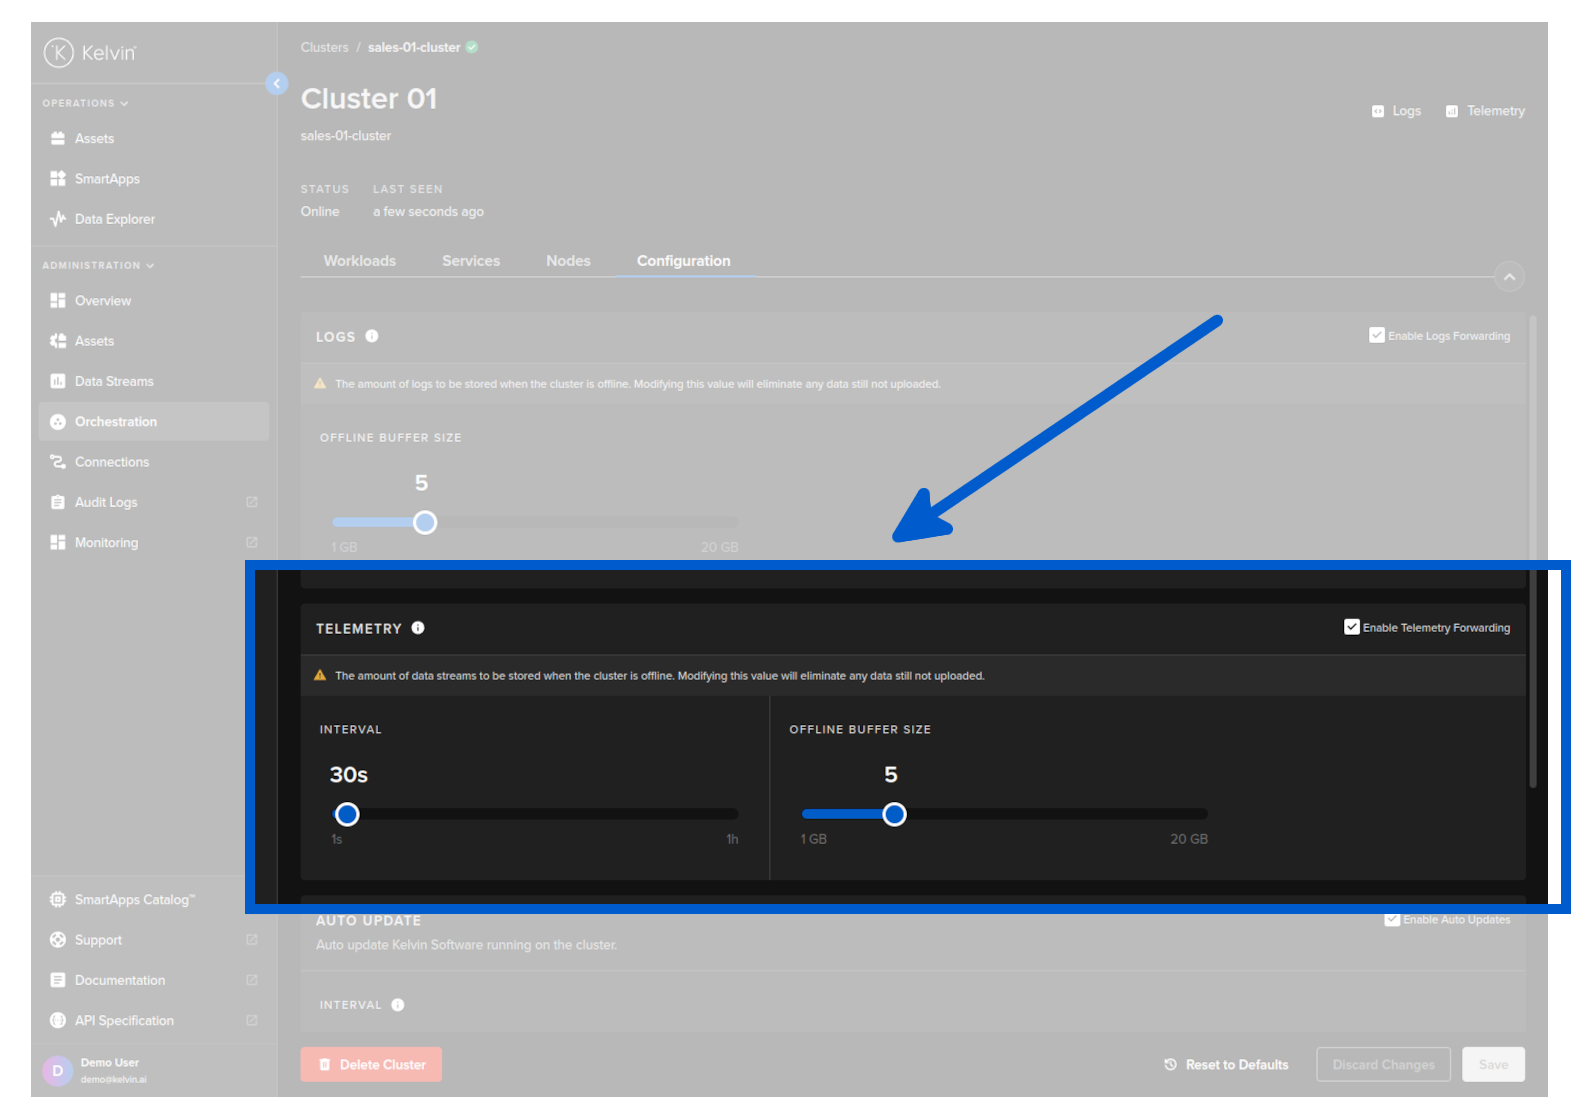
Telemetry
When the cluster is offline, the Clusters will continue to collect and buffer the telemetry data and transmit it to the Kelvin when it reconnects.
From Orchestration menu click on a single Cluster, then under the Configuration tab you can adjust the settings for the telemetry buffer size and recording interval while the cluster is not connected to the Kelvin.
Be careful when changing this setting as this will delete all current logs that are currently in the buffer waiting to be loaded to the Kelvin.
Auto Update
From Orchestration menu click on a single Cluster, then under the Configuration tab you can set or disable the auto update feature and the frequency to check for updates.
Remember to click save after changing any settings otherwise you will lose those changes.
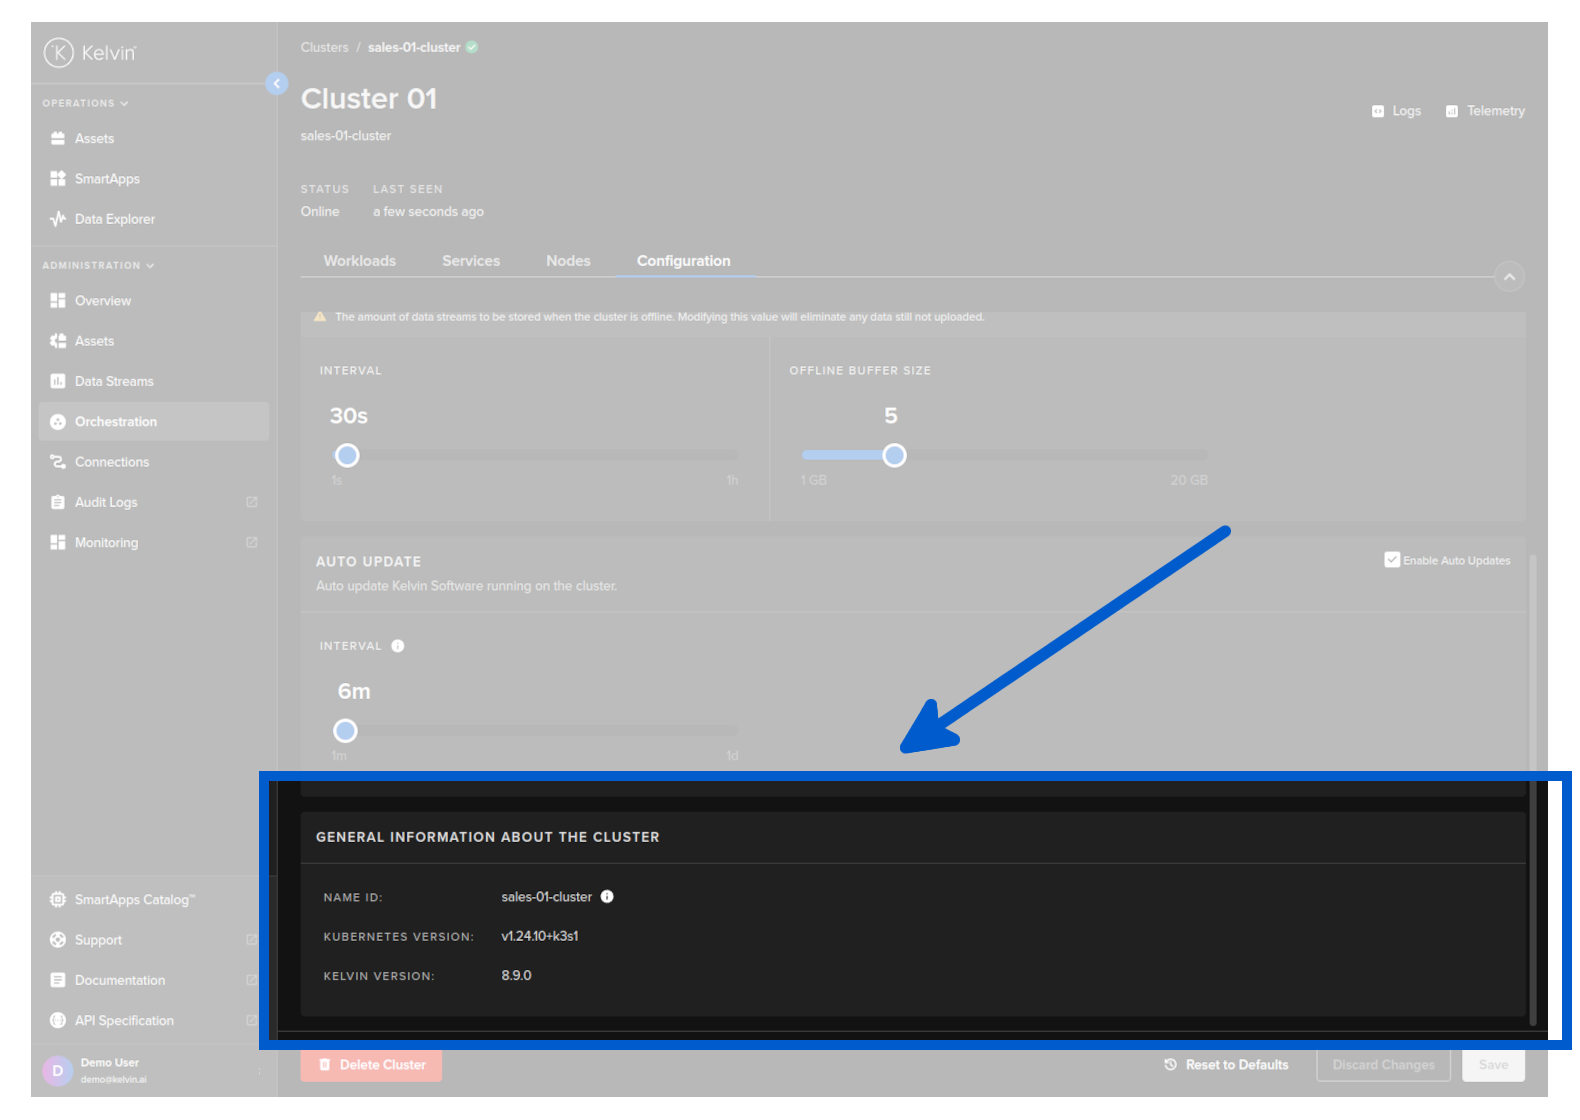
General Software Versions
From Orchestration menu click on a single Cluster, then under the Configuration tab you can see the software versions on the node for Kubernetes and Kelvin core services.
Delete Cluster
From Orchestration menu click on a single Cluster, then under the Configuration tab you can delete the Cluster by clicking on the delete button;
This will permanently delete all Kelvin software from the cluster including all Kelvin SmartApps™, Docker Apps and Connectors deployed to the cluster.
This is not reversible and you will need to setup a new cluster and redeploy all Kelvin SmartApps™, Docker Apps and Connectors again.
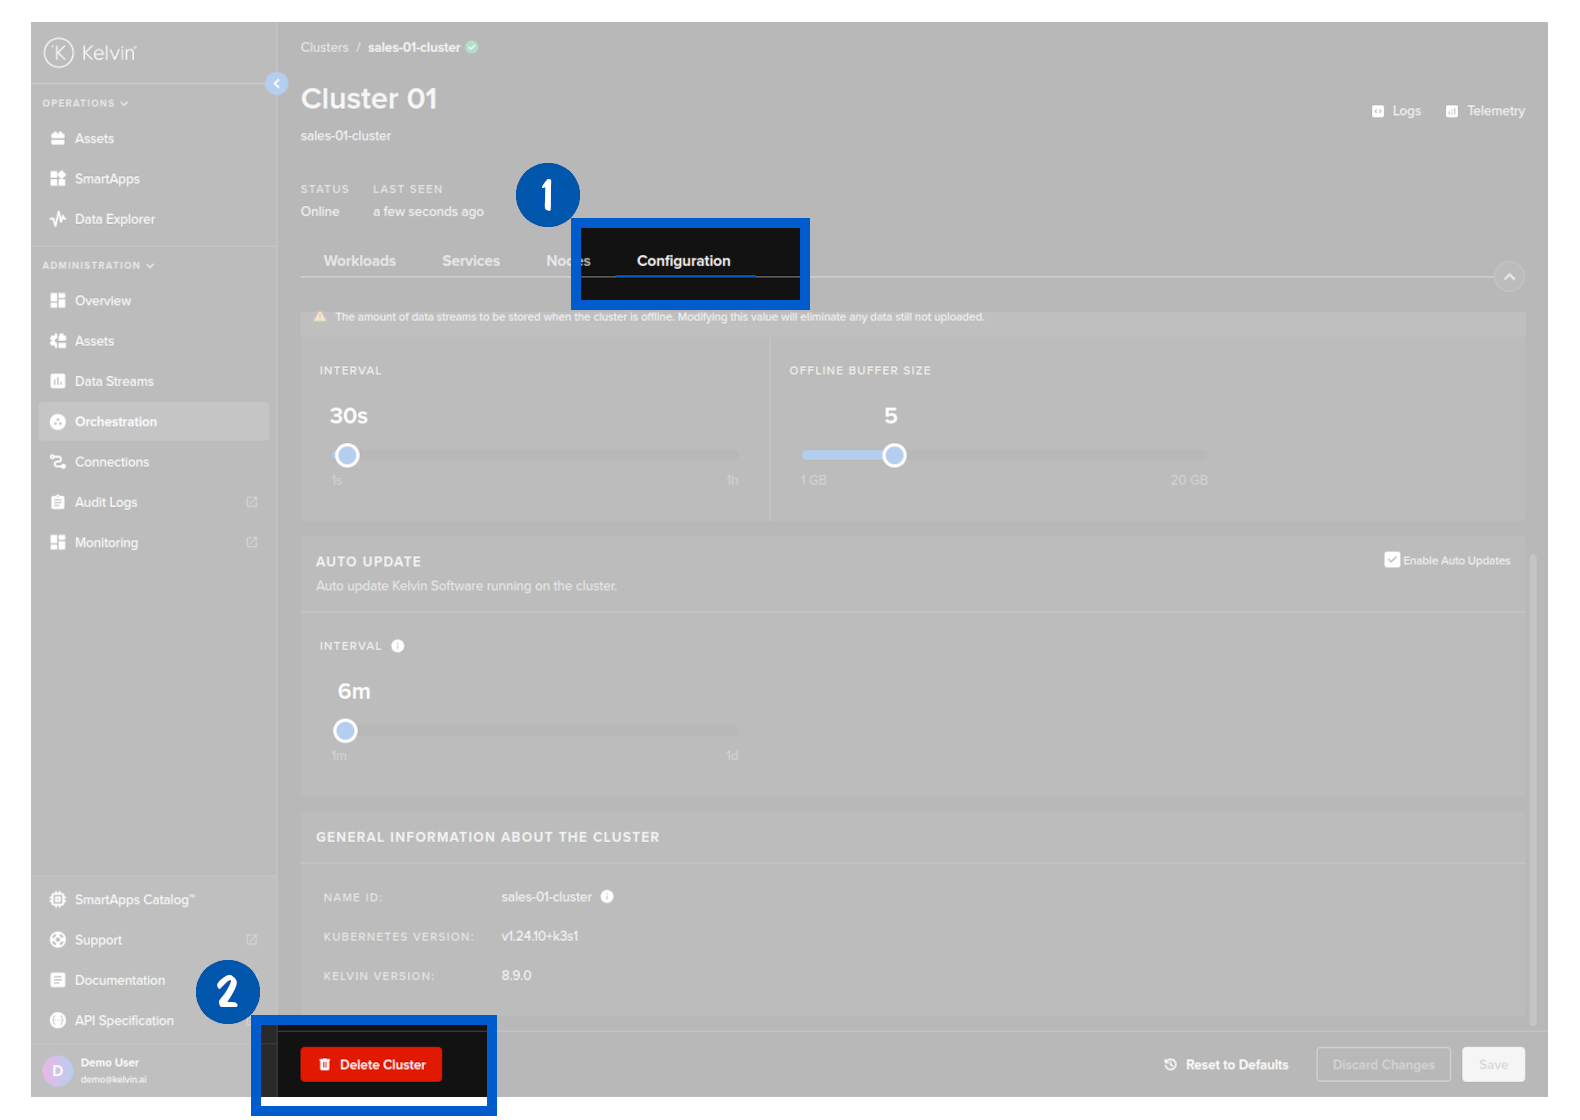
And write PERMANENTLY DELETE to confirm deleting the cluster.
Cluster Logs
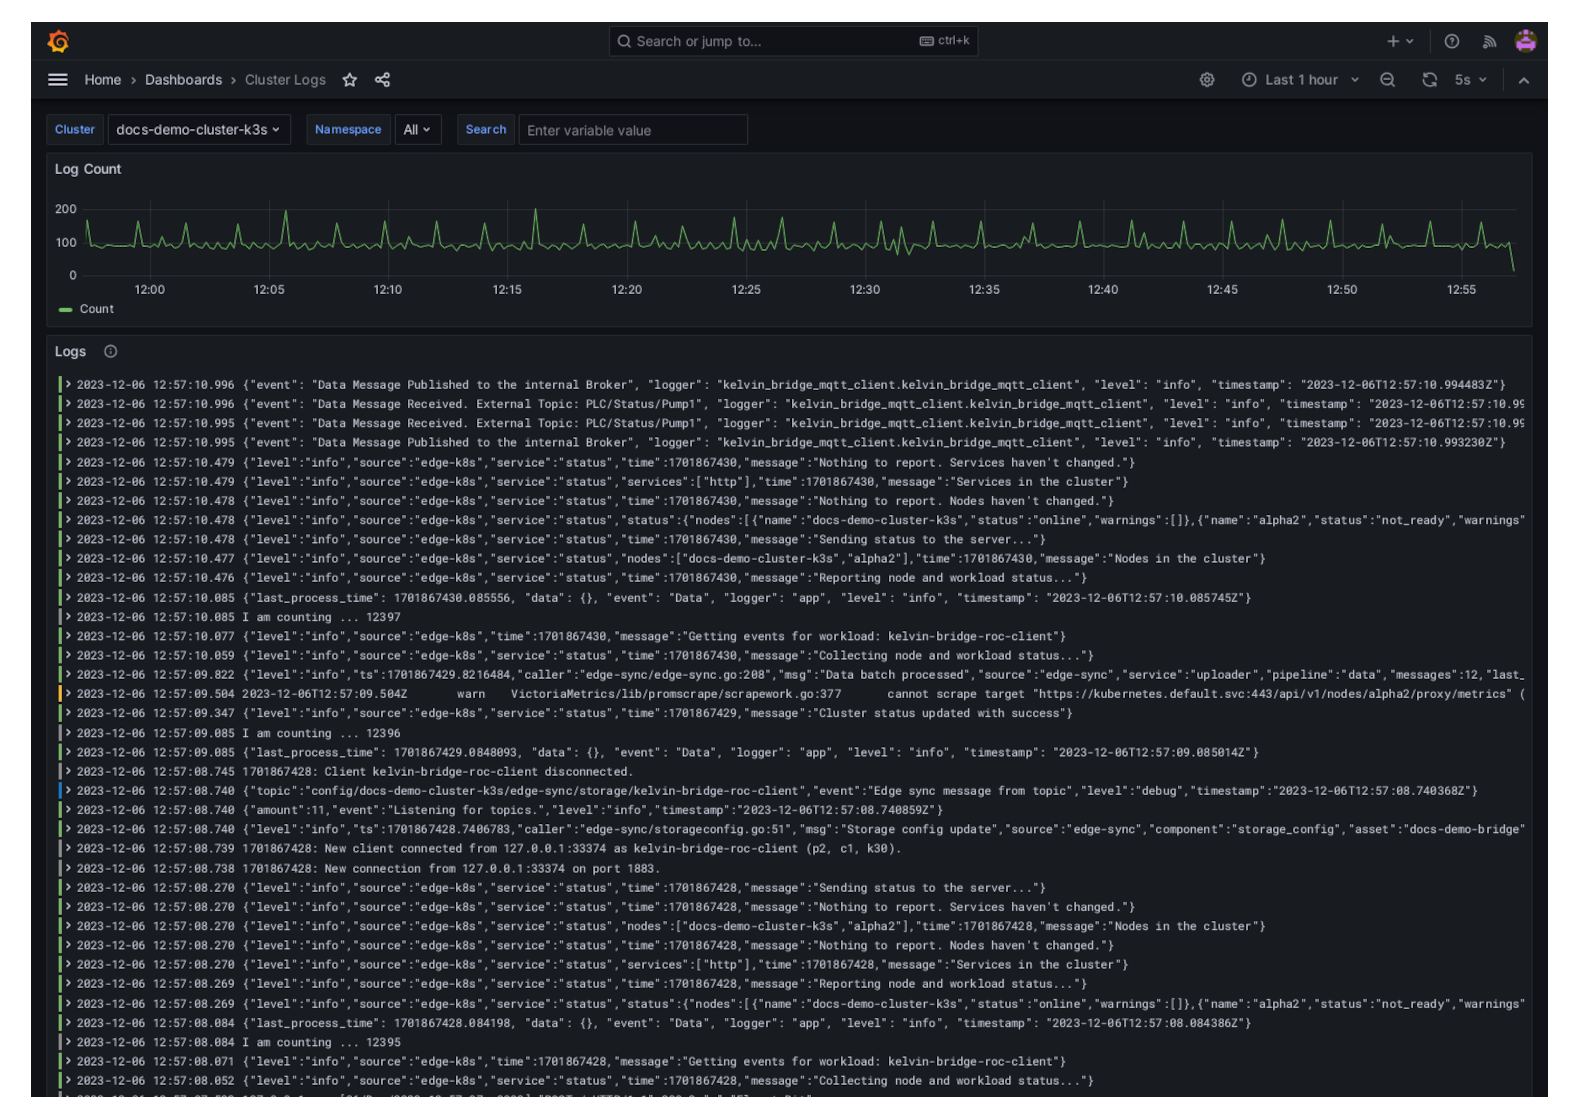
In the Kelvin UI you can view the logs of a Cluster and all the Workloads running on the Cluster.
From Orchestration menu click on a single Cluster, then click on the Logs button in the top right hand corner.
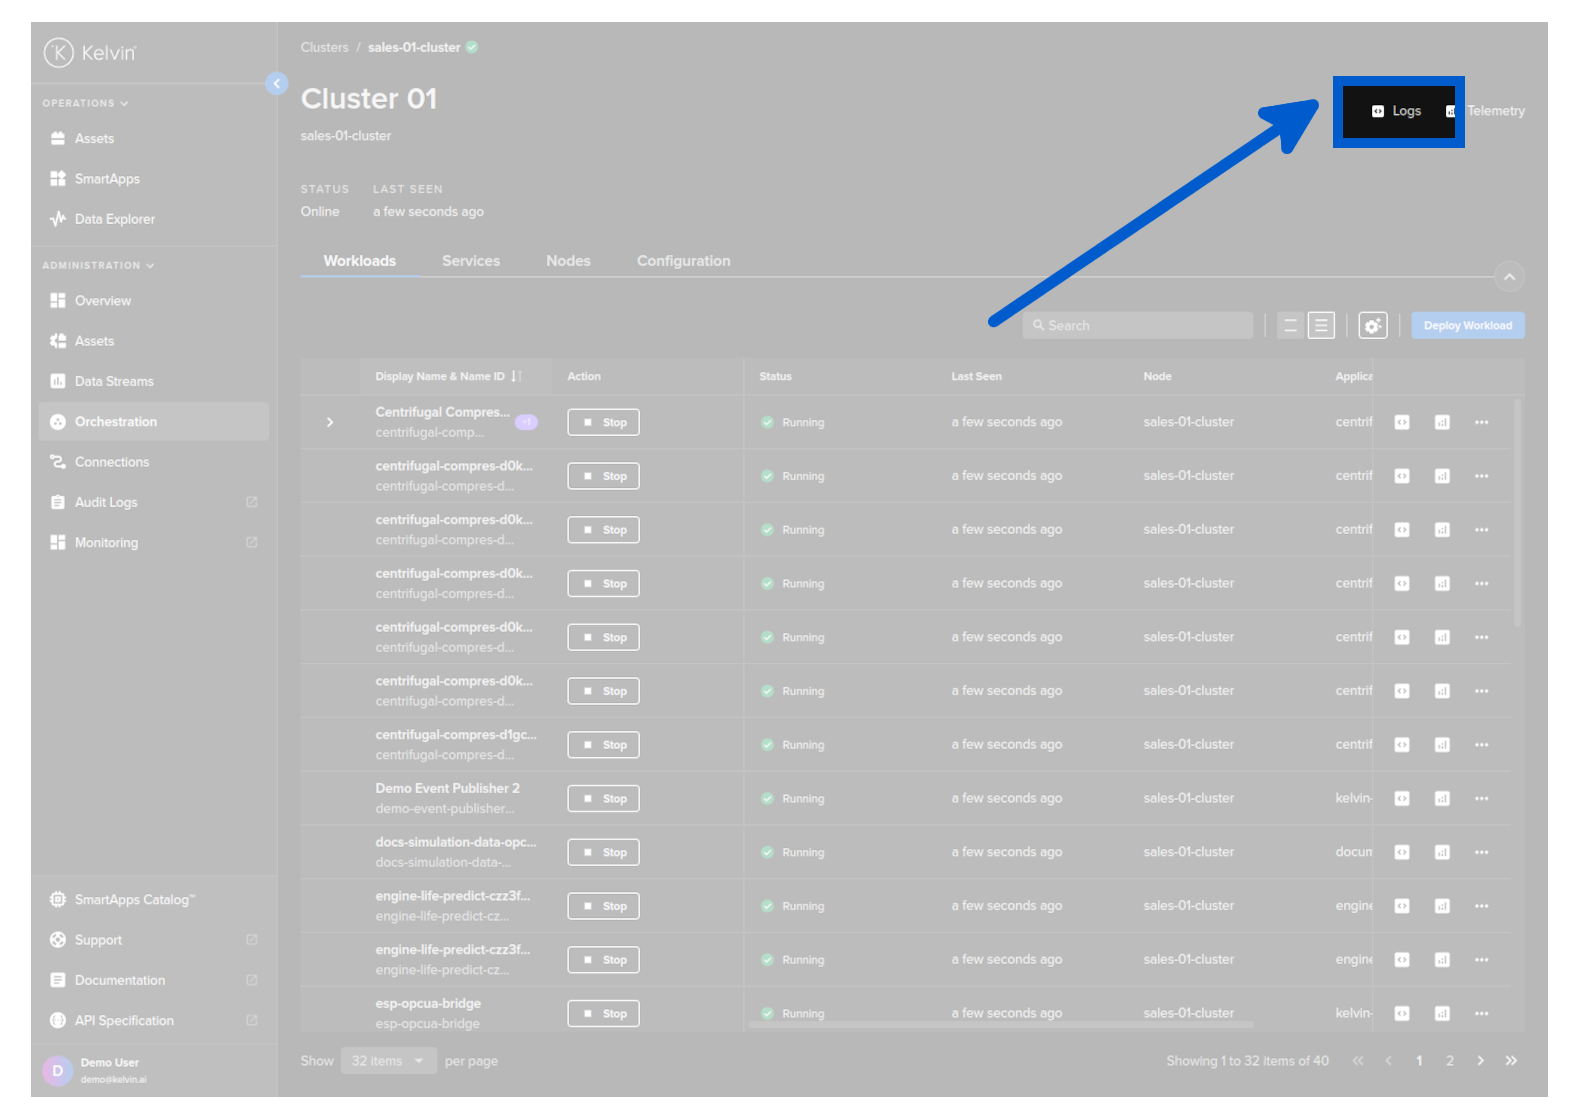
And then you will see the logs being displayed in a Grafana environment.
Cluster Telemetry
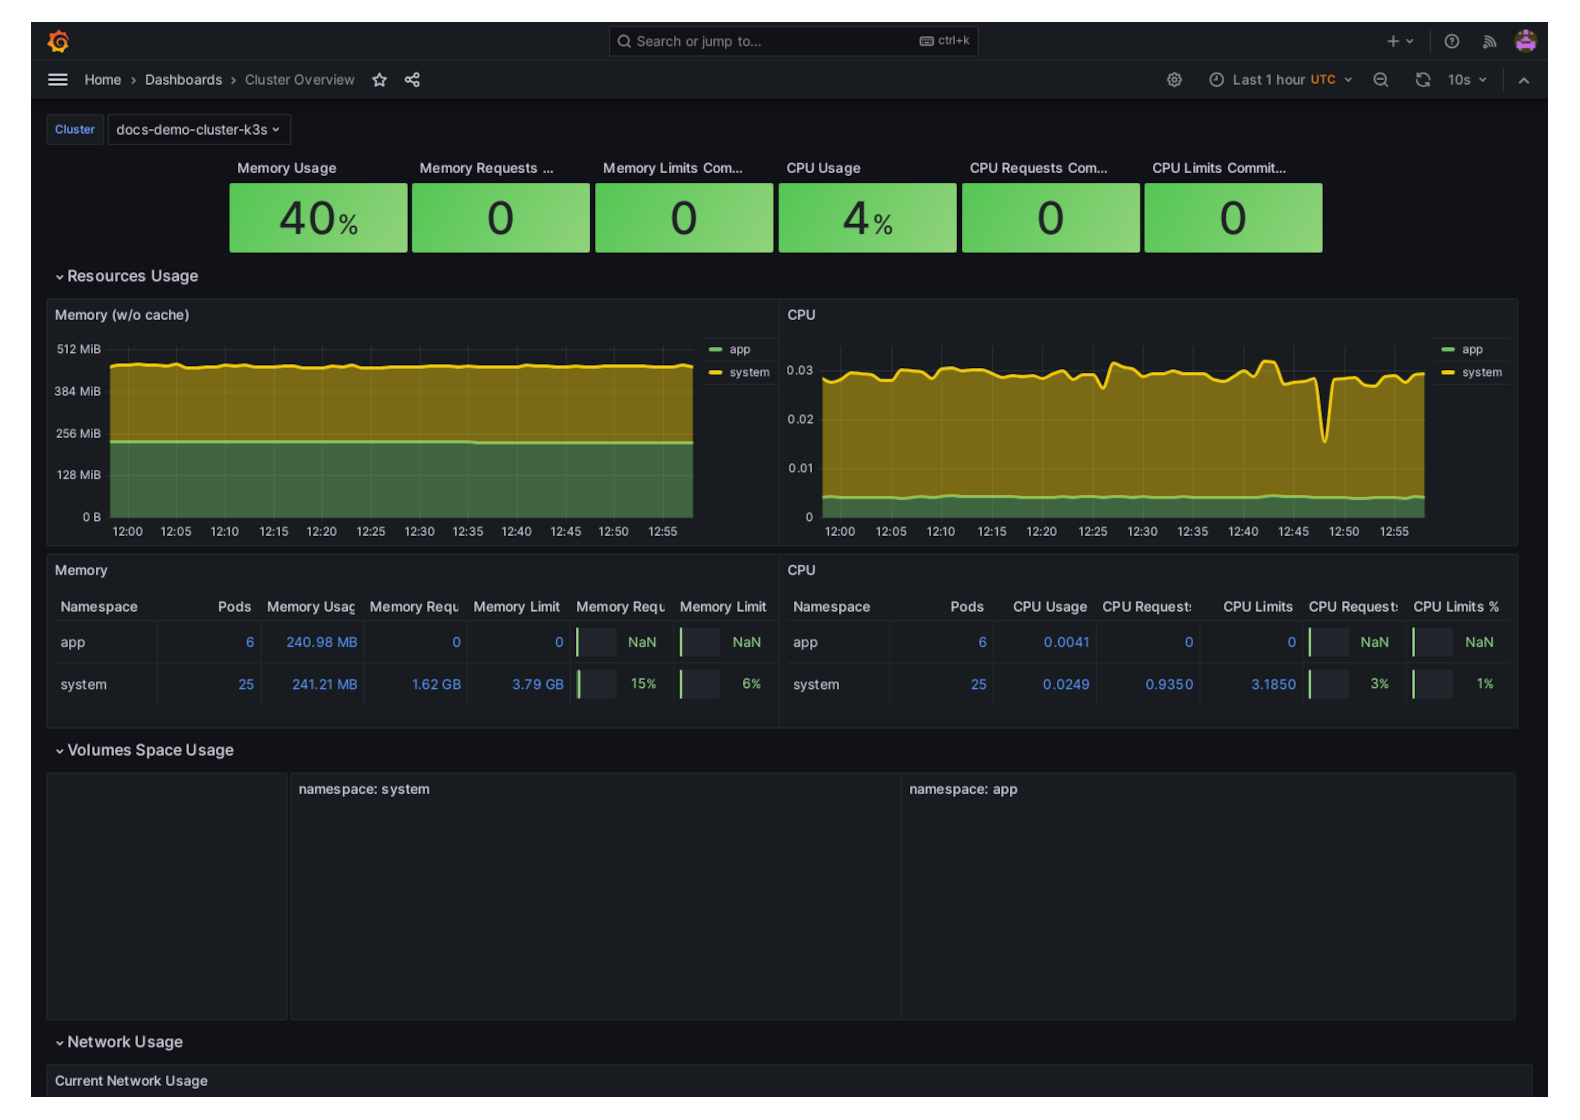
In the Kelvin UI you can view the Telemetry of the Cluster. It will show you the resources used on the hardware or in the case of a Virtual Machine, the resources the VM is using.
From Orchestration menu click on a single Cluster, then click on the Telemetry button in the top right hand corner.
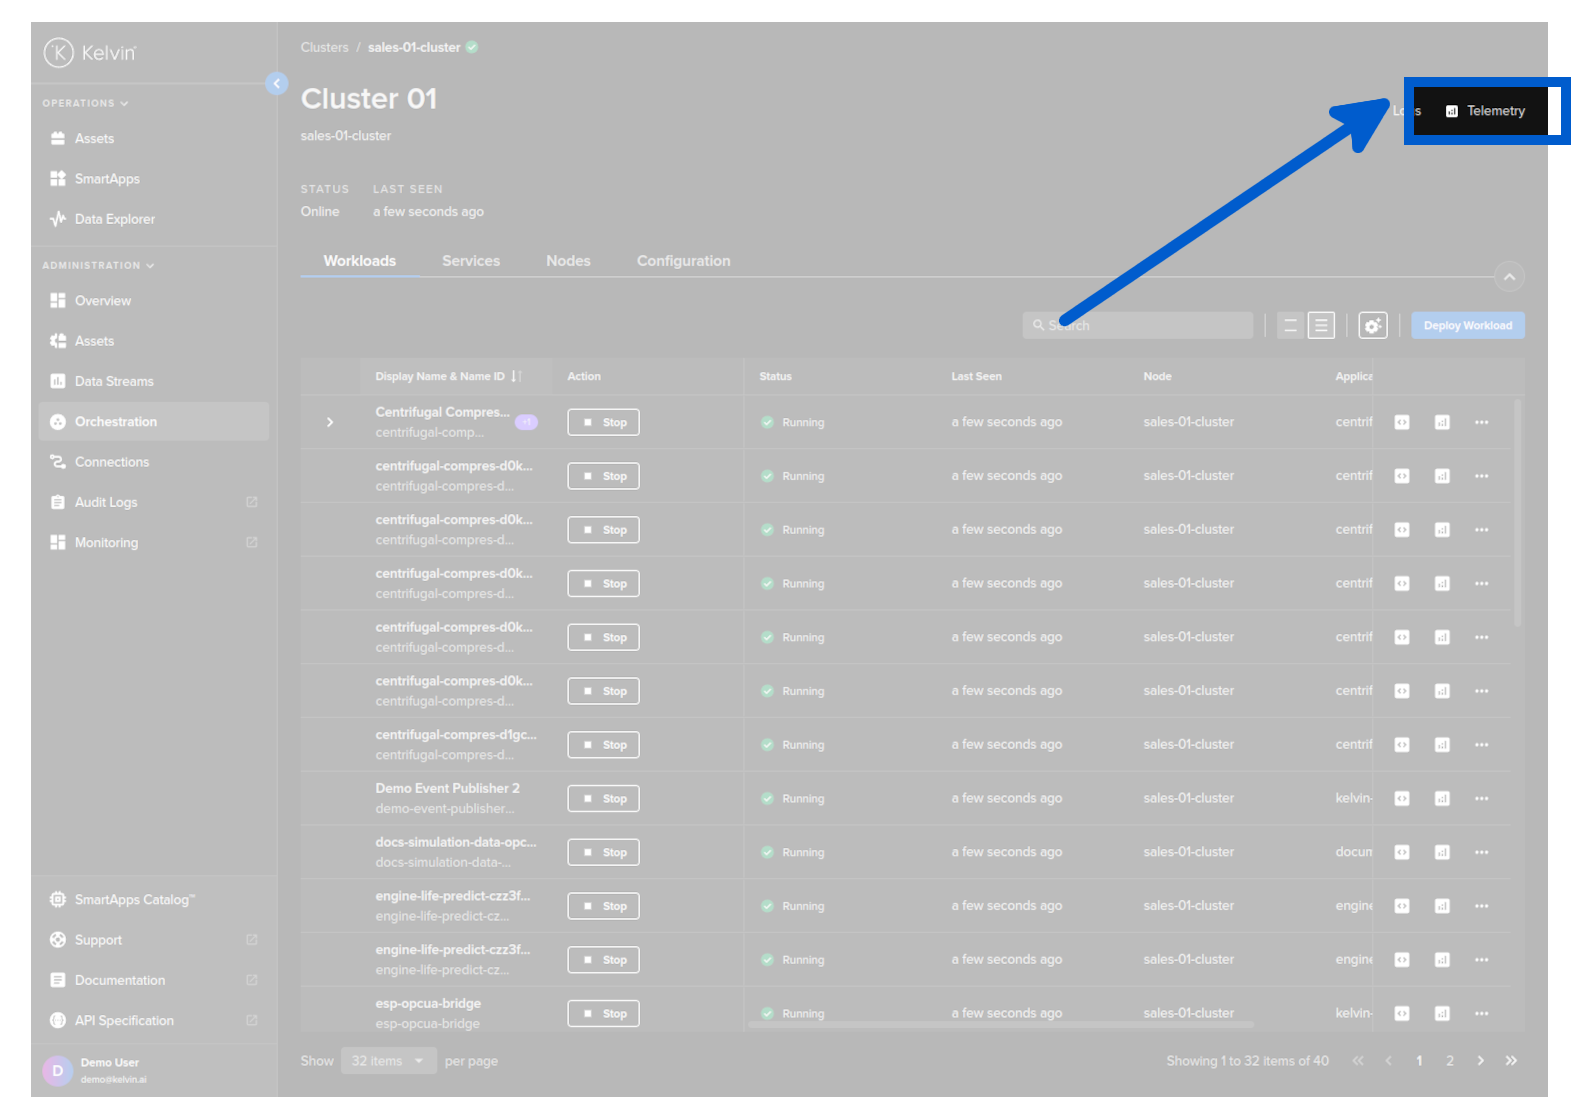
And then you will see the telemetry being displayed in a Grafana environment.